配置mongodb分片群集(sharding cluster)


Sharding cluster介绍

这是一种可以水平扩展的模式,在数据量很大时特给力,实际大规模应用一般会采用这种架构去构建monodb系统。

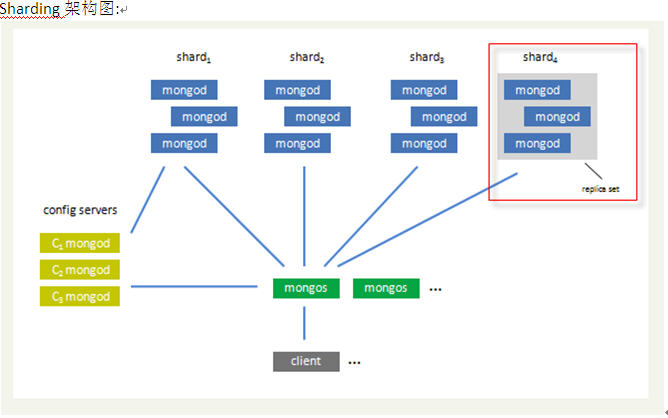
要构建一个 MongoDB Sharding Cluster,需要三种角色:

Shard Server: mongod 实例,用于存储实际的数据块,实际生产环境中一个shard server角色可由几台机器组个一个relica set承担,防止主机单点故障

Config Server: mongod 实例,存储了整个 Cluster Metadata,其中包括 chunk 信息。

Route Server: mongos 实例,前端路由,客户端由此接入,且让整个集群看上去像单一数据库,前端应用可以透明使用。

Sharding架构图:

本例实际环境架构

本例架构示例图:

  1. 分别在3台机器运行一个mongod实例(称为mongod shard11,mongod shard12,mongod shard13)组织replica set1,作为cluster的shard1
  2. 分别在3台机器运行一个mongod实例(称为mongod shard21,mongod shard22,mongod shard23)组织replica set2,作为cluster的shard2
  3. 每台机器运行一个mongod实例,作为3个config server
  4. 每台机器运行一个mongs进程,用于客户端连接


主机 IP 端口信息
Server1 10.1.1.1 mongod shard11:27017
mongod shard12:27018
mongod config1:20000
mongs1:30000
Server2 10.1.1.2 mongod shard12:27017
mongod shard22:27018
mongod config2:20000
mongs2:30000
Server3 10.1.1.3 mongod shard13:27017
mongod shard23:27018
mongod config3:20000
mongs3:30000


软件准备

软件准备
1. 创建用户
groupadd -g 20001 mongodb
useradd -u 20001 -g mongodb mongodb
passwd mongodb

2. 安装monodb软件
su – mongodb
tar zxvf mongodb-linux-x86_64-1.7.2.tar
安装好后,目录结构如下:
$ tree mongodb-linux-x86_64-1.7.2
mongodb-linux-x86_64-1.7.2
|– GNU-AGPL-3.0
|– README
|– THIRD-PARTY-NOTICES
`– bin
|– bsondump
|– mongo
|– mongod
|– mongodump
|– mongoexport
|– mongofiles
|– mongoimport
|– mongorestore
|– mongos
|– mongosniff
`– mongostat
1 directory, 14 files

3. 创建数据目录
根据本例sharding架构图所示,在各台sever上创建shard数据文件目录
Server1:
su – monodb
cd /home/monodb
mkdir -p data/shard11
mkdir -p data/shard21
Server2:
su – monodb
cd /home/monodb
mkdir -p data/shard11
mkdir -p data/shard22
Server3:
su – monodb
cd /home/monodb
mkdir -p data/shard13
mkdir -p data/shard23

配置relica sets

1. 配置shard1所用到的replica sets:
Server1:
cd /home/mongodb/mongodb-linux-x86_64-1.7.2/bin
./mongod –shardsvr –replSet shard1 –port 27017 –dbpath /home/mongodb/data/shard11 –oplogSize 100 –logpath /home/mongodb/data/shard11.log –logappend –fork

Server2:
cd /home/mongodb/mongodb-linux-x86_64-1.7.2/bin
./mongod –shardsvr –replSet shard1 –port 27017 –dbpath /home/mongodb/data/shard12 –oplogSize 100 –logpath /home/mongodb/data/shard12.log –logappend –fork

Server3:
cd /home/mongodb/mongodb-linux-x86_64-1.7.2/bin
./mongod –shardsvr –replSet shard1 –port 27017 –dbpath /home/mongodb/data/shard13 –oplogSize 100 –logpath /home/mongodb/data/shard13.log –logappend –fork

初始化replica set
用mongo连接其中一个mongod,执行:
> config = {_id: ’shard1′, members: [
{_id: 0, host: ‘10.1.1.1:27017’},
{_id: 1, host: ‘10.1.1.2:27017’},
{_id: 2, host: ‘10.1.1.3:27017’}]
}

> rs.initiate(config);

同样方法,配置shard2用到的replica sets:
server1:
cd /home/mongodb/mongodb-linux-x86_64-1.7.2/bin
./mongod –shardsvr –replSet shard2 –port 27018 –dbpath /home/mongodb/data/shard21 –oplogSize 100 –logpath /home/mongodb/data/shard21.log –logappend –fork

server2:
cd /home/mongodb/mongodb-linux-x86_64-1.7.2/bin
./mongod –shardsvr –replSet shard2 –port 27018 –dbpath /home/mongodb/data/shard22 –oplogSize 100 –logpath /home/mongodb/data/shard22.log –logappend –fork

server3:
cd /home/mongodb/mongodb-linux-x86_64-1.7.2/bin
./mongod –shardsvr –replSet shard2 –port 27018 –dbpath /home/mongodb/data/shard23 –oplogSize 100 –logpath /home/mongodb/data/shard23.log –logappend –fork

初始化replica set
用mongo连接其中一个mongod,执行:
> config = {_id: ’shard2′, members: [
{_id: 0, host: ‘10.1.1.1:27018’},
{_id: 1, host: ‘10.1.1.2:27018’},
{_id: 2, host: ‘10.1.1.3:27018’}]
}

> rs.initiate(config);

到此就配置好了二个replica sets,也就是准备好了二个shards

配置三台config server

Server1:
mkdir -p /home/mongodb/data/config
./mongod –configsvr –dbpath /home/mongodb/data/config –port 20000 –logpath /home/mongodb/data/config.log –logappend –fork   #config server也需要dbpath

Server2:
mkdir -p /home/mongodb/data/config
./mongod –configsvr –dbpath /home/mongodb/data/config –port 20000 –logpath /home/mongodb/data/config.log –logappend –fork

Server3:
mkdir -p /home/mongodb/data/config
./mongod –configsvr –dbpath /home/mongodb/data/config –port 20000 –logpath /home/mongodb/data/config.log –logappend –fork

配置mongs

在server1,server2,server3上分别执行:
./mongos –configdb 10.1.1.1:20000,10.1.1.2:20000,10.1.1.3:20000 –port 30000 –chunkSize 5 –logpath /home/mongodb/data/mongos.log –logappend –fork
#mongs不需要dbpath

Configuring the Shard Cluster

连接到其中一个mongos进程,并切换到admin数据库做以下配置
1. 连接到mongs,并切换到admin
./mongo 10.1.1.1:30000/admin
>db
Admin
2. 加入shards
如里shard是单台服务器,用>db.runCommand( { addshard : “<serverhostname>[:<port>]” } )这样的命令加入,如果shard是replica sets,用replicaSetName/<serverhostname>[:port][,serverhostname2[:port],…]这样的格式表示,例如本例执行:
>db.runCommand( { addshard : “shard1/10.1.1.1:27017,10.1.1.2:27017,10.1.1.3:27017″,name:”s1″,maxsize:20480} );
>db.runCommand( { addshard : “shard2/10.1.1.1:27018,10.1.1.2:27018,10.1.1.3:27018″,name:”s2″,maxsize:20480} );
注意:在添加第二个shard时,出现error:test database 已经存在的错误,这里用mongo命令连接到第二个replica set,用db.dropDatabase()命令把test数据库给删除然后就可加入

3. 可选参数
Name:用于指定每个shard的名字,不指定的话系统将自动分配
maxSize:指定各个shard可使用的最大磁盘空间,单位megabytes

4. Listing shards
>db.runCommand( { listshards : 1 } )
如果列出了以上二个你加的shards,表示shards已经配置成功

5. 激活数据库分片
命令:
> db.runCommand( { enablesharding : “<dbname>” } );
通过执行以上命令,可以让数据库跨shard,如果不执行这步,数据库只会存放在一个shard,一旦激活数据库分片,数据库中不同的collection将被存放在不同的shard上,但一个collection仍旧存放在同一个shard上,要使单个collection也分片,还需单独对collection作些操作

Collecton分片

要使单个collection也分片存储,需要给collection指定一个分片key,通过以下命令操作:
> db.runCommand( { shardcollection : “<namespace>”,key : <shardkeypatternobject> });
注:
a. 分片的collection系统会自动创建一个索引(也可用户提前创建好)
b. 分片的collection只能有一个在分片key上的唯一索引,其它唯一索引不被允许
One note: a sharded collection can have only one unique index, which must exist on the shard key. No other unique indexes can exist on the collection.

分片collection例子

>db.runCommand( { shardcollection : “test.c1″,key : {id: 1} } )
>for (var i = 1; i <= 200003; i++) db.c1.save({id:i,value1:”1234567890″,value2:”1234567890″,value3:”1234567890″,value4:”1234567890″});
> db.c1.stats()
{
“sharded” : true,
“ns” : “test.c1″,
“count” : 200003,
“size” : 25600384,
“avgObjSize” : 128,
“storageSize” : 44509696,
“nindexes” : 2,
“nchunks” : 15,
“shards” : {
“s1″ : {
“ns” : “test.c1″,
“count” : 141941,
“size” : 18168448,
“avgObjSize” : 128,
“storageSize” : 33327616,
“numExtents” : 8,
“nindexes” : 2,
“lastExtentSize” : 12079360,
“paddingFactor” : 1,
“flags” : 1,
“totalIndexSize” : 11157504,
“indexSizes” : {
“_id_” : 5898240,
“id_1″ : 5259264
},
“ok” : 1
},
“s2″ : {
“ns” : “test.c1″,
“count” : 58062,
“size” : 7431936,
“avgObjSize” : 128,
“storageSize” : 11182080,
“numExtents” : 6,
“nindexes” : 2,
“lastExtentSize” : 8388608,
“paddingFactor” : 1,
“flags” : 1,
“totalIndexSize” : 4579328,
“indexSizes” : {
“_id_” : 2416640,
“id_1″ : 2162688
},
“ok” : 1
}
},
“ok” : 1
}
 

调查服务器响应时间的利器 tcprstat

我们在做服务器程序的时候,经常要知道一个请求的响应时间,借以优化或者定位问题。 通常的做法是在代码里面加入日志计算时间,这个方法有问题,时间不准确。因为数据从网卡到应用程序,从应用到网卡的时间没有被计算在内。 而且这个时间随着系统的负载有很大的变化。
那同学说,我wireshark, tcpdump抓包人肉统计不行吗。 可以的,只不过我会很同情你,此举需要耐心且不具可持续性。 所以我们希望有个工具能够最少费力的做这个事情。

这时候来自percona的tcprstat来救助了! 这个工具原本开发用来调查mysqld的性能问题,所以不要奇怪它的默认端口是3306, 但是我们可以用这个工具来调查典型的request->response类型的服务器。

什么是tcprstat:

tcprstat is a free, open-source TCP analysis tool that watches network traffic and computes the delay between requests and responses. From this it derives response-time statistics and prints them out. The output is similar to other Unix -stat tools such as vmstat, iostat, and mpstat. The tool can optionally watch traffic to only a specified port, which makes it practical for timing requests and responses to a single daemon process such as mysqld, httpd, memcached, or any of a variety of other server processes.

文档很详细: 请参考: http://www.percona.com/docs/wiki/tcprstat:start

不愿意编译的同学直接从这里下载64位系统的编译好的二进制:http://github.com/downloads/Lowercases/tcprstat/tcprstat-static.v0.3.1.x86_64

源码编译也挺容易的: 由于它自带libpcap包, 这个包有可能在configure的时候没认识好netlink, 只要把config.h里面的netlink那个define注释掉就好。

编译好了, 典型使用很简单:

# tcprstat -p 3306 -t 1 -n 5
timestamp count max min avg med stddev 95_max 95_avg 95_std 99_max 99_avg 99_std
1283261499 1870 559009 39 883 153 13306 1267 201 150 6792 323 685
1283261500 1865 25704 29 578 142 2755 889 175 107 23630 333 1331
1283261501 1887 26908 33 583 148 2761 714 176 94 23391 339 1340
1283261502 2015 304965 35 624 151 7204 564 171 79 8615 237 507
1283261503 1650 289087 35 462 146 7133 834 184 120 3565 244 358

但是这个tcprstat在bonding的网卡下有点问题:

# /sbin/ifconfig
bond0 Link encap:Ethernet HWaddr A4:BA:DB:28:B5:AB
inet addr:10.232.31.19 Bcast:10.232.31.255 Mask:255.255.255.0
inet6 addr: fe80::a6ba:dbff:fe28:b5ab/64 Scope:Link
UP BROADCAST RUNNING MASTER MULTICAST MTU:1500 Metric:1
RX packets:19451951688 errors:0 dropped:4512 overruns:0 frame:0
TX packets:26522074966 errors:0 dropped:0 overruns:0 carrier:0
collisions:0 txqueuelen:0
RX bytes:6634368171533 (6.0 TiB) TX bytes:32576206882863 (29.6 TiB)

# tcprstat -p 3306 -t 1 -n 5
pcap: SIOCGIFFLAGS: bonding_masters: No such device

解决方案是:

# sudo tcprstat -p 3306 -t 1 -n 0 -l `/sbin/ifconfig | grep ‘addr:[^ ]\+’ -o | cut -f 2 -d : | xargs echo | sed -e ’s/ /,/g’`

在典型满负载的mysql服务器上抓包的开销是:

26163 root 18 0 104m 5304 4696 S 18.3 0.0 49:47.58 tcprstat

用IP方式,而不是网络接口方式搞定。

祝大家玩的开心。


HP电脑又黑屏了….今次决定自己整!!!(第一次拆手提电脑)

部hp又黑屏了…唉…第四次黑屏了.之前去电脑城整要260元/次。

第三次黑屏个阵,去咗HP维修点,话我系境外机,无得保修,要换主板1500+250,我马上SAY NO。走人。


今次系第四次黑屏了,唔想再去电脑城整,上YOUTUBE一搜,发现咗个好简单嘅方法。


我都系第一次拆手提电脑咋,有好多嘢系摸下摸下。。。后面有写要注意D乜。


HP黑屏原因我唔讲了。讲起9把火!!自己上网搜。不过,如果你的HP黑屏,10有8,9系呢个问题。


第一步:拆机,揾到张显卡。

就系佢,中间下面位置。。

重要工具A:防风打火机。(今日跑了置禾、壹加壹、假日、大信都揾唔到,最后系沙岗墟12蚊买到,沙岗墟很给力啊!)

重要工具B:锡纸。安照显卡蕊片的size,桔穿佢,用处就系集中火力,保险其它元件。

旭手啦,套住佢,用打火机狂烧佢,为咗防止烧坏个蕊片,火力不能集中在同一个位置,要不段左右,上下移动。使蕊片均匀受热。。一般情况下,烧2分钟就可以。每烧30秒,就要用力压下个蕊片(不能用手)。

终于搞掂,下面系解决这个系列手提电脑的一个大BUG。散热片与蕊片竟然有2MM空隙。HP的QA很不给力。。。


下面系一个港币1毫子,黄铜合金,当然有纯铜就最好啦。据说葡币的1毫是纯铜的。用沙纸礳平两面。


涂上散热圭脂,再黏上个蕊片上面。注意铜片不能太厚,否则CPU就会出现散热问题。

整完。开机!!!!

哈哈。。两日无见嘅XP login窗口。。。

开个监控软件睇睇。温度比之前抵了一些,遟D看下电影测试下,或者上下QQ农场。

第一次拆手提电脑,有2点需要注意:

1,电线要有顺序咁摆好,咪时唔记得边条打边条。

2,个螺丝都系,要分开摆放,好似我咁,按照原来未拆出来个位置,摆一个盘上面,等下装机个阵就唔怕乱啦。


终于搞翻好了。哈哈哈。。。

电脑整要260蚊,自己整??

12蚊+3+0.1 = 15.1元。

奸商真多。HP维修点还要1750元。TMD。。。。


一进入2011年,我就黑仔昨日,好彩2月开始转运。。希望好运继续来。。哈哈哈。。。


新版twitter背后的技术

果要评2010最牛逼的网站改版,除了豆瓣就是Twitter了(开个玩笑)。那天看了新版twitter的介绍视频,相当兴奋,那种感觉就像04年看到gmail。面对未知的新时代,一部分人在畅想,一部分人在抵触,只有小部分人在行动。Twitter很快交出了他们的答卷。

今天看到Twitter官方发表的博文“The Tech Behind the New Twitter.com”,总结了新版twitter背后的技术,值得一读。(下面的内容不是翻译,是我的理解)

API客户端
新版背后的一个重要的架构上的改变是像其它第三方客户端一样,Twitter自己也开始基于API开发,唯一不同是他们可以使用更多资源。同时对访问API做了诸多优化,原文提到的“highly optimized JSON fragment cache”。

评论:这种方式是很多技术团队都想实现的,但碍于原有架构的历史问题,下不了决心彻底改变它。但未来要满足各种终端上各种形式应用的开发需求,这种架构是最灵活的。

The Javascript API
对应后端的API架构,前端自然需要一个很给力的Javascript库实现和后端的数据交互。Twitter内部用到一个库叫@anywhere (http://platform.twitter.com/js-api.html),它提供的功能:
1. 负责和API交换数据。文档里可以看到提供了丰富的接囗。
2. 提供一个客户端的缓存策略(保存在本地的内存和localStorage中)。@ded不久前写的“JavaScript Cache Provider”其实透露了一些细节。
3. 提供一个事件通知机制,当UI发生变化,相应处理组件能够立即响应。

评论:从中可以看到Twitter前端架构的设计思路,跟后端充分对接,建立业务级的通用接囗层,提供通用处理机制解藕,保持代码的模块化。这个路子很对,很值得借鉴。

页面管理
新版的一个项目目标就是让页面导航更简单更快。它是利用URL hash建立一套浏览器端的页面路由系统。这个具体要等到用上新版后看一看。

评论:像GMail那种,用URL hash做页面切换,管理起来还是很复杂的。等用上新版后要好好分析一下代码。

渲染堆栈(The Rendering Stack)
新版Twitter的页面都是在前端渲染的,但在不支持Javascript的情况下,后端也需要一个渲染系统。他们前后端用的模板系统都是Mustache,这样前后端可以保持一致,利用Mustache将API对象转成HTML代码。另外,针对DOM操作还做了诸多优化,如事件处理都是用事件代理机制实现,提高组件的重用性,尽可能减小repaint提高页面渲染性能等。

评化:Mustache是开源的模板系统,支持各种语言。我原来认为它有点重,并没有在项目中用过它。但如果真要做一个所有页面切换都是Ajax的应用,Mustache是首选。

内联媒体(Inline Media)
新版Twitter整合了很多第三方内容,从URL中判断如果是像kiva,vimeo这样的合作方,会利用基于oEmbed标准的JSON-P方式,从合作方的接囗中抓取内容。如果判断是来自TwitPic的图片或来自Youtube的视频,就直接显示出来。从视频中可以看到,交互方式很酷。

开源
Twitter的前端开发大量用到开源技术,像jQuery, Mustache, LABjs, Modernizr和大量jQuery插件。这么做的好处是一方面可以将重心放在前端应用的创新上,另一方面对开源社区的发展也是一种推动。自己在项目中积累的一些技术也会开源。

评论:我非常赞同这样。不要重复造轮子,尤其像浏览器级的基础功能库,jQuery,YUI已经做的很成熟了,需要做的应该是在没有或没有成熟的开源技术解决的领域上,通常更多在应用层面上需要建立适合自己产品的各种功能库和框架机制。

Twitter前端团队成员,可以关注一下:
Ben Cherry
@bcherry

http://www.adequatelygood.com/

Marcus Phillips
@mracus

http://marcusphillips.com/

Dustin Diaz
@ded

http://www.dustindiaz.com/


CouchDB了解(-) 特性及实现


概述

CouchDB,大家或多或少都听说过。它到底有什么特性,适合哪些应用场景,和我们常用的关系型数据库有什么区别? 这些问题,可能我们心里都不是非常清楚。在以前的Blog中(PS,不是在javaeye哦),我提及了几次CouchDB,但是仅仅 限于编译,安装这些浮在水面上的工作。今天抽出时间把最近关于CouchDB的一些了解整理一下。


CouchDB是什么

CouchDB一种半结构化面向文档的分布式,高容错的数据库系统,其提供RESTFul HTTP/JSON接口。其拥有MVCC特性,用户可以通过自定义Map/Reduce函数生成对应的View。

在CouchDB中,数据是以JSON字符的方式存储在文件中。


特性

  • RESTFul API:HTTP GET/PUT/POST/DELETE + JSON
  • 基于文档存储,数据之间没有关系范式要求
  • 每个数据库对应单个个文件(以JSON保存),Hot backup
  • MVCC(Multi-Version-Concurrency-Control),读写均不锁定数据库
  • 用户自定义View
  • 内建备份机制
  • 支持附件
  • 使用Erlang开发(更多的特性)

应用场景 在我们的生活中,有很多document,比如信件,账单,笔记等,他们只是简单的信息,没有关系的需求,我们可能仅仅需要存储这些数据。 这样的情况下,CouchDB应该是很好的选择。当然其他使用关系型数据库的环境,也可以使用CouchDB来解决。


根据CouchDB的特性,在某些偶 尔连接网络的应用中,我们可以用CouchDB暂存数据,随后进行同步。也可以在Cloud环境中,作为分布式的数据存储。CouchDB提供给予 HTTP的API,这样所有的常见语言都可以使用CouchDB。


使用CouchDB,意味着我们不需要在像使用RMDBS一样,在设计应用前首先设计负责数据Table。我们的开发更加快速,灵活。


实现


在CouchDB中,Database表示一个数据库,每个Database对应一个”Storage”(后缀为.couch)以及多个View Index(用来存储View结果支持query)。


Database Storage中可以存储任意的Document,用户可以在Database中自定义View,方便对数据进行查询, View 默认使用JavaScript进行定义,定义好的相关函数保存在 design document中,而View对应的具体数据是保存在View Index文件中。我们可以通过HTTP API请求Database,Document,View,可以进行简单的Query,以及其他各种系统相关的信息。


Storage File结构

数据库文件的后缀为.couch,由Header和Body组成。

Header
包含两个完全相同的Header信息,每个Header的Size为2048
Header中前4字节为magic code:$g, $m, $k, 0
随后为header的payload,通过term_to_binary(db_header_record)产生
接下来是填充padding
最后是16字节的摘要信息(md5(payload+padding)产生)
Header总长度为:单个Header * 2 = 2048
Body
由两个B+Tree组成,其中一个B+Tree根据Document id进行组织,另一个B+Tree以 seqnum(CouchDB内部使用的序号,用来指示最新Revision的文档)为key。
  • fulldocinfo_by_id_btree

    使用Document id作为key,常用来根据id来查找对应的document,full_doc_info中包含对应document的所有的Revision信息,通过这些信息,我们可以获取指定Revision的document

  • docinfo_by_seq_btree

    使用seq作为key,当document被更新时,对应的seq会增加。 具体的document数据(json格式),以及B+Tree混合存储与这个.couch文件之中。通过B+Tree,我们可以快速的定位到指定的document。

文件结构示意图


所有的更新操作(包括document的创建,修改和删除)都是以在couch文件尾部追加的方式(即Append方式)进行。我们进行更新时,首 先拷贝原有的数据信息(仅仅针对修改,如果是Create那么就没有copy可言了),随后将其追加到文件的结尾,这个时候就激发B+Tree从leaf 到root的更新过程,更新的Node信息也是采用Append的方式写入到文件的结尾,到达根节点时,我们将根节点信息写入到Header中。这样一次 更新操作涉及1次数据写入,以及LogN次节点更新,所以其复杂度为O(logN)


因此采用追加的方式,所以在数据库运行一段时间后,我们需要对其进行“瘦身”,情理那些旧的Document数据。这个过程成为 Compaction。在Compation的过程,数据库仍然可用,只是请注意,在Compation的时候,是通过遍历DBName.couch文 件,将最新的数据拷贝到一个DBName.compat文件中,因此这个过程可能会耗费很大的存储空间,如果您在系统繁忙(主要是write)的情况下进 行Compation,可能会导致你的硬盘空间耗尽,一定注意哦!


ACID

CouchDB支持ACID特性。Document的更新(add,edit,delete)是顺序进行的,但是Database的read为并发 执行,其不必等待任何其他的read,write的完成。这样的特性与CouchDB存储文件的Append增加方式关系密切。

当CouchDB的文档更新时,为了保证数据的一致性,Commit分为以下两步:

  1. Document数据和index数据首先写入到disk数据库文件
  2. 生成两个连续的头信息(4kb),随后写入数据库文件

在上面两个过程中,如果在过程1,发生异常(系统崩溃或断电),那么couch文件的头信息没有发生变化,那么所有Append的数据都会被忽略; 如果在过程2发生异常,此时Header可能会发生损坏,我们验证第一个Header和第二个Header,如果任意一个Header可用,那么数据库文 件可用。如果两个Header都不可用,则对应数据库文件损坏,抛出异常。


一些数据库系统,为了实现 Atomic Commit ,提交数据前,将内容写入到一个rollback log文件,等提交完成后,删除log文件。


View Server

除了存储数据,我们还需要依据我们的要求展现数据,乃至一些统计,因此CouchDB中引入了View的概念。View的引入让CouchDB从一个有趣的文件存储系统,步入了数据库的殿堂。也使CouchDB能够融入到真正的应用环境中。


CouchDB中所有的Document都可以具有自己不同的结构,数据,这和关系型数据库中,严格的表结构,严格的关联完全不同。这样的特点对于数据的备份同步却非常有好处!

View Model

通过用户自定义View,我们可以汇集,统计数据,采用一个类似Map/Reduce的过程。这里的Map将原始的Document进行映射处理,Reduce将Map的中间结果进行重新归并统计,总而生成最终结果。这里和并行计算中的Map/Reduce有些不同。


CouchDB的View针对每个Database,但是其与Database关联性不是很大,View是一些用户自定义函数,处理从数据库的 Document输入,产生中间数据(如果没有reduce过程则为最终数据),然后再通过Reduce处理中间输出,产生最终结果。同样的View可以 使用在不同的Database上。


View存储在design Document中,请注意这里design Document和View Index是不同的。design Document保存的是view的定义,View Index保存的是针对某个Database进行View操作,产生的结果。

JavaScript View Function

CouchDB内部默认使用JavaScript作为View的编写语言,之所以采用Javascript,是和CouchDB面向Web开发相关 的。CouchDB使用Mozilla的spidermonkey作为JavaScript的解析运行平台,为了和Erlang进行交互,其使用c书写了 一个Port程序couchjs,/server/main.js作为View Server服务器。

在启动CouchDB时,通过Command:couchjs main.js即可启动基于JavaScript的View Server。

View中包含两个函数:

(map函数,必须)
function(doc) {
  emit(null, doc);
}
(reduce函数,可选)
function (key, values, rereduce) {
   return sum(values);
}

doc ,为我们数据库对应的Document,因为我们采用JSON格式存储数据,所以Document在 JavaScript中转化为Object。`emit(null, doc)`用来生成map的中间结果,其中第一个参数null表示结果的key,第二个参数为结果的value,上面的例子中我们的结果为:

null, value1
...
null, valueN

function (key, values, rereduce)中,根据rereduce变量不同这里有两种情况:

  1. rereduce为false
  • key为array,element为:[key,id],key为map function产生的key,id为Document对应id
  • values为array,elements为map function产生的结果
  • 比如 reduce([ [key1,id1], [key2,id2], [key3,id3] ], [value1,value2,value3], false)
  1. rereduce为true
  • key为null
  • values为array,element为前一次reduce返回的结果
  • 比如reduce(null, [intermediate1,intermediate2,intermediate3], true)

很多时候,我们一次调用reduce就可以生成最终结果,我们会忽略rereduce参数。


Pathway from ACEGI to Spring Security 2.0

Formerly called ACEGI Security for Spring, the re-branded Spring Security 2.0 has delivered on its promises of making it simpler to use and improving developer productivity. Already considered as the Java platform’s most widely used enterprise security framework with over 250,000 downloads from SourceForge, Spring Security 2.0 provides a host of new features.

This article outlines how to convert your existing ACEGI based Spring application to use Spring Security 2.0.


What is Spring Security 2.0


Spring Security 2.0 has recently been released as a replacement to ACEGI and it provides a host of new security features:


  • Substantially simplified configuration.

  • OpenID integration, single sign on standard.

  • Windows NTLM support, single sign on against Windows corporate networks.

  • Support for JSR 250 (“EJB 3”) security annotations.

  • AspectJ pointcut expression language support.

  • Comprehensive support for RESTful web request authorization.

  • Long-requested support for groups, hierarchical roles and a user management API.

  • An improved, database-backed “remember me” implementation.

  • New support for web state and flow transition authorization through the Spring Web Flow 2.0 release.

  • Enhanced WSS (formerly WS-Security) support through the Spring Web Services 1.5 release.

  • A whole lot more…

Goal


Currently I work on a Spring web application that uses ACEGI to control access to the secure resources. Users are stored in a database and as such we have configured ACEGI to use a JDBC based UserDetails Service. Likewise, all of our web resources are stored in the database and ACEGI is configure to use a custom AbstractFilterInvocationDefinitionSource to check authorization details for each request.
With the release of Spring Security 2.0 I would like to see if I can replace ACEGI and keep the current ability to use the database as our source of authentication and authorization instead of the XML configuration files (as most examples demonstrate).


Here are the steps that I took…


Steps


  1. The first (and trickiest) step was to download the new Spring Security 2.0 Framework and make sure that the jar files are deployed to the correct location. (/WEB-INF/lib/)
    There are 22 jar files that come with the Spring Security 2.0 download. I did not need to use all of them (especially not the *sources packages). For this exercise I only had to include:


    • spring-security-acl-2.0.0.jar


    • spring-security-core-2.0.0.jar


    • spring-security-core-tiger-2.0.0.jar


    • spring-security-taglibs-2.0.0.jar

  2. Configure a DelegatingFilterProxy in the web.xml file.


    1. <filter>  

    2.     <filter-name>springSecurityFilterChain</filter-name>  

    3.     <filter-class>org.springframework.web.filter.DelegatingFilterProxy</filter-class>  

    4. </filter>  

    5. <filter-mapping>  

    6.     <filter-name>springSecurityFilterChain</filter-name>  

    7.     <url-pattern>/*</url-pattern>  

    8. </filter-mapping>  

  3. Configuration of Spring Security 2.0 is far more concise than ACEGI, so instead of changing my current ACEGI based configuration file, I found it easier to start from a empty file. If you do want to change your existing configuration file, I am sure that you will be deleting more lines than adding.

    The first part of the configuration is to specifiy the details for the secure resource filter, this is to allow secure resources to be read from the database and not from the actual configuration file. This is an example of what you will see in most of the examples:


    1. <http auto-config=“true” access-denied-page=“/403.jsp”>  

    2.     <intercept-url pattern=“/index.jsp” access=“ROLE_ADMINISTRATOR,ROLE_USER”/>  

    3.     <intercept-url pattern=“/securePage.jsp” access=“ROLE_ADMINISTRATOR”/>  

    4.     <intercept-url pattern=“/**” access=“ROLE_ANONYMOUS” />  

    5. </http>  
    Replace this with:


    1. <authentication-manager alias=“authenticationManager”/>  

    2.       

    3. <beans:bean id=“accessDecisionManager” class=“org.springframework.security.vote.AffirmativeBased”>  

    4.     <beans:property name=“allowIfAllAbstainDecisions” value=“false”/>  

    5.     <beans:property name=“decisionVoters”>  

    6.         <beans:list>  

    7.             <beans:bean class=“org.springframework.security.vote.RoleVoter”/>  

    8.             <beans:bean class=“org.springframework.security.vote.AuthenticatedVoter”/>  

    9.         </beans:list>  

    10.     </beans:property>  

    11. </beans:bean>  

    12.   

    13. <beans:bean id=“filterInvocationInterceptor” class=“org.springframework.security.intercept.web.FilterSecurityInterceptor”>  

    14. <beans:property name=“authenticationManager” ref=“authenticationManager”/>  

    15.     <beans:property name=“accessDecisionManager” ref=“accessDecisionManager”/>  

    16.     <beans:property name=“objectDefinitionSource” ref=“secureResourceFilter” />  

    17. </beans:bean>  

    18.       

    19. <beans:bean id=“secureResourceFilter” class=“org.security.SecureFilter.MySecureResourceFilter” />  

    20.   

    21. <http auto-config=“true” access-denied-page=“/403.jsp”>  

    22.     <concurrent-session-control max-sessions=“1” exception-if-maximum-exceeded=“true” />  

    23.     <form-login login-page=“/login.jsp” authentication-failure-url=“/login.jsp” default-target-url=“/index.jsp” />  

    24.     <logout logout-success-url=“/login.jsp”/>  

    25.  </http>  

    The main part of this piece of configuration is the secureResourceFilter, this is a class that implementsFilterInvocationDefinitionSource and is called when Spring Security needs to check the Authorities for a requested page.
    Here is the code for MySecureResourceFilter:


    1. package org.security.SecureFilter;  

    2.   

    3. import java.util.Collection;  

    4. import java.util.List;  

    5.   

    6. import org.springframework.security.ConfigAttributeDefinition;  

    7. import org.springframework.security.ConfigAttributeEditor;  

    8. import org.springframework.security.intercept.web.FilterInvocation;  

    9. import org.springframework.security.intercept.web.FilterInvocationDefinitionSource;  

    10.   

    11.   

    12. public class MySecureResourceFilter implements FilterInvocationDefinitionSource {  

    13.   

    14.     public ConfigAttributeDefinition getAttributes(Object filter) throws IllegalArgumentException {  

    15.           

    16.         FilterInvocation filterInvocation = (FilterInvocation) filter;  

    17.           

    18.         String url = filterInvocation.getRequestUrl();  

    19.           

    20.         // create a resource object that represents this Url object  

    21.         Resource resource = new Resource(url);  

    22.           

    23.         if (resource == nullreturn null;  

    24.         else{  

    25.             ConfigAttributeEditor configAttrEditor = new ConfigAttributeEditor();  

    26.             // get the Roles that can access this Url  

    27.             List<Role> roles = resource.getRoles();  

    28.             StringBuffer rolesList = new StringBuffer();  

    29.             for (Role role : roles){  

    30.                 rolesList.append(role.getName());  

    31.                 rolesList.append(“,”);  

    32.             }  

    33.             // don’t want to end with a “,” so remove the last “,”  

    34.             if (rolesList.length() > 0)  

    35.                 rolesList.replace(rolesList.length()-1, rolesList.length()+1“”);  

    36.             configAttrEditor.setAsText(rolesList.toString());  

    37.             return (ConfigAttributeDefinition) configAttrEditor.getValue();  

    38.         }         

    39.     }  

    40.   

    41.     public Collection getConfigAttributeDefinitions() {  

    42.         return null;  

    43.     }  

    44.   

    45.     public boolean supports(Class arg0) {  

    46.         return true;  

    47.     }  

    48.   

    49. }  
    This getAttributes() method above essentially returns the name of Authorities (which I call Roles) that are allowed access to the current Url.

  4. OK, so now we have setup the database based resources and now the next step is to get Spring Security to read the user details from the database. The examples that come with Spring Security 2.0 shows you how to keep a list of users and authorities in the configuration file like this:


    1. <authentication-provider>  

    2.     <user-service>  

    3.     <user name=“rod” password=“password” authorities=“ROLE_SUPERVISOR, ROLE_USER” />  

    4.     <user name=“dianne” password=“password” authorities=“ROLE_USER,ROLE_TELLER” />  

    5.     <user name=“scott” password=“password” authorities=“ROLE_USER” />  

    6.     <user name=“peter” password=“password” authorities=“ROLE_USER” />  

    7.     </user-service>  

    8. </authentication-provider>  
    You could replace these examples with this configuration so that you can read the user details straight from the database like this:


    1. <authentication-provider>  

    2.     <jdbc-user-service data-source-ref=“dataSource” />  

    3. </authentication-provider>  
    While this is a very fast and easy way to configure database based security it does mean that you have to conform to a default databases schema. By default, the <jdbc-user-service> requires the following tables: user, authorities, groups, group_members and group_authorities.
    In my case this was not going to work as my security schema it not the same as what the <jdbc-user-service>requires, so I was forced to change the <authentication-provider>:


    1. <authentication-provider>  

    2.     <jdbc-user-service data-source-ref=“dataSource”  

    3.     users-by-username-query=“SELECT U.username, U.password, U.accountEnabled AS ‘enabled’ FROM User U where U.username=?”  

    4.     authorities-by-username-query=“SELECT U.username, R.name as ‘authority’ FROM User U JOIN Authority A ON u.id = A.userId JOIN Role R ON R.id = A.roleId WHERE U.username=?”/>  

    5. </authentication-provider>  
    By adding the users-by-username-query and authorities-by-username-query properties you are able to override the default SQL statements with your own. As in ACEGI security you must make sure that the columns that your SQL statement returns is the same as what Spring Security expects. There is a another property group-authorities-by-username-query which I am not using and have therefore left it out of this example, but it works in exactly the same manner as the other two SQL statements.

    This feature of the <jdbc-user-service> has only been included in the past month or so and was not available in the pre-release versions of Spring Security. Luckily it has been added as it does make life a lot easier. You can read about this here and here.

    The dataSource bean instructs which database to connect to, it is not included in my configuration file as it’s not specific to security. Here is an example of a dataSource bean for those who are not sure:


    1. <bean id=“dataSource” class=“org.springframework.jdbc.datasource.DriverManagerDataSource”>  

    2.     <property name=“driverClassName” value=“com.mysql.jdbc.Driver”/>  

    3.     <property name=“url” value=“jdbc:mysql://localhost/db_name?useUnicode=true&characterEncoding=utf-8”/>  

    4.     <property name=“username” value=“root”/>  

    5.     <property name=“password” value=“pwd”/>  

    6. </bean>  

  5. And that is all for the configuration of Spring Security. My last task was to change my current logon screen. In ACEGI you could create your own logon <form> by making sure that you POSTED the correctly named HTML input elements to the correct URL. While you can still do this in Spring Security 2.0, some of the names have changed.
    You can still call your username field j_username and your password field j_password as before.


    1. <input type=“text” name=“j_username” id=“j_username”/>  

    2. <input type=“password” name=“j_password” id=“j_password”/>  
    However you must set the action property of your <form> to point to j_spring_security_check and notj_acegi_security_check.


    1. <form method=“post” id=“loginForm” action=“<c:url value=’j_spring_security_check’/>”  
    There are a few places in our application where the user can logout, this is a link that redirects the logout request to the security framework so that it can be handled accordingly. This needs to be changed from j_acegi_logout toj_spring_security_logout.


    1. <a href=‘<c:url value=”j_spring_security_logout”/>’>Logout</a>  

Conclusion


This short guide on how to configure Spring Security 2.0 with access to resources stored in a database does not come close to illustrating the host of new features that are available in Spring Security 2.0, however I think that it does show some of the most commonly used abilities of the framework and I hope that you will find it useful.

One of the benefits of Spring Security 2.0 over ACEGI is the ability to write more consice configuration files, this is clearly shown when I compare my old ACEGI configration (172 lines) file to my new one (42 lines).
Here is my complete securityContext.xml file:


  1. <?xml version=“1.0” encoding=“UTF-8”?>  

  2. <beans:beans xmlns=“http://www.springframework.org/schema/security”   

  3. xmlns:beans=“http://www.springframework.org/schema/beans”   

  4. xmlns:xsi=“http://www.w3.org/2001/XMLSchema-instance”   

  5. xsi:schemaLocation=“http://www.springframework.org/schema/beans,http://www.springframework.org/schema/beans/spring-beans-2.0.xsd,http://www.springframework.org/schema/security,http://www.springframework.org/schema/security/spring-security-2.0.xsd”> <authentication-manager alias=“authenticationManager”/>  <beans:bean id=“accessDecisionManager” class=“org.springframework.security.vote.AffirmativeBased”> <beans:property name=“allowIfAllAbstainDecisions” value=“false”/> <beans:property name=“decisionVoters”> <beans:list> <beans:bean class=“org.springframework.security.vote.RoleVoter”/> <beans:bean class=“org.springframework.security.vote.AuthenticatedVoter”/> </beans:list> </beans:property> </beans:bean> <beans:bean id=“filterInvocationInterceptor” class=“org.springframework.security.intercept.web.FilterSecurityInterceptor”> <beans:property name=“authenticationManager” ref=“authenticationManager”/> <beans:property name=“accessDecisionManager” ref=“accessDecisionManager”/> <beans:property name=“objectDefinitionSource” ref=“secureResourceFilter” /> </beans:bean>  <beans:bean id=“secureResourceFilter” class=“org.security.SecureFilter.MySecureResourceFilter” /> <http auto-config=“true” access-denied-page=“/403.jsp”>  <concurrent-session-control max-sessions=“1” exception-if-maximum-exceeded=“true” /> <form-login login-page=“/login.jsp” authentication-failure-url=“/login.jsp” default-target-url=“/index.jsp” /> <logout logout-success-url=“/login.jsp”/> </http>  <beans:bean id=“loggerListener” class=“org.springframework.security.event.authentication.LoggerListener”/>  <authentication-provider> <jdbc-user-service data-source-ref=“dataSource” users-by-username-query=“SELECT U.username, U.password, U.accountEnabled AS ‘enabled’ FROM User U where U.username=?” authorities-by-username-query=“SELECT U.username, R.name as ‘authority’ FROM User U JOIN Authority A ON u.id = A.userId JOIN Role R ON R.id = A.roleId WHERE U.username=?” /> </authentication-provider> </beans:beans>  

As I said in step 1, downloading Spring Security was the trickiest step of all. From there on it was plain sailing…

Google Android Tutorial

Google has recently released the Android platform for developing mobile applications. The language used for developing Android programs is Java, but it is not Java Micro Edition.  No wireless application developer can ignore  Android. Google is the best known brand name, among the users of the web and Android comes from Google. 


I am presenting this hands-on tutorial, as a sequel to my j2me series. Adequate knowledge of core-java ,especially Event-handling, Swing and inner-classes is assumed. Though Android does not make use of Swing, it uses  similar ideas.


We can develop Android lessons and applications in Eclipse environment. Google have provided an Eclipse-plugin for Android. This is the popular method. Google has not given direct support to Netbeans. But some Netbeans users have developed a method for running Android in Netbeans . It is available at  http://undroid.nolimit.cz/. You can find more screenshots and guidance in http://eppleton.com/blog/.


We can develop Android lessons without using either Eclipse or Netbeans. The necessary command-line tools have been provided by Google. I found that using these command-line tools is easier than either Eclipse or Netbeans method. So, I am basing all the following lessons on these tools. I think, most readers will agree with my view, after they try this method as well as Eclipse method. The Android site at ‘code.google.com/android’ has already given step-by-step instructions about Android in Eclipse. You can also get more details with screen shots from  a wonderful website at www.tanguay.info/web/welcome.php titled ‘Edward’s Web Developer site’. He gives excellent guidance with plenty of screen shots 


The Android site lacks clarity about the command-line method. Hence, I think I am adding something useful by writing on the command-line method instead of simply repeating the material in Android site.
Let us start from the beginning. The first step is downloading the Android SDK (version m5-rc14, Feb-12, 2008). Android was released in November, 2007 . It has been revised in the Feb-2008 version.Some of the earlier examples may not work in the newer version.


I am working in Windows-2000 and so I downloaded the windows version. The supported platform in Windows is either Windows-XP or Vista.(Mac OS 10 & Ubuntu Linux are the other platforms mentioned). However, it works well in my Win-2000. It is advisable to have at least 512MB memory. The android SDK is a zip file. I unzipped it to C:\unzipped\android and later, I copied that folder to D:\android. If you want, you can simply copy it to another drive like G:\android also. In the following lessons D:\android is used.


If you want to develop using Eclipse, you must have installed either Eclipse3.2 or Eclipse3.3(Europa). I have tested with Eclipse3.2. No problem.It works. But, we require ADT  (ie) Android Development Tools plugin for Eclipse, if you are using Eclipse.You can get this plugin from http://code.google.com/android/adt_download. You have to be careful about the ADT version number.It is ADT-0.3.3.


As my present focus is on command-line method, let me begin straight away and give a simple demo.The procedure given here is common for all our experiments and so I will not be repeating it in each demo. So, please note it down carefully.


Demo 1 – TextBox


In my first demo, I will have a customary button and textbox ( called EditField in Android). When I click the button, I want the message “SUCCESS!” to be displayed in textbox. Just as an exercise, I am using two buttons and two textboxes.


The first step is to start the Emulator


cd to d:\android\tools

d:\android\tools>emulator


It will take a long time to get started. Do not be in a hurry. Wait till it gets fully started. And do not  close that window carelessly by mistake. In that case, you will have to start it again and wait for a long time again. Finally, we get the emulator screen


The second step is to give the following command, from another command window.


d:\android\tools>

activityCreator –out  demo                                   mypack.mydemos.demo


This means that my project is ‘demo’ and my package is ‘mypack.mydemos’. A number of folders are created automatically by this command:


  • tools\demo\src
  • tools\demo\bin
  • tools\demo\res.  

We need to note  the src and res folders carefully. We will place the java source file in src folder and main.xml file in res\layout, overwriting any files that are generated automatically. For the moment, we can think of the res\layout folder as the one which decides the gui design. As in asp.net, flex etc, the gui details are specified in xml file. But how shall we write the XML file? by hand? Not too difficult .But….luckily, there is an open-source gui designer named ‘DroidDraw’ available in http://www.droiddraw.org/ .It is a nice tool and if you like it, you can send your appreciation to [email protected]. He has given a simple tutorial too, on how to use this gui tool.


I downloaded this software from the above site. I unzipped it. ( any folder). When we click on the icon, we get the screen as given below.


Droid DrawDroid Draw


Drawing Canvas AreaDrawing Canvas Area


Toolbox &amp; Blank AreaToolbox & Blank Area 


Thus we get a window, showing the drawing canvas on leftside and toolbox and a blank area in the rightside. ( for printing purpose, I have split them into two screens) as above.


From the toolbox, we learn that we are having controls like button,check,radio,spinner,edittext(textbox) and  textview (label) etc. There is also a combo  to choose  layout, in the canvas screen.  I am choosing ‘absolute layout’. I simply drag and drop a button and an editview on the canvas.(Drag and drop, do not click and drop! It won’t work).


You will notice a number of tabs in toolbox. Select ‘properties’ tab.. After clicking the button on the canvas, give the id property of button as @id/button1. Similarly, for editview as @id/text1. Also, button2 and text2 After this, just click the ‘generate’ button at the bottom of  the blank window. We get the following XML file(main.xml) automatically generated.


  1. <?xml version=“1.0” encoding=“utf-8”?>  

  2. <RelativeLayout xmlns:android=“http://schemas.android.com/apk/res/android”  

  3.     android:layout_width=“fill_parent” android:layout_height=“wrap_content”  

  4.     android:padding=“10px”>  

  5.     <EditText android:id=“@+id/text1” android:layout_width=“fill_parent”  

  6.         android:layout_height=“wrap_content” />  

  7.     <Button android:id=“@+id/button1” android:layout_width=“wrap_content”  

  8.         android:layout_height=“wrap_content” android:layout_below=“@id/text1”  

  9.         android:layout_alignParentRight=“true” android:layout_marginLeft=“10px”  

  10.         android:text=“click” />  

  11.     <EditText android:id=“@+id/text2” android:layout_width=“fill_parent”  

  12.         android:layout_height=“wrap_content” android:layout_below=“@id/button1” />  

  13.     <Button android:id=“@+id/button2” android:layout_width=“wrap_content”  

  14.         android:layout_height=“wrap_content” android:layout_below=“@id/text2”  

  15.         android:layout_alignParentRight=“true” android:layout_marginLeft=“10px”  

  16.         android:text=“click” />  

  17. </RelativeLayout>  

We can now create our java source file. The code refers to main.xml for id of the controls.
(d:\android\mydemos\ex1\demo.java).This is our work folder.


  1. package mypack.mydemos;   

  2.   

  3.   

  4. import android.app.Activity;   

  5. import android.os.Bundle;   

  6. import android.view.View;   

  7. import android.widget.*;   

  8.   

  9.   

  10. public class demo extends Activity     

  11. {   

  12.   

  13. Button     button1,button2;   

  14. EditText   text1,text2;   

  15.   

  16.     @Override  

  17.   

  18.     public void onCreate(Bundle icicle)   

  19.     {   

  20.         super.onCreate(icicle);   

  21.         setContentView(R.layout.main);   

  22.     text1=  (EditText) findViewById(R.id.text1);   

  23.     button1 = (Button) findViewById(R.id.button1);   

  24.   

  25.     text2=  (EditText) findViewById(R.id.text2);   

  26.     button2 = (Button) findViewById(R.id.button2);   

  27.     button1.setOnClickListener(new clicker());   

  28.     button2.setOnClickListener(new clicker());   

  29.    }   

  30.   

  31.  //———————————–   

  32.   

  33.  class  clicker implements Button.OnClickListener   

  34.   {                  

  35.   public void onClick(View v)   

  36.      {   

  37.      if(v==button1){text1.setText(“welcome”); }   

  38.      if(v==button2){text2.setText(“hello”);   }        

  39.      }   

  40.   

  41.   }   

  42.   

  43. }  

The Android documentation and sample programs use anonymous inner class. I think it is quite unnecessary and is very tedious to follow. Instead, I have used user-defined ‘clicker’. This makes the code cleaner and more readable. This is just like any Swing program. In Android Terminology, an Activity is like a frame in swing (a screen). Just like ActionListener, here also we have, OnClickListener. I am not going into detailed theory now. I just  want to show how to develop and run a program first. Theory will follow later.


We have to copy this file(demo.java) to D:\android\tools\demo\src\mypack\mydemos


Go to d:\android\tools\demo

Give path= c:\winNT\system32;c:\jdk1.5\bin;e:\ant1.6\bin

(carefully note that this will not work with jdk1.4.2. It requires jdk1.5).


Secondly, how about the reference to Ant? Ant is a famous build tool from Apache Software foundation. Android requires the latest version of Ant for Windows(ie) Ant1.6. Do I have to know how to write the Ant’s build.xml file? NO. It is automatically created by the command.


So, I downloaded ant1.6 from the Apache website. It is a compact zip file. I have unzipped it and placed it as E:\ant1.6). Now use the command ‘ant’


d:\android\tools\demo>ant

We will get a series of messages. If we had done the previous steps correctly, we will get the message ‘BUILD SUCCESSFUL”.  Otherwise, we will get error messages, with line numbers where the errors occurred. We can correct them and build again.


The build process would have created a zip file named ‘demo.apk’ in demo\bin folder. All that remains now is to run the program in the emulator. As you remember, we have already started the emulator and it is running.


Now copy d:\android\tools\demo\bin\demo.apk  to d:\android\tools. After copying, give the command as:


…\tools>adb   install    demo.apk

After giving this command. go to the emulator window. You will find a checkpattern displayed for a while. Then an additional button appears in the screen with caption ‘demo’. Our program has been installed. We can test it by clicking on this ‘demo’button.


You can execute the program ‘demo’ now. Two textboxes and two buttons will appear. Click on button1. ‘welcome’ will appear in text1. Click on button2.’how are you?’ will appear in text2. The result is shown  below.


That completes our first  demo in  android.


We will be following exactly same procedure for all our demos. We will hereafter, see xml file and java files only, for the various demos. After a few more demos, it will be enough if I give the imports, declaration, definition and event handler.


The Android SDK comes with a number of sample applications. Within the APIDemos folder, we have a folder named ‘Views‘. I read it as ‘GUI’. It deals with layouts and controls and animations etc. There are a lot of demos. It may be confusing at first. Though, we may like to modify and simplify the code later, it is instructive to try each one of the sample programs by clicking on ‘apidemos’ button in the emulator screen and getting familiarity . I will list and give a brief comment on these, later.


Demo 2 – Spinner


As usual, the standard widgets are label(textview), textbox(edittext), combo(spinner), check, radio, ticker etc. I will now give a  demo for spinner. I have provided a spinner, button and a text to display the selected item in edittext.


We can design our layout as before using DroidDraw and get the following main.xml.


(obtained by using DroidDraw).


  1. <?xml version=“1.0” encoding=“utf-8”?>  

  2. <AbsoluteLayout android:id=“@+id/widget0”    

  3.     android:layout_width=“fill_parent”    

  4.      android:layout_height=“fill_parent”    

  5.       xmlns:android=“http://schemas.android.com/ apk/res/android”>                                               

  6. <Spinner  android:id=“@+id/spinner1” android:layout_width=“wrap_content” android:layout_height=“wrap_content” android:layout_x=“70px” android:layout_y=“42px”>                                               

  7. </Spinner>  

  8. <Button android:id=“@+id/button1” android:layout_width=“wrap_content” android:layout_height=“wrap_content” android:text=“confirm” android:layout_x=“70px” android:layout_y=“112px”>                                           </Button>                                      

  9. <EditText android:id=“@+id/text1” android:layout_width=“wrap_content” android:layout_height=“wrap_content” android:text=“EditText” android:textSize=“18sp” android:layout_x=“70px” android:layout_y=“182px”>  

  10. </EditText>  

  11. </AbsoluteLayout>  

The corresponding java source file is given below.


  1. package  mypack.mydemos;         

  2.   

  3. import android.app.Activity;                     

  4. import android.os.Bundle;                        

  5. import android.widget.*;      

  6. import android.view.View;   

  7.   

  8. public class  demo extends Activity              

  9. {                                                       

  10.         Spinner   spinner1;  

  11.         Button    button1;             

  12.         EditText   text1;    

  13.   

  14.       @Override                                                  

  15.       protected void onCreate(Bundle icicle)     

  16.   

  17.       {         

  18.                 super.onCreate(icicle);                             

  19.                 setTheme(android.R.style.Theme_Dark);  

  20.                 setContentView(R.layout.main);     

  21.     spinner1 = (Spinner)    

  22.     findViewById  (R.id.spinner1);     

  23.     button1    = (Button);  

  24.     findViewById (R.id.button1);                                                 

  25.     text1      = (EditText)    

  26.     findViewById  (R.id.text1);          

  27.     ArrayAdapter<String> adapter = new ArrayAdapter<String>(this, android.R.layout.simple_spinner_item, array);           

  28.     adapter.setDropDownViewResource(android.R.layout.simple_spinner_dropdown_ item);                      

  29.     spinner1.setAdapter(adapter);           

  30.     button1.setOnClickListener(  new clicker());      

  31.    }            

  32.   

  33.          private static final String[] array = {        “sunday”“monday”“tuesday”“wednesday”,  

  34.                          “thursday”“friday”“saturday” };     

  35.   

  36. class  clicker implements  Button.OnClickListener   

  37.   

  38. {   

  39.     public   void  onClick(View   v)  

  40.               {           

  41.            String       s = (String) spinner1.getSelectedItem();   

  42.              text1.setText(s);                                  

  43.     }                                            

  44.   

  45. }      

  46.   

  47.   

  48. }  

As before place demo.java in d:\android\tools\demo\src\mypack\mydemos. Place main.xml in d:\android\tools\demo\res\layout


Build using ant. Deploy demo.apk to the emulator exactly as in previous demo. The original demo gets overwritten. But, our work folder , where we have our xml and java files is d:\android\mydemos\ex1.They  are intact. So, no problem..The current java and xml files are in d:\android\mydemos\ex2.


When we click on the spinner, we get the items displayed as drop-down. We select an item and confirm. The selected item appears in text1. I am not going to explain the code. It is simple enough, if we remember our core java.


Demo 3 – Ticker


The third demo is a ‘ticker’ having a textbox for entering the ticker’s text, a ticker(timer) , two labels(editview) one for status and the other for diplaying the sliding message.


  1. <LinearLayout xmlns:android=http://schemas.android.com/apk/res/android   

  2.    android:layout_width=“fill_parent”       

  3.    android:layout_height=“fill_parent”       

  4.    android:orientation=“vertical”>                                                                              

  5. <EditText android:id=“@+id/text1”           

  6.    android:layout_width=“fill_parent”           

  7.    android:layout_height=“wrap_content” />                                                                             

  8. <Ticker android:id=“@+id/ticker1”           

  9. android:layout_width=“fill_parent”           

  10. android:layout_height=“wrap_content”    

  11. android:layout_marginTop=“20dip” />                                                                      

  12. <TextView android:id=“@+id/label1”               

  13.   android:layout_width=“wrap_content”               

  14.   android:layout_height=“fill_parent” />                                                                       

  15.  </Ticker>  

  16. <TextView android:id=“@+id/label2”           

  17.   android:layout_width=“fill_parent”           

  18.   android:layout_height=“wrap_content”           

  19.    android:layout_marginTop=“20dip”  />                                                             

  20. </LinearLayout>  

 LinearLayout with vertical orientation is like FlowLayout but in a vertical direction.


  1. package mypack.mydemos;   

  2.   

  3. import android.app.Activity;   

  4. import android.os.Handler;   

  5. import android.os.Bundle;   

  6. import android.view.View;   

  7. import android.view.View.OnClickListener;   

  8. import android.widget.*;   

  9. import java.util.Map;   

  10.   

  11. public class demo extends Activity   

  12.   

  13. implements Ticker.TickerListener {   

  14.     Ticker ticker1;   

  15.     TextView label1, label2;   

  16.     EditText text1;   

  17.   

  18.     @Override  

  19.     protected void onCreate(Bundle icicle) {   

  20.         super.onCreate(icicle);   

  21.         setContentView(R.layout.main);   

  22.         ticker1 = (Ticker) findViewById(R.id.ticker1);   

  23.         label1 = (TextView) findViewById(R.id.label1);   

  24.         label2 = (TextView) findViewById(R.id.label2);   

  25.         text1 = (EditText) findViewById(R.id.text1);   

  26.         ticker1.setTickerListener(this);   

  27.         text1.setOnClickListener(new clicker());   

  28.     }   

  29.   

  30.     class clicker implements EditText.OnClickListener {   

  31.         public void onClick(View v) {   

  32.   

  33.             label1.setText(text1.getText());   

  34.             ticker1.startTicker();   

  35.             label2.setText(“Ticking…”);   

  36.         }   

  37.     }   

  38.   

  39.     public void onTickerFinished(Ticker view) {   

  40.         label2.setText(“Done!”);   

  41.     }   

  42.   

  43. }  


Demo 4 – Checkbox 


Copy this to tools\demo\res\layout\


  1. <?xml version=“1.0” encoding=“utf-8”?>  

  2. <AbsoluteLayout android:id=“@+id/widget1”  

  3.     android:layout_width=“fill_parent” android:layout_height=“fill_parent”  

  4.     xmlns:android=“http://schemas.android.com/ apk/res/android”>  

  5.     <CheckBox android:id=“@+id/check1”  

  6.         android:layout_width=“wrap_content”  

  7.         android:layout_height=“wrap_content” android:text=“java”  

  8.         android:layout_x=“50px” android:layout_y=“22px”>  

  9.     </CheckBox>  

  10.   

  11.     <CheckBox android:id=“@+id/check2”  

  12.         android:layout_width=“wrap_content”  

  13.         android:layout_height=“wrap_content” android:text=“C#”  

  14.         android:layout_x=“50px” android:layout_y=“72px”>  

  15.     </CheckBox>  

  16.   

  17.     <Button android:id=“@+id/button1”  

  18.         android:layout_width=“wrap_content”  

  19.         android:layout_height=“wrap_content” android:text=“Confirm”  

  20.         android:layout_x=“60px” android:layout_y=“122px”>  

  21.     </Button>  

  22.   

  23.     <EditText android:id=“@+id/text1”  

  24.         android:layout_width=“wrap_content”  

  25.         android:layout_height=“wrap_content” android:text=“EditText”  

  26.         android:textSize=“18sp” android:layout_x=“60px”  

  27.         android:layout_y=“202px”>  

  28.     </EditText>  

  29. </AbsoluteLayout>  


To be copied to tools\demo\mypack\mydemos


  1. package mypack.mydemos;   

  2.   

  3. import android.app.Activity;   

  4. import android.os.Bundle;   

  5. import android.view.View;   

  6. import android.widget.*;   

  7.   

  8. public class demo extends Activity   

  9.   

  10. {   

  11.   

  12.     Button button1;   

  13.     CheckBox check1, check2;   

  14.     EditText text1;   

  15.   

  16.     @Override  

  17.     public void onCreate(Bundle icicle)   

  18.   

  19.     {   

  20.         super.onCreate(icicle);   

  21.         setContentView(R.layout.main);   

  22.         text1 = (EditText) this.findViewById(R.id.text1);   

  23.         check1 = (CheckBox) findViewById(R.id.check1);   

  24.         check2 = (CheckBox) findViewById(R.id.check2);   

  25.   

  26.         button1 = (Button) findViewById(R.id.button1);   

  27.         button1.setOnClickListener(new clicker());   

  28.   

  29.     }   

  30.   

  31.     class clicker implements Button.OnClickListener   

  32.   

  33.     {   

  34.         public void onClick(View v)   

  35.   

  36.         {   

  37.   

  38.             String r = “”;   

  39.             if (check1.isChecked())   

  40.             {   

  41.                 r = r + “java” + “\n”;   

  42.             }   

  43.             if (check2.isChecked())   

  44.             {   

  45.                 r = r + “c#”;   

  46.             }   

  47.             text1.setText(r);   

  48.         }   

  49.   

  50.     }   

  51.   

  52. }  


This is just the usual Java code and needs very little explanation. The only difference is the way , the controls are defined ( through res\layout\xml file).


Demo 5 – RadioButtons


The next standard control is the RadioButton, within a RadioGroup.


To be placed in tools\demo\res\layout


  1. <LinearLayout xmlns:android=“http://schemas.android.com/apk/res/android”  

  2.     android:orientation=“vertical” android:layout_width=“fill_parent”  

  3.     android:layout_height=“wrap_content”>  

  4.     <RadioGroup android:id=“@+id/group1” android:layout_width=“fill_parent”  

  5.         android:layout_height=“wrap_content” android:orientation=“vertical”>  

  6.         <RadioButton android:id=“@+id/radio1” android:text=“madras”  

  7.             android:layout_width=“wrap_content” android:layout_height=“wrap_content” />  

  8.         <RadioButton android:id=“@+id/radio2” android:text=“bombay”  

  9.             android:layout_width=“wrap_content” android:layout_height=“wrap_content” />  

  10.     </RadioGroup>  

  11.     <Button android:id=“@+id/button1” android:layout_width=“wrap_content”  

  12.         android:layout_height=“wrap_content” android:text=“Button” />  

  13.     <TextView android:id=“@+id/label1” android:layout_width=“wrap_content”  

  14.         android:layout_height=“wrap_content” android:text=“where” />  

  15.     <EditText android:id=“@+id/text1” android:layout_width=“wrap_content”  

  16.         android:layout_height=“wrap_content” android:text=“” android:textSize=“18sp”  

  17.         android:layout_x=“70px” android:layout_y=“182px” />  

  18. </LinearLayout>  

The following Java code should be placed in tools\demo\src\mypack\mydemo


  1. package mypack.mydemos;   

  2.   

  3. import android.app.Activity;   

  4.   

  5. import android.os.Bundle;   

  6.   

  7. import android.view.View;   

  8.   

  9. import android.widget.*;   

  10.   

  11. public class demo extends Activity   

  12.   

  13. {   

  14.   

  15.     TextView label1;   

  16.   

  17.     RadioGroup group1;   

  18.   

  19.     RadioButton radio1, radio2;   

  20.   

  21.     Button button1;   

  22.   

  23.     EditText text1;   

  24.   

  25.     @Override  

  26.     protected void onCreate(Bundle icicle)   

  27.   

  28.     {   

  29.   

  30.         super.onCreate(icicle);   

  31.   

  32.         setContentView(R.layout.main);   

  33.   

  34.         group1 = (RadioGroup)   

  35.   

  36.         findViewById(R.id.group1);   

  37.   

  38.         radio1 = (RadioButton)   

  39.   

  40.         findViewById(R.id.radio1);   

  41.   

  42.         radio2 = (RadioButton)   

  43.   

  44.         findViewById(R.id.radio2);   

  45.   

  46.         button1 = (Button) findViewById(R.id.button1);   

  47.   

  48.         text1 = (EditText) findViewById(R.id.text1);   

  49.   

  50.         text1.setText(“radio”);   

  51.   

  52.         label1 = (TextView) findViewById(R.id.label1);   

  53.   

  54.         label1.setText(“where?”);   

  55.   

  56.         button1.setOnClickListener(new clicker());   

  57.   

  58.     }   

  59.   

  60.     // …inner class —follows ->   

  61.   

  62.     class clicker implements Button.OnClickListener   

  63.   

  64.     {   

  65.   

  66.         public void onClick(View v)   

  67.   

  68.         {   

  69.   

  70.             if (v == button1)   

  71.   

  72.             {   

  73.   

  74.                 if (radio1.isChecked())   

  75.   

  76.                 {   

  77.                     text1.setText(“madras”);   

  78.                 }   

  79.   

  80.                 if (radio2.isChecked())   

  81.   

  82.                 {   

  83.                     text1.setText(“bombay”);   

  84.                 }   

  85.   

  86.             }   

  87.   

  88.         }   

  89.   

  90.     }   

  91.   

  92.     // —-inner class ends here —   

  93.   

  94. }  


You would have observed that I am naming all my java files as ‘demo.java’. May be confusing at first but I am doing so with a purpose. First of all, the emulator screen gets cluttered with too many buttons if we go on adding my examples. What I have done is :


I have created a folder as d:\android\mydemos.


In mydemos folder, I have created subfolders such as (ex1,ex2 etc). But, within each folder, I have demo.java & main.xml.


This way, we can easily test each of our demos  by uniform procedure. In my system, I had the problem of insufficient memory. And, by the above step, I was able to test all my programs by the same name.


Here is an important tip however, if you choose to name the source files and xml files differently and want to reduce the clutter.


Demo 6 – Gallery 


Interestingly, there is a ready-made control in the toolbox, named ‘gallery’. Let us now learn to use this control, though the syntax is a bit difficult. This time, we will need demo.java, main.xml and also another folder in tools\demo\res\drawable. This special folder is to be created by us. You can read ‘img’ instead of ‘drawable’. So, we place all the image files to be displayed in the gallery, in this folder.


Let us as usual create the xml file by using DroidDraw as follows.


  1. <?xml version=“1.0” encoding=“utf-8”?>  

  2. <Gallery xmlns:android=“http://schemas.android.com/apk/res/android”  

  3.     android:id=“@+id/gallery” android:layout_width=“fill_parent”  

  4.     android:layout_height=“fill_parent” android:layout_alignParentBottom=“true”  

  5.     android:layout_alignParentLeft=“true” android:gravity=“center_vertical”  

  6.     android:spacing=“5” />  


The following class is to be placed in tools\demo\mypack\mydemos


  1. package mypack.mydemos;   

  2.   

  3. import android.app.Activity;   

  4. import android.content.Context;   

  5. import android.os.Bundle;   

  6. import android.view.View;   

  7. import android.view.ViewGroup;   

  8. import android.widget.*;   

  9. import android.widget.AdapterView.OnItemClickListener;   

  10.   

  11. public class example extends Activity   

  12.   

  13. {   

  14.   

  15.     @Override  

  16.     public void onCreate(Bundle icicle) {   

  17.   

  18.         super.onCreate(icicle);   

  19.         setContentView(R.layout.main);   

  20.         Gallery gallery = (Gallery)   

  21.         findViewById(R.id.gallery);   

  22.         gallery.setAdapter(new ImageAdapter(this));   

  23.         gallery.setOnItemClickListener(new OnItemClickListener()   

  24.         {   

  25.   

  26.             public void onItemClick(AdapterView parent,   

  27.             View v,   

  28.             int position,   

  29.             long id)   

  30.   

  31.             {   

  32.   

  33.                 Toast.makeText(example.this“” + position,   

  34.                 Toast.LENGTH_SHORT).show();   

  35.             }   

  36.   

  37.         });   

  38.   

  39.     }   

  40.   

  41.     public class ImageAdapter extends BaseAdapter   

  42.     {   

  43.   

  44.         public ImageAdapter(Context c)   

  45.         {   

  46.             mContext = c;   

  47.         }   

  48.   

  49.         public int getCount()   

  50.         {   

  51.             return mImageIds.length;   

  52.         }   

  53.   

  54.         public Object getItem(int position)   

  55.         {   

  56.             return position;   

  57.         }   

  58.   

  59.         public long getItemId(int position)   

  60.         {   

  61.             return position;   

  62.         }   

  63.   

  64.         public View getView(int position, View   

  65.         convertView, ViewGroup parent)   

  66.         {   

  67.             ImageView i = new ImageView(mContext);   

  68.             i.setImageResource(mImageIds[position]);   

  69.             i.setScaleType(ImageView.ScaleType.FIT_XY);   

  70.             i.setLayoutParams(new Gallery.LayoutParams(160200));   

  71.             return i;   

  72.         }   

  73.   

  74.         public float getAlpha(boolean focused, int offset)   

  75.         {   

  76.             return Math.max(01.0f – (0.2f * Math.abs(offset)));   

  77.         }   

  78.   

  79.         public float getScale(boolean focused, int offset)   

  80.         {   

  81.             return Math.max(01.0f – (0.2f *   

  82.             Math.abs(offset)));   

  83.         }   

  84.         private Context mContext;   

  85.         private Integer[] mImageIds = {   

  86.         R.drawable.cindy,   

  87.         R.drawable.clinton,   

  88.         R.drawable.ford,   

  89.         R.drawable.cybil,   

  90.         R.drawable.demi,   

  91.         R.drawable.colin,   

  92.         R.drawable.david,   

  93.         R.drawable.drew   

  94.         };   

  95.   

  96.     }   

  97.   

  98. }  

How to uninstall an application from the emulator?


  • Make sure your emulator is running
  • Open a dos box in the android/tools folder  d:\android\tools>adb shell 
  • You will get the shell prompt
     #cd /data/app
     #ls
     (It will list all the *.apk installed in your emulator)
    # rm  example.apk
    ( if you want to remove ‘example’)
    #exit
  • You will see the application getting removed from the emulator at the same moment


That completes the first part of my introductory tutorial on Android SDK.


Is Hibernate the best choice?


Is Hibernate the best choice? Or is the technical marketing of other ORM vendors lacking?


Recently Jonathan Lehr posed a question on his blog: “Is Hibernate the best choice?“, and this lead me to ask the same question.


Although, I tend to use Hibernate as my first choice, it would be nice to see some head to head comparisons of Hibernate vs. TopLink (pros and cons), Hibernate vs. OpenJPA, Hibernate vs. Cayenne, etc. Searching around finds that many of the comparison are pretty old and not very detailed or compelling.


Having used other ORM frameworks, I found that when something goes wrong with Hibernate, you can usually google and find an answer, and there are many books on Hibernate. In my experience, the other frameworks seemed to be a less well-worn path and it is harder to find answers to even common problems. This is not to say that Hibernate is better, but that it is a lot more popular. In the end, I use Hibernate because my clients use it, if my clients switched to TopLink or OpenJPA, then I would use them as well.

So this begs the question, if Hibernate works for you, you just might have something else to do, like implementing a client solution that makes your client money, than to try several other ORM frameworks. How much time should someone spend learning a new ORM framework (new to them anyway)?


Don’t get this wrong, trying out new ORM frameworks is fine. If there is a large IT/developer organization, and you have a certain selection criteria like integrating with legacy databases, conformance to JPA specification, ability to hire new developers, easy of use, etc. then by all means having someone create a few prototypes and/or proofs of concepts and try out a few ORM frameworks is great. There is often good ROI in this type of testing. Perhaps share your findings with the rest of us.


However, it seems if you are a vendor of a JPA solution, you could start by pointing out how your product differs from Hibernate. Like it or not, Hibernate dominates the mind-share of developers. If you can’t prove your ORM frameworks has compelling reasons for switching, why should developers spend their time evaluating your product?


Now let me boil things down to brass tacks, it seems vendors of the ORMs should write white-papers, articles, blogs, and such to highlight the advantages of their ORM framework versus Hibernate. Logic dictates that if you have a product and there is a competing product that dominates the market that you might want to highlight what differentiates your product from the dominate one.


As a test, let’s go to different vendor sites and see if they have comparisons of their ORM framework vs. the 800 pound gorilla, Hibernate.


So first let’s go to Oracle TopLink website, you would expect since Hibernate has such a huge adoption rate in the industry that Oracle would want to point out why TopLink is better like a nice white-paper perhaps featured prominently on their TopLink site (see graph).


TopLink versus Hibernate


After hunting around a bit this entry appeared in the TopLink Essentials FAQ, Why should TopLink Essentials be used instead of JBoss(TM) Hibernate?


The two main points that seemed intriguing were as follows:


“Customers with any degree of complexity in the domain model or relational schemas, most notably where changing the schema is not an option, will benefit from the flexibility and proven nature of TopLink.”


NOTE: At times mapping Hibernate to legacy systems can be challenging. How is TopLink better at this? Are there articles or white-papers, etc. that attempt to prove that TopLink is better at legacy integration? (I find that many developers are not aware of all of the features that Hibernate provides for legacy mapping.)


“As the reference implementation of JPA TopLink offers the first certified implementation of this new standard. as well as providing some useful value-add functionality. Going forward this open source project will continue to innovate based on contributions from Oracle, Sun, and others.”


NOTE: This is compelling to me since I now use the JPA interface to Hibernate whenever I can.


Now I did not find the arguments in the FAQ particularly compelling or at all detailed. Sadly, you can find more compelling arguments in some of the TopLink public forums and random blogs. However, none so compelling that I feel the sudden need to switch.


Now on to the BEA site to look at dear KODO. I have always heard good things about KODO. Sadly, I found the BEA KODO site to be very out of date. It mentions a 2005 award for KODO as the lead news item. It also mentions that OpenJPA is in incubation, it has been out for a while. Even the FAQ, which did mention Hibernate, merely mentions that Hibernate is not EJB3 (seems it should say Hibernate is not JPA). This site really seems out of date and like the TopLink site mosty ignores the elephant in the room (see graph).


KODO vs. Hibernate


Well, let’s look at the Apache OpenJPA site, as KODO’s DNA may live at Apache long after Oracle decides on a single JPA solutions and likely leaves KODO to rot on the vine. Searching through the main site, FAQ, OpenJPA documentation, etc., I find no mention of Hibernate. Now this is an open source project so one would likely expect to see no marketing angle per se. But, you might expect that a project recognize that many would not be able to use this project without first justifying their pick against picking Hibernate (OpenJPA barely appears at all on job graphs). How many IT/development managers will feel comfortable with this choice without some explanation?


Now on to the next ORM framework site, Cayenne. No mention of Hibernate vs. Cayenne (but I know I have read articles on this). Seems like there might be some compelling ease-of-use arguments for Cayenne vs. Hibernate but they choose not to compare them. (Cayenne barely appears at all on job graphs)


Now back to Jonathan Lehr blog, Jonathan states that he feels TopLink and Cayenne are better choices than Hibernate and cites his reasons for these choices. There is a long discussion on the pros and cons of each in the comment section. I’d love to see more discussion, and I’d love to see some viable alternatives to Hibernate, but feel that no vendor or open source project does a real good job of pointing out the differences and possible limitations of Hibernate. If the vendors and project owners choose not to make their case, it makes it very difficult for the rank and file developers to make their case.


Perhaps one reason Hibernate is so dominate is because competing projects are so bad at technical marketing. Not one project I looked at mentions Hibernate on their front page. I could not find a decent comparison of features (to Hibernate’s) on any of the ORM sites.


Has anyone done a comparison of Hibernate and OpenJPA, TopLink Essentials, Cayenne that compares ease-of-use, caching, tool support, legacy integration, etc.? Perhaps such an internal report was used to decide which ORM tool to pick. If so, what were the results?


If you use TopLink, OpenJPA, Cayenne instead of Hibernate, why?


Were you hoping that JPA would level the playing field and there would be more competition?

Tomcat Today, GlassFish Tomorrow?

While there are indeed several advantages to using GlassFish vs. Tomcat, it’s probably useful to know that Sun is the original creator of Tomcat and that any application running today on Tomcat should run just fine (no modification whatsoever) on GlassFish.

Grizzly


Historically, if you wanted to get good HTTP performance from Tomcat you really needed to have a the Apache web server to sit in front of Tomcat which involved more setting up and extra administrative work. Since GlassFish v1 (May 2006), Grizzly is the HTTP frontend of the application server. It’s a 100% Java nio framework that provides the same performance as Apache only it’s written in Java and integrated straight into the application server. While using Apache or Sun Web Server in front of GlassFish is quite possible, it’s certainly no longer needed for performance reasons. Grizzly is also used for other protocols such as IIOP and now SIP (project Sailfin). Finally, Grizzly is the key technology for implementing Comet (aka Reverse Ajax, aka Ajax Push) which enables so very interesting push scenarios (from server to clients).


Full Java EE 5 support


Support for Java EE 5 (and soon Java EE 6) has always been a key priority for the GlassFish project. It delivered its first Java EE 5- certified implementation more than two years ago. This allowed developers to enjoy the much simplified EJB 3.0 specification, JAX-WS, and more goodness early on but it also provided dependency injection in the web tier (in servlet or JSF managed beans). Tomcat is not a full blown application server so while it may be enough for some developments, many companies find themselves maintaining a stack of frameworks and libraries on top of Tomcat when a GlassFish provides a JPA persistence engine (Toplink), a full web services stack (Metro), an application model (EJB3), and more, all out of the box. Java EE 6 profiles should help improve that situation for the industry as a whole.


Admin Tools


Administration and monitoring tools is what GlassFish users coming from Tomcat get as an immediate benefit. From web tools to command- line tools, GlassFish has an extensive set of features ranging from application (un)deployment, to JNDI resource creation, to all sorts of configuration details. All is JMX-based, exposed using MBeans (called AMX) and usable from JMX tools such as JConsole or the new VisualVM (specific plugin for GlassFish there). GlassFish also provides a fully- integrated monitoring feature called Call-Flow which reveals very accurately where time is being spent in the application before a response is sent. GlassFish also comes with a self-monitoring framework capable of implementing administrative rules such as the addition of a new node to a cluster if the average response time goes beyond a certain threshold.


Documentation


Technical information for GlassFish comes in various forms complementing one another quite well. The official documentation is extensive and complete (20+ books, from Developer’s Guide to Deployment Planning Guide). There’s also the Java EE tutorial, Enterprise Tech Tips, GlassFish user FAQs, blogs from engineers, forums and mailing lists.


Clustering


Full clustering is built right into GlassFish with no need to move to some other codebase or for-pay version of the product. In fact, you can even upgrade from a “developer” profile to a “cluster” profile. Clustering in GlassFish means the grouping technology (heartbeats, centralized admin), the load-balancing, but also the stateful data in- memory replication. Project Shoal is the GlassFish sub-project that does the heavy-lifting for most of these features. It uses JXTA under the covers which has the nice side-effect or requiring little to no configuration. GlassFish clustering make no assumption about the load- balancing technology used – it provides Web Server plugins but also works with hardware load-balancers. Such load-balancers do not need to know where the replicas are. Finally, Sun also offers a 99.999% solution with an in-memory distributed database (HADB). It has greater performance degradation, but probably unmatched availability.


Performance


Sun has literally worked for years on the performance of GlassFish – Grizzly, EJB container, Servlet container, Web Services, OpenMQ implementation, etc… The best result of this has been the SPECjAppServer world record published late last year and putting GlassFish in first place ahead of Weblogic and WebSphere (Tomcat isn’t a full app server and thus isn’t listed there, while JBoss has never published results). This is the first time one could claim that you no longer need to choose between open source and performance, you can have both. Performance is a strong priority for Sun.


Support from Sun


GlassFish is free and open source (dual CDDL + GPLv2 license), but Sun also has a business strategy to monetize GlassFish thru services. One such service is the subscription that covers access to patches and interim releases, access to support and escalation of bugs as well as indemnification. Sun also recently announced the GlassFish and MySQL unlimited offering (see http://www.sun.com/aboutsun/pr/2008-06/sunflash.20080627.1.xml) .


Tooling


While the NetBeans/GlassFish integration is very good, there is clearly no “NetBeans prerequisite” to use GlassFish. In fact Sun is the main developer of an open source plugin for Eclipse WTP to use GlassFish v2 and even v3. Both NetBeans and Eclipse users can get the plugin right from the IDE (for Eclipse, it’s a WTP plugin for Eclipse 3.3 or 3.4). There is also support for GlassFish in IntelliJ and Oracle has announced support in JDeveloper.


Tomcat, GlassFish v3


GlassFish has made a lot of efforts to appeal to developers. Its a single, small download of about 60MB, has auto-deploy capabilities, starts pretty fast for an application server with GlassFish v2 (probably the best full-blown application server startup time). To be fair to Tomcat or Jetty, they are still perceived by many as lighter- weight and faster to start. GlassFish v3 is all about being modular (based on OSGi), extensible and very developer friendly. The recently released TP2 (Tech Preview 2) starts in less than a second, starts/ stops containers and resources as needed and provides support for scripting technologies such as Rails, Groovy, PHP and more. There is also an Embedded mode for GlassFish which enables developers to use GlassFish via an API for testing or embeddability purposes. GlassFish v3 is scheduled to be aligned with Java EE 6 and released mid-2009. In the mean time there will be regular refreshes.