搭建微信订阅号后台服务
搭建微信订阅号后台服务 准备域名 任务时间:20min ~ 40min 微信公众平台需要配置服务器地址 URL 访问,在实验开始之前,我们要准备域名。 域名注册 如果您还没有域名,可以在腾讯云上选购,过程可以参考下面的视频。 视频 – 在腾讯云上购买域名 域名解析 域名购买完成后, 需要将域名解析到实验云主机上,实验云主机的 IP 为: <您的 CVM IP 地址> 在腾讯云购买的域名,可以到控制台添加解析记录,过程可参考下面的视频: 视频 – 如何在腾讯云上解析域名 域名设置解析后需要过一段时间才会生效,通过 ping 命令检查域名是否生效 [?],如: ping www.yourmpdomain.com 如果 ping 命令返回的信息中含有你设置的解析的 IP 地址,说明解析成功。 注意替换下面命令中的 www.yourmpdomain.com 为您自己的注册的域名 申请微信个人订阅号 任务时间:5min ~ 10min 在开始搭建我们的订阅号服务器之前,需要先拿到订阅号相关信息。 注册开发者账号 如果你还不是微信订阅号开发者,请先在微信公众平台注册: https://mp.weixin.qq.com 具体注册流程可参考如下视频: 视频 – 注册开发者账号 若您已注册,请点击下一步。 获取微信订阅号公众平台认证字段信息 我们需要获取3个字段:AppID Token EncodingAESKey。 登录微信公众平台,依次进入 开发 – 基本配置 可以拿到 AppID。 在基本配置 – 服务器配置 – 修改配置 表单中: […]
Express 入门
Express 入门 安装 NodeJS 任务时间:5min ~ 10min 安装 NodeJS 在终端中,使用下面的命令安装 NodeJS: curl –silent –location https://rpm.nodesource.com/setup_8.x | sudo bash – yum -y install nodejs 安装完成后,可使用下面的命令测试安装结果: node -v 安装 Express 任务时间:5min ~ 10min 创建工作目录 使用下面的命令在服务器创建一个工作目录: mkdir -p /data/release/hello 进入此工作目录: cd /data/release/hello 初始化项目 通过 npm init 命令为你的应用创建一个 package.json 文件。欲了解 package.json 是如何起作用的,请参考 Specifics of npm’s package.json handling。 npm init 此命令将要求你输入几个参数,例如此应用的名称和版本。 除 entry point: (index.js) 参数外,其他参数你可以直接按 “回车” 键接受默认设置即可。 对于 entry […]
使用NIO进行快速的文件拷贝
public static void fileCopy( File in, File out ) throws IOException { FileChannel inChannel = new FileInputStream( in ).getChannel(); FileChannel outChannel = new FileOutputStream( out ).getChannel(); try { // inChannel.transferTo(0, inChannel.size(), outChannel); // original — apparently has trouble copying large files on Windows // magic number for Windows, 64Mb – 32Kb) int maxCount = (64 * 1024 * 1024) – (32 * 1024); long size = inChannel.size(); long position = 0; while ( position < size ) { position += inChannel.transferTo( position, maxCount, outChannel ); } } finally { if ( inChannel != null ) { inChannel.close(); } if ( outChannel != null ) { outChannel.close(); } } }
列出文件和目录
File dir = new File(“directoryName”); String[] children = dir.list(); if (children == null) { // Either dir does not exist or is not a directory } else { for (int i=0; i < children.length; i++) { // Get filename of file or directory String filename = children[i]; } } // It is also possible to filter the list of returned files. // This example does not return any files that start with `.’. FilenameFilter filter = new FilenameFilter() { public boolean accept(File dir, String name) { return !name.startsWith(“.”); } }; children = dir.list(filter); // The list of files can also be retrieved as File objects File[] files = dir.listFiles(); // This filter only returns directories FileFilter fileFilter = new FileFilter() { public boolean accept(File file) { return file.isDirectory(); } }; files = dir.listFiles(fileFilter);
创建ZIP和JAR文件 create zip jar
import java.util.zip.*; import java.io.*; public class ZipIt { public static void main(String args[]) throws IOException { if (args.length < 2) { System.err.println(“usage: java ZipIt Zip.zip file1 file2 file3”); System.exit(-1); } File zipFile = new File(args[0]); if (zipFile.exists()) { System.err.println(“Zip file already exists, please try another”); System.exit(-2); } FileOutputStream fos = new FileOutputStream(zipFile); ZipOutputStream zos = new ZipOutputStream(fos); int bytesRead; byte[] buffer = new byte[1024]; CRC32 crc = new CRC32(); for (int i=1, n=args.length; i < n; i++) { String name = args[i]; File file = new File(name); if (!file.exists()) { System.err.println(“Skipping: “ + name); continue; } BufferedInputStream bis = new BufferedInputStream( new FileInputStream(file)); crc.reset(); while ((bytesRead = bis.read(buffer)) != –1) { crc.update(buffer, 0, bytesRead); } bis.close(); // Reset to beginning of input stream bis = new BufferedInputStream( new FileInputStream(file)); ZipEntry entry = new ZipEntry(name); entry.setMethod(ZipEntry.STORED); entry.setCompressedSize(file.length()); entry.setSize(file.length()); entry.setCrc(crc.getValue()); zos.putNextEntry(entry); while ((bytesRead = bis.read(buffer)) != –1) { zos.write(buffer, 0, bytesRead); } bis.close(); } zos.close(); } }
解析/读取XML 文件
<?xml version=“1.0”?> <students> <student> <name>John</name> <grade>B</grade> <age>12</age> </student> <student> <name>Mary</name> <grade>A</grade> <age>11</age> </student> <student> <name>Simon</name> <grade>A</grade> <age>18</age> </student> </students> package net.viralpatel.java.xmlparser; import java.io.File; import javax.xml.parsers.DocumentBuilder; import javax.xml.parsers.DocumentBuilderFactory; import org.w3c.dom.Document; import org.w3c.dom.Element; import org.w3c.dom.Node; import org.w3c.dom.NodeList; public class XMLParser { public void getAllUserNames(String fileName) { try { DocumentBuilderFactory dbf = DocumentBuilderFactory.newInstance(); DocumentBuilder db = dbf.newDocumentBuilder(); File file = new File(fileName); if (file.exists()) { Document doc = db.parse(file); Element docEle = doc.getDocumentElement(); // Print root element of the document System.out.println(“Root element of the document: “ + docEle.getNodeName()); NodeList studentList = docEle.getElementsByTagName(“student”); // Print total student elements in document System.out .println(“Total students: “ + studentList.getLength()); if (studentList != null && studentList.getLength() > 0) { for (int i = 0; i < studentList.getLength(); i++) { Node node = studentList.item(i); if (node.getNodeType() == Node.ELEMENT_NODE) { System.out .println(“=====================”); Element e = (Element) node; NodeList nodeList = e.getElementsByTagName(“name”); System.out.println(“Name: “ + nodeList.item(0).getChildNodes().item(0) .getNodeValue()); nodeList = e.getElementsByTagName(“grade”); System.out.println(“Grade: “ […]
使用iText JAR生成PDF
import java.io.File; import java.io.FileOutputStream; import java.io.OutputStream; import java.util.Date; import com.lowagie.text.Document; import com.lowagie.text.Paragraph; import com.lowagie.text.pdf.PdfWriter; public class GeneratePDF { public static void main(String[] args) { try { OutputStream file = new FileOutputStream(new File(“C:\\Test.pdf”)); Document document = new Document(); PdfWriter.getInstance(document, file); document.open(); document.add(new Paragraph(“Hello Kiran”)); document.add(new Paragraph(new Date().toString())); document.close(); file.close(); } catch (Exception e) { e.printStackTrace(); } } }
创建图片的缩略图 createThumbnail
private void createThumbnail(String filename, int thumbWidth, int thumbHeight, int quality, String outFilename) throws InterruptedException, FileNotFoundException, IOException { // load image from filename Image image = Toolkit.getDefaultToolkit().getImage(filename); MediaTracker mediaTracker = new MediaTracker(new Container()); mediaTracker.addImage(image, 0); mediaTracker.waitForID(0); // use this to test for errors at this point: System.out.println(mediaTracker.isErrorAny()); // determine thumbnail size from WIDTH and HEIGHT double thumbRatio = (double)thumbWidth / (double)thumbHeight; int imageWidth = image.getWidth(null); int imageHeight = image.getHeight(null); double imageRatio = (double)imageWidth / (double)imageHeight; if (thumbRatio < imageRatio) { thumbHeight = (int)(thumbWidth / imageRatio); } else { thumbWidth = (int)(thumbHeight * imageRatio); } // draw original image to thumbnail image object and // scale it to the new size on-the-fly BufferedImage thumbImage = new BufferedImage(thumbWidth, thumbHeight, BufferedImage.TYPE_INT_RGB); Graphics2D graphics2D = thumbImage.createGraphics(); graphics2D.setRenderingHint(RenderingHints.KEY_INTERPOLATION, RenderingHints.VALUE_INTERPOLATION_BILINEAR); graphics2D.drawImage(image, 0, 0, thumbWidth, thumbHeight, null); // save thumbnail image to outFilename BufferedOutputStream out = new BufferedOutputStream(new FileOutputStream(outFilename)); JPEGImageEncoder encoder = JPEGCodec.createJPEGEncoder(out); JPEGEncodeParam param = encoder.getDefaultJPEGEncodeParam(thumbImage); quality = Math.max(0, Math.min(quality, 100)); param.setQuality((float)quality / 100.0f, false); encoder.setJPEGEncodeParam(param); encoder.encode(thumbImage); out.close(); }
ElasticSearch 简单入门
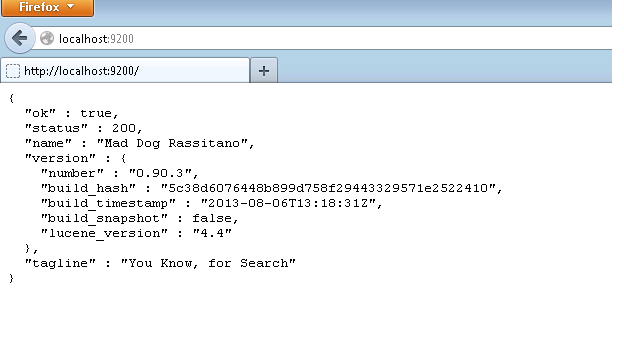
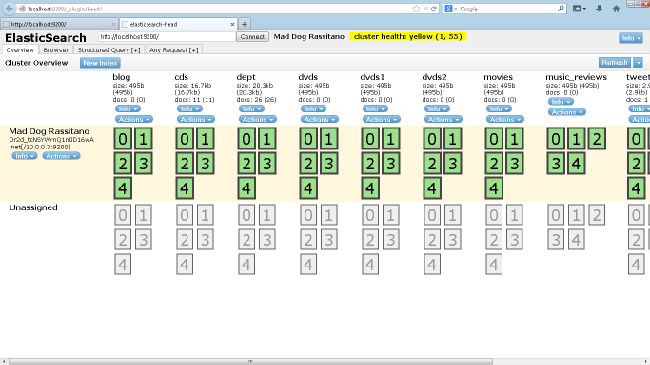
简介 ElasticSearch是一个开源的分布式搜索引擎,具备高可靠性,支持非常多的企业级搜索用例。像Solr4一样,是基于Lucene构建的。支持时间时间索引和全文检索。官网:http://www.elasticsearch.org 它对外提供一系列基于java和http的api,用于索引、检索、修改大多数配置。 写这篇博客的的主要原因是ElasticSearch的网站只有一些简单的介绍,质量不高,缺少完整的教程。我费了好大劲才把它启动起来,做了一些比hello world更复杂一些的工作。我希望通过分享我的一些经验来帮助对ElasticSearch(很强大的哦)感兴趣的人在初次使用它的时候能够节省些时间。学完这篇教程,你就掌握了它的基本操作——启动、运行。我将从我的电脑上分享这个链接。 这么着就开始了。 作者假设读者拥有安装后的Java。 下载来自http://www.elasticsearch.org/download/的ElasticSearch。再一次,关于在Linux与其他非视窗系统环境里操作它的谈论有许多,但是作者更加关心着视窗7版桌面环境。请对应选择安装包裹。对视窗系统 – 一Zip文件 – 用户可解压缩到C:\elasticsearch-0.90.3\. 牢记,这十分的不同于安装Eclipse IDE。 作者不熟悉curl跟cygwin,而且作者打算节省掌握时间(此多数在官网ElasticSearch.org应用的命令面对非视窗平台)(译者:大可以安装一虚拟机、便携版Linux或者MinGW)。读者可以在http://curl.haxx.se/download.html和http://cygwin.com/install.html安装Curl和cygwin。 于是测试下目前作者和读者所做到的。 视窗7版桌面环境,运行命令行,进入 cd C:\elasticsearch-0.90.3\bin 目录。 这时运行 elasticsearch.bat 上面在本机启动了一个ElasticSearch节点。 读者会看到下面的记录提示。 (如果您家情况明显不一样,请读者们不要忧愁,因那作者有些个Elastic Search的插件程序,而且作者家节点命名和其它会不同读者家的) 4. 现在在浏览器里测试一下 如果你得到的status是200那它意味着所有的事情都ok啦…是不是很简单? 让我们看看JSON的每个字段代表的含义: Ok:当为true时,意味着请求成功。 Status:发出请求后的HTTP的错误代码。200表示一切正常。 Name:我们Elasticsearch实例的名字。在默认情况下,它将从一个巨长的名字列表中随机选择一个。 Version:这个对象有一个number字段,代表了当前运行的Elasticsearch版本号,和一个Snapshot_build字段,代表了你当前运行的版本是否是从源代码构建而来。 Tagline:包含了Elasticsearch的第一个tagline: “You Know, for Search.” 5. 现在让我们从http://mobz.github.io/elasticsearch-head/ 安装ElasticSearch Head插件 安装方法非常简单 1 cd C:\elasticsearch-0.90.3\bin 2 plugin -install mobz/elasticsearch-head 上面的命令会把 elasticsearch-head插件装到你的环境里 教程样例 我们将要部署一个非常简单的应用–在一个部门里的雇员–这样我们可以把注意力放在功能而不是氧立得复杂性上。总而言之,这篇博文是为了帮助人们开始ElasticSearch入门。 1)现在打开你的cygwin窗口并且键入命令 1 curl -XPUT ‘http://localhost:9200/dept/employee/32’ -d ‘{ “empname”: “emp32”}’ dept是一个索引并且索引类型是雇员,此时我们正在输入这个索引类型的第31个id。 你应该能在cygwin的窗口看到这样的信息: 让我们看一下这个输出: […]