MySQL Master Slave Replication: 7 Easy Steps

1. Setting Up The Master
The first thing you need to accomplish in the MySQL master-slave replication process is to install and configure the master server. If you have not installed MySQL, then you can install MySQL using the following command:

root@repl-master:~# sudo apt-get update
root@repl-master:~# sudo apt-get install mysql-server mysql-client -y
root@repl-master:~# sudo mysql_secure_installation
Read through Installing MySQL on Ubuntu 20.04: 6 Easy Steps for more insights.

Once the MySQL installation process is completed, use the following command to edit the MySQL configuration file:

root@repl-master:~# sudo nano /etc/mysql/mysql.conf.d/mysqld.cnf
Next, in the same file, find the line containing bind-address = 127.0.0.1 and replace that IP address with the IP address of your master replication server. So, the line will look like:
bind-address = 12.34.56.111

Next, find the following lines in the file:

server-id = 1
log_bin = /var/log/mysql/mysql-bin.log
You will see that the above lines have been commented, just uncomment these lines and exit the edit interface by clicking CTRL + X. Save the changes and restart the MySQL service for the changes to take effect.

Restart MySQL service using the following command:

root@repl-master:~# sudo service mysql restart
2. Create A New User For Slave
The next step is to create a new user for your slave server. Use the following command to create it:

root@repl-master:~# mysql -uroot -p;
mysql> CREATE USER ‘slave’@’12.34.56.789‘ IDENTIFIED BY ‘SLAVE_PASSWORD‘;
mysql> GRANT REPLICATION SLAVE ON . TO ‘slave’@’12.34.56.222 ‘;
mysql> FLUSH PRIVILEGES;
mysql> FLUSH TABLES WITH READ LOCK;
You will use the following command to know the current status of the master server:

mysql> SHOW MASTER STATUS;
This command will also tell the slave to follow the master from this position.

3. Move Data From Master To Slave
Now that you have marked the position, you can start moving the data from the master to the slave. You need to create a MySQL dump file to move the data. Use the following command to create the dump file:

root@repl-master:~# mysqldump -u root -p –all-databases –master-data > data.sql
To copy the dump file to the slave, use the following command:

scp data.sql root@12.34.56.222
Unlock the tables using the following command:

mysql> UNLOCK TABLES;
4. Configure Slave Server
Now, all you need to do is configure the slave server and test if replication is working. Ensure MySQL is installed.
Open the configuration file in your slave server and update these lines:

root@repl-slave:~# sudo nano /etc/mysql/mysql.conf.d/mysqld.cnf
In the same way that you did for the master server, you need to bind the IP address and uncomment those two lines for the slave server.
Now, restart the MySQL server using the following command:

root@repl-slave:~# sudo service mysql restart
5. Import Data Dump
Use the following command to import the dump file to the slave server:

root@repl-slave:~# mysql -uroot -p < data.sql Once the data is imported, you need to stop MySQL in the slave server using the following command: root@repl-slave:~# mysql -uroot -p; mysql> STOP SLAVE;
You have finally imported the dump files and updated the master IP address, password, log file name, and position, to enable the master to communicate with the slave without any issues.

6. Start Slave Server
Next, use the “Start Slave” command to start operating the slave server.

START SLAVE;
7. Test MySQL Master Slave Replication
To test if your MySQL master slave replication works, just create a database in your master server and see if it is replicated in the slave server. If you can see the database in the slave, then it is working fine.

Create a test database in a master server called ‘sampledb’.

CREATE DATABASE sampledb;
Now login to your slave server and list the databases, and if you see the “sampledb” there, then the master slave replication process is working fine.

Login to your slave server and use the following command to list all databases:

show databases;

Analog JoyStick with Arduino

The Analog Joystick is similar to two potentiometers connected together, one for the vertical movement (Y-axis) and other for the horizontal movement (X-axis). The joystick also comes with a Select switch. It can be very handy for retro gaming, robot control or RC cars. So let’s understand how it works!dsc09428.jpg

Basics

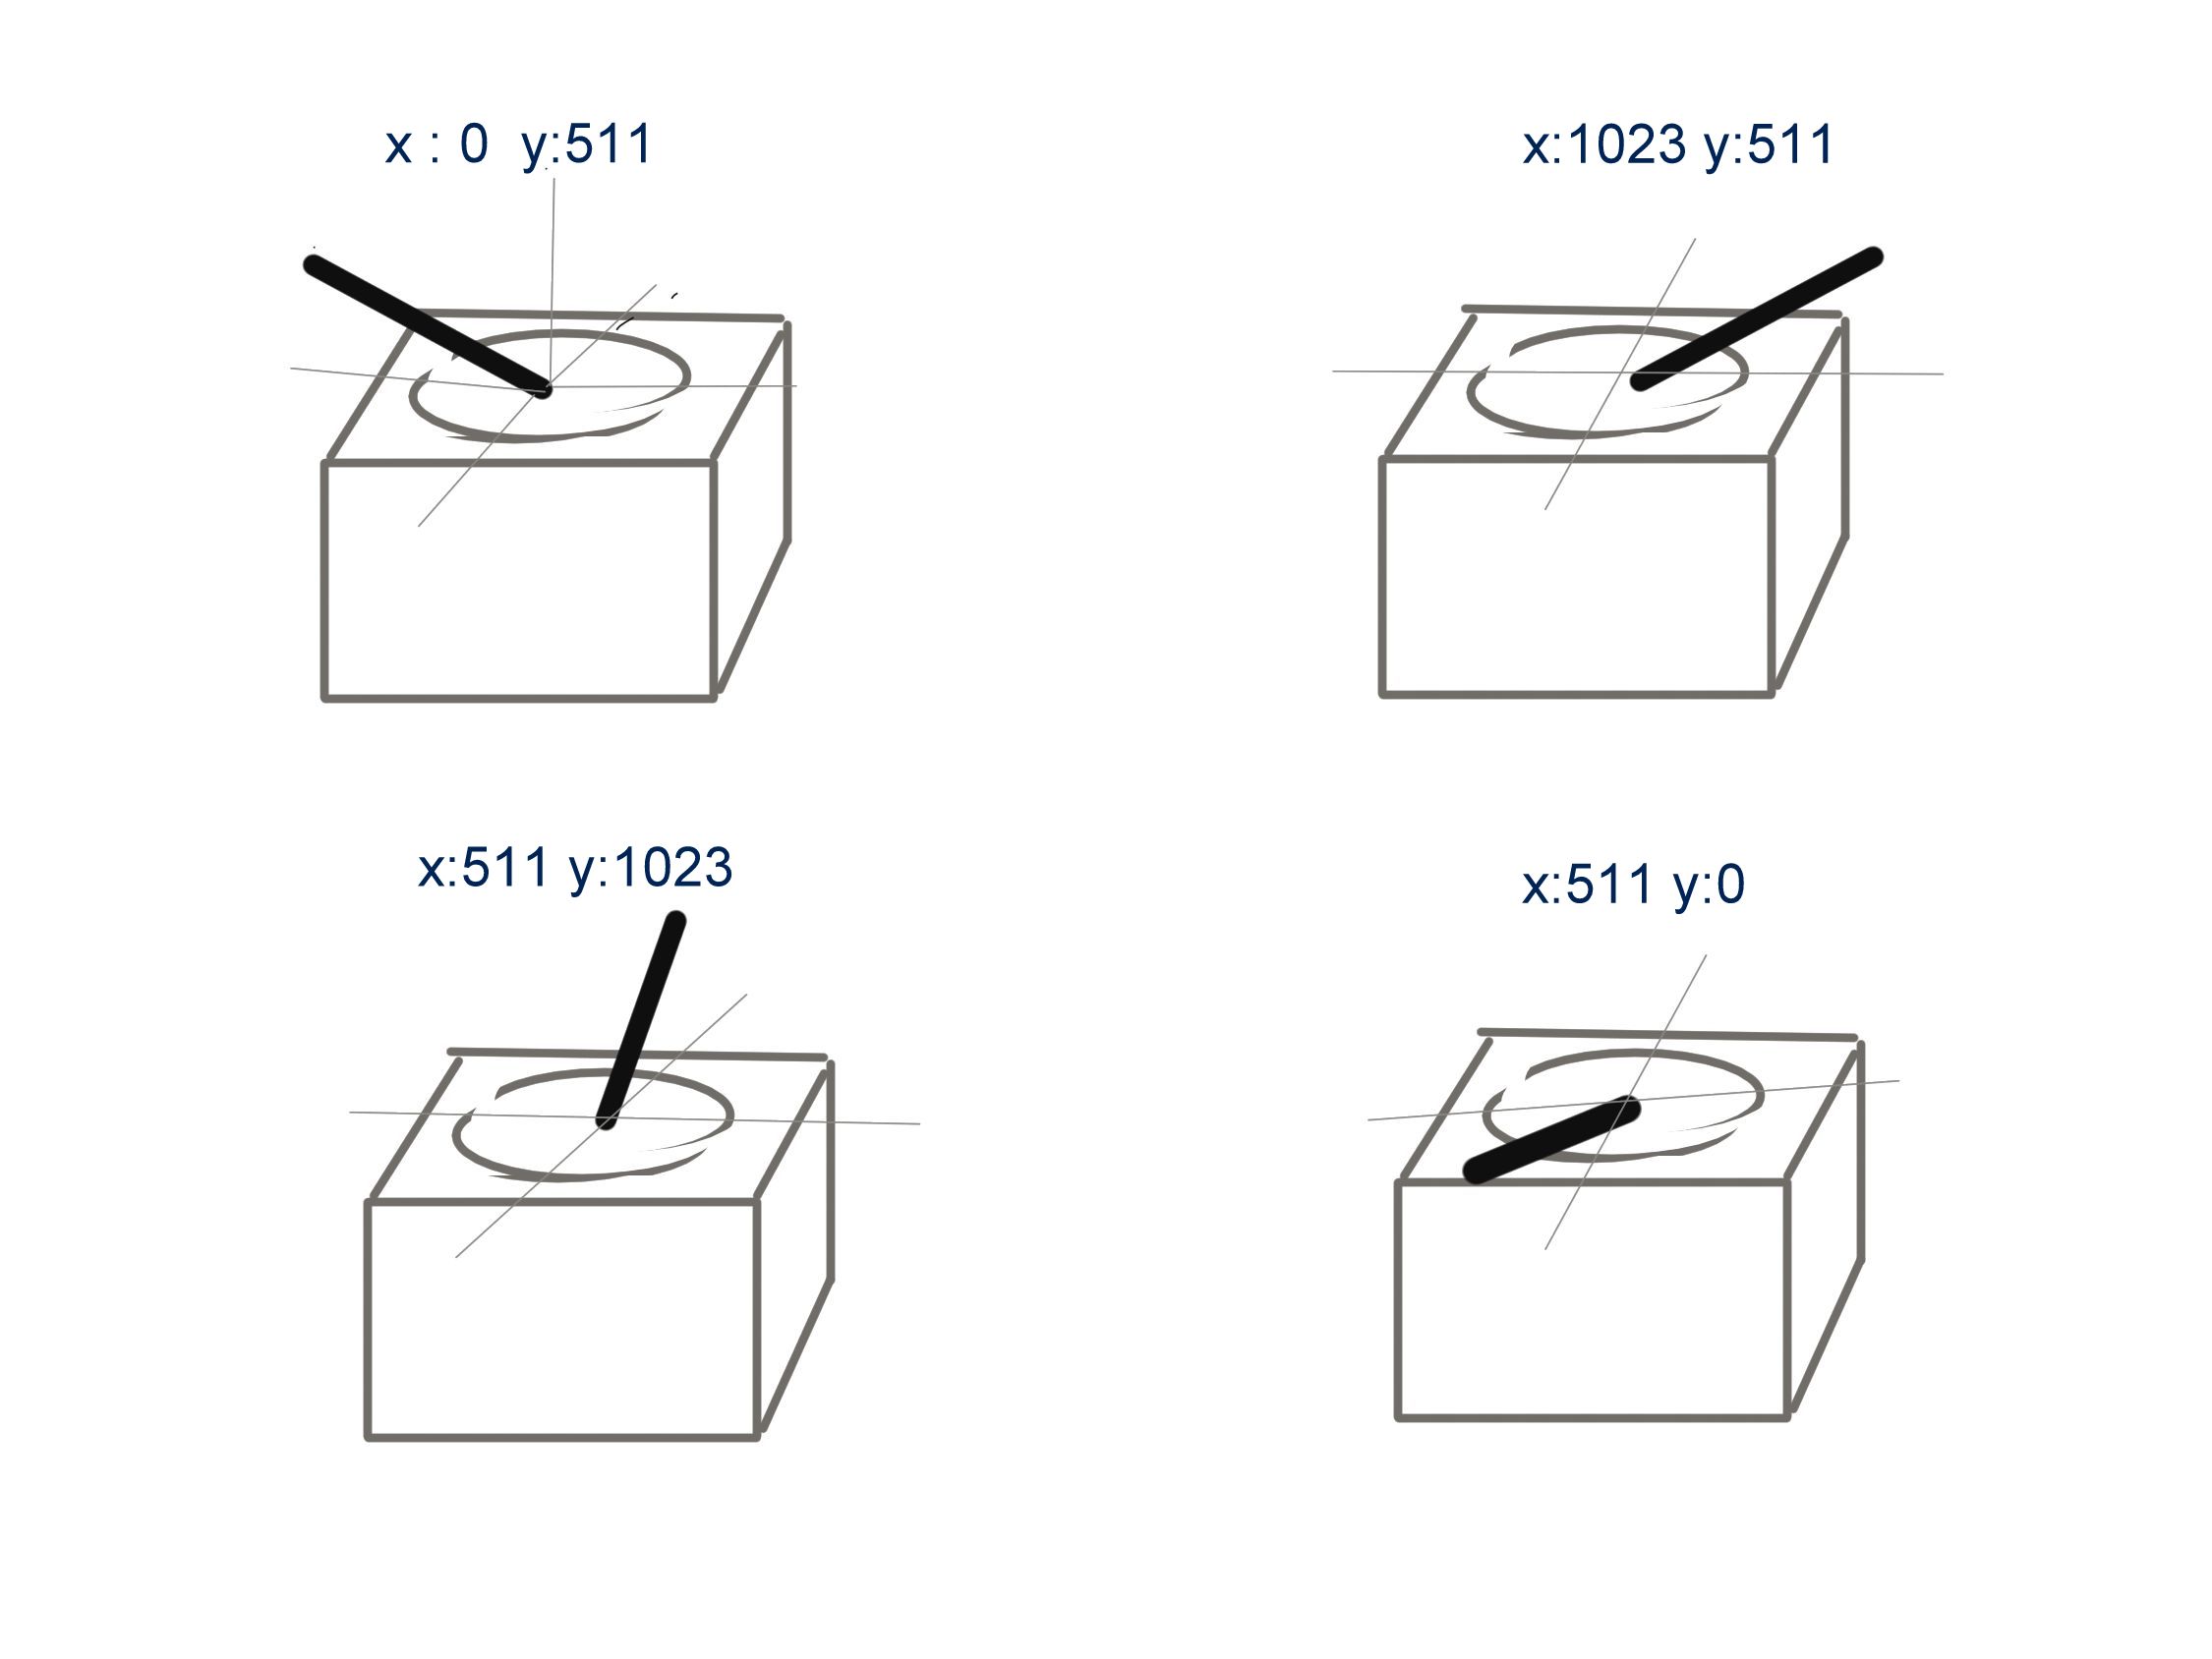
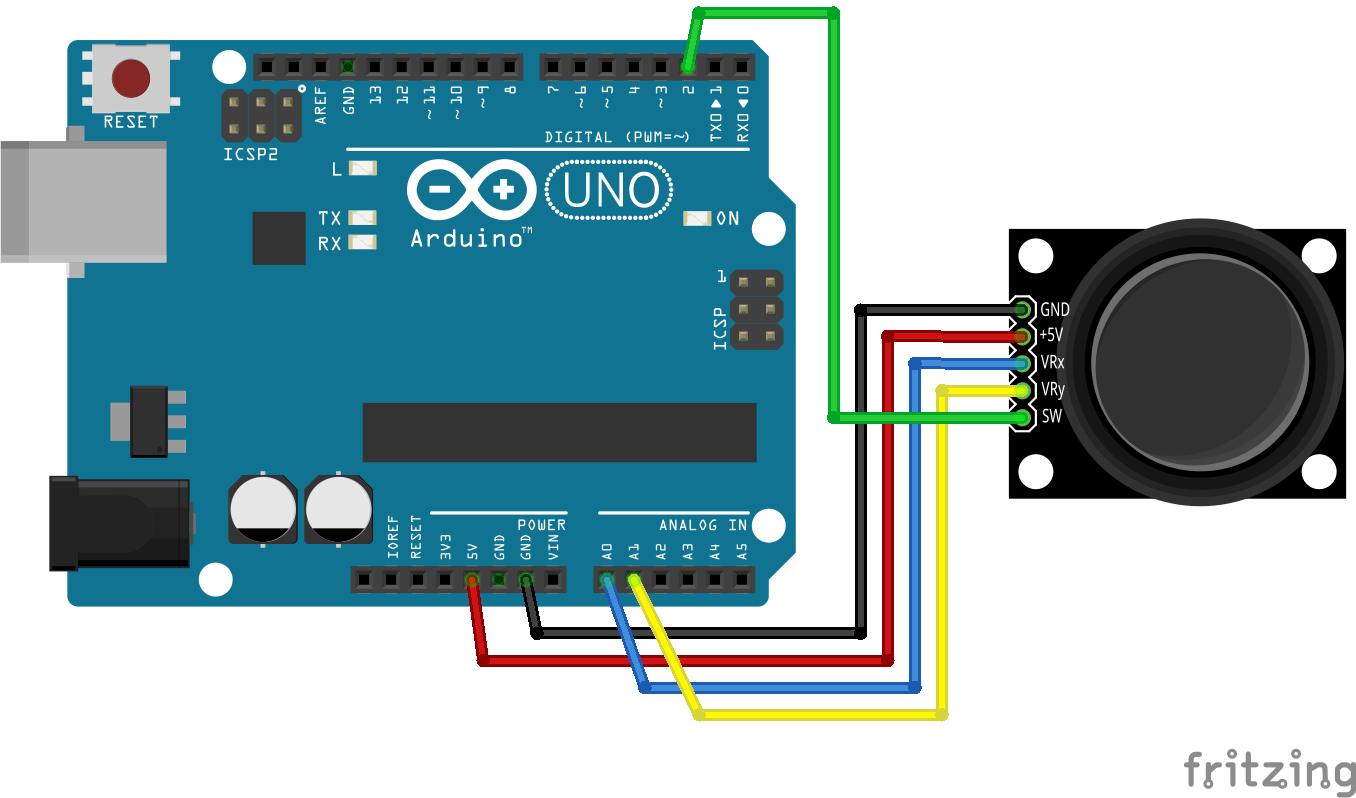
The Arduino Uno or any other Arduino board that uses Atmega328 as the Microcontroller has ADC resolution of 10 bits. Hence the values on each analog channel can vary from 0 to 1023. Now connecting the VRx to A0 and VRy to A1 analog inputs respectively should show values as shown in the image below.

Joy diagram.jpeg

The home position for the stick is at ( x,y:511,511). If the stick is moved on X axis from one end to the other, the X values will change from 0 to 1023 and similar thing happens when moved along the Y axis. On the same lines you can read position of the stick anywhere in upper half hemisphere from combination of these values.

Hookup

0 Joystick with Arduino bb.png

So let’s print the values on the terminal so that we can verify the working!

Raw Sketch

  1. #define joyX A0
  2. #define joyY A1
  3.  
  4. void setup() {
  5. Serial.begin(9600);
  6. }
  7.  
  8. void loop() {
  9. // put your main code here, to run repeatedly:
  10. xValue = analogRead(joyX);
  11. yValue = analogRead(joyY);
  12.  
  13. //print the values with to plot or view
  14. Serial.print(xValue);
  15. Serial.print(\t);
  16. Serial.println(yValue);
  17. }

Mapping

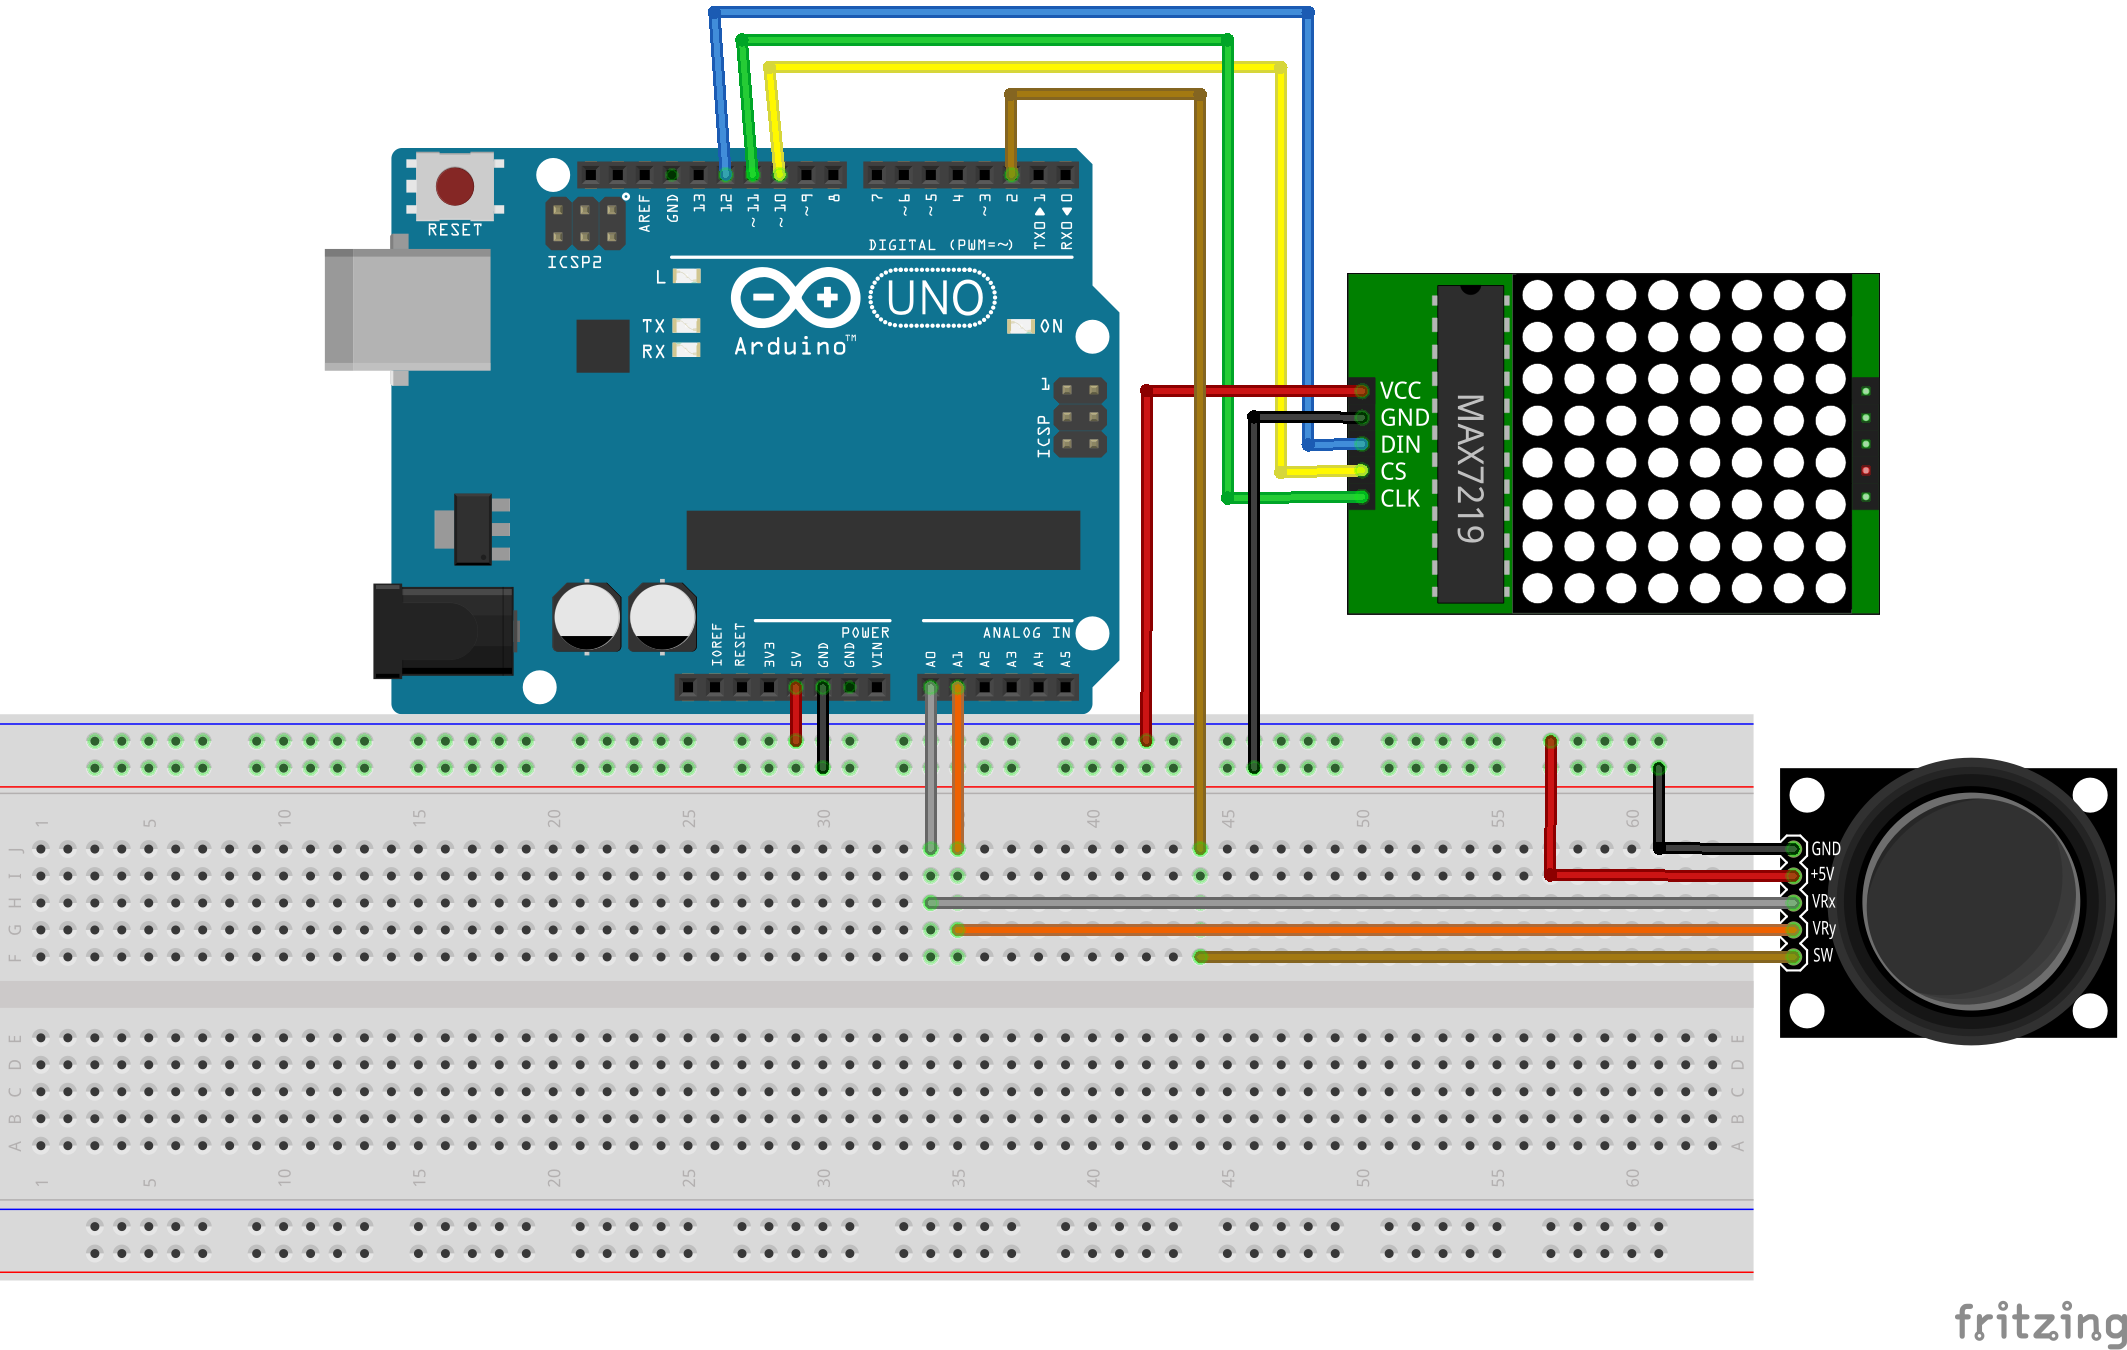
It is usually not enough to read the analog values, you might want to map it to a display or any other interface. So let’s map these these values to a 8×8 led matrix. So that we can move the pixel with the joystick. You can easily change this to map to a graphic or a OLED display.Matrx LED and Joystick with Arduino bb.png

  1. #include “LedControl.h”
  2. #define joyX A0
  3. #define joyY A1
  4.  
  5. int xMap, yMap, xValue, yValue;
  6. LedControl lc=LedControl(12,11,10,1);
  7.  
  8. void setup() {
  9. Serial.begin(115200);
  10.  
  11. lc.shutdown(0,false);
  12. /* Set the brightness to a medium values */
  13. lc.setIntensity(0,8);
  14. /* and clear the display */
  15. lc.clearDisplay(0);
  16. }
  17.  
  18. void loop() {
  19. // put your main code here, to run repeatedly:
  20. xValue = analogRead(joyX);
  21. yValue = analogRead(joyY);
  22. xMap = map(xValue, 0,1023, 0, 7);
  23. yMap = map(yValue,0,1023,7,0);
  24. lc.setLed(0,xMap,yMap,true);
  25. lc.clearDisplay(0);
  26.  
  27. }

So as you see in the code above, the map() function can be used to map the ranges as you wish. Also notice that the Y axis map is inverted! So much to learn with a simple interface! Do checkout the retro ping-pong game built with the same setup.


int VRx = A0;
int VRy = A1;
int SW = 2;

int xPosition = 0;
int yPosition = 0;
int SW_state = 0;
int mapX = 0;
int mapY = 0;

void setup() {
  Serial.begin(9600); 
  
  pinMode(VRx, INPUT);
  pinMode(VRy, INPUT);
  pinMode(SW, INPUT_PULLUP); 
  
}

void loop() {
  xPosition = analogRead(VRx);
  yPosition = analogRead(VRy);
  SW_state = digitalRead(SW);
  mapX = map(xPosition, 0, 1023, -512, 512);
  mapY = map(yPosition, 0, 1023, -512, 512);
  
  Serial.print("X: ");
  Serial.print(mapX);
  Serial.print(" | Y: ");
  Serial.print(mapY);
  Serial.print(" | Button: ");
  Serial.println(SW_state);

  delay(100);
  
}

Mac 安裝Secp256k1 no secp256k1 in java.library.path

報錯

#報錯提示
no secp256k1 in java.library.path

解決方案

  1. 使用 brew 安裝構建依賴項
    brew install autoconf automake libtool berkeley-db4 pkg-config openssl boost boost-build libevent
  2. 下載secp256k1
    #隨便找個地方clone就行
    git clone git@github.com:bitcoin-core/secp256k1.git
  3. 構建secp256k1
    #以下步驟都在clone的secp256k1 中進行
    1. sh autogen.sh 
    #這一步與github 中的不同,github 的還是會出錯,視情況輸入命令吧
    2. ./configure --enable-module-recovery --enable-jni --enable-module-ecdh --enable-experimental
    3. make 
    4. make check 
    5. sudo make install
    6.

參考資料

Spring Boot Admin的介绍及使用

Spring Boot 有一个非常好用的监控和管理的源软件,这个软件就是 Spring Boot Admin。该软件能够将 Actuator 中的信息进行界面化的展示,也可以监控所有 Spring Boot 应用的健康状况,提供实时警报功能。

主要的功能点有:

  • 显示应用程序的监控状态
  • 应用程序上下线监控
  • 查看 JVM,线程信息
  • 可视化的查看日志以及下载日志文件
  • 动态切换日志级别
  • Http 请求信息跟踪
  • 其他功能点……

可点击 https://github.com/codecentric/spring-boot-admin 更多了解 Spring-boot-admin。

创建Spring Boot Admin项目

创建一个 Spring Boot 项目,用于展示各个服务中的监控信息,加上 Spring Boot Admin 的依赖,具体代码如下所示。

<dependency>
<groupId>org.springframework.boot</groupId>
<artifactId>spring-boot-starter-web</artifactId>
</dependency>
<dependency>
<groupId>de.codecentric</groupId>
<artifactId>spring-boot-admin-starter-server</artifactId>
<version>2.0.2</version>
</dependency>

创建一个启动类,具体代码如下所示。

  1. @EnableAdminServer
  2. @SpringBootApplication
  3. public class App {
  4. public static void main(String[] args) {
  5. SpringApplication.run(App.class, args);
  6. }
  7. }

在属性文件中增加端口配置信息:

server.port=9091

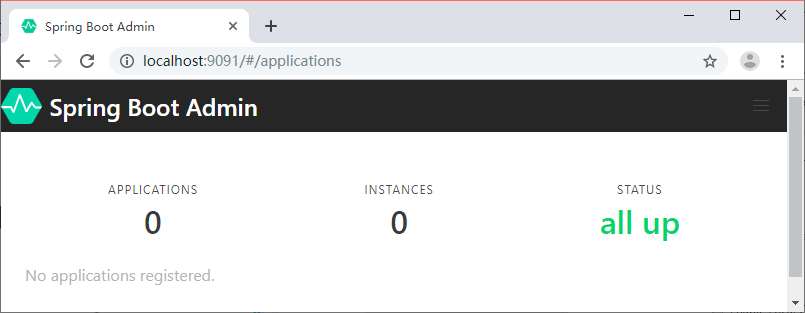
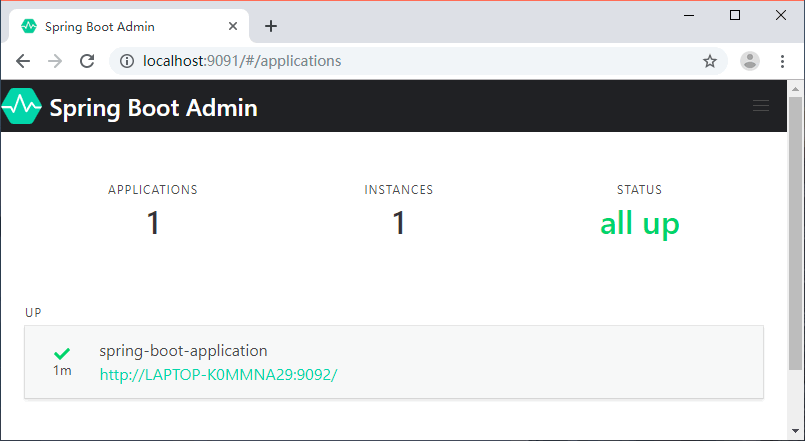
启动程序,访问 Web 地址 http://localhost:9091 就可以看到主页面了,这个时候是没有数据的,如图 1 所示。

Spring Boot Admin主页
图 1  Spring Boot Admin主页

将服务注册到 Spring Boot Admin

创建一个 Spring Boot 项目,名称为 spring-boot-admin-client。添加 Spring Boot Admin Client 的 Maven 依赖,代码如下所示。

<dependency>
<groupId>de.codecentric</groupId>
<artifactId>spring-boot-admin-starter-client</artifactId>
<version>2.0.2</version>
</dependency>

然后在属性文件中添加下面的配置:

server.port=9092
spring.boot.admin.client.url=http://localhost:9091

spring.boot.admin.client.url:Spring Boot Admin 服务端地址。

将服务注册到 Admin 之后我们就可以在 Admin 的 Web 页面中看到我们注册的服务信息了,如图 2 所示。

Spring Boot Admin主页(有数据)
图 2  Spring Boot Admin主页(有数据)

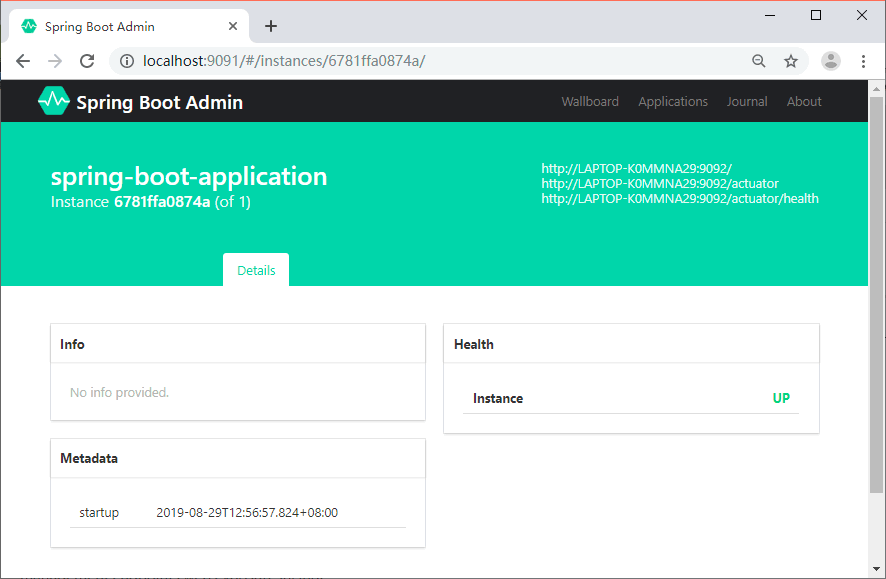
点击实例信息跳转到详细页面,可以查看更多的信息,如图 3 所示。

Spring Boot Admin详情
图 3  Spring Boot Admin详情

可以看到详情页面并没有展示丰富的监控数据,这是因为没有将 spring-boot-admin-client 的端点数据暴露出来。

在 spring-boot-admin-client 中加入 actuator 的 Maven 依赖,代码如下所示。

<dependency>
<groupId>org.springframework.boot</groupId>
<artifactId>spring-boot-starter-actuator</artifactId>
</dependency>

然后在属性文件中追加下面的配置:

management.endpoints.web.exposure.include=*

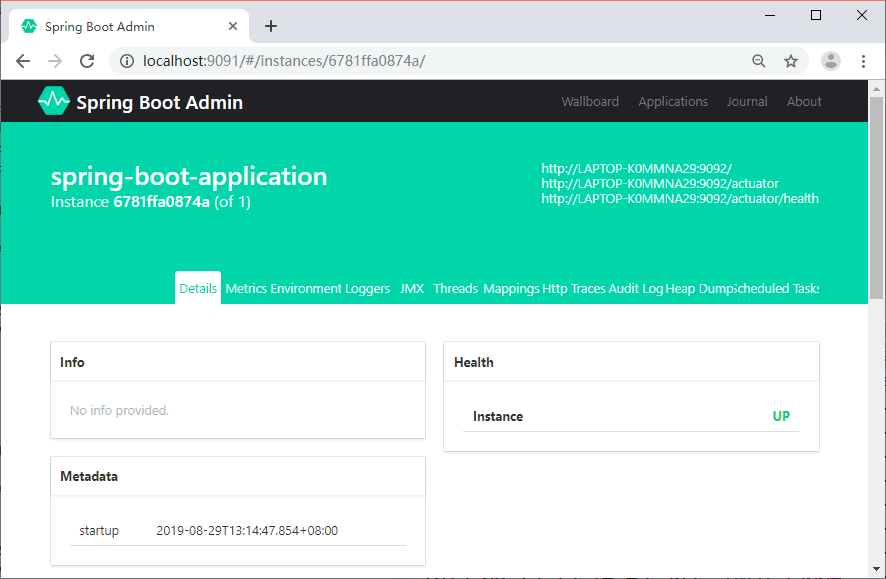
management.endpoints.web.exposure.include:暴露所有的 actuator 端点信息重启 spring-boot-admin-client,我们就可以在详情页面看到更多的数据,如图 4 所示。

Spring Boot Admin详情(有数据)
图 4  Spring Boot Admin详情(有数据)

监控内容介绍

自定义的 Info 信息、健康状态、元数据,如图 5 所示。

Spring Boot Admin数据展示(一)
图 5  Spring Boot Admin数据展示(一)

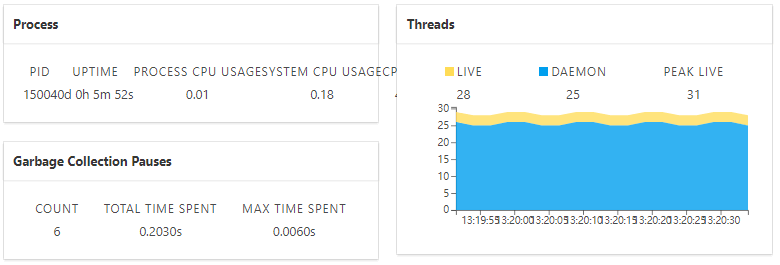
CPU、线程等信息如图 6 所示。

Spring Boot Admin数据展示(二)
图 6  Spring Boot Admin数据展示(二)

内存使用情况如图 7 所示。

Spring Boot Admin数据展示(三)
图 7  Spring Boot Admin数据展示(三)

配置信息如图 8 所示。

Spring Boot Admin数据展示(四)
图 8  Spring Boot Admin数据展示(四)

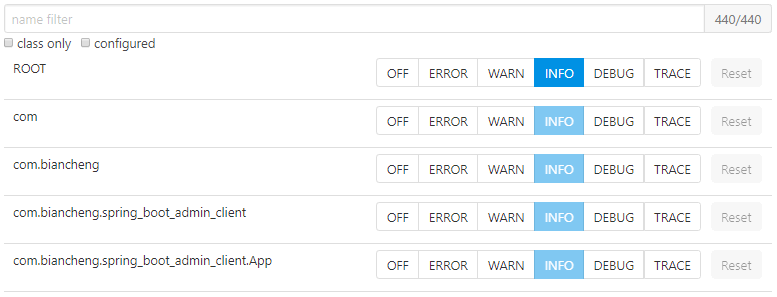
日志级别调整如图 9 所示。

Spring Boot Admin数据展示(五)
图 9  Spring Boot Admin数据展示(五)

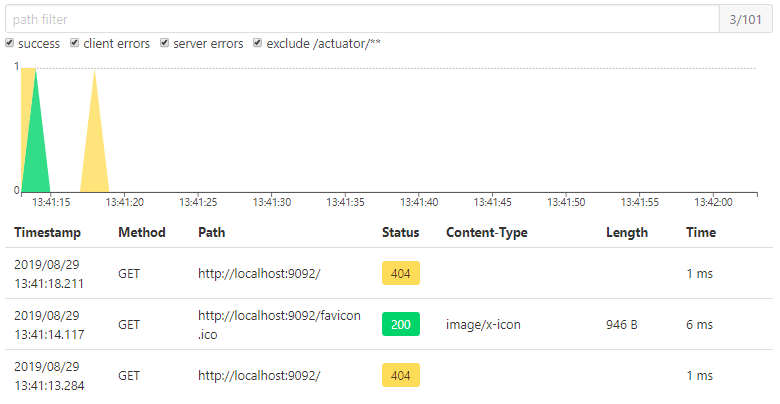
Http请求信息如图 10 所示。

Spring Boot Admin数据展示(六)
图 10  Spring Boot Admin数据展示(六)

如何在Admin中查看各个服务的日志

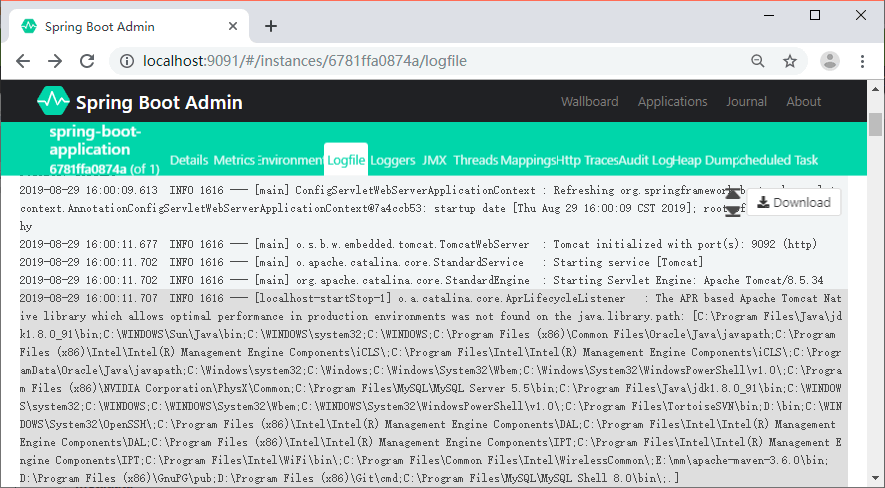
Spring Boot Admin 提供了基于 Web 页面的方式实时查看服务输出的本地日志,前提是服务中配置了 logging.file。

我们在 spring-boot-admin-client 的属性文件中增加下面的内容:

logging.file=/Users/zhangsan/Downloads/spring-boot-admin-client.log

重启服务,就可以在 Admin Server 的 Web 页面中看到新加了一个 Logfile 菜单,如图 11 所示。

Spring Boot Admin日志
图 11  Spring Boot Admin 日志

IDEA 2019.02.07注册码

N757JE0KCT-eyJsaWNlbnNlSWQiOiJONzU3SkUwS0NUIiwibGljZW5zZWVOYW1lIjoid3UgYW5qdW4iLCJhc3NpZ25lZU5hbWUiOiIiLCJhc3NpZ25lZUVtYWlsIjoiIiwibGljZW5zZVJlc3RyaWN0aW9uIjoiRm9yIGVkdWNhdGlvbmFsIHVzZSBvbmx5IiwiY2hlY2tDb25jdXJyZW50VXNlIjpmYWxzZSwicHJvZHVjdHMiOlt7ImNvZGUiOiJJSSIsInBhaWRVcFRvIjoiMjAyMC0wMS0wNyJ9LHsiY29kZSI6IkFDIiwicGFpZFVwVG8iOiIyMDIwLTAxLTA3In0seyJjb2RlIjoiRFBOIiwicGFpZFVwVG8iOiIyMDIwLTAxLTA3In0seyJjb2RlIjoiUFMiLCJwYWlkVXBUbyI6IjIwMjAtMDEtMDcifSx7ImNvZGUiOiJHTyIsInBhaWRVcFRvIjoiMjAyMC0wMS0wNyJ9LHsiY29kZSI6IkRNIiwicGFpZFVwVG8iOiIyMDIwLTAxLTA3In0seyJjb2RlIjoiQ0wiLCJwYWlkVXBUbyI6IjIwMjAtMDEtMDcifSx7ImNvZGUiOiJSUzAiLCJwYWlkVXBUbyI6IjIwMjAtMDEtMDcifSx7ImNvZGUiOiJSQyIsInBhaWRVcFRvIjoiMjAyMC0wMS0wNyJ9LHsiY29kZSI6IlJEIiwicGFpZFVwVG8iOiIyMDIwLTAxLTA3In0seyJjb2RlIjoiUEMiLCJwYWlkVXBUbyI6IjIwMjAtMDEtMDcifSx7ImNvZGUiOiJSTSIsInBhaWRVcFRvIjoiMjAyMC0wMS0wNyJ9LHsiY29kZSI6IldTIiwicGFpZFVwVG8iOiIyMDIwLTAxLTA3In0seyJjb2RlIjoiREIiLCJwYWlkVXBUbyI6IjIwMjAtMDEtMDcifSx7ImNvZGUiOiJEQyIsInBhaWRVcFRvIjoiMjAyMC0wMS0wNyJ9LHsiY29kZSI6IlJTVSIsInBhaWRVcFRvIjoiMjAyMC0wMS0wNyJ9XSwiaGFzaCI6IjExNTE5OTc4LzAiLCJncmFjZVBlcmlvZERheXMiOjAsImF1dG9Qcm9sb25nYXRlZCI6ZmFsc2UsImlzQXV0b1Byb2xvbmdhdGVkIjpmYWxzZX0=-AE3x5sRpDellY4SmQVy2Pfc2IT7y1JjZFmDA5JtOv4K5gwVdJOLw5YGiOskZTuGu6JhOi50nnd0WaaNZIuVVVx3T5MlXrAuO3kb2qPtLtQ6/n3lp4fIv+6384D4ciEyRWijG7NA9exQx39Tjk7/xqaGk7ooKgq5yquIfIA+r4jlbW8j9gas1qy3uTGUuZQiPB4lv3P5OIpZzIoWXnFwWhy7s//mjOWRZdf/Du3RP518tMk74wizbTeDn84qxbM+giNAn+ovKQRMYHtLyxntBiP5ByzfAA9Baa5TUGW5wDiZrxFuvBAWTbLrRI0Kd7Nb/tB9n1V9uluB2WWIm7iMxDg==-MIIElTCCAn2gAwIBAgIBCTANBgkqhkiG9w0BAQsFADAYMRYwFAYDVQQDDA1KZXRQcm9maWxlIENBMB4XDTE4MTEwMTEyMjk0NloXDTIwMTEwMjEyMjk0NlowaDELMAkGA1UEBhMCQ1oxDjAMBgNVBAgMBU51c2xlMQ8wDQYDVQQHDAZQcmFndWUxGTAXBgNVBAoMEEpldEJyYWlucyBzLnIuby4xHTAbBgNVBAMMFHByb2QzeS1mcm9tLTIwMTgxMTAxMIIBIjANBgkqhkiG9w0BAQEFAAOCAQ8AMIIBCgKCAQEAxcQkq+zdxlR2mmRYBPzGbUNdMN6OaXiXzxIWtMEkrJMO/5oUfQJbLLuMSMK0QHFmaI37WShyxZcfRCidwXjot4zmNBKnlyHodDij/78TmVqFl8nOeD5+07B8VEaIu7c3E1N+e1doC6wht4I4+IEmtsPAdoaj5WCQVQbrI8KeT8M9VcBIWX7fD0fhexfg3ZRt0xqwMcXGNp3DdJHiO0rCdU+Itv7EmtnSVq9jBG1usMSFvMowR25mju2JcPFp1+I4ZI+FqgR8gyG8oiNDyNEoAbsR3lOpI7grUYSvkB/xVy/VoklPCK2h0f0GJxFjnye8NT1PAywoyl7RmiAVRE/EKwIDAQABo4GZMIGWMAkGA1UdEwQCMAAwHQYDVR0OBBYEFGEpG9oZGcfLMGNBkY7SgHiMGgTcMEgGA1UdIwRBMD+AFKOetkhnQhI2Qb1t4Lm0oFKLl/GzoRykGjAYMRYwFAYDVQQDDA1KZXRQcm9maWxlIENBggkA0myxg7KDeeEwEwYDVR0lBAwwCgYIKwYBBQUHAwEwCwYDVR0PBAQDAgWgMA0GCSqGSIb3DQEBCwUAA4ICAQAF8uc+YJOHHwOFcPzmbjcxNDuGoOUIP+2h1R75Lecswb7ru2LWWSUMtXVKQzChLNPn/72W0k+oI056tgiwuG7M49LXp4zQVlQnFmWU1wwGvVhq5R63Rpjx1zjGUhcXgayu7+9zMUW596Lbomsg8qVve6euqsrFicYkIIuUu4zYPndJwfe0YkS5nY72SHnNdbPhEnN8wcB2Kz+OIG0lih3yz5EqFhld03bGp222ZQCIghCTVL6QBNadGsiN/lWLl4JdR3lJkZzlpFdiHijoVRdWeSWqM4y0t23c92HXKrgppoSV18XMxrWVdoSM3nuMHwxGhFyde05OdDtLpCv+jlWf5REAHHA201pAU6bJSZINyHDUTB+Beo28rRXSwSh3OUIvYwKNVeoBY+KwOJ7WnuTCUq1meE6GkKc4D/cXmgpOyW/1SmBz3XjVIi/zprZ0zf3qH5mkphtg6ksjKgKjmx1cXfZAAX6wcDBNaCL+Ortep1Dh8xDUbqbBVNBL4jbiL3i3xsfNiyJgaZ5sX7i8tmStEpLbPwvHcByuf59qJhV/bZOl8KqJBETCDJcY6O2aqhTUy+9x93ThKs1GKrRPePrWPluud7ttlgtRveit/pcBrnQcXOl1rHq7ByB8CFAxNotRUYL9IF5n3wJOgkPojMy6jetQA5Ogc8Sm7RG6vg1yow==

使用NIO进行快速的文件拷贝

  1. public static void fileCopy( File in, File out )
  2.             throws IOException
  3.     {
  4.         FileChannel inChannel = new FileInputStream( in ).getChannel();
  5.         FileChannel outChannel = new FileOutputStream( out ).getChannel();
  6.         try
  7.         {
  8. //          inChannel.transferTo(0, inChannel.size(), outChannel);      // original — apparently has trouble copying large files on Windows  
  9.             // magic number for Windows, 64Mb – 32Kb)  
  10.             int maxCount = (64 * 1024 * 1024) – (32 * 1024);
  11.             long size = inChannel.size();
  12.             long position = 0;
  13.             while ( position < size )
  14.             {
  15.                position += inChannel.transferTo( position, maxCount, outChannel );
  16.             }
  17.         }
  18.         finally
  19.         {
  20.             if ( inChannel != null )
  21.             {
  22.                inChannel.close();
  23.             }
  24.             if ( outChannel != null )
  25.             {
  26.                 outChannel.close();
  27.             }
  28.         }
  29.     }