Signing and Verifying JAR Files


Signing and Verifying JAR Files

You can optionally sign a JAR file with your electronic “signature.” Users who verify your signature can grant your JAR-bundled software security privileges that it wouldn’t ordinarily have. Conversely, you can verify the signatures of signed JAR files that you want to use.

This lesson shows you how to use the tools provided in the JavaTM Development Kit to sign and verify JAR files:


Understanding Signing and Verification


If you’re not familiar with the concepts of signing and verification, this section will help to bring you up to speed. It contains definitions of the relevant terms, explanations of some of the benefits provided by signing, and an outline of the signing mechanism used by the Java platform as it relates to JAR files.

Signing JAR Files


In this section, you’ll learn how to use the JDKTM tools to digitally sign your JAR files.

Verifying Signed JAR Files


This section shows you how to use the JDK tool set to verify signed JAR files.

Verifying Signed JAR Files

Verifying Signed JAR Files

Typically, verification of signed JAR files will be the responsibility of your JavaTM Runtime Environment. Your browser will verify signed applets that it downloads. Signed applications invoked with the -jar option of the interpreter will be verified by the runtime environment.

However, you can verify signed JAR files yourself by using the Jarsigner tool. You might want to do this, for example, to test a signed JAR file that you’ve prepared.


The basic command to use for verifying a signed JAR file is:


jarsigner -verify jar-file

This command will verify the JAR file’s signature and ensure that the files in the archive haven’t changed since it was signed. You’ll see the following message if the verification is successful:


jar verified.

If you try to verify an unsigned JAR file, the following message results:


jar is unsigned. (signatures missing or not parsable)

If the verification fails, an appropriate message is displayed. For example, if the contents of a JAR file have changed since the JAR file was signed, a message similar to the following will result if you try to verify the file:


jarsigner: java.lang.SecurityException: invalid SHA1
signature file digest for test/classes/Manifest.class

Signing JAR Files


Signing JAR Files

You use the JAR Signing and Verification Tool to sign JAR files. You invoke the JAR Signing and Verification Tool by using the jarsigner command, so we’ll refer to it as “Jarsigner” for short.

To sign a JAR file, you must first have a private key. Private keys and their associated public-key certificates are stored in password-protected databases called keystores. A keystore can hold the keys of many potential signers. Each key in the keystore can be identified by an alias which is typically the name of the signer who owns the key. The key belonging to Rita Jones might have the alias “rita”, for example.


The basic form of the command for signing a JAR file is


jarsigner jar-file alias
In this command:

  • jar-file is the pathname of the JAR file that’s to be signed.

  • alias is the alias identifying the private key that’s to be used to sign the JAR file, and the key’s associated certificate.

The Jarsigner tool will prompt you for the passwords for the keystore and alias.


This basic form of the command assumes that the keystore to be used is in a file named .keystore in your home directory. It will create signature and signature block files with names x.SF and x.DSA respectively, where x is the first eight letters of the alias, all converted to upper case. This basic command will overwrite the original JAR file with the signed JAR file.


In practice, you may want to use this command in conjunction with one or more of these options, which must precede the jar-file pathname:


Jarsigner Command Options
Option Description
-keystore url Specifies a keystore to be used if you don’t want to use the .keystore default database.
-storepass password Allows you to enter the keystore’s password on the command line rather than be prompted for it.
-keypass password Allows you to enter your alias’s password on the command line rather than be prompted for it.
-sigfile file Specifies the base name for the .SF and .DSA files if you don’t want the base name to be taken from your alias. file must be composed only of upper case letters (A-Z), numerals (0-9), hyphen (-), and underscore (_).
-signedjar file Specifies the name of the signed JAR file to be generated if you don’t want the original unsigned file to be overwritten with the signed file.


Example


Let’s look at a couple of examples of signing a JAR file with the Jarsigner tool. In these examples we will assume:

  • your alias is “johndoe”.

  • the keystore you want to use is in a file named “mykeys” in the current working directory.

  • the keystore’s password is “abc123”.

  • the password for your alias is “mypass”.
Under these assumptions, you could use this command to sign a JAR file named app.jar:
jarsigner -keystore mykeys -storepass abc123
-keypass mypass app.jar johndoe

Because this command doesn’t make use of the -sigfile option, the .SF and .DSA files it creates would be named JOHNDOE.SF and JOHNDOE.DSA. Because the command doesn’t use the -signedjar option, the resulting signed file will overwrite the original version of app.jar.


Let’s look at what would happen if you used a different combination of options:


jarsigner -keystore mykeys -sigfile SIG
-signedjar SignedApp.jar app.jar johndoe

This time, you would be prompted to enter the passwords for both the keystore and your alias because the passwords aren’t specified on the command line. The signature and signature block files would be named SIG.SF and SIG.DSA, respectively, and the signed JAR file SignedApp.jar would be placed in the current directory. The original unsigned JAR file would remain unchanged.

Understanding Signing and Verification

Understanding Signing and Verification

The JavaTM platform enables you to digitally sign JAR files. You digitally sign a file for the same reason you might sign a paper document with pen and ink — to let readers know that you wrote the document, or at least that the document has your approval.

When you sign a letter, for example, everyone who recognizes your signature can confirm that you wrote the letter. Similarly when you digitally sign a file, anyone who “recognizes” your digital signature knows that the file came from you. The process of “recognizing” electronic signatures is called verification.


The ability to sign and verify files is an important part of the Java platform’s security architecture. Security is controlled by the security policy that’s in force at runtime. You can configure the policy to grant security privileges to applets and to applications. For example, you could grant permission to an applet to perform normally forbidden operations such as reading and writing local files or running local executable programs. If you have downloaded some code that’s signed by a trusted entity, you can use that fact as a criterion in deciding which security permissions to assign to the code.


Once you (or your browser) have verified that an applet is from a trusted source, you can have the platform relax security restrictions to let the applet perform operations that would ordinarily be forbidden. A trusted applet can have freedoms as specified by the policy file in force.


The Java platform enables signing and verification by using special numbers called public and private keys. Public keys and private keys come in pairs, and they play complementary roles.


The private key is the electronic “pen” with which you can sign a file. As its name implies, your private key is known only to you so that no one else can “forge” your signature. A file signed with your private key can be verified only by the corresponding public key.


Public and private keys alone, however, aren’t enough to truly verify a signature. Even if you’ve verified that a signed file contains a matching key pair, you still need some way to confirm that the public key actually comes from the signer that it purports to come from.


One more element, therefore, is required to make signing and verification work. That additional element is the certificate that the signer includes in a signed JAR file. A certificate is a digitally signed statement from a recognized certification authority that indicates who owns a particular public key. A certification authority are entities (typically firms specializing in digital security) that are trusted throughout the industry to sign and issue certificates for keys and their owners. In the case of signed JAR files, the certificate indicates who owns the public key contained in the JAR file.


When you sign a JAR file your public key is placed inside the archive along with an associated certificate so that it’s easily available for use by anyone wanting to verify your signature.


To summarize digital signing:


  • The signer signs the JAR file using a private key.

  • The corresponding public key is placed in the JAR file, together with its certificate, so that it is available for use by anyone who wants to verify the signature.

Digests and the Signature File


When you sign a JAR file, each file in the archive is given a digest entry in the archive’s manifest. Here’s an example of what such an entry might look like:
Name: test/classes/ClassOne.class
SHA1-Digest: TD1GZt8G11dXY2p4olSZPc5Rj64=
The digest values are hashes or encoded representations of the contents of the files as they were at the time of signing. A file’s digest will change if and only if the file itself changes.

When a JAR file is signed, a signature file is automatically generated and placed in the JAR file’s META-INF directory, the same directory that contains the archive’s manifest. Signature files have filenames with an .SF extension. Here is an example of the contents of a signature file:


Signature-Version: 1.0
SHA1-Digest-Manifest: h1yS+K9T7DyHtZrtI+LxvgqaMYM=
Created-By: 1.6.0 (Sun Microsystems Inc.)

Name: test/classes/ClassOne.class
SHA1-Digest: fcav7ShIG6i86xPepmitOVo4vWY=

Name: test/classes/ClassTwo.class
SHA1-Digest: xrQem9snnPhLySDiZyclMlsFdtM=

Name: test/images/ImageOne.gif
SHA1-Digest: kdHbE7kL9ZHLgK7akHttYV4XIa0=

Name: test/images/ImageTwo.gif
SHA1-Digest: mF0D5zpk68R4oaxEqoS9Q7nhm60=


As you can see, the signature file contains digest entries for the archive’s files that look similar to the digest-value entries in the manifest. However, while the digest values in the manifest are computed from the files themselves, the digest values in the signature file are computed from the corresponding entries in the manifest. Signature files also contain a digest value for the entire manifest (see the SHA1-Digest-Manifest header in the above example).


When a signed JAR file is being verified, the digests of each of its files are re-computed and compared with the digests recorded in the manifest to ensure that the contents of the JAR file haven’t changed since it was signed. As an additional check, digest values for the manifest file itself are re-computed and compared against the values recorded in the signature file.


You can read additional information about signature files on the Manifest Format page of the JDKTM documentation.


The Signature Block File


In addition to the signature file, a signature block file is automatically placed in the META-INF directory when a JAR file is signed. Unlike the manifest file or the signature file, signature block files are not human-readable.

The signature block file contains two elements essential for verification:


  • The digital signature for the JAR file that was generated with the signer’s private key

  • The certificate containing the signer’s public key, to be used by anyone wanting to verify the signed JAR file

Signature block filenames typically will have a .DSA extension indicating that they were created by the default Digital Signature Algorithm. Other filename extensions are possible if keys associated with some other standard algorithm are used for signing.


Setting Package Version Information

Setting Package Version Information

You may need to include package version information in a JAR file’s manifest. You provide this information with the following headers in the manifest:


Headers in a manifest
Header Definition
Name The name of the specification.
Specification-Title The title of the specification.
Specification-Version The version of the specification.
Specification-Vendor The vendor of the specification.
Implementation-Title The title of the implementation.
Implementation-Version The build number of the implementation.
Implementation-Vendor The vendor of the implementation.


One set of such headers can be assigned to each package. The versioning headers should appear directly beneath the Name header for the package. This example shows all the versioning headers:


Name: java/util/
Specification-Title: Java Utility Classes
Specification-Version: 1.2
Specification-Vendor: Sun Microsystems, Inc.
Implementation-Title: java.util
Implementation-Version: build57
Implementation-Vendor: Sun Microsystems, Inc.


For more information about package version headers, see the Package Versioning specification .


An Example


We want to include the headers in the example above in the manifest of MyJar.jar.

We first create a text file named Manifest.txt with the following contents:


Name: java/util/
Specification-Title: Java Utility Classes
Specification-Version: 1.2
Specification-Vendor: Sun Microsystems, Inc.
Implementation-Title: java.util
Implementation-Version: build57
Implementation-Vendor: Sun Microsystems, Inc.


Warning : The text file must end with a new line or carriage return. The last line will not be parsed properly if it does not end with a new line or carriage return.


We then create a JAR file named MyJar.jar by entering the following command:
jar cmf MyJar.jar Manifest.txt MyPackage/*.class
This creates the JAR file with a manifest with the following contents:
Manifest-Version: 1.0
Created-By: 1.6.0 (Sun Microsystems Inc.)
Name: java/util/
Specification-Title: Java Utility Classes
Specification-Version: 1.2
Specification-Vendor: Sun Microsystems, Inc.
Implementation-Title: java.util
Implementation-Version: build57
Implementation-Vendor: Sun Microsystems, Inc.

Distributing your Application as an executable JAR file

Distributing your Application as an executable JAR file


A JAR (Java ARchive) is a way of packaging together all of the resources associated with a program (class files, images, sounds, etc.). Putting your program in a JAR allows it to be distributed as a single executable file, saving space and simplifying the download process. The information in this tutorial applies to Java version 1.2 or higher. For more information about JAR files, follow Sun’s tutorial. To learn about signing the JAR and Java Web Start.


A simple example. Let’s say we wanted to distribute the simple program Hello.java as a JAR. First, we create a text file named Hello.mf which contains:


Manifest-Version: 1.0
Main-Class: Hello
Then, we create the archive by typing:
jar cmf Hello.mf Hello.jar Hello.class Hello.java
and run it by typing:
java -jar Hello.jar
The file Hello.jar can now be downloaded and executed.


Creating an executable JAR file. Here is the general procedure for creating an executable JAR:


  1. Compile your java code, generating all of the program’s class files.


  2. Create a manifest file containing the following 2 lines:
    Manifest-Version: 1.0
    Main-Class: name of class containing main
    The name of the file should end with the .mf suffix. It is important that the file ends with a blank line.


  3. To create the JAR, type the following command:
    jar cmf manifest-file jar-file input-files
    The input-files must include any class files, images, sounds, etc. that your program uses. Optionally, you can include the program’s .java files in the JAR. See below for adding directories ot the JAR.


  4. To view the contents of the JAR, type:
    jar tf jar-file


  5. Execute the application from the command line by typing:
    java -jar jar-file
    If the application is GUI-based, you can also launch it by double-clicking the JAR file.

Accessing resources in a JAR. In general, the first step in accessing a JAR resource involves creating a URL. This might require modifying your program. For example, you can no longer use the following code fragment to read in an image that is stored in a file as follows


Image image = Toolkit.getDefaultToolkit().getImage(filename);
Instead, create the URL object using
URL url = getClass.getResource(filename);
Image image = Toolkit.getDefaultToolkit().getImage(url);
Or, if the code is in a static method of class X, then create the URL with
URL url = X.class.getResource(filename); 
Now, the resource can be accessed the same way, regardless of whether it is in a JAR or the current directory. See the method play(filename) in StdDraw.java for an example involving audio clips, and and the constructor In(String s) in In.java for an example involving text files.

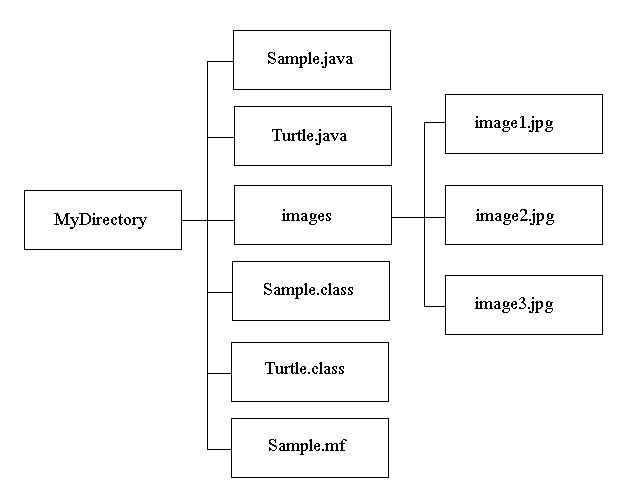
JAR Subdirectories. The JAR format also support storing files in a directory structure. Consider a program Sample.java, which uses the Turtle Graphics interface to display a collection of pictures stored in a subdirectory called images. Our working directory looks like:


The Manifest should read:


Manifest-Version: 1.0
Main-Class: Sample

To create the JAR, type:


jar cmf Sample.mf Sample.jar Sample.class Turtle.class Sample.java Turtle.java images

The contents listing appears as:


META-INF/
META-INF/MANIFEST.MF
Sample.class
Turtle.class
Sample.java
Turtle.java
images/
images/image1.gif
images/image2.gif
images/image3.gif

Notice that the directory structure is still preserved (the META-INF directory is created to hold the manifest and other general information about the JAR).


yWorks Ant Explorer Eclipse Plugin

Eclipse Integration


yWorks Ant Explorer is available as a plugin for the popular Java IDE Eclipse. It supports both the visualization and execution of Ant build scripts.


Installation


You can install the plugin by using Eclipse’s integrated Update Manager, which is available via the menu items “Help” – “Software Updates” – “Find and Install.”
A “New Remote Site” with URL “http://www.yworks.com/eclipse/update” has to be created.


Update Manager Update Manager Update Manager Update Manager


Alternatively, the Jar archive containing the Eclipse plugin can be directly downloaded and extracted into the respective directory (normally, %ECLIPSE_HOME% or ${user.home}/.eclipse).


Usage


The views of yWorks Ant Explorer are opened whenever the visualization of an Ant build script is started via its menu item from the “Package Explorer.”


Furthermore, the views are automatically updated whenever they are visible and an Ant build script is opened inside the editor view.


The visualization view comprises two parts; one view holds the graph that displays dependencies between targets, whilst the other view displays the properties. Edges between properties denote that they are being used in other properties.


Further information for each view can be found in our documentation.


Restrictions


  • Build processes are executed inside the same JVM that runs Eclipse.
    This can lead to side effects, for example regarding the class path or open file handles, etc.
    For problematic build scripts, we recommend that you use the yWorks Ant Explorer stand-alone version instead.

  • “Unesthetic” Icons
    Unfortunately, Eclipse Version 3.0.1 cannot render transparent PNGs in the menu bar. Lower-quality GIFs are used to replace them.

Generating Code Automatically Using Custom code Template In Eclipse

One of the good features of Eclipse is its auto fill property. This can be further enhanced using its code template feature. Creation of code templates is necessary to improve development productivity. Templates add consistency and uniformity to your code. Eclipse has so many ready-to-use templates. And you can create your own code templates according to your requirements. To use these templates just type the starting characters of the template and then press “CTRL+SPACE”. For example in Ecipse IDE type “tr” and then press “CTRL+SPACE”, It will add “try-catch” block to the code.


This article will guide you to create your own code template. Let us take an example to generate a “if-else” template with one “else if” condition.


  1. Go to the Templates ( Window –> Preference –> java–> Editor –> Templates) .

  2. Click “New”. A window similiar to below appears.

  3. 1.JPG


  4. Fill the details as shown above.

  5. Click “OK”.

  6. Now you can use your custom template in the program like any other template by pressing “CTRL+SPACE” as shown in the below given screenshots.

2.JPG


3.JPG


Generating Undeclared Methods

Eclipse has many features that make the job of a programmer easy. Here a simple project is created and will use few of those features to demonstrate how easy programming can be using Eclipse. Most of the new programmers, ignore these and prefer to code everything themselves which is time consuming.


  1. First creating a package: really simple. Right click the project name and click “ New ” – > “ Package” . Name it as “car” .


  2. Creating a class in it named “ Car ” and defined 2 private attributes namely “ doors ” , “ seats ” . Now generate getters/setters for that. Eclipse can generate those for us. In the Source menu, click “ Generate getters and setters ” .


  3. Now make another class in the same package named “ Honda ”. Create a “ main ” method in this class. Eclipse will generate “ main ” method once you check the “ generate main method ” checkbox while creating the class.

  4. Also to make Car class to be the superclass for “ Honda ” class. Click “ Browse ” button against superclass field of the class declaration window. As “ Car ” class is under package “ cars ”, parent class for Honda will be “ cars.Car ”.


Eclipse will generate the following code:


package cars;public class Honda extends Car {
 
/**
 
* @param args
 
*/

 
public static void main(String[] args) {
 
// TODO Auto-generated method stub
 
}
 
}

In class Honda, following lines of code are added.


	Car car1 = new Honda(); car1.setSeats(4);
 
car1.setDoors(2);
 
System.out.println(car1.calcNum());

“ car1.calcNum() ” shows error as this method is not declared in the class Car. One way is to go back to class Car and declare the method. Simple way is to click the red cross on the left of the problem line and Eclipse will give you the options for automatically generating the required method in the required class. After generating the required method, Write code according to the requirement in the generated method.


Review the code:


package cars;public class Car {private int doors;private int seats;
 
public int getDoors() {
 
return doors;
 
}
 
public void setDoors(int doors) {
 
this.doors = doors;
 
}
 
public int getSeats() {
 
return seats;
 
}
 
public void setSeats(int seats) {
 
this.seats = seats;
 
}
 
public Object calcNum() {
 
return this.getDoors() * this.getSeats();
 
}
 
}
 
package cars;
 
public class Honda extends Car {
 
public static void main(String[] args) {
 
Car car1 = new Honda();
 
car1.setSeats(4);
 
car1.setDoors(2);
 
System.out.println(car1.calcNum());
 
}
 
}

Name Obfuscation Using yGuard


Name Obfuscation Using yGuard


yGuard is a Java byte code obfuscator that can be used for effective name obfuscation of Java byte code. It is bundled with every yFiles distribution (see the yGuard README file), and is also freely available.


Since yGuard fulfills the obfuscation requirements of the yFiles license terms, it is a perfectly suited tool to protect the yFiles part of any yFiles-based application. (Of course, it is also the perfect tool to protect the entire application.)


yGuard is available as an Apache Ant task for easy integration into any Ant-based build process. Example A.2, “Using the yGuard Ant task” shows an Ant build file’s target that obfuscates the yFiles part of an application.


Note


The example uses yGuard 2.0 syntax.


Example A.2. Using the yGuard Ant task


<!– Obfuscates the yFiles part of an application (i.e., y.jar) and adjusts –>
<!– the non-yFiles part given by the application’s Jar file accordingly. –>
<target name=”obfuscate” depends=”jar”>
  <!– yGuard Ant task. –>
  <taskdef name=”yguard”
           classname=”com.yworks.yguard.YGuardTask”
           classpath=”${yGuardJar}”/>
  <!– Integrated obfuscation and name adjustment… –>
  <yguard>
    <!– Obfuscate the yFiles Jar. –>
    <inoutpair in=”${yJar}” out=”${yJarObf}”/>
    <!– While obfuscating, adjust the names of yFiles features in the –>
    <!– application’s Jar file. –>
    <inoutpair in=”${myAppJar}” out=”${myAppJarObf}”/>
   
    <!– …using the yGuard ‘rename’ task. –>
    <rename logfile=”${obfuscationLog}” replaceClassNameStrings=”true”>
   
      <property name=”obfuscation-prefix” value=”myprefix”/>
      <keep>
        <class classes=”private” methods=”private” fields=”private”>
          <patternset>
            <include name=”com.mycompany.myApp.**”/>
          </patternset>
        </class>
      </keep>
     
      <!– Adjust all occurences of now obfuscated names in plain-text –>
      <!– files, too. –>
      <!– For example, the names of property resource bundle files for –>
      <!– yFiles classes must be adjusted to reflect the yFiles class’s –>
      <!– obfuscated name. –>
      <adjust replaceName=”true”>
        <include name=”y/**/*.properties”/>
      </adjust>
     
    </rename>
  </yguard>
</target>


For detailed explanations of yGuard’s Ant syntax, please see the yGuard manual.


Adjusting Names


Any code that makes use of yFiles features, or more specifically uses names of yFiles features, needs to be adjusted to their new names. This adjustment is automatically performed for all Jar files given to the yGuard obfuscation machinery using the <inoutpair> element.


Using yGuard’s <adjust> element (inside the <obfuscate> element), any additional plain-text files that are not processed by the obfuscation itself, e.g., resource files, can be adjusted in several ways, too. For example, a file’s path, its name, and also its content are subject to possible modifications.


Checking Obfuscation Success


During the obfuscation process, yGuard optionally generates a log file that contains all original names, their new obfuscated names, and also additional statistical information in XML-based syntax. The log file is an important document, since it shows the mapping of original to obfuscated names. To display the information nicely, yGuard offers a convenient reverse name look-up feature.


Example A.3, “yGuard’s command line syntax” shows the command line syntax to invoke yGuard’s reverse name look-up. Given a generated log file (or its GZip compressed variant), both the original class, method, and field names and their obfuscated counterparts are conveniently presented in a tree view, as depicted in Figure A.1, “yGuard’s reverse name look-up view”.


Example A.3. yGuard’s command line syntax

java -jar yguard.jar [yGuard_obfuscation_log_file.xml[.gz]]


Figure A.1. yGuard’s reverse name look-up view


yGuard's reverse name look-up view.

To ensure that the yFiles API has been properly obfuscated, all public and protected class, method, and field names must be present in the tree view presented by yGuard’s reverse name look-up feature. In other words, all names of such features must have been replaced by new names that are distinctly different from their originals.


Tutorial Demo Code


For an example on how to obfuscate the yFiles part of a yFiles-based application using yGuard, see the obfuscation demo’s Ant build file (included with the yFiles Complete distribution). The build file also shows how to adjust the occurences of obfuscated names of any yFiles features in properties files.