( ! ) Deprecated: Function WP_Dependencies-&gt;add_data() was called with an argument that is <strong>deprecated</strong> since version 6.9.0! IE conditional comments are ignored by all supported browsers. in /var/www/html/wp-includes/functions.php on line 6131
Call Stack
#TimeMemoryFunctionLocation
10.0000484224{main}( ).../index.php:0
20.0000484576require( '/var/www/html/wp-blog-header.php ).../index.php:17
30.14204274688require_once( '/var/www/html/wp-includes/template-loader.php ).../wp-blog-header.php:19
40.14314304008include( '/var/www/html/wp-content/themes/twentyfifteen/archive.php ).../template-loader.php:125
50.14314304008get_header( $name = ???, $args = ??? ).../archive.php:19
60.14314304224locate_template( $template_names = [0 => 'header.php'], $load = TRUE, $load_once = TRUE, $args = [] ).../general-template.php:48
70.14314304320load_template( $_template_file = '/var/www/html/wp-content/themes/twentyfifteen/header.php', $load_once = TRUE, $args = [] ).../template.php:749
80.14314304864require_once( '/var/www/html/wp-content/themes/twentyfifteen/header.php ).../template.php:814
90.14334312272wp_head( ).../header.php:18
100.14334312272do_action( $hook_name = 'wp_head' ).../general-template.php:3197
110.14334312488WP_Hook->do_action( $args = [0 => ''] ).../plugin.php:522
120.14334312488WP_Hook->apply_filters( $value = '', $args = [0 => ''] ).../class-wp-hook.php:365
130.14354315472wp_enqueue_scripts( '' ).../class-wp-hook.php:341
140.14354315472do_action( $hook_name = 'wp_enqueue_scripts' ).../script-loader.php:2311
150.14354315688WP_Hook->do_action( $args = [0 => ''] ).../plugin.php:522
160.14354315688WP_Hook->apply_filters( $value = '', $args = [0 => ''] ).../class-wp-hook.php:365
170.14364317576twentyfifteen_scripts( '' ).../class-wp-hook.php:341
180.14384319096wp_style_add_data( $handle = 'twentyfifteen-ie', $key = 'conditional', $value = 'lt IE 9' ).../functions.php:440
190.14384319096WP_Styles->add_data( $handle = 'twentyfifteen-ie', $key = 'conditional', $value = 'lt IE 9' ).../functions.wp-styles.php:245
200.14384319096WP_Dependencies->add_data( $handle = 'twentyfifteen-ie', $key = 'conditional', $value = 'lt IE 9' ).../class-wp-styles.php:385
210.14384437880_deprecated_argument( $function_name = 'WP_Dependencies->add_data()', $version = '6.9.0', $message = 'IE conditional comments are ignored by all supported browsers.' ).../class-wp-dependencies.php:317
220.14384443832wp_trigger_error( $function_name = '', $message = 'Function WP_Dependencies->add_data() was called with an argument that is <strong>deprecated</strong> since version 6.9.0! IE conditional comments are ignored by all supported browsers.', $error_level = 16384 ).../functions.php:5925
230.14394444584trigger_error( $message = 'Function WP_Dependencies-&gt;add_data() was called with an argument that is <strong>deprecated</strong> since version 6.9.0! IE conditional comments are ignored by all supported browsers.', $error_level = 16384 ).../functions.php:6131

( ! ) Deprecated: Function WP_Dependencies-&gt;add_data() was called with an argument that is <strong>deprecated</strong> since version 6.9.0! IE conditional comments are ignored by all supported browsers. in /var/www/html/wp-includes/functions.php on line 6131
Call Stack
#TimeMemoryFunctionLocation
10.0000484224{main}( ).../index.php:0
20.0000484576require( '/var/www/html/wp-blog-header.php ).../index.php:17
30.14204274688require_once( '/var/www/html/wp-includes/template-loader.php ).../wp-blog-header.php:19
40.14314304008include( '/var/www/html/wp-content/themes/twentyfifteen/archive.php ).../template-loader.php:125
50.14314304008get_header( $name = ???, $args = ??? ).../archive.php:19
60.14314304224locate_template( $template_names = [0 => 'header.php'], $load = TRUE, $load_once = TRUE, $args = [] ).../general-template.php:48
70.14314304320load_template( $_template_file = '/var/www/html/wp-content/themes/twentyfifteen/header.php', $load_once = TRUE, $args = [] ).../template.php:749
80.14314304864require_once( '/var/www/html/wp-content/themes/twentyfifteen/header.php ).../template.php:814
90.14334312272wp_head( ).../header.php:18
100.14334312272do_action( $hook_name = 'wp_head' ).../general-template.php:3197
110.14334312488WP_Hook->do_action( $args = [0 => ''] ).../plugin.php:522
120.14334312488WP_Hook->apply_filters( $value = '', $args = [0 => ''] ).../class-wp-hook.php:365
130.14354315472wp_enqueue_scripts( '' ).../class-wp-hook.php:341
140.14354315472do_action( $hook_name = 'wp_enqueue_scripts' ).../script-loader.php:2311
150.14354315688WP_Hook->do_action( $args = [0 => ''] ).../plugin.php:522
160.14354315688WP_Hook->apply_filters( $value = '', $args = [0 => ''] ).../class-wp-hook.php:365
170.14364317576twentyfifteen_scripts( '' ).../class-wp-hook.php:341
180.16834445688wp_style_add_data( $handle = 'twentyfifteen-ie7', $key = 'conditional', $value = 'lt IE 8' ).../functions.php:444
190.16834445688WP_Styles->add_data( $handle = 'twentyfifteen-ie7', $key = 'conditional', $value = 'lt IE 8' ).../functions.wp-styles.php:245
200.16834445688WP_Dependencies->add_data( $handle = 'twentyfifteen-ie7', $key = 'conditional', $value = 'lt IE 8' ).../class-wp-styles.php:385
210.16834445688_deprecated_argument( $function_name = 'WP_Dependencies->add_data()', $version = '6.9.0', $message = 'IE conditional comments are ignored by all supported browsers.' ).../class-wp-dependencies.php:317
220.16834446008wp_trigger_error( $function_name = '', $message = 'Function WP_Dependencies->add_data() was called with an argument that is <strong>deprecated</strong> since version 6.9.0! IE conditional comments are ignored by all supported browsers.', $error_level = 16384 ).../functions.php:5925
230.16844446232trigger_error( $message = 'Function WP_Dependencies-&gt;add_data() was called with an argument that is <strong>deprecated</strong> since version 6.9.0! IE conditional comments are ignored by all supported browsers.', $error_level = 16384 ).../functions.php:6131

XHTML MP Tables

To create a table in XHTML MP, you need the <table>, <tr> and <td> tags. Data in a cell is enclosed in <td></td> tags. Cells in the same row are enclosed in <tr></tr> tags. All rows are enclosed in <table></table> tags. So, <td></td> should be enclosed in <tr></tr> and <tr></tr> should be enclosed in <table></table>. The following XHTML MP example demonstrates how to create tables:


<?xml version=”1.0″?>
<!DOCTYPE html PUBLIC “-//WAPFORUM//DTD XHTML Mobile 1.0//EN” “http://www.wapforum.org/DTD/xhtml-mobile10.dtd”>

<html xmlns=”http://www.w3.org/1999/xhtml”>
  <head>
    <title>Table in XHTML MP</title>
  </head>

  <body>
    <table>
      <tr>
        <td>Cell A</td>
        <td>Cell B</td>
        <td>Cell C</td>
      </tr>

      <tr>
        <td>Cell D</td>
        <td>Cell E</td>
        <td rowspan=”2″>Cell F</td>
      </tr>

      <tr>
        <td colspan=”2″>Cell G</td>
      </tr>
    </table>
  </body>
</html>


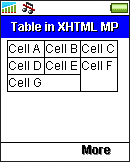
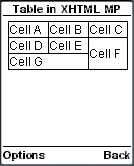
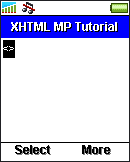
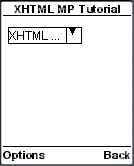
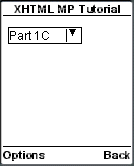
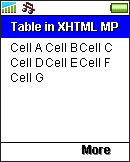
The result of the above XHTML MP markup code in mobile phone emulators is shown below:


Sony Ericsson T610


Nokia Mobile Browser 4.0


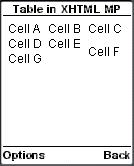
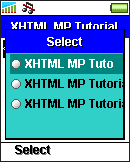
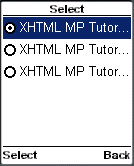
WAP CSS is required to control the presentation aspect of a table. For example, if you want to add a border to the table or specify the color of a table cell, you have to make use of WAP CSS. To let you see clearly the effect of the rowspan and colspan attributes in the previous XHTML MP example, we specify black borders to the table cells with the WAP CSS border property, like this:


td {
  border: thin solid black
}


Sony Ericsson T610


Nokia

Anchor Links in XHTML MP

Anchor links are used for navigation. You select an anchor link to go to another resource such as an XHTML MP page, or to scroll to a location in the current XHTML MP document. Anchor links are created with the <a></a> tag pair.


The href attribute of the <a> tag is used to specify the URL (Uniform Resource Locator) to the link target. The protocol used is HTTP. A URL has the form:


http://host_name/path/file_name#offset?parameter1=value1&parameter2=value2…


You should be very familiar with it if you have programmed HTML or WML before.


Going to a Location in the Current XHTML MP Page


As said earlier, you can make use of an anchor link to scroll to a location in the current XHTML MP page. To do this, first you have to set a link destination (target anchor) within the document. Second, you have to point an anchor link to the destination.


To set a link destination within an XHTML MP document, the id attribute should be used. Most XHTML MP tags contain the id attribute. Here are some examples:


<a id=”destination_id></a>


<a id=”destination_id />


<h1 id=”destination_id>XHTML MP Tutorial</h1>


<p id=”destination_id>Some text in a paragraph</p>


To point an anchor link to the link destination, you need to construct a URL using the id of the link destination as the offset (Note that an offset begins with the # character), and then specify this URL as the href attribute value of the anchor link, like this:


<a href=”#destination_id“>Select here to go to a location in the current XHTML MP document</a>


As the link destination is in the current XHTML MP document, there is no need to specify the host name, path and file name in the URL. Only the offset is needed.


The following XHTML MP example demonstrates how to go to a location within the current document:


<?xml version=”1.0″?>
<!DOCTYPE html PUBLIC “-//WAPFORUM//DTD XHTML Mobile 1.0//EN” “http://www.wapforum.org/DTD/xhtml-mobile10.dtd”>

<html xmlns=”http://www.w3.org/1999/xhtml”>
  <head>
    <title>XHTML MP Tutorial</title>
  </head>

  <body>
    <p><a id=”top”>Table of Contents:</a></p>
    <ul>
      <li>Part 1 XHTML MP Introduction</li>
      <li>Part 2 Development of Wireless Markup Languages</li>
      <li>Part 3 Advantages of XHTML MP</li>
      <li>Part 4 WML Features Lost in XHTML MP</li>
    </ul>
    <p><a href=”#top”>Back to top</a></p>
  </body>
</html>


This is the result of the above XHTML MP example in a mobile phone browser:


Nokia Mobile Browser 4.0


If you select the “Back to top” link, the page will be scrolled to show the text “Table of Contents”.


Nokia Mobile Browser 4.0


For Sony Ericsson mobile phones, going to a link destination in the current XHTML MP page is not supported until browser version 4.0, which is first included in Sony Ericsson Z1010 mobile phones. Hence, earlier mobile phone models such as T610 and T68i do not support this feature.

Submitting Form Data to the Server in XHTML MP


In the previous sections of this XHTML MP tutorial, we have mentioned about how to use selection lists and various input elements to obtain data from a user in XHTML MP. However, the user data has no use if it is not posted to the server for further processing. To post data to the server in XHTML MP, you need the <form></form> tags and a submit button. Let’s first have a look at the following XHTML MP example. Then we will go into the details.


<?xml version=”1.0″?>
<!DOCTYPE html PUBLIC “-//WAPFORUM//DTD XHTML Mobile 1.0//EN” “http://www.wapforum.org/DTD/xhtml-mobile10.dtd”>

<html xmlns=”http://www.w3.org/1999/xhtml”>
  <head>
    <title>XHTML MP Tutorial</title>
  </head>

  <body>
    <h1>Registration Form</h1>
    <form method=”get” action=”processing.asp”>
      <p>
        Username:<br/>
        <input name=”username”/><br/>

        Password:<br/>
        <input type=”password” name=”password”/><br/>

        Gender:<br/>
        <input type=”radio” name=”gender” value=”m”/>Male
        <input type=”radio” name=”gender” value=”f”/>Female<br/>

        Country:<br/>
        <select name=”country”>
          <option value=”ca”>Canada</option>
          <option value=”cn”>China</option>
          <option value=”fr”>France</option>
          <option value=”de”>Germany</option>
          <option value=”in”>India</option>
          <option value=”it”>Italy</option>
          <option value=”jp”>Japan</option>
          <option value=”kr”>Korea</option>
          <option value=”uk”>United Kingdom</option>
          <option value=”us”>United States</option>
        </select><br/>

        Which part of our XHTML MP tutorial do you like?<br/>
        <input type=”checkbox” name=”tutorial_part” value=”1″/>Part 1
        <input type=”checkbox” name=”tutorial_part” value=”2″/>Part 2
        <input type=”checkbox” name=”tutorial_part” value=”3″/>Part 3
        <input type=”checkbox” name=”tutorial_part” value=”4″/>Part 4

        <input type=”hidden” name=”temp_id” value=”123456″/>
      </p>

      <hr/>

      <p>
        <input type=”submit”/>
        <input type=”reset”/>
      </p>
    </form>
  </body>
</html>


Sony Ericsson T610


Nokia Mobile Browser 4.0

XHTML MP Selection Lists

A selection list is a list of options that a user can select. The <select></select> tags define a selection list in XHTML MP. One or more <option></option> tag pairs are enclosed within the <select></select> tags. The <option></option> tag pair defines a list item.


To send the value of the selected item to the server, the <select> tag has to be used in conjunction with the <form> tag. You can learn how to use the <form> tag and how to read the value of the selected item at the server later in the “Sending Data to the Server in XHTML MP” section of this tutorial.


The name attribute of the <select> tag specifies the name of a selection list. At the server-side, the name will be used to retrieve the value of the selected item. The value of an item is specified with the value attribute of the <option> tag.


Let’s take a look at the following XHTML MP example. It can help you understand better what we are talking about.


<?xml version=”1.0″?>
<!DOCTYPE html PUBLIC “-//WAPFORUM//DTD XHTML Mobile 1.0//EN” “http://www.wapforum.org/DTD/xhtml-mobile10.dtd”>

<html xmlns=”http://www.w3.org/1999/xhtml”>
  <head>
    <title>XHTML MP Tutorial</title>
  </head>

  <body>
    <form method=”get” action=”xhtml_mp_tutorial_proc.asp”>
      <p>
        <select name=”selectionList”>
          <option value=”tutorial_A”>XHTML MP Tutorial Part A</option>
          <option value=”tutorial_B”>XHTML MP Tutorial Part B</option>
          <option value=”tutorial_C”>XHTML MP Tutorial Part C</option>
        </select>

      </p>
    </form>
  </body>
</html>


The result of the above XHTML MP example in WAP browsers is shown below.


Sony Ericsson T610


Nokia Mobile Browser 4.0


If you select the selection list, the options available will be displayed like this:


Sony Ericsson T610


Nokia Mobile Browser 4.0


The selected attribute of the <option> tag can be used to set the default option. The default option will be initially selected. The selected attribute only accepts the value “selected”. Here is an example that shows how to pre-select the second option “XHTML MP Tutorial Part B”:


<option value=”tutorial_B” selected=”selected”>XHTML MP Tutorial Part B</option>


Selecting Multiple Options


In the previous XHTML MP example, a user can only select one option of the selection list. To allow a user to select multiple options, you need to make use of the multiple attribute of the <select> tag. The multiple attribute can only be assigned with the value “multiple”. Options in such kind of selection lists are displayed as check boxes on the screen.


Let’s take a look at the following XHTML MP example:


<?xml version=”1.0″?>
<!DOCTYPE html PUBLIC “-//WAPFORUM//DTD XHTML Mobile 1.0//EN” “http://www.wapforum.org/DTD/xhtml-mobile10.dtd”>

<html xmlns=”http://www.w3.org/1999/xhtml”>
  <head>
    <title>XHTML MP Tutorial</title>
  </head>

  <body>
    <form method=”get” action=”xhtml_mp_tutorial_proc.asp”>
      <p>
        <select name=”selectionList” multiple=”multiple”>
          <option value=”tutorial_A”>XHTML MP Tutorial Part A</option>
          <option value=”tutorial_B”>XHTML MP Tutorial Part B</option>
          <option value=”tutorial_C”>XHTML MP Tutorial Part C</option>
        </select>
      </p>
    </form>
  </body>
</html>


The result of the above XHTML MP code is shown below:


Sony Ericsson T610


Nokia Mobile Browser 4.0


When the multiple attribute is present in the <select> tag, it is possible to specify multiple default options. To do so, add selected=”selected” to each of the <option> tags that should be selected by default. Here is an example:


<select name=”selectionList” multiple=”multiple”>
  <option value=”tutorial_A” selected=”selected”>XHTML MP Tutorial Part A</option>
  <option value=”tutorial_B” selected=”selected”>XHTML MP Tutorial Part B</option>
  <option value=”tutorial_C”>XHTML MP Tutorial Part C</option>
</select>


The above lines of code tell the WAP browser that the first and second options of the selection list should be pre-selected.


Organizing Options in XHTML MP Selection Lists


If an XHTML MP selection list contains too many options, it will look disorganized. To tackle this, you can arrange options into groups. You define an option group using the <optgroup></optgroup> tag pair. The label attribute of the <optgroup> tag specifies the title of an option group.


The usage of the <optgroup></optgroup> tags is shown in this XHTML MP example:


<?xml version=”1.0″?>
<!DOCTYPE html PUBLIC “-//WAPFORUM//DTD XHTML Mobile 1.0//EN” “http://www.wapforum.org/DTD/xhtml-mobile10.dtd”>

<html xmlns=”http://www.w3.org/1999/xhtml”>
  <head>
    <title>XHTML MP Tutorial</title>
  </head>

  <body>
    <form method=”get” action=”xhtml_mp_tutorial_proc.asp”>
      <p>
        <select name=”selectionList”>
          <optgroup label=”Tutorial Ch1″>
            <option value=”tutorial_1A”>Part 1A</option>
            <option value=”tutorial_1B”>Part 1B</option>
            <option value=”tutorial_1C”>Part 1C</option>
          </optgroup>
          <optgroup label=”Tutorial Ch2″>
            <option value=”tutorial_2A”>Part 2A</option>
            <option value=”tutorial_2B”>Part 2B</option>
            <option value=”tutorial_2C”>Part 2C</option>
          </optgroup>
          <optgroup label=”Tutorial Ch3″>
            <option value=”tutorial_3A”>Part 3A</option>
            <option value=”tutorial_3B”>Part 3B</option>
            <option value=”tutorial_3C”>Part 3C</option>
          </optgroup>
        </select>
      </p>
    </form>
  </body>
</html>


This is the result of the above XHTML MP example in WAP browsers:


Sony Ericsson T610


Nokia Mobile Browser 4.0

XHTML MP Input Elements

Like HTML, XHTML MP provides numerous input element types for obtaining data from users. The following input element types are available in XHTML MP:


  1. Text field


  2. Password field


  3. Checkbox


  4. Radio button


  5. Hidden field


All of the above input elements are created with the <input> element. To send the user data to the server, the <input> element has to be used in conjunction with the <form> element. The <form> element will be mentioned in more detail later at the “Sending Data to the Server in XHTML MP” section.


The type attribute of the <input> element defines the input element type in XHTML MP.


The name attribute of the <input> element specifies the name of the input element. The name will be used to retrieve the user data at the server.

Upload File from WAP Cell Phone

Many wireless devices like cell phones can be used as a digital camera or as a music player. With them, you can take pictures, record video clips and listen to your favorite MP3 songs at any time and in any place.


However, your cell phone may not have enough space to store all your pictures, video clips, music files, ringtones, etc. To solve this, you can upload some files to a server through a WAP connection. When you need them, you can download them back to your cell phone.


For example, if you are traveling in a beautiful country, you will definitely take many photos and record many video clips with your cell phone. You can upload some of the image files and video files to a server to share with your friends and at the same time make room for more photos and videos along the journey.


Some cell phones support both file upload and 3G wireless network. The upload speed will be very fast if you are using a 3G connection.


How to Upload Files from WAP Cell Phones


Both WML (the markup language of WAP 1.x) and XHTML MP (the markup language of WAP 2.0) do not support file upload. But fortunately the browser on some WAP 2.0 cell phones support the <input type=”file”> element as an extension of XHTML MP. Some HTML-capable WAP browsers also support the <input type=”file”> element.


The <input type=”file”> element will be rendered as a button on a WAP browser. When it is clicked, the list of files stored on the wireless device and the memory card will be displayed. You can then choose a file to upload to the server.


At the server-side, you use a server-side technology like ASP / ASP.NET, ColdFusion, Java Servlet / JSP, Perl and PHP to extract the file from the HTTP request, just like what you will do to handle HTML file upload. Then you can process the file or save it to a directory or a database system.


Nokia Cell Phones that Support WAP Upload


Below shows some of the cell phone models from Nokia that support WAP upload at the time of writing (last updated: 23 Nov 2006). If you know a cell phone model (of any brand) that supports WAP upload but is not listed in the following table, you may report to us using the feedback form at the end of this web page.


Nokia cell phone model


Platform


Nokia 2650


Series 40 Platform 1st Edition


Nokia 3200


Series 40 Platform 1st Edition


Nokia 3220


Series 40 Platform 2nd Edition


Nokia 3250


S60 Platform 3rd Edition (formerly called Series 60)


Nokia 5140


Series 40 Platform 2nd Edition


Nokia 6020


Series 40 Platform 2nd Edition


Nokia 6021


Series 40 Platform 2nd Edition


Nokia 6030


Series 40 Platform 2nd Edition


Nokia 6060


Series 40 Platform 2nd Edition


Nokia 6070


Series 40 Platform 2nd Edition


Nokia 6101


Series 40 Platform 2nd Edition


Nokia 6103


Series 40 Platform 2nd Edition


Nokia 6111


Series 40 Platform 2nd Edition


Nokia 6112


Series 40 Platform 2nd Edition


Nokia 6125


Series 40 Platform 3rd Edition


Nokia 6131


Series 40 Platform 3rd Edition


Nokia 6136


Series 40 Platform 3rd Edition


Nokia 6170


Series 40 Platform 2nd Edition


Nokia 6220


Series 40 Platform 1st Edition


Nokia 6230


Series 40 Platform 2nd Edition


Nokia 6230i


Series 40 Platform 2nd Edition


Nokia 6233


Series 40 Platform 3rd Edition


Nokia 6270


Series 40 Platform 3rd Edition


Nokia 6280


Series 40 Platform 2nd Edition


Nokia 6282


Series 40 Platform 3rd Edition


Nokia 6630


S60 Platform 2nd Edition Feature Pack 2 (formerly called Series 60)


Nokia 6680


S60 Platform 2nd Edition Feature Pack 2 (formerly called Series 60)


Nokia 6681


S60 Platform 2nd Edition Feature Pack 2 (formerly called Series 60)


Nokia 6682


S60 Platform 2nd Edition Feature Pack 2 (formerly called Series 60)


Nokia 6810


Series 40 Platform 1st Edition


Nokia 6820


Series 40 Platform 1st Edition


Nokia 6822


Series 40 Platform 2nd Edition


Nokia 7200


Series 40 Platform 1st Edition


Nokia 7250i


Series 40 Platform 1st Edition


Nokia 7260


Series 40 Platform 2nd Edition


Nokia 7270


Series 40 Platform 2nd Edition


Nokia 7360


Series 40 Platform 2nd Edition


Nokia 7370


Series 40 Platform 3rd Edition


Nokia 7380


Series 40 Platform 3rd Edition


Nokia 7600


Series 40 Platform 1st Edition


Nokia 8800


Series 40 Platform 2nd Edition


Nokia 9300


Series 80 Platform 2nd Edition


Nokia 9500


Series 80 Platform 2nd Edition


Nokia E60


S60 Platform 3rd Edition (formerly called Series 60)


Nokia E61


S60 Platform 3rd Edition (formerly called Series 60)


Nokia E70


S60 Platform 3rd Edition (formerly called Series 60)


Nokia N70


S60 Platform 2nd Edition Feature Pack 3 (formerly called Series 60)


Nokia N71


S60 Platform 3rd Edition (formerly called Series 60)


Nokia N72


S60 Platform 2nd Edition Feature Pack 3 (formerly called Series 60)


Nokia N73


S60 Platform 3rd Edition (formerly called Series 60)


Nokia N80


S60 Platform 3rd Edition (formerly called Series 60)


Nokia N90


S60 Platform 2nd Edition Feature Pack 3 (formerly called Series 60)


Nokia N91


S60 Platform 3rd Edition (formerly called Series 60)


Nokia N92


S60 Platform 3rd Edition (formerly called Series 60)


Nokia N93


S60 Platform 3rd Edition (formerly called Series 60)


how to get cpu information on Linux machine

Hi,

I want to display cpu information like model number, vender information, and how many cpu’s are there in the system (Linux machine)

Is there any system call ? or /proc/cpuinfo is the only way

And also how get information regarding controllers and adapters installed on system(Linux machine) using any system call


Thanks and regards
laxmi


re:

cat /proc/cpuinfo
cat /proc/meminfo
dmesg
lspci

or


/usr/sbin/./x86info -a

獲取LINUX系統資訊(how to get system info in linux)


以下命令列表,提示和資訊是我翻譯過來的.使用這些命令可以很快的取得您的系統資訊.


一般性的系統資訊

提示:很多硬體資訊命令一定要使用root管理員才可以執行,或者使用管理員執行可以獲得更多資訊.


運行qtparted 或者GParted 獲得硬盤和分區資訊.並且使用KDiskFree和fdisk -l獲得全部分區資訊.


hardinfo – 非常好的工具,而且可以獲得詳細報告.


獲取一個硬體報告:


這個報告包含很多其他報告,一些已經列到這篇文章裏面.通過installation-report 安裝Synaptic 包,


在全屏的命令行下運行:
report-hw
或者
report-hw > hwreport (把結果保存到文件hwreport 裏)


sysinfo – 在命令行下運行,可以獲得不錯的效果.


hal-device-manager
kde-hal-device-manager
這些包可以安裝在Synaptic下. 當使用kde-hal-device-manager時.可以通過 KMenu > System > Device Manager 來安裝.


dmidecode -t memory (as root)這個工具顯示系統的DMI(Desktop Management Interface)報告,報告內容包括系統的所有硬體,例如BIOS的版本號等. dmidecode 不單單顯示系統的當前配置,還包括BIOS支援CPU速度,最大記憶體等資訊.
dmidecode | less (as root) BIOS 資訊和系統資訊 (使用空格換頁,使用q退出)


uname -a (系統版本號)
uname -m 系統版本 (i.e. – i686)
uname -r 系統核心版本號


lshw (as root) – 列印硬體列表; 可以要使用 lshw | less (使用空格換頁,使用q退出)
lshw-gtk (as root) –


lsb_release -a (發行版本的資訊)  (或者查看 /etc/lsb_release)

***在 RedHat Linux AS4, 顯示的內容為:
LSB Version:    :core-3.0-ia32:core-3.0-noarch:graphics-3.0-ia32:graphics-3.0-noarch
Distributor ID: RedHatEnterpriseAS
Description:    Red Hat Enterprise Linux AS release 4 (Nahant Update 2)
Release:        4
Codename:       NahantUpdate2


lspci (as root) (控制器等資訊) (非常好的報告;參數 -v 顯示詳細內容,參數 -vv 顯示非常詳細的內定)
lspci -tv (as root) 以樹的形式顯示
lsusb, lsusb -tv – 列出USB設備
lsmod (at root, 顯示系統已載入的核心模組. 或者使用lsmod | less)


/proc – 包含很多本地重要資訊,使用 cd /proc  && ls ,使用cat命令查看/proc下面的文件,例如:cpuinfo,devices,filesystems,meminfo,partitions,swaps,uptime,version等;也可以進入子目錄查看,例如 cd driver.
例子:
cat /proc/cpuinfo (或者在/proc下使用cat cpuinfo )
cat /proc/version (或者在/proc下使用 cat verson ) – 版本資訊
cat /proc/swaps (或者在/proc下使用 cat swaps ) 顯示所有交換區.


top – 即時地顯示Linux的進程; 系統的情況和被內核所管理的進程,還包括交換區使用情況;使用 Shift-f 來排序 (默認排序是 k – CPU 使用率)

ctrl-esc 在KDE環境下顯示進程列表

顯示正在運行的線程:
ps aux
ps -e


swapon -s 顯示記憶體交換區和對應的資訊
swapon -a 使得包含在/etc/fstab裏的全部交換區生效.


free (記憶體使用情況,以K單位)
free -m (記憶體使用情況,以M為單位).


df -h (顯示所有載入的文件系統的資訊, 全部用戶都有權查看)
df -hT (顯示所有載入的文件系統的資訊,並且顯示文件系統的類型, 全部用戶都有權查看)


du / -bh | more 詳細的顯示每個子目錄的使用情況,全部用戶都可以查看,使用空格換頁,使用q退出.
du -s /var/log/* – 顯示系統記錄/var/log所使用的空間


hdparm -t /dev/hda (as root) – 測試並顯示 hda 的性能


相關時間命令:
date
uptime


fdisk -l 顯示所有硬碟上面的分區資訊.


/etc/fstab (這個文件包含文件系統的配置)內容一般為:
LABEL=/                 /                       ext3    defaults        1 1
none                    /dev/pts                devpts  gid=5,mode=620  0 0
none                    /dev/shm                tmpfs   defaults        0 0
LABEL=/home             /home                   ext3    defaults        1 2
LABEL=/home1            /home1                  ext3    defaults        1 2
none                    /proc                   proc    defaults        0 0
none                    /sys                    sysfs   defaults        0 0
/dev/sda5               swap                    swap    defaults        0 0


simultaneous-build-throttle resin config

對系統做壓力測試時經常出現以下問題,測試就不通過.

We are already in the process of making 6 connections and the number of simultaneous builds has be
en throttled to 5


但在400個用戶時沒有很問題.一超過400就會有40來個錯誤,,,查看系統記錄,發現了上面的問題.


查了一個官方的資料,問題解決了!


In http://proxool.sourceforge.net/properties.html is Say:


simultaneous-build-throttle:
This is the maximum number of connections we can be building at any one time. That is, the number of new connections that have been requested but aren’t yet available for use. Because connections can be built using more than one thread (for instance, when they are built on demand) and it takes a finite time between deciding to build the connection and it becoming available we need some way of ensuring that a lot of threads don’t all decide to build a connection at once. (We could solve this in a smarter way – and indeed we will one day) Default is 10.


<simultaneous-build-throttle>5</simultaneous-build-throttle>

改成

<simultaneous-build-throttle>20</simultaneous-build-throttle>


問題就不再出現了!

upgrading SVN or remove SVN REPO


  1. Shut down svnserve, Apache, and anything else that might be accessing the repository.
  2. svnadmin dump /path/to/repository > dumpfile.txt , using version X of svnadmin.
  3. mv /path/to/repository /path/to/saved-old-repository
  4. Now upgrade to Subversion Y (i.e., build and install Y, replacing X).
  5. svnadmin create /path/to/repository, using version Y of svnadmin.
  6. svnadmin load /path/to/repository < dumpfile.txt , again using version Y of svnadmin.
  7. Copy over hook scripts, etc, from the old repository to the new one.
  8. Restart svnserve, Apache, etc.