sitemap.xml.gz Generator for use with Google ™ |
Month: September 2007


Security Considerations of File Upload
Before enabling HTTP file upload on your server, one important thing that you must consider is security, as improper design and configuration will make your server vulnerable to attacks.
For example, the PHP file upload script and JSP file upload script that were covered earlier are not secure. One problem is that we have not checked what the user entered in the optional filename text box. This gives malicious users the chance to modify the server’s files (e.g. system files or password files). For example, if a malicious user enters a path such as “../password/password.dat” in the optional filename text box, our PHP and JSP script will save the uploaded file to the destination “/file_uploads/../password/password.dat”, which is actually the path “/password/password.dat”.
Here are a few security tips that may be useful to you. We will only provide some brief descriptions here. For more details, please refer to other sources.
Check all information provided by the client to ensure that it is safe. For example:
The HTTP request received includes a MIME type that describes what the uploaded file contains. A malicious user can provide a wrong value to trick you to think that the uploaded file is of another type. Hence, you should not rely on the MIME type included in the HTTP request but should perform a check by your own at the server-side. For instance, the photo album example covered earlier does not perform any checks to ensure the uploaded files are really image files. To enhance security, we can include a check on the uploaded files using the PHP function getimagesize() at the server-side. If getimagesize() returns false, that means the uploaded file is not a valid image file and it should be rejected.
The HTTP request received includes the uploaded file’s original file name at the client-side. A malicious user can provide an unsafe value to trick you to modify system or password files. This problem is similar to the one described in the second paragraph of this section, so we will not describe it once more.
In addition, you should prepare for the situation that the file name contains special characters that are not allowed to appear in file names or non-English characters. Make sure your WAP/web application will not crash or be left in an erroneous state when such situations occur.
Set a file size limit so that the user cannot upload files that are too large or too small.
Do not run web servers or application servers with the administrator account. Create and configure an account that is specifically for their use. Limit the file access permissions of the account so that even if your WAP/web application has security holes, the OS will not allow it to work with system files or files of other users.
Make sure your WAP/web application does not reveal too much information to the user when an error occurs. The information revealed can help a malicious user find ways to attack your system.
Log down the details (such as the time, the client’s IP address and the user name) of file uploads and other related events. Although the logs only tell you what has happened, they can help you check what types of attacks have been made against your server and whether there were any successful attacks.
Example JSP File Upload Script
Below shows a JSP file upload script that is used to print out the name-value pair received from the earlier XHTML MP document and save the uploaded file to a certain location on the WAP server. Remember to change the action attribute of the <form> element in the earlier XHTML MP document from file_upload.php to file_upload.jsp for this example to work.
<?xml version=”1.0″?>
<!DOCTYPE html PUBLIC “-//WAPFORUM//DTD XHTML Mobile 1.0//EN” “http://www.wapforum.org/DTD/xhtml-mobile10.dtd”>
<%@ page import=”org.apache.commons.fileupload.*, org.apache.commons.fileupload.servlet.ServletFileUpload, org.apache.commons.fileupload.disk.DiskFileItemFactory, org.apache.commons.io.FilenameUtils, java.util.*, java.io.File, java.lang.Exception” %>
<% response.setContentType(“application/vnd.wap.xhtml+xml”); %>
<html xmlns=”http://www.w3.org/1999/xhtml”>
<head>
<title>File Upload Example</title>
</head>
<body>
<h1>Data Received at the Server</h1>
<hr/>
<p>
<%
if (ServletFileUpload.isMultipartContent(request)){
ServletFileUpload servletFileUpload = new ServletFileUpload(new DiskFileItemFactory());
List fileItemsList = servletFileUpload.parseRequest(request);
String optionalFileName = “”;
FileItem fileItem = null;
Iterator it = fileItemsList.iterator();
while (it.hasNext()){
FileItem fileItemTemp = (FileItem)it.next();
if (fileItemTemp.isFormField()){
%>
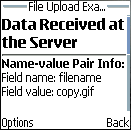
<b>Name-value Pair Info:</b><br/>
Field name: <%= fileItemTemp.getFieldName() %><br/>
Field value: <%= fileItemTemp.getString() %><br/><br/>
<%
if (fileItemTemp.getFieldName().equals(“filename”))
optionalFileName = fileItemTemp.getString();
}
else
fileItem = fileItemTemp;
}
if (fileItem!=null){
String fileName = fileItem.getName();
%>
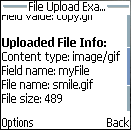
<b>Uploaded File Info:</b><br/>
Content type: <%= fileItem.getContentType() %><br/>
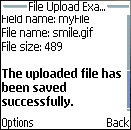
Field name: <%= fileItem.getFieldName() %><br/>
File name: <%= fileName %><br/>
File size: <%= fileItem.getSize() %><br/><br/>
<%
/* Save the uploaded file if its size is greater than 0. */
if (fileItem.getSize() > 0){
if (optionalFileName.trim().equals(“”))
fileName = FilenameUtils.getName(fileName);
else
fileName = optionalFileName;
String dirName = “/file_uploads/”;
File saveTo = new File(dirName + fileName);
try {
fileItem.write(saveTo);
%>
<b>The uploaded file has been saved successfully.</b>
<%
}
catch (Exception e){
%>
<b>An error occurred when we tried to save the uploaded file.</b>
<%
}
}
}
}
%>
</p>
</body>
</html>
The following screenshots show what you will see in the Nokia 6230 cell phone:
|
The above JSP script is very straightforward. Most of the code has been covered earlier. Below shows some lines of code that you may be unfamiliar with.
The line:
<% response.setContentType(“application/vnd.wap.xhtml+xml”); %>
is used to set the MIME type of the JSP document. “application/vnd.wap.xhtml+xml” is the MIME type of XHTML MP.
The line:
fileName = FilenameUtils.getName(fileName);
is used to extract the file name from a path. (FilenameUtils is a class of the org.apache.commons.io package in the Apache Jakarta Commons IO library.) For example, both FilenameUtils.getName(“/files/myFile.txt”) and FilenameUtils.getName(“myFile.txt”) return the string “myFile.txt”. The above line of code is necessary in our JSP script since some browsers provide the full path of the uploaded file in the HTTP request and so after the execution of the following line, the fileName variable may contain a path but not a file name.
String fileName = fileItem.getName();
As XHTML MP is compatible with HTML/XHTML, the resulting XHTML MP document generated by the JSP script can also be viewed on web browsers such as Microsoft Internet Explorer and Mozilla Firefox. The only thing you need to do is to remove the following line from the JSP script:
<% response.setContentType(“application/vnd.wap.xhtml+xml”); %>
This is because unlike WAP 2.0 browsers on cell phones, Internet Explorer 6 and Mozilla Firefox 2.0 do not understand the MIME type of XHTML MP. Instead of displaying the XHTML MP document, they will pop up a dialog box asking you to select a program to open the document or save the document on disk.
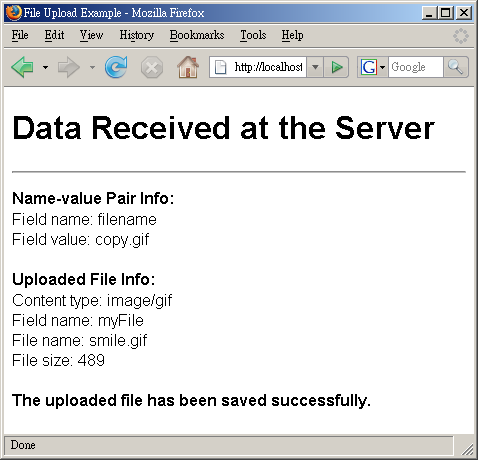
The following screenshots show the result on Mozilla Firefox 2.0:
|

Example PHP File Upload Script
Below shows a PHP file upload script that is written to handle the form data submitted from the earlier XHTML MP document. The PHP script prints out the information obtained from the HTTP request and saves the uploaded file to the “/file_uploads” directory of the WAP server.
<?php header(`Content-type: application/vnd.wap.xhtml+xml`); ?>
<?php echo `<?xml version=”1.0″?` . `>`; ?>
<!DOCTYPE html PUBLIC “-//WAPFORUM//DTD XHTML Mobile 1.0//EN” “http://www.wapforum.org/DTD/xhtml-mobile10.dtd”>
<html xmlns=”http://www.w3.org/1999/xhtml”>
<head>
<title>File Upload Example</title>
</head>
<body>
<h1>Data Received at the Server</h1>
<hr/>
<p>
<?php
foreach ($_POST as $key => $value){
?>
<b>Name-value Pair Info:</b><br/>
Field name: <?php echo $key; ?><br/>
Field value: <?php echo $value; ?><br/><br/>
<?php
}
$optionalFileName = $_POST[`filename`];
if ($_FILES[`myFile`][`error`] == UPLOAD_ERR_OK){
$fileName = $_FILES[`myFile`][`name`];
?>
<b>Uploaded File Info:</b><br/>
Content type: <?php echo $_FILES[`myFile`][`type`]; ?><br/>
Field name: myFile<br/>
File name: <?php echo $fileName; ?><br/>
File size: <?php echo $_FILES[`myFile`][`size`]; ?><br/><br/>
<?php
/* Save the uploaded file if its size is greater than 0. */
if ($_FILES[`myFile`][`size`] > 0){
if ($optionalFileName == “”)
$fileName = basename($fileName);
else
$fileName = $optionalFileName;
$dirName = `/file_uploads/`;
if (move_uploaded_file($_FILES[`myFile`][`tmp_name`], $dirName . $fileName)){
?>
<b>The uploaded file has been saved successfully.</b>
<?php
}
else{
?>
<b>An error occurred when we tried to save the uploaded file.</b>
<?php
}
}
}
?>
</p>
</body>
</html>
The following screenshots show what you will see on the Nokia 6230 cell phone:
|
The above PHP script is very straightforward. Most of the code has been covered before. Below shows some lines of code that you may be unfamiliar with.
The line:
<?php header(`Content-type: application/vnd.wap.xhtml+xml`); ?>
is used to set the MIME type of the PHP document. “application/vnd.wap.xhtml+xml” is the MIME type of XHTML MP.
The line:
<?php echo `<?xml version=”1.0″?` . `>`; ?>
is used to output the XML declaration “<?xml version=”1.0″?>”. We have to output it this way since “<?” and “?>” of the XML declaration are the opening and closing tags of the PHP language. If we include the XML declaration in a PHP document directly, like this:
<?php header(`Content-type: application/vnd.wap.xhtml+xml`); ?>
<?xml version=”1.0″?>
<!DOCTYPE html PUBLIC “-//WAPFORUM//DTD XHTML Mobile 1.0//EN” “http://www.wapforum.org/DTD/xhtml-mobile10.dtd”>
…
then a parse error will occur.
The line:
$fileName = basename($fileName);
is necessary in the example PHP script since some browsers provide the full path of the uploaded file in the HTTP request, which means $_FILES[`myFile`][`name`] may contain a path but not a file name. Hence, we need to use the PHP function basename() to extract the file name from the path. For example, both basename(`/files/myFile.txt`) and basename(`myFile.txt`) returns the string “myFile.txt”.
As XHTML MP is compatible with HTML/XHTML, the resulting XHTML MP document generated by the PHP script can also be viewed on web browsers such as Microsoft Internet Explorer and Mozilla Firefox. The only thing you need to do is to remove the following line from the PHP script:
<?php header(`Content-type: application/vnd.wap.xhtml+xml`); ?>
This is because unlike WAP 2.0 browsers on cell phones, Internet Explorer 6 and Mozilla Firefox 2.0 do not understand the MIME type of XHTML MP. Instead of displaying the XHTML MP document, they will pop up a dialog box asking you to select a program to open the document or save the document on disk.
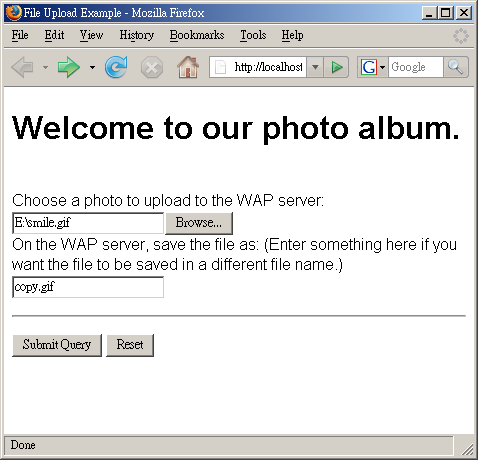
The following screenshots show the result on Mozilla Firefox 2.0:
|

Handling Form-based File Upload with Java Servlet or JSP
Unlike PHP, Java Servlet and JSP do not have build-in mechanisms for handling form-based file uploads. One solution to this problem is to implement a function yourself to extract uploaded files contained in an HTTP request. However, a better choice is to make use of a third-party library that can help us handle file uploads.
One robust library available is the Apache Jakarta Commons FileUpload package. It is open-source and can be downloaded free of charge over the Internet. We will demonstrate how to use the Apache Jakarta Commons FileUpload package to extract uploaded files submitted from a form. The techniques are the same for HTML and XHTML. If you are not familiar with JSP or Java Servlet, you may want to read some introductory tutorials before going through this section.
At the time of writing, the most up-to-date version of the Apache Jakarta Commons FileUpload library is 1.1.1. So, we assume you are using Commons FileUpload 1.1.1 in this tutorial. For other versions of Commons FileUpload, the procedures may be slightly different but the principle is the same.
Downloading the Apache Jakarta Commons FileUpload and Commons IO Libraries
To download the Apache Jakarta Commons FileUpload library, go to the home page of the Apache Jakarta Commons FileUpload project and navigate to the download section. The binaries are available in two file formats: zip format and tar-gzip format. Download either one of them and uncompress the file. Then go to the home page of the Apache Jakarta Commons IO project and repeat the same steps. We need the Commons IO library since Commons FileUpload uses it internally. Now you have two JAR files, “commons-fileupload-version.jar” and “commons-io-version.jar”, where version is the version number. At the time of writing, the latest version of the Commons FileUpload library and that of the Commons IO library are 1.1.1 and 1.2 respectively. So, the JAR files we obtain are “commons-fileupload-1.1.1.jar” and “commons-io-1.2.jar”.
Installing Apache Jakarta Commons FileUpload and Commons IO into a Servlet/JSP Container Like Tomcat
Next, we need to install the Apache Jakarta Commons FileUpload library and the Apache Jakarta Commons IO library into a Servlet/JSP container such as Apache Tomcat. To do this, copy the JAR files “commons-fileupload-1.1.1.jar” and “commons-io-1.2.jar” to the /WEB-INF/lib/ directory in the document root of your web application.
Note that JAR libraries stored in /WEB-INF/lib/ will be available to the containing web application only. If you want to share the libraries among all web applications installed in Tomcat (suppose you are using Tomcat 5 or Tomcat 4), the JAR files should be copied to the $CATALINA_HOME/shared/lib/ directory, where $CATALINA_HOME is the root of your Tomcat installation.
Checking If an HTTP Request is Encoded in Multipart Format
Now that you have installed the Apache Jakarta Commons FileUpload library, you can start writing the code. First, we have to make sure the HTTP request is encoded in multipart format. This can be done using the static method isMultipartContent() of the ServletFileUpload class of the org.apache.commons.fileupload.servlet package:
if (ServletFileUpload.isMultipartContent(request)){
// Parse the HTTP request…
}
In the above Java code snippet, request is a javax.servlet.http.HttpServletRequest object that encapsulates the HTTP request. It should be very familiar to you if you know Java Servlet or JSP.
Parsing Form Data with Java Servlet / JSP
Second, we will parse the form data contained in the HTTP request. Parsing the form data is very straightforward with the Apache Jakarta Commons FileUpload library:
ServletFileUpload servletFileUpload = new ServletFileUpload(new DiskFileItemFactory());
List fileItemsList = servletFileUpload.parseRequest(request);
(In the above Java code snippet, DiskFileItemFactory is a class contained in the org.apache.commons.fileupload.disk package and List is an interface contained in the java.util package.)
If everything works fine, fileItemsList will contain a list of file items that are instances of FileItem of the org.apache.commons.fileupload package. A file item may contain an uploaded file or a simple name-value pair of a form field. (More details about FileItem will be provided later.)
By default, the ServletFileUpload instance created by the above Java code uses the following values when parsing the HTTP request:
Size threshold = 10,240 bytes. If the size of a file item is smaller than the size threshold, it will be stored in the memory. Otherwise it will be stored in a temporary file on disk.
Maximum HTTP request body size = -1, which means the server will accept HTTP request bodies of any size.
Repository = System default temp directory, whose value can be found by the Java code System.getProperty(“java.io.tmpdir”). Temporary files will be stored there.
If you do not like the default settings, you can change them using the methods setSizeThreshold() and setRespository() of the DiskFileItemFactory class and the setSizeMax() method of the ServletFileUpload class, like this:
DiskFileItemFactory diskFileItemFactory = new DiskFileItemFactory();
diskFileItemFactory.setSizeThreshold(40960); /* the unit is bytes */
File repositoryPath = new File(“/temp”);
diskFileItemFactory.setRepository(repositoryPath);
ServletFileUpload servletFileUpload = new ServletFileUpload(diskFileItemFactory);
servletFileUpload.setSizeMax(81920); /* the unit is bytes */
(In the above Java code snippet, File is a class of the java.io package.)
If the size of the HTTP request body exceeds the maximum you set, the SizeLimitExceededException exception (fully qualified name: org.apache.commons.fileupload.FileUploadBase.SizeLimitExceededException) will be thrown when you call the parseRequest() method:
try {
List fileItemsList = servletFileUpload.parseRequest(request);
/* Process file items… */
}
catch (SizeLimitExceededException ex) {
/* The size of the HTTP request body exceeds the limit */
}
Iterating through File Items
Third, we will iterate through the file items and process each of them. The isFormField() method of the FileItem interface is used to determine whether a file item contains a simple name-value pair of a form field or an uploaded file:
Iterator it = fileItemsList.iterator();
while (it.hasNext()){
FileItem fileItem = (FileItem)it.next();
if (fileItem.isFormField()){
/* The file item contains a simple name-value pair of a form field */
}
else{
/* The file item contains an uploaded file */
}
}
(In the above Java code snippet, Iterator is an interface in the java.util package and FileItem is an interface in the org.apache.commons.fileupload package.)
XHTML MP Example Demonstrating File Upload
The following example demonstrates how to upload a file from a Nokia 6230 cell phone. Here is the XHTML MP document of the example. As XHTML MP is compatible with HTML/XHTML, this XHTML MP document can also be opened with web browsers such as Microsoft Internet Explorer and Mozilla Firefox.
<?xml version=”1.0″?>
<!DOCTYPE html PUBLIC “-//WAPFORUM//DTD XHTML Mobile 1.0//EN” “http://www.wapforum.org/DTD/xhtml-mobile10.dtd”>
<html xmlns=”http://www.w3.org/1999/xhtml”>
<head>
<title>File Upload Example</title>
</head>
<body>
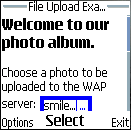
<h1>Welcome to our photo album.</h1>
<form action=”file_upload.php” method=”post” enctype=”multipart/form-data”>
<p><br/>
Choose a photo to upload to the WAP server:
<input name=”myFile” type=”file”/><br/>
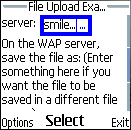
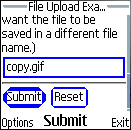
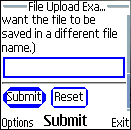
On the WAP server, save the file as: (Enter something here if you want the file to be saved in a different file name.)
<input name=”filename” type=”text”/>
</p>
<hr/>
<p>
<input type=”submit”/>
<input type=”reset”/>
</p>
</form>
</body>
</html>
The above XHTML MP document enables the user to choose a photo to upload and specify a different name for the file if he/she wants to do so.
If you have read our XHTML MP tutorial, the tags and attributes in the above XHTML MP document should be very familiar to you, with the exception of the enctype attribute of the <form> tag. The enctype attribute is used to specify how the form data should be encoded in the HTTP request when the method attribute value is post. The default value of the enctype attribute is “application/x-www-form-urlencoded”. It has to be changed to “multipart/form-data” to enable file upload.
In most cases, that’s all we need to know about “multipart/form-data” since we will not parse the form data encoded in HTTP requests ourselves but to use functions provided by a server-side technology. Writing the functions by our own is error-prone and is not recommended. If you need to learn the details of the “multipart/form-data” format, please refer to the Form-based File Upload in HTML (RFC 1867) document.
Note that the above XHTML MP document does not conform to the XHTML MP specification since “file” is not a valid value of the type attribute of the <input> tag in standard XHTML MP. Thus, the document cannot pass the check of an XHTML MP validator.
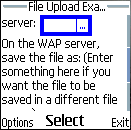
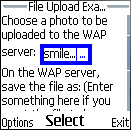
The screenshots below show what you will see on the screen of the Nokia 6230 cell phone:
|

If you click the file select field, you will see something like this:
|
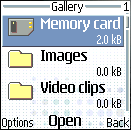
Select the “Memory card” item in the above menu and you will see something like this:
|

Select the “Options” softkey in the bottom left-hand corner of the screen of the cell phone and you will see:
|
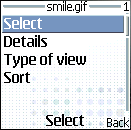
Select the “Select” option. The mobile browser will go back to the first page and the name of the file chosen will be displayed in the file select field, like this:
|
If you click the submit button of the form, the form data will be posted to the WAP server.
Now the only thing left is to write a server-side script to extract the uploaded file from the HTTP request and save it to the local file system or a database.
In the following sections, we will introduce to you how to handle file uploads with PHP and Java Servlet / JSP. If you use a server-side technology other than PHP and Java Servlet / JSP, the code will be different but the idea is the same.
Handling Form-based File Upload with PHP
In this section, we will introduce to you how to handle form-based file uploads with a PHP script. The techniques are the same for HTML and XHTML. At the time of writing, the latest version of PHP is 5.2.0. So, we assume you are using PHP 5.2.0 in this tutorial. For other versions of PHP, the procedures should be similar. If you are not familiar with PHP, you may want to read some introductory tutorials before going through this section.
Parsing Form Data and Getting Information about the Uploaded File with PHP
To extract an uploaded file from an HTTP request, we need to parse the form data that is encoded in the “multipart/form-data” format. In PHP, the form data in an HTTP request is automatically parsed. The PHP engine stores the information of the uploaded files in the $_FILES array.
Now let’s say the name attribute value of the <input type=”file”> element in a certain HTML/XHTML/XHTML MP document is myFile. To obtain the information about the uploaded file, use the following lines of PHP script:
/* Get the size of the uploaded file in bytes. */
$fileSize = $_FILES[‘myFile’][‘size’];
/* Get the name (including path information) of the temporary file created by PHP that contains the same contents as the uploaded file. */
$tmpFile = $_FILES[‘myFile’][‘tmp_name’];
/* Get the name of the uploaded file at the client-side. Some browsers include the whole path here (e.g. e:\files\myFile.txt), so you may need to extract the file name from the path. This information is provided by the client browser, which means you should be cautious since it may be a wrong value provided by a malicious user. */
$fileName = $_FILES[‘myFile’][‘name’];
/* Get the content type (MIME type) of the uploaded file. This information is provided by the client browser, which means you should be cautious since it may be a wrong value provided by a malicious user. */
$contentType = $_FILES[‘myFile’][‘type’];
Nokia cell phones such as Nokia 6230 determine the content type (MIME type) of the file to be uploaded by its file extension. The following table lists some of the file extensions that are recognized by Nokia 6230:
File extension | Content type / MIME type |
|---|---|
.jpg | image/jpeg |
.gif | image/gif |
.png | image/png |
.wbmp | image/vnd.wap.wbmp |
.txt | text/plain |
If the Nokia 6230 cell phone does not recognize a file extension, it will specify “application/octet-stream” as the content type / MIME type of the file in the HTTP request.
Upload File from WAP Cell Phone
Many wireless devices like cell phones can be used as a digital camera or as a music player. With them, you can take pictures, record video clips and listen to your favorite MP3 songs at any time and in any place.
However, your cell phone may not have enough space to store all your pictures, video clips, music files, ringtones, etc. To solve this, you can upload some files to a server through a WAP connection. When you need them, you can download them back to your cell phone.
For example, if you are traveling in a beautiful country, you will definitely take many photos and record many video clips with your cell phone. You can upload some of the image files and video files to a server to share with your friends and at the same time make room for more photos and videos along the journey.
Some cell phones support both file upload and 3G wireless network. The upload speed will be very fast if you are using a 3G connection.
How to Upload Files from WAP Cell Phones
Both WML (the markup language of WAP 1.x) and XHTML MP (the markup language of WAP 2.0) do not support file upload. But fortunately the browser on some WAP 2.0 cell phones support the <input type=”file”> element as an extension of XHTML MP. Some HTML-capable WAP browsers also support the <input type=”file”> element.
The <input type=”file”> element will be rendered as a button on a WAP browser. When it is clicked, the list of files stored on the wireless device and the memory card will be displayed. You can then choose a file to upload to the server.
At the server-side, you use a server-side technology like ASP / ASP.NET, ColdFusion, Java Servlet / JSP, Perl and PHP to extract the file from the HTTP request, just like what you will do to handle HTML file upload. Then you can process the file or save it to a directory or a database system.
Nokia Cell Phones that Support WAP Upload
Below shows some of the cell phone models from Nokia that support WAP upload at the time of writing (last updated: 23 Nov 2006). If you know a cell phone model (of any brand) that supports WAP upload but is not listed in the following table, you may report to us using the feedback form at the end of this web page.
Nokia cell phone model | Platform |
|---|---|
Nokia 2650 | Series 40 Platform 1st Edition |
Nokia 3200 | Series 40 Platform 1st Edition |
Nokia 3220 | Series 40 Platform 2nd Edition |
Nokia 3250 | S60 Platform 3rd Edition (formerly called Series 60) |
Nokia 5140 | Series 40 Platform 2nd Edition |
Nokia 6020 | Series 40 Platform 2nd Edition |
Nokia 6021 | Series 40 Platform 2nd Edition |
Nokia 6030 | Series 40 Platform 2nd Edition |
Nokia 6060 | Series 40 Platform 2nd Edition |
Nokia 6070 | Series 40 Platform 2nd Edition |
Nokia 6101 | Series 40 Platform 2nd Edition |
Nokia 6103 | Series 40 Platform 2nd Edition |
Nokia 6111 | Series 40 Platform 2nd Edition |
Nokia 6112 | Series 40 Platform 2nd Edition |
Nokia 6125 | Series 40 Platform 3rd Edition |
Nokia 6131 | Series 40 Platform 3rd Edition |
Nokia 6136 | Series 40 Platform 3rd Edition |
Nokia 6170 | Series 40 Platform 2nd Edition |
Nokia 6220 | Series 40 Platform 1st Edition |
Nokia 6230 | Series 40 Platform 2nd Edition |
Nokia 6230i | Series 40 Platform 2nd Edition |
Nokia 6233 | Series 40 Platform 3rd Edition |
Nokia 6270 | Series 40 Platform 3rd Edition |
Nokia 6280 | Series 40 Platform 2nd Edition |
Nokia 6282 | Series 40 Platform 3rd Edition |
Nokia 6630 | S60 Platform 2nd Edition Feature Pack 2 (formerly called Series 60) |
Nokia 6680 | S60 Platform 2nd Edition Feature Pack 2 (formerly called Series 60) |
Nokia 6681 | S60 Platform 2nd Edition Feature Pack 2 (formerly called Series 60) |
Nokia 6682 | S60 Platform 2nd Edition Feature Pack 2 (formerly called Series 60) |
Nokia 6810 | Series 40 Platform 1st Edition |
Nokia 6820 | Series 40 Platform 1st Edition |
Nokia 6822 | Series 40 Platform 2nd Edition |
Nokia 7200 | Series 40 Platform 1st Edition |
Nokia 7250i | Series 40 Platform 1st Edition |
Nokia 7260 | Series 40 Platform 2nd Edition |
Nokia 7270 | Series 40 Platform 2nd Edition |
Nokia 7360 | Series 40 Platform 2nd Edition |
Nokia 7370 | Series 40 Platform 3rd Edition |
Nokia 7380 | Series 40 Platform 3rd Edition |
Nokia 7600 | Series 40 Platform 1st Edition |
Nokia 8800 | Series 40 Platform 2nd Edition |
Nokia 9300 | Series 80 Platform 2nd Edition |
Nokia 9500 | Series 80 Platform 2nd Edition |
Nokia E60 | S60 Platform 3rd Edition (formerly called Series 60) |
Nokia E61 | S60 Platform 3rd Edition (formerly called Series 60) |
Nokia E70 | S60 Platform 3rd Edition (formerly called Series 60) |
Nokia N70 | S60 Platform 2nd Edition Feature Pack 3 (formerly called Series 60) |
Nokia N71 | S60 Platform 3rd Edition (formerly called Series 60) |
Nokia N72 | S60 Platform 2nd Edition Feature Pack 3 (formerly called Series 60) |
Nokia N73 | S60 Platform 3rd Edition (formerly called Series 60) |
Nokia N80 | S60 Platform 3rd Edition (formerly called Series 60) |
Nokia N90 | S60 Platform 2nd Edition Feature Pack 3 (formerly called Series 60) |
Nokia N91 | S60 Platform 3rd Edition (formerly called Series 60) |
Nokia N92 | S60 Platform 3rd Edition (formerly called Series 60) |
Nokia N93 | S60 Platform 3rd Edition (formerly called Series 60) |
XHTML MP Input Elements
Like HTML, XHTML MP provides numerous input element types for obtaining data from users. The following input element types are available in XHTML MP:
Text field
Password field
Checkbox
Radio button
Hidden field
All of the above input elements are created with the <input> element. To send the user data to the server, the <input> element has to be used in conjunction with the <form> element. The <form> element will be mentioned in more detail later at the “Sending Data to the Server in XHTML MP” section.
The type attribute of the <input> element defines the input element type in XHTML MP.
The name attribute of the <input> element specifies the name of the input element. The name will be used to retrieve the user data at the server.
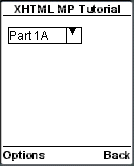
XHTML MP Selection Lists
A selection list is a list of options that a user can select. The <select></select> tags define a selection list in XHTML MP. One or more <option></option> tag pairs are enclosed within the <select></select> tags. The <option></option> tag pair defines a list item.
To send the value of the selected item to the server, the <select> tag has to be used in conjunction with the <form> tag. You can learn how to use the <form> tag and how to read the value of the selected item at the server later in the “Sending Data to the Server in XHTML MP” section of this tutorial.
The name attribute of the <select> tag specifies the name of a selection list. At the server-side, the name will be used to retrieve the value of the selected item. The value of an item is specified with the value attribute of the <option> tag.
Let’s take a look at the following XHTML MP example. It can help you understand better what we are talking about.
<?xml version=”1.0″?>
<!DOCTYPE html PUBLIC “-//WAPFORUM//DTD XHTML Mobile 1.0//EN” “http://www.wapforum.org/DTD/xhtml-mobile10.dtd”>
<html xmlns=”http://www.w3.org/1999/xhtml”>
<head>
<title>XHTML MP Tutorial</title>
</head>
<body>
<form method=”get” action=”xhtml_mp_tutorial_proc.asp”>
<p>
<select name=”selectionList”>
<option value=”tutorial_A”>XHTML MP Tutorial Part A</option>
<option value=”tutorial_B”>XHTML MP Tutorial Part B</option>
<option value=”tutorial_C”>XHTML MP Tutorial Part C</option>
</select>
</p>
</form>
</body>
</html>
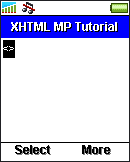
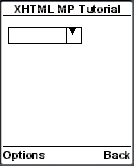
The result of the above XHTML MP example in WAP browsers is shown below.
|
|
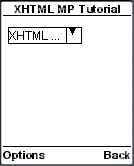
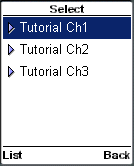
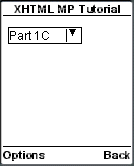
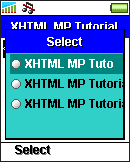
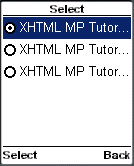
If you select the selection list, the options available will be displayed like this:
|
|
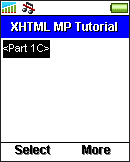
The selected attribute of the <option> tag can be used to set the default option. The default option will be initially selected. The selected attribute only accepts the value “selected”. Here is an example that shows how to pre-select the second option “XHTML MP Tutorial Part B”:
<option value=”tutorial_B” selected=”selected”>XHTML MP Tutorial Part B</option>
Selecting Multiple Options
In the previous XHTML MP example, a user can only select one option of the selection list. To allow a user to select multiple options, you need to make use of the multiple attribute of the <select> tag. The multiple attribute can only be assigned with the value “multiple”. Options in such kind of selection lists are displayed as check boxes on the screen.
Let’s take a look at the following XHTML MP example:
<?xml version=”1.0″?>
<!DOCTYPE html PUBLIC “-//WAPFORUM//DTD XHTML Mobile 1.0//EN” “http://www.wapforum.org/DTD/xhtml-mobile10.dtd”>
<html xmlns=”http://www.w3.org/1999/xhtml”>
<head>
<title>XHTML MP Tutorial</title>
</head>
<body>
<form method=”get” action=”xhtml_mp_tutorial_proc.asp”>
<p>
<select name=”selectionList” multiple=”multiple”>
<option value=”tutorial_A”>XHTML MP Tutorial Part A</option>
<option value=”tutorial_B”>XHTML MP Tutorial Part B</option>
<option value=”tutorial_C”>XHTML MP Tutorial Part C</option>
</select>
</p>
</form>
</body>
</html>
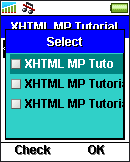
The result of the above XHTML MP code is shown below:
|
|
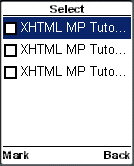
When the multiple attribute is present in the <select> tag, it is possible to specify multiple default options. To do so, add selected=”selected” to each of the <option> tags that should be selected by default. Here is an example:
<select name=”selectionList” multiple=”multiple”>
<option value=”tutorial_A” selected=”selected”>XHTML MP Tutorial Part A</option>
<option value=”tutorial_B” selected=”selected”>XHTML MP Tutorial Part B</option>
<option value=”tutorial_C”>XHTML MP Tutorial Part C</option>
</select>
The above lines of code tell the WAP browser that the first and second options of the selection list should be pre-selected.
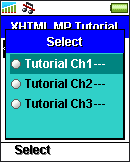
Organizing Options in XHTML MP Selection Lists
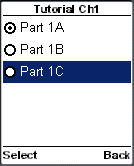
If an XHTML MP selection list contains too many options, it will look disorganized. To tackle this, you can arrange options into groups. You define an option group using the <optgroup></optgroup> tag pair. The label attribute of the <optgroup> tag specifies the title of an option group.
The usage of the <optgroup></optgroup> tags is shown in this XHTML MP example:
<?xml version=”1.0″?>
<!DOCTYPE html PUBLIC “-//WAPFORUM//DTD XHTML Mobile 1.0//EN” “http://www.wapforum.org/DTD/xhtml-mobile10.dtd”>
<html xmlns=”http://www.w3.org/1999/xhtml”>
<head>
<title>XHTML MP Tutorial</title>
</head>
<body>
<form method=”get” action=”xhtml_mp_tutorial_proc.asp”>
<p>
<select name=”selectionList”>
<optgroup label=”Tutorial Ch1″>
<option value=”tutorial_1A”>Part 1A</option>
<option value=”tutorial_1B”>Part 1B</option>
<option value=”tutorial_1C”>Part 1C</option>
</optgroup>
<optgroup label=”Tutorial Ch2″>
<option value=”tutorial_2A”>Part 2A</option>
<option value=”tutorial_2B”>Part 2B</option>
<option value=”tutorial_2C”>Part 2C</option>
</optgroup>
<optgroup label=”Tutorial Ch3″>
<option value=”tutorial_3A”>Part 3A</option>
<option value=”tutorial_3B”>Part 3B</option>
<option value=”tutorial_3C”>Part 3C</option>
</optgroup>
</select>
</p>
</form>
</body>
</html>
This is the result of the above XHTML MP example in WAP browsers:
|
|