How to Use MQTT With the Raspberry Pi and ESP8266

How to Use MQTT With the Raspberry Pi and ESP8266

In this Instructable, I will explain what the MQTT protocol is and how it is used to communicate between devices.Then, as a practical demonstration, I shall show you how to setup a simple two client system, where an ESP8266 module will send a message to a Python program when a button is pushed. Specifically, I am using an Adafruit HUZZAH module for this project, a Raspberry Pi and a desktop computer. The Raspberry Pi will be acting as the MQTT broker, and the Python client will be run from a separate desktop computer (optional, as this could be run on the Raspberry Pi).

To follow along with this Instructable, you will need to have some basic knowledge of electronics, and how to use the Arduino software. You should also be familiar with using a command line interface (for the Raspberry Pi). Hopefully, once you’ve gained the knowledge of what MQTT is, and how to use it in a basic scenario, you will be able to create your own IoT projects!

Required Parts

  • 1 x Raspberry Pi, connected to a local network (running Jessie)
  • 1 x ESP8266 Module (Adafruit HUZZAH)
  • 1 x Breadboard
  • 3 x Jumper Wires (Male-to-Male)
  • 1 x Pushbutton
  • 1 x 10k Ohm Resistor (Brown-Black-Orange colour code)

I’ve created this Instructable, as MQTT has always interested me as a protocol and there are many different ways it could be used. However, I couldn’t seem to get my head around how to code devices to use it. This was because I didn’t know/understand what was actually going on to take my “Hello, World!” from device A and send it to device B. Hence, I decided to write this Instructable to (hopefully) teach you how it works, and to also reinforce my own understanding of it!


Step 1: What Is MQTT?

What Is MQTT?

MQTT, or MQ Telemetry Transport, is a messaging protocol which allows multiple devices to talk to each other. Currently, it is a popular protocol for the Internet of Things, although it has been used for other purposes – for example, Facebook Messenger. Interestingly MQTT was invented in 1999 – meaning it’s as old as me!

MQTT is based around the idea that devices can publish or subscribe to topics. So, for example. If Device #1 has recorded the temperature from one of its sensors, it can publish a message which contains the temperature value it recorded, to a topic (e.g. “Temperature”). This message is sent to an MQTT Broker, which you can think of as a switch/router on a local area network. Once the MQTT Broker has received the message, it will send it to any devices (in this case, Device #2) which are subscribed to the same topic.

In this project, we will be publishing to a topic using an ESP8266, and creating a Python script that will subscribe to this same topic, via a Raspberry Pi which will act as the MQTT Broker. The great thing about MQTT is that it is lightweight, so it perfect for running on small microcontrollers such as an ESP8266, but it is also widely available – so we can run it on a Python script as well.

Hopefully, at the end of this project, you will have an understanding of what MQTT is and how to use it for your own projects in the future.

Step 2: Installing the MQTT Broker on the Raspberry Pi

Installing the MQTT Broker on the Raspberry Pi

To setup our MQTT system, we need a broker, as explained in the previous step. For the Raspberry Pi, we will be using the “Mosquitto” MQTT broker. Before we install this, it is always best to update our Raspberry Pi.

sudo apt-get update
sudo apt-get upgrade

Once you’ve done this, install mosquitto and then the mosquitto-clients packages.

sudo apt-get install mosquitto -y
sudo apt-get install mosquitto-clients -y

When you’ve finished installing these two packages, we are going to need to configure the broker. The mosquitto broker’s configuration file is located at /etc/mosquitto/mosquitto.conf, so open this with your favourite text editor. If you don’t have a favourite text editor or don’t know how to use any of the command line editors, I’ll be using nano so you can follow along:

sudo nano /etc/mosquitto/mosquitto.conf

At the bottom of this file, you should see the line:

include_dir /etc/mosquitto/conf.d

Delete this line. Add the following lines to the bottom of the file.

allow_anonymous false
password_file /etc/mosquitto/pwfile
listener 1883

By typing those lines, we’ve told mosquitto that we don’t want anyone connecting to our broker who doesn’t supply a valid username and password (we’ll get on to set these in a second) and that we want mosquitto to listen for messages on port number 1883.

If you don’t want the broker to require a username and password, don’t include the first two lines that we added (i.e. allow_anonymous… and password_file…). If you have done this, then skip to rebooting the Raspberry Pi.

Now close (and save) that file. If you are following along with the nano example, press CTRL+X, and type Y when prompted.

Because we’ve just told mosquitto that users trying to use the MQTT broker need to be authenticated, we now need to tell mosquitto what the username and password are! So, type the following command – replacing username with the username that you would like – then enter the password you would like when prompted (Note: if, when editing the configuration file, you specified a different password_file path, replace the path below with the one you used).

sudo mosquitto_passwd -c /etc/mosquitto/pwfile username

As we’ve just changed the mosquitto configuration file, we should reboot the Raspberry Pi.

sudo reboot

Once the Raspberry Pi has finished rebooting, you should have a fully functioning MQTT broker! Next, we are going to try to interact with it, using a number of different devices/methods!

Step 3: Testing the Broker

Testing the Broker

Once you’ve installed mosquitto on the Raspberry Pi, you can give it a quick test – just to make sure everything is working correctly. For this purpose, there are two commands that we can use on the command line. mosquitto_pub and mosquitto_sub. In this step, I will guide you through using each of these to test our broker.

In order to test the broker, you will need to open two command line windows. If you are using Putty or another SSH client, this is as simple as opening another SSH window and logging in as usual. If you are accessing your Pi from a UNIX terminal, this is exactly the same. If you are using the Raspberry Pi directly, you will need to open two terminal windows in the GUI mode (the command startxcan be used to start the GUI).

Now that you have opened two windows, we can get started on the testing. In one of the two terminals, type the following command, replacing username and password with the ones you setup in the previous step.

mosquitto_sub -d -u username -P password -t test

If you decided not to set a username and password in the previous step, then from now on, ignore the -u and -P flags in the commands. So, as an example, the mosquitto_sub command would now be:

mosquitto_sub -d -t test

The mosquitto_sub command will subscribe to a topic, and display any messages that are sent to the specified topic in the terminal window. Here, -d means debug mode, so all messages and activity will be output on the screen. -u and -P should be self-explanatory. Finally, -t is the name of the topic we want to subscribe to – in this case, “test”.

Next, in the other terminal window, we are going to try and publish a message to the “test” topic. Type the following, remembering again to change username and password:

mosquitto_pub -d -u username -P password -t test -m "Hello, World!"

When you press enter, you should see your message “Hello, World!” appear in the first terminal window we used (to subscribe). If this is the case, you’re all set to start working on the ESP8266!

Step 4: Setting Up the ESP8266 (Adafruit HUZZAH)

Setting Up the ESP8266 (Adafruit HUZZAH)

This step if specific to the Adafruit HUZZAH (as that is what I am using to complete this project). If you are using a different Arduino / ESP8266 device, you may wish to skip this step. However, I would advise you skim read it, just in case there is any information here that may be relevant to you.

For this project, I am going to be programming the HUZZAH with the Arduino software. So, if you haven’t already, make sure to install the Arduino software (newer than 1.6.4). You can download it here.

Once you have installed the Arduino software, open it and navigate to File->Preferences. Here you should see (near the bottom of the window) a text box with the label: “Additional Boards Manager URLs”. In this text box, copy and paste the following link:

http://arduino.esp8266.com/stable/package_esp8266com_index.json

Click OK to save your changes. Now open the Board Manager (Tools->Board->Board Manager) and search for ESP8266. Install the esp8266 by ESP8266 Community package. Restart the Arduino software.

Now, before we can program the board, we need to select a few different options. In the Tools menu option, select Adafruit HUZZAH ESP8266 for Board, 80 MHz for the CPU Frequency (you can use 160 MHz if you wish to overclock it, but for now I’m going to use 80 MHz), 4M (3M SPIFFS) for the Flash Size, and 115200 for the Upload Speed. Also, make sure to select the COM port that you are using (this will depend on your setup).

Before you can upload any code, you need to make sure that the HUZZAH is in bootloader mode. To enable this, hold down the button on the board marked GPIO0, and whilst this is held, hold down the Reset button as well. Then, release the Reset button, and then GPIO0. If you have done this correctly, the red LED that came on when you pressed GPIO0 should now be dimly lit.

To upload code to the microcontroller, first make sure the HUZZAH is in bootloader mode, then simply click the upload button in the Arduino IDE.

If you are having any trouble setting up the HUZZAH, further information can be found at Adafruit’s own tutorial.

Step 5: Programming the ESP8266

Programming the ESP8266

Now we will begin to program the ESP8266, but before we can start, you will need to install the following libraries in the Arduino Library manager (Sketch->Include Libraries->Manage Libraries)

  • Bounce2
  • PubSubClient

Once you’ve installed those libraries, you will be able to run the code I’ve included in this Instructable (MQTT_Publish.zip). I’ve made sure to comment it so that you can understand what each section is doing, and this should hopefully enable you to adapt it to your needs.

Remember to change the constants at the top of the code so that your ESP8266 can connect to your WiFi network and your MQTT Broker (the Raspberry Pi).

If you decided not to set a username and password for the MQTT Broker, then download the MQTT_PublishNoPassword.zip file instead.

Attachments

Step 6: Installing Python Client (paho-mqtt)

Installing Python Client (paho-mqtt)

Thankfully, this step is very simple! To install the mosquitto python client, you just need to type the following into the command line (Linux/Mac) or even command prompt (Windows).

pip install paho-mqtt

Note: Windows command prompt may have an issue running the pip command if you didn’t specify that you wanted pip installed and python added to your PATH variable when you installed Python. There are a number of ways of fixing this, but I think just reinstalling Python is the easiest way. If in doubt – give it a google!

Step 7: Python Client – Subscribing

Python Client - Subscribing

In this step, we are going to setup the Python script (either on the Raspberry Pi itself or on another computer connected to the network) to handle all of the messages that are sent (published) by the ESP8266 to the MQTT topic.

I have included the python code below (PythonMQTT_Subscribe.py), which has been commented to help you understand what is going on, but I will explain some of the main features here as well.

If you didn’t set a username and password for the MQTT connection earlier, download the PythonMQTT_SubscribeNoPassword.py file instead.

Attachments

Step 8: Communicating Between ESP8266 Devices

Communicating Between ESP8266 Devices

If you want to set up an IoT network, for example, you may wish to communicate between ESP8266 devices. Thankfully, this isn’t much more complex than the code we’ve written before, however, there are a couple of notable changes.

For one ESP to send data to another, the first ESP will need to publish to the topic, and the second ESP will need to subscribe to that topic. This setup will allow for a one-way conversation – ESP(1) to ESP(2). If we want ESP(2) to talk back to ESP(1), we can create a new topic, to which ESP(2) will publish, and ESP(1) will subscribe. Thankfully, we can have multiple subscribers on the same topic, so if you want to send data to a number of systems, you will only need one topic (to which they all subscribe, except the device which is sending the data, as that will be publishing).

If you need help figuring out what each device needs to do, think about the system as a room of people. If ESP(1) is publishing, you can imagine this device as a “speaker”, and any devices that are subscribing to the topic are “listeners” in this example.

I have included some example code below, which demonstrates how an ESP8266 can subscribe to a topic, and listen for certain messages – 1 and 0. If 1 is received, the on-board LED (for the HUZZAH – GPIO 0) is switched on. If 0 is received, this LED is switched off.

If you want to process more complex data, this should be done in the ReceivedMessage function (see code).

For your own projects, if you need to both send and receive data, you can incorporate the publish function from the previous example into the code included in this step. This should be handled in the main Arduino loop() function.

Remember to change the variables at the top of the code to suit your network!

Go 語言很好很強大,但我有幾個問題想吐槽

Go 是一門非常不錯的編程語言。然而,我在公司的Slack 編程頻道中對Go 的抱怨卻越來越多(猜到我是做啥了的吧?),因此我認為有必要把這些吐槽寫下來並放在這裡,這樣當人們問我抱怨什麼時,我給他們一個鏈接就行了。

image

先聲明一下,在過去的一年裡,我大量地使用Go語言開發命令行應用程序、scclc和API。其中既有供客戶端調用的大規模API,也有即將在https://searchcode.com/使用的語法高亮顯示器

我這些批評全部是針對Go 語言的。但是,我對使用過的每種語言都有不滿。我非常贊同下面的話:

“世界上只有兩種語言:人們抱怨的語言和沒人使用的語言。” —— Bjarne Stroustrup

1 不支持函數式編程

我並不是一個函數式編程狂熱者。說到Lisp 語言,我首先想到的是語言障礙。

這可能是Go 語言最大的痛點了。與大部分人不同,我不希望Go 支持泛型,因為它會為多數Go 項目帶來不必要的複雜性。我希望Go 語言支持適用於內置切片和Map 的函數式方法。切片和Map 具有通用性,並且可以容納任何類型,從這個意義上講,它們已經非常神奇。在Go 語言中只有利用接口才能實現類似效果,但這樣一來將喪失安全性和速度。

例如,請考慮下面的問題。

給定兩個字符串切片,找出二者都包含的字符串,並將其放入新的切片以備後用。

複製代碼

existsBoth := []string{}
for _, first := range firstSlice {
for _, second := range secondSlice {
if first == second {
existsBoth = append(existsBoth, proxy)
break
}
}
}

上面是一個用Go 語言實現的簡單方案。當然還有其它方法,比如借助Map 來減少運行時間。這裡我們假設內存足夠用或者切片都不太大,同時假設優化運行時間帶來的複雜性遠超收益,因此不值得優化。作為對比,使用Java 流和函數式編程把相同的邏輯重寫如下:

複製代碼

var existsBoth = firstList.stream()
.filter(x -> secondList.contains(x))
.collect(Collectors.toList());

上面的代碼隱藏了算法的複雜性,但是,你更容易理解它實際做的事情。

與Go 代碼相比,Java 代碼的意圖一目了然。真正靈活之處在於,添加更多的過濾條件易如反掌。如果使用Go 語言添加下面例子中的過濾條件,我們需要在嵌套的for 循環中再添加兩個if 條件。

複製代碼

var existsBoth = firstList.stream()
.filter(x -> secondList.contains(x))
.filter(x -> x.startsWith(needle))
.filter(x -> x.length() >= 5)
.collect(Collectors.toList());

有些借助go generate 命令的項目可以幫你實現上面的一些功能。但是,如果缺少良好的IDE 支持,抽取循環中的語句作為單獨的方法是一件低效又麻煩的事情。

2 通道/ 並行切片處理

Go 通道通常都很好用。但它並不能提供無限的並發能力。它確實存在一些會導致永久阻塞的問題,但這些問題用競爭檢測器能很容易地解決。對於數量不確定或不知何時結束的流式數據,以及非CPU 密集型的數據處理方法,Go 通道都是很好的選擇。

Go 通道不太適合併行處理大小已知的切片。

多線程編程、理論和實踐

image

幾乎在其它任何語言中,當列表或切片很大時,為了充分利用所有CPU 內核,通常都會使用並行流、並行Linq、Rayon、多處理或其它語法來遍歷列表。遍歷後的返回值是一個包含已處理元素的列表。如果元素足夠多,或者處理元素的函數足夠複雜,多核系統會更高效。

但是在Go 語言中,實現高效處理所需要做的事情卻並不顯而易見。

一種可能的解決方案是為切片中的每個元素都創建一個Go 例程。由於Go 例程的開銷很低,因此從某種程度上來說這是一個有效的策略。

複製代碼

toProcess := []int{1,2,3,4,5,6,7,8,9}
var wg sync.WaitGroup
for i, _ := range toProcess {
wg.Add(1)
go func(j int) {
toProcess[j] = someSlowCalculation(toProcess[j])
wg.Done()
}(i)
}
wg.Wait()
fmt.Println(toProcess)

上面的代碼會保持切片中元素的順序,但我們假設不必保持元素順序。

這段代碼的第一個問題是增加了一個WaitGroup,並且必須要記得調用它的Add 和Done 方法。這增加了開發人員的工作量。如果弄錯了,這個程序不會產生正確的輸出,結果是要么輸出不確定,要么程序永不結束。此外,如果列表很長,你會為每個列表創建一個Go 例程。正如我之前所說,這不是問題,因為Go 能輕鬆搞定。問題在於,每個Go 例程都會爭搶CPU 時間片。因此,這不是執行該任務的最有效方式。

你可能希望為每個CPU內核創建一個Go例程,並讓這些例程選取列表並處理。創建Go例程的開銷很小,但是在一個非常緊湊的循環中創建它們會使開銷陡增。當我開發scc時就遇到了這種情況,因此我採用了每個CPU內核對應一個Go例程的策略。在Go語言中,要這樣做的話,你首先要創建一個通道,然後遍歷切片中的元素,使函數從該通道讀取數據,之後從另一個通道讀取。我們來看一下。

複製代碼

toProcess := []int{1,2,3,4,5,6,7,8,9}
var input = make(chan int, len(toProcess))
for i, _ := range toProcess {
input <- i
}
close(input)
var wg sync.WaitGroup
for i := 0; i < runtime.NumCPU(); i++ {
wg.Add(1)
go func(input chan int, output []int) {
for j := range input {
toProcess[j] = someSlowCalculation(toProcess[j])
}
wg.Done()
}(input, toProcess)
}
wg.Wait()
fmt.Println(toProcess)

上面的代碼創建了一個通道,然後遍歷切片,將索引值放入通道。接下來我們為每個CPU 內核創建一個Go 例程,操作系統會報告並處理相應的輸入,然後等待,直到所有操作完成。這裡有很多代碼需要理解。

然而,這種實現有待商榷。如果切片非常大,通道的緩衝區長度和切片大小相同,你可能不希望創建一個有這麼大緩衝區的通道。因此,你應該創建另一個Go 例程來遍歷切片,並將切片中的值放入通道,完成後關閉通道。但這樣一來代碼會變得冗長,因此我把它去掉了。我希望可以大概地闡明基本思路。

使用Java 語言大致這樣實現:

複製代碼

var firstList = List.of(1,2,3,4,5,6,7,8,9);
firstList = firstList.parallelStream()
.map(this::someSlowCalculation)
.collect(Collectors.toList());

通道和流並不等價。使用隊列去仿寫Go 代碼的邏輯更好一些,因為它們更具有可比性,但我們的目的不是進行1 對1 的比較。我們的目標是充分利用所有的CPU 內核處理切片或列表。

如果someSlowCalucation 方法調用了網絡或其它非CPU 密集型任務,這當然不是問題。在這種情況下,通道和Go 例程都會表現得很好。

這個問題與問題#1 有關。如果Go 語言支持適用於切片/Map 對象的函數式方法,那麼就能實現這個功能。但是,如果Go 語言支持泛型,有人就可以把上面的功能封裝成像Rust 的Rayon 一樣的庫,讓每個人都從中受益,這就很令人討厭了(我不希望Go 支持泛型)。

順便說一下,我認為這個缺陷妨礙了Go 語言在數據科學領域的成功,這也是為什麼Python 仍然是數據科學領域的王者。Go 語言在數值操作方面缺乏表現力和能力,原因就是以上討論的這些。

3 垃圾回收器

Go 的垃圾回收器做得非常不錯。我開發的應用程序通常都會因為新版本的改進而變得更快。但是,它以低延遲為最高優先級。對於API 和UI 應用來說,這個選擇完全可以接受。對於包含網絡調用的應用,因為網絡調用往往會是瓶頸,所以它也沒問題。

我發現的問題是Go對UI應用來講一點也不好(我不知道它有任何良好的支持)。如果你想要盡可能高的吞吐量,那這個選擇會讓你很受傷。這是我開發scc時遇到的一個主要問題。scc是一個CPU密集型的命令行工具。為了解決這個問題,我不得不在代碼裡添加邏輯關閉GC,直到達到某個閾值。但是我又不能簡單的禁用它,因為有些任務會很快耗盡內存。

缺乏對GC 的控制時常令人沮喪。你得學會適應它,但是,有時候如果能做到這樣該有多好:“嘿,這些代碼確實需要盡可能快地運行,所以如果你能在高吞吐模式運行一會,那就太好了。”

image

我認為這種情況在Go 1.12 版本中有所改善,因為GC 得到了進一步的改進。但僅僅是關閉和打開GC 還不夠,我期望更多的控制。如果有時間我會再進行研究。

4 錯誤處理

我並不是唯一一個抱怨這個問題的人,但我不吐不快。

複製代碼

value, err := someFunc()
if err != nil {
// Do something here
}
err = someOtherFunc(value)
if err != nil {
// Do something here
}

上面的代碼很乏味。Go 甚至不會像有些人建議的那樣強制你處理錯誤。你可以使用“_”顯式忽略它(這是否算作對它進行了處理呢?),你還可以完全忽略它。比如上面的代碼可以重寫為:

複製代碼

value, _ := someFunc()
someOtherFunc(value)

很顯然,我顯式忽略了someFunc 方法的返回。someOtherFunc(value)方法也可能返回錯誤值,但我完全忽略了它。這裡的錯誤都沒有得到處理。

說實話,我不知道如何解決這個問題。我喜歡Rust中的“?”運算符,它可以幫助避免這種情況。V-Lang https://vlang.io/看起來也可能有一些有趣的解決方案。

另一個辦法是使用可選類型(Optional types)並去掉nil,但這不會發生在Go 語言裡,即使是Go 2.0 版本,因為它會破壞向後兼容性。

結語

Go 仍然是一種非常不錯的語言。如果你讓我寫一個API,或者完成某個需要大量磁盤/ 網絡調用的任務,它依然是我的首選。現在我會用Go 而非Python 去完成很多一次性任務,數據合併任務是例外,因為函數式編程的缺失使執行效率難以達到要求。

與Java 不同,Go 語言盡量遵循“最小驚喜“原則。比如可以這樣比較字兩個符串是否相等:stringA == stringB。但如果你這樣比較兩個切片,那麼會產生編譯錯誤。這些都是很好的特性。

的確,二進製文件還可以變的更小(一些編譯標誌和upx可以解決這個問題),我希望它在某些方面變得更快,GOPATH雖然不是很好,但也沒有人們想得那麼糟糕,默認的單元測試框架缺少很多功能,模擬(mocking)有點讓人痛苦…

它仍然是我使用過的效率較高的語言之一。我會繼續使用它,雖然我希望https://vlang.io/能最終發布,並解決我的很多抱怨。V語言或Go 2.0,Nim或Rust。現在有很多很酷的新語言可以使用,我們開發人員真的要被寵壞了。

查看英文原文:

https://boyter.org/posts/my-personal-complaints-about-golang/

本博客Nginx 配置之安全篇

之前有細心的朋友問我,為什麼你的博客副標題是「專注WEB 端開發」,是不是少了「前端」的「前」。我想說的是,儘管我從畢業到現在七年左右的時間一直都在專業前端團隊從事前端相關工作,但這並不意味著我的知識體係就必須局限於前端這個範疇內。現在比較流行「全棧工程師」的概念,我覺得全棧意味著一個項目中,各個崗位所需要的技能你都具備,但並不一定意味著你什麼都需要做。你需要做什麼,更多是由能力、人員配比以及成本等各個因素所決定。儘管我現在的工作職責是在WEB 前端領域,但是我的關注點在整個WEB 端。

我接觸過的有些前端朋友,從一開始就把自己局限在一個很小的範圍之中,這在大公司到也無所謂,大公司分工明確,基礎設施齊全,你只要做好自己擅長的那部分就可以了。但是當他們進入創業公司之後,會發現一下子來了好多之前完全沒有接觸過的東西,十分被動。

去年我用Lua + OpenResty替換了線上千萬級的PHP + Nginx服務,至今穩定運行,算是前端之外的一點嘗試。我一直認為學習任何知識很重要的一點是實踐,所以我一直都在折騰我的VPS,進行各種WEB安全、優化相關的嘗試。我打算從安全和性能兩方面介紹一下本博客所用Nginx的相關配置,今天先寫安全相關的。

隱藏不必要的信息

大家可以看一下我的博客請求響應頭,有這麼一行server: nginx,說明我用的是Nginx服務器,但並沒有具體的版本號。由於某些Nginx漏洞只存在於特定的版本,隱藏版本號可以提高安全性。這只需要在配置裡加上這個就可以了:

server_tokens   off;

如果想要更徹底隱藏所用Web Server,可以修改Nginx源碼,把Server Name改掉再編譯,具體步驟可以自己搜索。需要提醒的是:如果你的網站支持SPDY,只改動網上那些文章寫到的地方還不夠,跟SPDY有關的代碼也要改。更簡單的做法是改用Tengine這個Nginx的增強版,並指定server_tag為off或者任何想要的值就可以了。另外,既然想要徹底隱藏Nginx,404、500等各種出錯頁也需要自定義。

同樣,一些WEB語言或框架默認輸出的x-powered-by也會洩露網站信息,他們一般都提供了修改或移除的方法,可以自行查看手冊。如果部署上用到了Nginx的反向代理,也可以通過proxy_hide_header指令隱藏它:

proxy_hide_header        X-Powered-By;

禁用非必要的方法

由於我的博客只處理了GET、POST 兩種請求方法,而HTTP/1 協議還規定了TRACE 這樣的方法用於網絡診斷,這也可能會暴露一些信息。所以我針對GET、POST 以及HEAD 之外的請求,直接返回了444 狀態碼(444 是Nginx 定義的響應狀態碼,會立即斷開連接,沒有響應正文)。具體配置是這樣的:

NGINXif ($request_method !~ ^(GET|HEAD|POST)$ ) {
    return    444;
}

合理配置響應頭

我的博客是由自己用ThinkJS 寫的Node 程序提供服務,Nginx 通過proxy_pass 把請求反向代理給Node 綁定的IP 和端口。在最終輸出時,我給響應增加了以下頭部:

NGINXadd_header  Strict-Transport-Security  "max-age=31536000";
add_header  X-Frame-Options  deny;
add_header  X-Content-Type-Options  nosniff;
add_header  Content-Security-Policy  "default-src 'self'; script-src 'self' 'unsafe-inline' 'unsafe-eval' https://a.disquscdn.com; img-src 'self' data: https://www.google-analytics.com; style-src 'self' 'unsafe-inline'; frame-src https://disqus.com";

Strict-Transport-Security(簡稱為HSTS)可以告訴瀏覽器,在指定的max-age內,始終通過HTTPS訪問我的博客。即使用戶自己輸入HTTP的地址,或者點擊了HTTP鏈接,瀏覽器也會在本地替換為HTTPS再發送請求。另外由於我的證書不支持多域名,我沒有加上includeSubDomains。關於HSTS更多信息,可以查看我之前的介紹

X-Frame-Options用來指定此網頁是否允許被iframe嵌套,deny就是不允許任何嵌套發生。關於這個響應頭的更多介紹可以看這裡

X-Content-Type-Options用來指定瀏覽器對未指定或錯誤指定Content-Type資源真正類型的猜測行為,nosniff表示不允許任何猜測。這部分內容更多介紹見這裡

Content-Security-Policy(簡稱為CSP)用來指定頁面可以加載哪些資源,主要目的是減少XSS的發生。我允許了來自本站、disquscdn的外鏈JS,還允許內聯JS,以及在JS中使用eval;允許來自本站和google統計的圖片,以及內聯圖片(Data URI形式);允許本站外鏈CSS以及內聯CSS;允許iframe加載來自disqus的頁面。對於其他未指定的資源,都會走默認規則self,也就是只允許加載本站的。關於CSP的詳細介紹請看這裡

之前的博客中,我還介紹過X-XSS-Protection這個響應頭,也可以用來防範XSS。不過由於有了CSP,所以我沒配置它。

需要注意的是,以上這些響應頭現代瀏覽器才支持,所以並不是說加上他們,網站就可以不管XSS,萬事大吉了。但是鑑於低廉的成本,還是都配上。

HTTPS 安全配置

啟用HTTPS 並正確配置了證書,意味著數據傳輸過程中無法被第三者解密或修改。有了HTTPS,也得合理配置好Web Server,才能發揮最大價值。我的博客關於HTTPS 這一塊有以下配置:

NGINXssl_certificate      /home/jerry/ssl/server.crt;
ssl_certificate_key  /home/jerry/ssl/server.key;
ssl_dhparam          /home/jerry/ssl/dhparams.pem;

ssl_ciphers          ECDHE-ECDSA-CHACHA20-POLY1305:ECDHE-RSA-CHACHA20-POLY1305:ECDHE-ECDSA-AES128-GCM-SHA256:ECDHE-RSA-AES128-GCM-SHA256:ECDHE-ECDSA-AES256-GCM-SHA384:ECDHE-RSA-AES256-GCM-SHA384:ECDHE-ECDSA-AES128-SHA:ECDHE-RSA-AES128-SHA:ECDHE-ECDSA-AES256-SHA384:ECDHE-RSA-AES256-SHA384:ECDHE-ECDSA-AES256-SHA:ECDHE-RSA-AES256-SHA:ECDHE-ECDSA-AES128-SHA256:ECDHE-RSA-AES128-SHA256:AES128-GCM-SHA256:AES256-GCM-SHA384:DES-CBC3-SHA;

ssl_prefer_server_ciphers  on;

ssl_protocols        TLSv1 TLSv1.1 TLSv1.2;

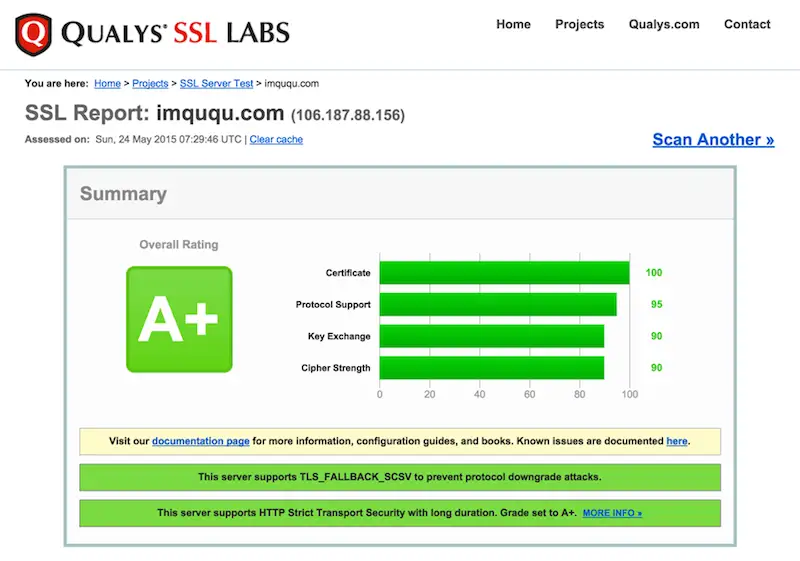
最終效果是我的博客在ssllabs的測試中達到了A+,如下圖:

ssllabs test

如何配置ssl_ciphers可以參考這個網站。需要注意的是,這個網站默認提供的加密方式安全性較高,一些低版本客戶端並不支持,例如IE9-、Android2.2-和Java6-。如果需要支持這些老舊的客戶端,需要點一下網站上的「Yes, give me a ciphersuite that works with legacy / old software」鏈接。

另外,我在ssl_ciphers最開始加上了CHACHA20,這是因為我的Nginx支持了CHACHA20_POLY1305加密算法,這是由Google開發的新一代加密方式,它有兩方面優勢:更好的安全性和更好的性能(尤其是在移動和可穿戴設備上)。下面有一張移動平台上它與AES-GCM的加密速度對比圖(via):

chacha20 poly1305

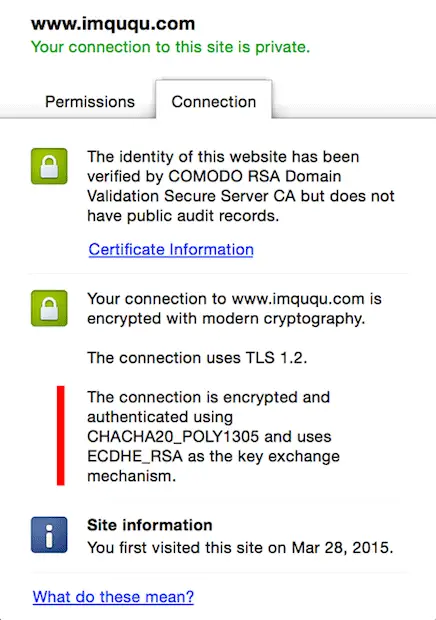
啟用CHACHA20_POLY1305最簡單的方法是在編譯Nginx時,使用LibreSSL代替OpenSSL。下面是用Chrome訪問我的博客時,點擊地址欄小鎖顯示的信息,可以看到加密方式使用的就是CHACHA20_POLY1305:

imququ.com

關於CHACHA20_POLY1305安全性和性能的詳細介紹可以查看本文

補充:使用CHACHA20_POLY1305的最佳實踐是「僅針對不支持AES-NI的終端使用CHACHA20算法,否則使用AES-GCM」。關於這個話題的詳細解釋和配置方法,請參考我的這篇文章:使用BoringSSL優化HTTPS加密算法選擇

關於ssl_dhparam的配置,可以參考這篇文章:Guide to Deploying Diffie-Hellman for TLS

SSLv3已被證實不安全,所以在ssl_protocols指令中,我並沒有包含它。

ssl_prefer_server_ciphers配置為on,可以確保在TLSv1握手時,使用服務端的配置項,以增強安全性。

好了,本文先就這樣,後面再寫跟性能有關的配置。

一天学会PostgreSQL应用开发与管理 – 1 如何搭建一套学习、开发PostgreSQL的环境

背景

万事开头难,搭建好一套学习、开发PostgreSQL的环境,是重中之重。

因为其他平台(Ubuntu, CentOS, MAC)的用户大多数都具备了自行安装数据库的能力,在这里我只写一个面向Windows用户的学习环境搭建文档。

分为三个部分,用户可以自由选择。

如果你想深入的学习PostgreSQL,建议搭建PostgreSQL on Linux的环境。如果你只是想将数据库使用在日常的应用开发工作中,有也不需要PG的其他附加插件的功能,那么你可以选择PostgreSQL on Win的环境搭建。

如果你不想搭建本地的PostgreSQL,那么你可以使用云数据库服务,比如阿里云RDS for PostgreSQL。

本章大纲

一、PostgreSQL on Win环境搭建

1 环境要求

2 下载PostgreSQL安装包

3 解压PostgreSQL安装包

4 下载pgadmin安装包(可选)

5 安装pgadmin(可选)

6 规划数据文件目录

7 初始化数据库集群

8 配置postgresql.conf

9 配置pg_hba.conf(可选)

10 启动、停止数据库集群

11 如何自动启动数据库集群

12 使用psql 命令行连接数据库

13 新增用户

14 使用psql帮助

15 使用psql语法补齐

16 使用psql sql语法帮助

17 查看当前配置

18 设置会话参数

19 在psql中切换到另一个用户或数据库

20 使用pgadmin4连接数据库

21 文档

二、PostgreSQL on Linux(虚拟机)环境搭建

1 环境要求

2 下载Linux镜像

3 安装VMware Workstation(试用版本)

4 安装securecrt(试用版本)

5 安装Linux虚拟机

6 配置Linux虚拟机网络

7 securecrt终端连接Linux

8 配置linux

9 配置yum仓库(可选)

10 创建普通用户

11 规划数据库存储目录

12 下载PostgreSQL源码

13 安装PostgreSQL

14 配置linux用户环境变量

15 初始化数据库集群

16 配置数据库

17 启动数据库集群

18 连接数据库

19 安装pgadmin(可选)

20 配置pgadmin(可选)

21 使用pgadmin连接数据库(可选)

三、云数据库RDS for PostgreSQL

1 购买云数据库

2 设置并记住RDS for PostgreSQL数据库根用户名和密码

3 配置网络

4 配置白名单

5 本地安装pgadmin(可选)

6 本地配置pgadmin(可选)

7 使用pgadmin连接RDS PostgreSQL数据库(可选)

一、PostgreSQL on Win环境搭建

1 环境要求

Win 7 x64, 8GB以上内存, 4核以上, SSD硬盘(推荐),100GB以上剩余空间, 可以访问公网(10MB/s以上网络带宽)

2 下载PostgreSQL安装包

https://www.postgresql.org/download/windows/

建议下载高级安装包,不需要安装,直接使用。

下载win x64的版本(建议下载最新版本)

http://www.enterprisedb.com/products/pgbindownload.do

例如

https://get.enterprisedb.com/postgresql/postgresql-9.6.2-3-windows-x64-binaries.zip

3 解压PostgreSQL安装包

postgresql-9.6.2-3-windows-x64-binaries.zip

例如解压到d:\pgsql

pic

bin: 二进制文件

doc: 文档

include: 头文件

lib: 动态库

pgAdmin 4: 图形化管理工具

share: 扩展库

StackBuilder: 打包库

symbols: 符号表

4 下载pgadmin安装包(可选)

如果PostgreSQL包中没有包含pgAdmin,建议自行下载一个

建议下载pgadmin4(pgadmin3不再维护)

https://www.pgadmin.org/index.php

https://www.postgresql.org/ftp/pgadmin3/pgadmin4/v1.3/windows/

5 安装pgadmin(可选)

6 规划数据文件目录

例如将D盘的pgdata作为数据库目录。

新建d:\pgdata空目录。

7 初始化数据库集群

以管理员身份打开cmd.exe

pic

>d:  
  
>cd pgsql  
  
>cd bin  
  
>initdb.exe -D d:\pgdata -E UTF8 --locale=C -U postgres  
  
初始化时,指定数据库文件目录,字符集,本地化,数据库超级用户名  

pic

pic

8 配置postgresql.conf

数据库配置文件名字postgresql.conf,这个文件在数据文件目录D:\pgdata中。

将以下内容追加到postgresql.conf文件末尾

listen_addresses = '0.0.0.0'  
port = 1921  
max_connections = 200  
tcp_keepalives_idle = 60  
tcp_keepalives_interval = 10  
tcp_keepalives_count = 6  
shared_buffers = 512MB  
maintenance_work_mem = 64MB  
dynamic_shared_memory_type = windows  
vacuum_cost_delay = 0  
bgwriter_delay = 10ms  
bgwriter_lru_maxpages = 1000  
bgwriter_lru_multiplier = 5.0  
bgwriter_flush_after = 0  
old_snapshot_threshold = -1  
wal_level = minimal  
synchronous_commit = off  
full_page_writes = on  
wal_buffers = 64MB  
wal_writer_delay = 10ms  
wal_writer_flush_after = 4MB  
checkpoint_timeout = 35min  
max_wal_size = 2GB  
min_wal_size = 80MB  
checkpoint_completion_target = 0.1  
checkpoint_flush_after = 0  
random_page_cost = 1.5  
log_destination = 'csvlog'  
logging_collector = on  
log_directory = 'pg_log'  
log_truncate_on_rotation = on  
log_checkpoints = on  
log_connections = on  
log_disconnections = on  
log_error_verbosity = verbose  
log_temp_files = 8192  
log_timezone = 'Asia/Hong_Kong'  
autovacuum = on  
log_autovacuum_min_duration = 0  
autovacuum_naptime = 20s  
autovacuum_vacuum_scale_factor = 0.05  
autovacuum_freeze_max_age = 1500000000  
autovacuum_multixact_freeze_max_age = 1600000000  
autovacuum_vacuum_cost_delay = 0  
vacuum_freeze_table_age = 1400000000  
vacuum_multixact_freeze_table_age = 1500000000  
datestyle = 'iso, mdy'  
timezone = 'Asia/Hong_Kong'  
lc_messages = 'C'  
lc_monetary = 'C'  
lc_numeric = 'C'  
lc_time = 'C'  
default_text_search_config = 'pg_catalog.english'  

9 配置pg_hba.conf(可选)

数据库防火墙文件名字pg_hba.conf,这个文件在数据文件目录D:\pgdata中。

将以下内容追加到文件末尾,表示允许网络用户使用用户密码连接你的postgresql数据库.

host all all 0.0.0.0/0 md5  

10 启动、停止数据库集群

使用命令行启动数据库集群

>d:  
  
>cd pgsql  
  
>cd bin  
  
D:\pgsql\bin>pg_ctl.exe start -D d:\pgdata  
正在启动服务器进程  
  
D:\pgsql\bin>LOG:  00000: redirecting log output to logging collector process  
HINT:  Future log output will appear in directory "pg_log".  
LOCATION:  SysLogger_Start, syslogger.c:622  

使用命令行停止数据库集群

D:\pgsql\bin>pg_ctl.exe stop -m fast -D "d:\pgdata"
等待服务器进程关闭 .... 完成
服务器进程已经关闭

11 如何自动启动数据库集群

配置windows自动启动服务.

12 使用psql 命令行连接数据库

psql -h IP地址 -p 端口 -U 用户名 数据库名

D:\pgsql\bin>psql -h 127.0.0.1 -p 1921 -U postgres postgres  
psql (9.6.2)  
输入 "help" 来获取帮助信息.  
  
postgres=# \dt  

13 新增用户

新建用户属于数据库操作,先使用psql和超级用户postgres连接到数据库。

新增一个普通用户

postgres=# create role digoal login encrypted password 'pwd_digoal';  
CREATE ROLE  

新增一个超级用户

postgres=# create role dba_digoal login superuser encrypted password 'dba_pwd_digoal';  
CREATE ROLE  

新增一个流复制用户

postgres=# create role digoal_rep replication login encrypted password 'pwd';  
CREATE ROLE  

你还可以将一个用户在不同角色之间切换

例如将digoal设置为超级用户

postgres=# alter role digoal superuser;  
ALTER ROLE  

查看已有用户

postgres=# \du+  
                                 角色列表  
  角色名称  |                    属性                    | 成员属于 | 描述  
------------+--------------------------------------------+----------+------  
 dba_digoal | 超级用户                                   | {}       |  
 digoal     | 超级用户                                   | {}       |  
 digoal_rep | 复制                                       | {}       |  
 postgres   | 超级用户, 建立角色, 建立 DB, 复制, 绕过RLS | {}       |  

14 使用psql帮助

psql有很多快捷的命令,使用\?就可以查看。

postgres=# \?  
一般性  
  \copyright            显示PostgreSQL的使用和发行许可条款  
  \errverbose            以最冗长的形式显示最近的错误消息  
  \g [文件] or;     执行查询 (并把结果写入文件或 |管道)  
  \gexec                 执行策略,然后执行其结果中的每个值  
  \gset [PREFIX]     执行查询并把结果存到psql变量中  
  \q             退出 psql  
  \crosstabview [COLUMNS] 执行查询并且以交叉表显示结果  
  \watch [SEC]          每隔SEC秒执行一次查询  
  
帮助  
  \? [commands]          显示反斜线命令的帮助  
  
  ......  
  

15 使用psql语法补齐

如果你编译PostgreSQL使用了补齐选项,那么在psql中按TAB键,可以自动补齐命令。

16 使用psql sql语法帮助

如果你忘记了某个SQL的语法,使用\h 命令即可打印命令的帮助

例如

postgres=# \h create table  
命令:       CREATE TABLE  
描述:       建立新的数据表  
语法:  
CREATE [ [ GLOBAL | LOCAL ] { TEMPORARY | TEMP } | UNLOGGED ] TABLE [ IF NOT EXI  
STS ] 表名 ( [  
  { 列名称 数据_类型 [ COLLATE 校对规则 ] [ 列约束 [ ... ] ]  
    | 表约束  
    | LIKE 源表 [ like选项 ... ] }  
    [, ... ]  
] )  
  
......  

17 查看当前配置

show 参数名

postgres=# show client_encoding;  
 client_encoding  
-----------------  
 GBK  
(1 行记录)  

查看pg_settings

postgres=# select * from pg_settings;  

18 设置会话参数

set 参数名=值;

postgres=# set client_encoding='sql_ascii';  
SET  

19 在psql中切换到另一个用户或数据库

\c 切换到其他用户或数据库

postgres=# \c template1 digoal  
您现在已经连接到数据库 "template1",用户 "digoal".  

20 使用pgadmin4连接数据库

pgAdmin4被安装在这个目录

d:\pgsql\pgAdmin 4\bin  

双击pgAdmin4.exe打开pgadmin4(有点耗时,自动启动HTTPD服务)

点击server,右键,创建server.

配置server别名,连接数据库的 IP,端口,用户,密码,数据库名

pic

21 文档

PostgreSQL的安装包中包含了pgadmin, PostgreSQL的文档,找到对应的doc目录,打开index.html。

二、PostgreSQL on Linux(虚拟机)环境搭建

1 环境要求

Win 7 x64, 8GB以上内存, 4核以上, SSD硬盘(推荐),100GB以上剩余空间, 可以访问公网(10MB/s以上网络带宽)

2 下载Linux镜像

http://isoredirect.centos.org/centos/6/isos/x86_64/

http://mirrors.163.com/centos/6.9/isos/x86_64/CentOS-6.9-x86_64-minimal.iso

3 安装VMware Workstation(试用版本)

http://www.vmware.com/cn/products/workstation/workstation-evaluation.html

4 安装securecrt(试用版本)

securecrt可以用来连接Linux终端,方便使用

https://www.vandyke.com/products/securecrt/windows.html

5 安装Linux虚拟机

打开vmware, 创建虚拟机, 选择CentOS 6 x64版本.

1. 配置建议:

4G内存,40G磁盘,2核以上,NAT网络模式。

2. 安装建议:

minimal最小化安装。

3. root密码:

记住你设置的root密码。

4. Linux安装配置建议

配置主机名,配置网络(根据你的vmware NAT网络进行配置),关闭selinux,关闭防火墙或开放ssh端口(测试环境)。

6 配置Linux虚拟机网络

vmware窗口连接linux

例子,192.168.150 请参考你的vmware NAT网络修改一下。

配置网关

vi /etc/sysconfig/network  
  
NETWORKING=yes  
HOSTNAME=digoal01  
GATEWAY=192.168.150.2  

配置IP

cat /etc/sysconfig/network-scripts/ifcfg-eth0   
  
DEVICE=eth0  
TYPE=Ethernet  
UUID=d28f566a-b0b9-4bde-95e7-20488af19eb6  
ONBOOT=yes  
NM_CONTROLLED=yes  
BOOTPROTO=static  
HWADDR=00:0C:29:5D:6D:9C  
IPADDR=192.168.150.133  
PREFIX=24  
GATEWAY=192.168.150.2  
DNS1=192.168.150.2  
DEFROUTE=yes  
IPV4_FAILURE_FATAL=yes  
IPV6INIT=no  
NAME="System eth0"  

配置DNS

cat /etc/resolv.conf  
  
nameserver 192.168.150.2  

重启网络服务

service network restart  

7 securecrt终端连接Linux

添加一个session,连接到Linux虚拟机。

pic

8 配置linux

1. /etc/sysctl.conf

vi /etc/sysctl.conf  
  
追加到文件末尾  
  
kernel.shmall = 4294967296  
kernel.shmmax=135497418752  
kernel.shmmni = 4096  
kernel.sem = 50100 64128000 50100 1280  
fs.file-max = 7672460  
fs.aio-max-nr = 1048576  
net.ipv4.ip_local_port_range = 9000 65000  
net.core.rmem_default = 262144  
net.core.rmem_max = 4194304  
net.core.wmem_default = 262144  
net.core.wmem_max = 4194304  
net.ipv4.tcp_max_syn_backlog = 4096  
net.core.netdev_max_backlog = 10000  
net.ipv4.netfilter.ip_conntrack_max = 655360  
net.ipv4.tcp_timestamps = 0  
net.ipv4.tcp_tw_recycle=1  
net.ipv4.tcp_timestamps=1  
net.ipv4.tcp_keepalive_time = 72   
net.ipv4.tcp_keepalive_probes = 9   
net.ipv4.tcp_keepalive_intvl = 7  
vm.zone_reclaim_mode=0  
vm.dirty_background_bytes = 40960000  
vm.dirty_ratio = 80  
vm.dirty_expire_centisecs = 6000  
vm.dirty_writeback_centisecs = 50  
vm.swappiness=0  
vm.overcommit_memory = 0  
vm.overcommit_ratio = 90  

生效

sysctl -p  

2. /etc/security/limits.conf

vi /etc/security/limits.conf   
  
* soft    nofile  131072  
* hard    nofile  131072  
* soft    nproc   131072  
* hard    nproc   131072  
* soft    core    unlimited  
* hard    core    unlimited  
* soft    memlock 500000000  
* hard    memlock 500000000  

3. /etc/security/limits.d/*

rm -f /etc/security/limits.d/*  

4. 关闭selinux

# vi /etc/sysconfig/selinux   
  
SELINUX=disabled  
SELINUXTYPE=targeted  

5. 配置OS防火墙
(建议按业务场景设置,我这里先清掉)

iptables -F  

配置范例

# 私有网段  
-A INPUT -s 192.168.0.0/16 -j ACCEPT  
-A INPUT -s 10.0.0.0/8 -j ACCEPT  
-A INPUT -s 172.16.0.0/16 -j ACCEPT  

重启linux。

reboot  

9 配置yum仓库(可选)

在linux虚拟机中,找一个有足够空间的分区,下载ISO镜像

wget http://mirrors.163.com/centos/6.9/isos/x86_64/CentOS-6.9-x86_64-bin-DVD1.iso  
  
wget http://mirrors.163.com/centos/6.9/isos/x86_64/CentOS-6.9-x86_64-bin-DVD2.iso  

新建ISO挂载点目录

mkdir /mnt/cdrom1  
mkdir /mnt/cdrom2  

挂载ISO

mount -o loop,defaults,ro /u01/CentOS-6.8-x86_64-bin-DVD1.iso /mnt/cdrom1  
mount -o loop,defaults,ro /u01/CentOS-6.8-x86_64-bin-DVD2.iso /mnt/cdrom2  

备份并删除原有的YUM配置文件

mkdir /tmp/yum.bak  
cd /etc/yum.repos.d/  
mv * /tmp/yum.bak/  

新增YUM配置文件

cd /etc/yum.repos.d/  
  
vi local.repo  
  
[local-yum]  
name=Local Repository  
baseurl=file:///mnt/cdrom1  
enabled=1  
gpgcheck=0  

刷新YUM缓存

yum clean all  

测试

yum list  
  
yum install createrepo   -- 方便后面测试  

修改YUM配置,修改路径为上层目录

cd /etc/yum.repos.d/  
  
vi local.repo  
  
[local-yum]  
name=Local Repository  
baseurl=file:///mnt/  
enabled=1  
gpgcheck=0  

创建YUM索引

cd /mnt/  
createrepo .  

刷新YUM缓存,测试

yum clean all  
  
yum list  
  
yum install vim  

10 创建普通用户

useradd digoal  

11 规划数据库存储目录

假设/home分区有足够的空间, /home/digoal/pgdata规划为数据文件目录

Filesystem      Size  Used Avail Use% Mounted on  
/dev/sda3        14G  5.7G  7.2G  45% /  

12 下载PostgreSQL源码

https://www.postgresql.org/ftp/source/

su - digoal  
  
wget https://ftp.postgresql.org/pub/source/v9.6.2/postgresql-9.6.2.tar.bz2  

13 安装PostgreSQL

安装依赖包

root用户下,使用yum 安装依赖包  
  
yum -y install coreutils glib2 lrzsz mpstat dstat sysstat e4fsprogs xfsprogs ntp readline-devel zlib-devel openssl-devel pam-devel libxml2-devel libxslt-devel python-devel tcl-devel gcc make smartmontools flex bison perl-devel perl-Ext  
Utils* openldap-devel jadetex  openjade bzip2  

编译安装PostgreSQL

digoal用户下,编译安装PostgreSQL  
  
tar -jxvf postgresql-9.6.2.tar.bz2  
cd postgresql-9.6.2  
./configure --prefix=/home/digoal/pgsql9.6  
make world -j 8  
make install-world  

14 配置linux用户环境变量

digoal用户下,配置环境变量

su - digoal  
vi ~/.bash_profile  
  
追加  
  
export PS1="$USER@`/bin/hostname -s`-> "  
export PGPORT=1921  
export PGDATA=/home/digoal/pgdata  
export LANG=en_US.utf8  
export PGHOME=/home/digoal/pgsql9.6  
export LD_LIBRARY_PATH=$PGHOME/lib:/lib64:/usr/lib64:/usr/local/lib64:/lib:/usr/lib:/usr/local/lib:$LD_LIBRARY_PATH  
export PATH=$PGHOME/bin:$PATH:.  
export DATE=`date +"%Y%m%d%H%M"`  
export MANPATH=$PGHOME/share/man:$MANPATH  
export PGHOST=$PGDATA  
export PGUSER=postgres  
export PGDATABASE=postgres  
alias rm='rm -i'  
alias ll='ls -lh'  
unalias vi  

重新登录digoal用户,配置生效

exit  
  
su - digoal  

15 初始化数据库集群

initdb -D $PGDATA -E UTF8 --locale=C -U postgres  

16 配置数据库

配置文件在$PGDATA目录中

1. 配置postgresql.conf

追加  
  
listen_addresses = '0.0.0.0'  
port = 1921  
max_connections = 200  
unix_socket_directories = '.'  
tcp_keepalives_idle = 60  
tcp_keepalives_interval = 10  
tcp_keepalives_count = 10  
shared_buffers = 512MB  
dynamic_shared_memory_type = posix  
vacuum_cost_delay = 0  
bgwriter_delay = 10ms  
bgwriter_lru_maxpages = 1000  
bgwriter_lru_multiplier = 10.0  
bgwriter_flush_after = 0   
old_snapshot_threshold = -1  
backend_flush_after = 0   
wal_level = minimal  
synchronous_commit = off  
full_page_writes = on  
wal_buffers = 16MB  
wal_writer_delay = 10ms  
wal_writer_flush_after = 0   
checkpoint_timeout = 30min   
max_wal_size = 2GB  
min_wal_size = 128MB  
checkpoint_completion_target = 0.05    
checkpoint_flush_after = 0    
random_page_cost = 1.3   
log_destination = 'csvlog'  
logging_collector = on  
log_truncate_on_rotation = on  
log_checkpoints = on  
log_connections = on  
log_disconnections = on  
log_error_verbosity = verbose  
autovacuum = on  
log_autovacuum_min_duration = 0  
autovacuum_naptime = 20s  
autovacuum_vacuum_scale_factor = 0.05  
autovacuum_freeze_max_age = 1500000000  
autovacuum_multixact_freeze_max_age = 1600000000  
autovacuum_vacuum_cost_delay = 0  
vacuum_freeze_table_age = 1400000000  
vacuum_multixact_freeze_table_age = 1500000000  
datestyle = 'iso, mdy'  
timezone = 'PRC'  
lc_messages = 'C'  
lc_monetary = 'C'  
lc_numeric = 'C'  
lc_time = 'C'  
default_text_search_config = 'pg_catalog.english'  
shared_preload_libraries='pg_stat_statements'  

2. 配置pg_hba.conf

追加  
  
host all all 0.0.0.0/0 md5  

17 启动数据库集群

su - digoal  
  
pg_ctl start  

18 连接数据库

su - digoal  
  
psql  
psql (9.6.2)  
Type "help" for help.  
  
postgres=#   

19 安装pgadmin(可选)

在windows 机器上,安装pgadmin

https://www.pgadmin.org/download/windows4.php

20 配置pgadmin(可选)

参考章节1

21 使用pgadmin连接数据库(可选)

参考章节1

三、云数据库RDS for PostgreSQL

1 购买云数据库

https://www.aliyun.com/product/rds/postgresql

2 设置并记住RDS for PostgreSQL数据库根用户名和密码

在RDS 控制台操作。

3 配置网络

在RDS 控制台操作,配置连接数据库的URL和端口。

4 配置白名单

在RDS 控制台操作,配置来源IP的白名单,如果来源IP为动态IP,白名单设置为0.0.0.0。

(数据库开放公网连接有风险,请谨慎设置,本文仅为测试环境。)

5 本地安装pgadmin(可选)

在windows 机器上,安装pgadmin

https://www.pgadmin.org/download/windows4.php

6 本地配置pgadmin(可选)

参考章节1

7 使用pgadmin连接RDS PostgreSQL数据库(可选)

参考章节1

mongodb 数据库操作–备份 还原 导出 导入

mongodb数据备份和还原主要分为二种,一种是针对于库的mongodump和mongorestore,一种是针对库中表的mongoexport和mongoimport。

一,mongodump备份数据库

1,常用命令格

mongodump -h IP --port 端口 -u 用户名 -p 密码 -d 数据库 -o 文件存在路径 

如果没有用户谁,可以去掉-u和-p。
如果导出本机的数据库,可以去掉-h。
如果是默认端口,可以去掉–port。
如果想导出所有数据库,可以去掉-d。

2,导出所有数据库

[root@localhost mongodb]# mongodump -h 127.0.0.1 -o /home/zhangy/mongodb/ 
connected to: 127.0.0.1 
Tue Dec 3 06:15:55.448 all dbs 
Tue Dec 3 06:15:55.449 DATABASE: test   to   /home/zhangy/mongodb/test 
Tue Dec 3 06:15:55.449   test.system.indexes to /home/zhangy/mongodb/test/system.indexes.bson 
Tue Dec 3 06:15:55.450     1 objects 
Tue Dec 3 06:15:55.450   test.posts to /home/zhangy/mongodb/test/posts.bson 
Tue Dec 3 06:15:55.480     0 objects 
 
。。。。。。。。。。。。。。。。。。。。省略。。。。。。。。。。。。。。。。。。。。。。。。。。 

3,导出指定数据库

[root@localhost mongodb]# mongodump -h 192.168.1.108 -d tank -o /home/zhangy/mongodb/ 
connected to: 192.168.1.108 
Tue Dec 3 06:11:41.618 DATABASE: tank   to   /home/zhangy/mongodb/tank 
Tue Dec 3 06:11:41.623   tank.system.indexes to /home/zhangy/mongodb/tank/system.indexes.bson 
Tue Dec 3 06:11:41.623     2 objects 
Tue Dec 3 06:11:41.623   tank.contact to /home/zhangy/mongodb/tank/contact.bson 
Tue Dec 3 06:11:41.669     2 objects 
Tue Dec 3 06:11:41.670   Metadata for tank.contact to /home/zhangy/mongodb/tank/contact.metadata.json 
Tue Dec 3 06:11:41.670   tank.users to /home/zhangy/mongodb/tank/users.bson 
Tue Dec 3 06:11:41.685     2 objects 
Tue Dec 3 06:11:41.685   Metadata for tank.users to /home/zhangy/mongodb/tank/users.metadata.json 

三,mongorestore还原数据库

1,常用命令格式

mongorestore -h IP --port 端口 -u 用户名 -p 密码 -d 数据库 --drop 文件存在路径

–drop的意思是,先删除所有的记录,然后恢复。

2,恢复所有数据库到mongodb中

[root@localhost mongodb]# mongorestore /home/zhangy/mongodb/  #这里的路径是所有库的备份路径

3,还原指定的数据库

[root@localhost mongodb]# mongorestore -d tank /home/zhangy/mongodb/tank/  #tank这个数据库的备份路径 
 
[root@localhost mongodb]# mongorestore -d tank_new /home/zhangy/mongodb/tank/  #将tank还有tank_new数据库中

这二个命令,可以实现数据库的备份与还原,文件格式是json和bson的。无法指写到表备份或者还原。

四,mongoexport导出表,或者表中部分字段

1,常用命令格式

mongoexport -h IP --port 端口 -u 用户名 -p 密码 -d 数据库 -c 表名 -f 字段 -q 条件导出 --csv -o 文件名 

上面的参数好理解,重点说一下:
-f    导出指字段,以字号分割,-f name,email,age导出name,email,age这三个字段
-q    可以根查询条件导出,-q ‘{ “uid” : “100” }’ 导出uid为100的数据
–csv 表示导出的文件格式为csv的,这个比较有用,因为大部分的关系型数据库都是支持csv,在这里有共同点

2,导出整张表

[root@localhost mongodb]# mongoexport -d tank -c users -o /home/zhangy/mongodb/tank/users.dat 
connected to: 127.0.0.1 
exported 4 records 

3,导出表中部分字段

[root@localhost mongodb]# mongoexport -d tank -c users --csv -f uid,name,sex -o tank/users.csv 
connected to: 127.0.0.1 
exported 4 records 

4,根据条件敢出数据

[root@localhost mongodb]# mongoexport -d tank -c users -q '{uid:{$gt:1}}' -o tank/users.json 
connected to: 127.0.0.1 
exported 3 records 

五,mongoimport导入表,或者表中部分字段

1,常用命令格式

1.1,还原整表导出的非csv文件
mongoimport -h IP –port 端口 -u 用户名 -p 密码 -d 数据库 -c 表名 –upsert –drop 文件名
重点说一下–upsert,其他参数上面的命令已有提到,–upsert 插入或者更新现有数据
1.2,还原部分字段的导出文件
mongoimport -h IP –port 端口 -u 用户名 -p 密码 -d 数据库 -c 表名 –upsertFields 字段 –drop 文件名
–upsertFields根–upsert一样
1.3,还原导出的csv文件
mongoimport -h IP –port 端口 -u 用户名 -p 密码 -d 数据库 -c 表名 –type 类型 –headerline –upsert –drop 文件名
上面三种情况,还可以有其他排列组合的。

2,还原导出的表数据

[root@localhost mongodb]# mongoimport -d tank -c users --upsert tank/users.dat 
connected to: 127.0.0.1 
Tue Dec 3 08:26:52.852 imported 4 objects

3,部分字段的表数据导入

[root@localhost mongodb]# mongoimport -d tank -c users  –upsertFields uid,name,sex  tank/users.dat
connected to: 127.0.0.1
Tue Dec  3 08:31:15.179 imported 4 objects

4,还原csv文件

[root@localhost mongodb]# mongoimport -d tank -c users --type csv --headerline --file tank/users.csv 
connected to: 127.0.0.1 
Tue Dec 3 08:37:21.961 imported 4 objects 

总体感觉,mongodb的备份与还原,还是挺强大的,虽然有点麻烦。

The 7 Best Open Source Load Testing Tools of 2017

All open source load testing tools don’t have the same functionality and some will better suit to your needs than others.

open-source-load-testing

Open Source Drawbacks

Open source load testing tools may not be ideal, but they’re a whole lot better than skipping load testing entirely just because you don’t have room in the budget for a premium tool. That doesn’t mean you should just use the first open source tool you can find. They don’t all have the same functionality and some will be better suited to your needs than others.

The drawback to all open source load testing solutions (as opposed to cloud-based solutions like LoadView) is that all the virtual users originate on your own servers. You’ll be testing your site under ideal conditions – you won’t even be crossing your own firewall. This may be adequate for your needs, or you may eventually decide to upgrade to a premium load testing solution.

Apache JMeter

JMeter is the most popular open source load testing tool, and it’s easy to see why. It offers almost as many features as premium tools. It allows you to record test scripts via point and click, specify a maximum number of users, and validate the test scripts before running the load test. Reports include easy-to-read graphs that show a variety of performance metrics.

However, JMeter doesn’t easily scale to large-scale testing across a number of machines.

Taurus

Taurus is meant to work on its own or in conjunction with other open source load testing tools, adding to their functionality. Taurus allows you to perform load testing on a specific piece of code while it’s still being developed. Instead of recording test scripts with point and click functionality, you’ll write test scripts in YAML (an easily readable coding language). Reports are displayed within the application.

Locust

With Locust, you code test scripts in Python, and the application sends a swarm of virtual users to your website (or other system) to carry out those test scripts. Locust allows you to create hundreds of thousands of virtual users. It offers a web-based UI that displays load test results in real time.

The Grinder

The Grinder is Java-based and can load test any system that has a Java API. It’s designed to be used by programmers, but can also be used for production load testing. It requires you to write scripts in Jython or Clojure.

Gatling

Gatling uses a DSL (domain-specific language) for test scripting. The report it generates is colorful and dynamic. It works with any browser or operating system. Gatling does allow you to execute test cases in different clouds, but doesn’t allow you to distribute load between multiple machines.

Multi-Mechanize

Multi-Mechanize performs load tests by running concurrent Python scripts. It can be used to load test any remote API accessible from Python, but is most often used to test web performance and scalability. Reports include a variety of graphs.

Siege

Siege is another load testing tool aimed at developers. Test scripts can test basic authentication, HTTP, HTTPS, cookies, and FTP protocols. Siege doesn’t support more complicated transactions, but may still be adequate for your needs. It can be run with multiple IP addresses from the same machine, better mimicking real-world traffic. Siege isn’t suited for large-scale testing, and is most useful in the coding phase.

搭建 Docker 环境

安装 Docker

Docker 软件包已经包括在默认的 CentOS-Extras 软件源里。因此想要安装 docker,只需要运行下面的 yum 命令:

yum install docker-io -y

直接yum安装,安装成功后查看版本

docker -v

启动docker

service docker start

设置开机启动

chkconfig docker on

配置 Docker

因为国内访问 Docker Hub 较慢, 可以使用腾讯云提供的国内镜像源, 加速访问 Docker Hub

依次执行以下命令

echo "OPTIONS='--registry-mirror=https://mirror.ccs.tencentyun.com'" >> /etc/sysconfig/docker
systemctl daemon-reload
service docker restart

Docker 的简单操作

任务时间:10min ~ 20min

下载镜像

下载一个官方的 CentOS 镜像到本地

docker pull centos

下载好的镜像就会出现在镜像列表里

docker images

运行容器

这时我们可以在刚才下载的 CentOS 镜像生成的容器内操作了。

生成一个 centos 镜像为模板的容器并使用 bash shell

docker run -it centos /bin/bash

这个时候可以看到命令行的前端已经变成了 [root@(一串 hash Id)] 的形式, 这说明我们已经成功进入了 CentOS 容器。

在容器内执行任意命令, 不会影响到宿主机, 如下

mkdir -p /data/simple_docker

可以看到 /data 目录下已经创建成功了 simple_docker 文件夹

ls /data

退出容器

exit

查看宿主机的 /data 目录, 并没有 simple_docker 文件夹, 说明容器内的操作不会影响到宿主机

ls /data

保存容器

查看所有的容器信息, 能获取容器的id

docker ps -a

然后执行如下命令[?],保存镜像:

docker commit -m="备注" 你的CONTAINER_ID 你的IMAGE

请自行将 -m 后面的信息改成自己的容器的信息

大功告成!

恭喜你结束了 Docker 的教程并学会了 Docker 的一些基本操作,


使用docker attach命令
我们使用
docker attach db3 或者 docker attach d48b21a7e439


db3是后台容器的NAMES,d48b21a7e439是容器的进程ID  CONTAINER ID
然后就进去了这个容器的ssh界面。
但是它有一个缺点,只要这个连接终止,或者使用了exit命令,容器就会退出后台运行
 
 
使用docker exec命令
这个命令使用exit命令后,不会退出后台,一般使用这个命令,使用方法如下
docker exec -it db3 /bin/sh 或者 docker exec -it d48b21a7e439 /bin/sh

搭建微信订阅号后台服务

搭建微信订阅号后台服务

准备域名

任务时间:20min ~ 40min

微信公众平台需要配置服务器地址 URL 访问,在实验开始之前,我们要准备域名。

域名注册

如果您还没有域名,可以在腾讯云上选购,过程可以参考下面的视频。

  • 视频 – 在腾讯云上购买域名

域名解析

域名购买完成后, 需要将域名解析到实验云主机上,实验云主机的 IP 为:

<您的 CVM IP 地址>

在腾讯云购买的域名,可以到控制台添加解析记录,过程可参考下面的视频:

  • 视频 – 如何在腾讯云上解析域名

域名设置解析后需要过一段时间才会生效,通过 ping 命令检查域名是否生效 [?],如:

ping www.yourmpdomain.com

如果 ping 命令返回的信息中含有你设置的解析的 IP 地址,说明解析成功。

注意替换下面命令中的 www.yourmpdomain.com 为您自己的注册的域名

申请微信个人订阅号

任务时间:5min ~ 10min

在开始搭建我们的订阅号服务器之前,需要先拿到订阅号相关信息。

注册开发者账号

如果你还不是微信订阅号开发者,请先在微信公众平台注册:

https://mp.weixin.qq.com

具体注册流程可参考如下视频:

  • 视频 – 注册开发者账号

若您已注册,请点击下一步。

获取微信订阅号公众平台认证字段信息

我们需要获取3个字段:AppID Token EncodingAESKey。

登录微信公众平台,依次进入 开发 – 基本配置 可以拿到 AppID。

基本配置 – 服务器配置 – 修改配置 表单中:

URL 填第一步申请的域名;

Token 用户根据提示填写,用于后面校验服务端合法性;

EncodingAESKey 点击随机生成按钮来生成。

当点击表单提交按钮时,微信会通过 Token 来校验 URL 的合法性,这个我们在后面步骤实现,此界面暂时保留不关闭。

AppID Token EncodingAESKey 这3个参数具体的获取步骤也可以参照下面的视频

  • 视频 – 获取微信订阅号信息

搭建 HTTP 服务

任务时间:15min ~ 30min

下面的步骤,将带大家在服务器上使用 Node 和 Express 搭建一个 HTTP 服务器

安装 NodeJS 和 NPM

使用下面的命令安装 NodeJS 和 NPM

curl --silent --location https://rpm.nodesource.com/setup_8.x | sudo bash -
yum install nodejs -y

安装完成后,使用下面的命令测试安装结果

node -v

编写 HTTP Server 源码

创建工作目录

使用下面的命令在服务器创建一个工作目录:

mkdir -p /data/release/weapp

进入此工作目录

cd /data/release/weapp

创建 package.json

在刚才创建的工作目录创建 package.json,添加我们服务器包的名称和版本号,可参考下面的示例。

示例代码:/data/release/weapp/package.json
{
    "name": "weapp",
    "version": "1.0.0"
}

完成后,使用 Ctrl + S 保存文件

添加 Server 源码

在工作目录创建 app.js,使用 Express.js 来监听 5050 端口[?],可参考下面的示例代码(注:请将 app.js 文件中的token/appid/encodingAESKey等配置项替换为您的订阅号对应的取值)。

示例代码:/data/release/weapp/app.js
// 引用 express 来支持 HTTP Server 的实现
const express = require('express');

// 引用微信公共平台自动回复消息接口服务中间件
var wechat = require('wechat');

// 创建一个 express 实例
const app = express();

// 配置微信公众平台参数,在教程第二步中获取
var config = {
    token: 'your token', // 填第二步中获取的 `token`
    appid: 'your appid', // 填第二步中获取的 `appid`
    encodingAESKey: 'your encodingAESKey', // 填第二步中获取的 `encodingAESKey`
    checkSignature: true // 可选,默认为true。由于微信公众平台接口调试工具在明文模式下不发送签名,所以如要使用该测试工具,请将其设置为false 
};

app.use(express.query());

app.use('/', wechat(config, function (req, res, next) {
    res.reply({
        content: '你好,Hello World!',
        type: 'text'
    });
}));

// 监听端口,等待连接
const port = 5050;
app.listen(port);

// 输出服务器启动日志
console.log(`Server listening at http://127.0.0.1:${port}`);

本实验会以 5050 端口的打开作为实验步骤完成的依据,为了后面的实验步骤顺利进行,请不要使用其它端口号

运行 HTTP 服务

安装 PM2

在开始之前,我们先来安装 [PM2]

npm install pm2 --global

PM2 安装时间可能稍长,请耐心等候 [?]

安装 Express

我们的服务器源码里使用到了 Express 模块,下面的命令使用 NPM 来安装 Express

cd /data/release/weapp
npm install express --save

安装 Wechat

我们的服务器源码里使用到了 Wechat 模块,下面的命令使用 NPM 来安装 Wechat

cd /data/release/weapp
npm install wechat --save

启动服务

安装完成后,使用 PM2 来启动 HTTP 服务

cd /data/release/weapp
pm2 start app.js

现在,您的 HTTP 服务已经在 http://<您的 CVM IP 地址>:5050 运行

要查看服务输出的日志,可以使用下面的命令:

pm2 logs

如果要重启服务,可以使用下面的命令:

pm2 restart app

我们使用 PM2 来进行 Node 进程的运行、监控和管理

NPM 仓库在国内访问速度可能不太理想,如果实在太慢可以尝试使用 CNPM 的 Registry 进行安装:npm install pm2 -g --registry=https://r.cnpmjs.org/

搭建 nginx 对外服务

任务时间:15min ~ 30min

NodeJs只是侦听的机器上的 5050 端口,我们使用 nginx 侦听 80 端口提供对外域名服务

安装 Nginx

在 CentOS 上,可直接使用 yum 来安装 Nginx

yum install nginx -y

安装完成后,使用 nginx 命令启动 Nginx:

nginx

此时,访问 http://<您的域名> 可以看到 Nginx 的测试页面 [?]

如果无法访问,请重试用 nginx -s reload 命令重启 Nginx

配置 HTTP 反向代理

外网用户访问服务器的 Web 服务由 Nginx 提供,Nginx 需要配置反向代理才能使得 Web 服务转发到本地的 Node 服务。

Nginx 配置目录在 /etc/nginx/conf.d,我们在该目录创建 wechat.conf

示例代码:/etc/nginx/conf.d/wechat.conf
server {
        listen 80;
        server_name www.example.com; # 改为第一步申请的域名

        location / {
            proxy_pass http://127.0.0.1:5050;
        }
    }

按 Ctrl + S 保存配置文件,让 Nginx 重新加载配置使其生效:

nginx -s reload

在浏览器通过 http 的方式访问你解析的域名来测试 HTTP 是否成功启动

使用Server端回复微信消息

任务时间:1min ~ 5min

提交服务端配置

我们将第二步微信公众平台中保留的表单提交,同时将 基本配置 – 服务器配置 启用

关注、发送与消息回复

首先通过二维码关注微信订阅号

在聊天界面向微信公众号发送一条消息

最终我们会回到一条 你好,Hello World! 的回复

大功搞成

恭喜!您已经完成了搭建微信订阅号后台服务的实验内容!您可以留用或者购买 Linux 版本的 CVM 继续学习。

ElasticSearch 简单入门

简介

ElasticSearch是一个开源的分布式搜索引擎,具备高可靠性,支持非常多的企业级搜索用例。像Solr4一样,是基于Lucene构建的。支持时间时间索引和全文检索。官网:http://www.elasticsearch.org

它对外提供一系列基于java和http的api,用于索引、检索、修改大多数配置。

写这篇博客的的主要原因是ElasticSearch的网站只有一些简单的介绍,质量不高,缺少完整的教程。我费了好大劲才把它启动起来,做了一些比hello world更复杂一些的工作。我希望通过分享我的一些经验来帮助对ElasticSearch(很强大的哦)感兴趣的人在初次使用它的时候能够节省些时间。学完这篇教程,你就掌握了它的基本操作——启动、运行。我将从我的电脑上分享这个链接。

这么着就开始了。

  1. 作者假设读者拥有安装后的Java。
  2. 下载来自http://www.elasticsearch.org/download/的ElasticSearch。再一次,关于在Linux与其他非视窗系统环境里操作它的谈论有许多,但是作者更加关心着视窗7版桌面环境。请对应选择安装包裹。对视窗系统 – 一Zip文件 – 用户可解压缩到C:\elasticsearch-0.90.3\. 牢记,这十分的不同于安装Eclipse IDE。
  3. 作者不熟悉curl跟cygwin,而且作者打算节省掌握时间(此多数在官网ElasticSearch.org应用的命令面对非视窗平台)(译者:大可以安装一虚拟机、便携版Linux或者MinGW)。读者可以在http://curl.haxx.se/download.htmlhttp://cygwin.com/install.html安装Curl和cygwin。

于是测试下目前作者和读者所做到的。

  1. 视窗7版桌面环境,运行命令行,进入 cd C:\elasticsearch-0.90.3\bin 目录。
  2. 这时运行 elasticsearch.bat
  3. 上面在本机启动了一个ElasticSearch节点。 读者会看到下面的记录提示。

(如果您家情况明显不一样,请读者们不要忧愁,因那作者有些个Elastic Search的插件程序,而且作者家节点命名和其它会不同读者家的)

4. 现在在浏览器里测试一下

如果你得到的status是200那它意味着所有的事情都ok啦…是不是很简单?

让我们看看JSON的每个字段代表的含义:

Ok:当为true时,意味着请求成功。

Status:发出请求后的HTTP的错误代码。200表示一切正常。

Name:我们Elasticsearch实例的名字。在默认情况下,它将从一个巨长的名字列表中随机选择一个。

Version:这个对象有一个number字段,代表了当前运行的Elasticsearch版本号,和一个Snapshot_build字段,代表了你当前运行的版本是否是从源代码构建而来。

Tagline:包含了Elasticsearch的第一个tagline: “You Know, for Search.”

5. 现在让我们从http://mobz.github.io/elasticsearch-head/ 安装ElasticSearch Head插件

安装方法非常简单

1 cd C:\elasticsearch-0.90.3\bin
2 plugin -install mobz/elasticsearch-head

上面的命令会把 elasticsearch-head插件装到你的环境里

教程样例

我们将要部署一个非常简单的应用–在一个部门里的雇员–这样我们可以把注意力放在功能而不是氧立得复杂性上。总而言之,这篇博文是为了帮助人们开始ElasticSearch入门。

1)现在打开你的cygwin窗口并且键入命令

1 curl -XPUT 'http://localhost:9200/dept/employee/32' -d '{ "empname": "emp32"}'

dept是一个索引并且索引类型是雇员,此时我们正在输入这个索引类型的第31个id。

你应该能在cygwin的窗口看到这样的信息:

让我们看一下这个输出:

1 ========================================================================
2   % Total    % Received % Xferd  Average Speed   Time    Time     Time  Current
3                                  Dload  Upload   Total   Spent    Left  Speed
4 100    91  100    70  100    21    448    134 --:--:-- --:--:-- --:--:--   500{"ok":true,"_index":"dept","_type":"employee","_id":"31","_version":1}
5 ========================================================================

和上面的命令一样–让我们输入更多的记录:

1 curl -XPUT 'http://localhost:9200/dept/employee/1' -d '{ "empname": "emp1"}'
2 curl -XPUT 'http://localhost:9200/dept/employee/2' -d '{ "empname": "emp2"}'
3 ...
4 ...
5 curl -XPUT 'http://localhost:9200/dept/employee/30' -d '{ "empname": "emp30"}'

注意:你要记得增加索引计数器和大括号里empname的值。

一旦这些工作都完成了–你为ElasticSearch输入了足够多的数据,你就可以开始使用head插件搜索你的数据了。

让我们试试吧!

在浏览器中输入:

http://localhost:9200/_plugin/head/

你会看到这个:

这里是有关簇使用情况和不同索引信息的概况。我们最近创建的索引在其中,显示为”dept”。

现在点击Structured Query选项卡

在Search下来菜单中选择”dept”并点击”Search”按钮。

这将显示所有记录。

搜索特定条目

让我们来搜索emp1,emp25和emp7。不断点击最右面的”+”来添加更多的搜索项,就像如图显示的那样,之后点击”Search”。确保最左边的选项为”should”,其他的选项也应该和图中的保持一致。