nmcli网络配置命令

nmcli使用方法非常类似linux ip命令、cisco交换机命令,并且支持tab补全,也可在命令最后通过-h、–help、help查看帮助。在nmcli中有2个命令最为常用:

nmcli语法:
nmcli [ OPTIONS ] OBJECT { COMMAND | help }
OBJECT和COMMAND可以用全称也可以用简称,最少可以只用一个字母,建议用头三个字母。OBJECT里面我们平时用的最多的就是connection和device,还有其他的选项在里暂时不介绍,这里需要简单区分一下connection和device

详细的介绍请看这篇文章:RHEL/CentOS系列发行版nmcli命令概述

这里主要介绍命令的使用

1、查看网络接口信息
————————————————————–
nmcli          ##查看ip(类似于ifconfig、ip addr)

nmcli device status      ##所有接口的简略信息

nmcli device show       ##所有接口的详细信息

nmcli device show interface-name     ##特定接口的详细信息
————————————————————–

2、查看连接信息
————————————————————–
nmcli connection show         ##所有连接的简略信息

nmcli connection show –active      ##显示激活的连接

nmcli connection show inteface-name   ##某个接口的详细连接信息
————————————————————–

3、激活连接与取消激活链接
————————————————————–
#激活连接
nmcli connection up connection-name
nmcli device connect interface-name

#取消激活链接
nmcli connection down connection-name    ##这个操作当取消一个激活后,如果有其它连接会自动激活其它连接
nmcli device disconnect interface-name     ##这个操作会取消接口上的激活,如果有其它连接也不会自动激活其它连接
————————————————————–
建议使用 nmcli device disconnect(connect) interface-name,因为连接断开可将该接口放到“手动”模式,这样做用户让 NetworkManager 启动某个连接前,或发生外部事件(比如载波变化、休眠或睡眠)前,不会启动任何自动连接。

4、创建动态获取ip地址的连接
————————————————————–
nmcli connection add type ethernet con-name connection-name ifname interface-name

add表示添加连接,type后面是指定创建连接时候必须指定类型,类型有很多,可以通过nmcli c add type -h看到,这里指定为ethernet。con-name后面是指定创建连接的名字,ifname后面是指定物理设备,网络接口

例子:nmcli connection add type ethernet con-name dhcp-ens33 ifname ens33
————————————————————–

5、创建静态ip地址连接
————————————————————–
nmcli connection add type ethernet con-name connection-name ifname interface-name ipv4.method manual ipv4.addresses address ipv4.gateway address

ipv4.addresses后面指定网卡ipv4的地址,ipv4.gateway后面指定网卡的ipv4网关

例子:nmcli connection add type ethernet con-name static-enp0s3 ifname enp0s3 ipv4.method manual ipv4.addresses 192.168.1.115/24 ipv4.gateway 192.168.1.1
————————————————————–
注意:创建连接后,NetworkManager 自动将 connection.autoconnect 设定为 yes。还会将设置保存到 /etc/sysconfig/network-scripts/connection-name 文件中,且自动将 ONBOOT 参数设定为 yes。

6、常用参数和网卡配置文件参数的对应关系这个只使用RHEL系列的发行版,不适合Debian系列发行版
————————————————————–

7、修改连接配置

————————————————————–
#添加一个ip地址
nmcli connection modify connection-name ipv4.addresses 192.168.0.58     ##如果已经存在ip会更改现有ip

#给eth0添加一个子网掩码(NETMASK)
nmcli connection modify connection-name ipv4.addresses 192.168.0.58/24

#获取方式设置成手动(BOOTPROTO=static/none)

nmcli connection modify connection-name ipv4.method manual

#获取方式设置成自动(BOOTPROTO=dhcp)

nmcli connection modify connection-name ipv4.method auto

#添加DNS

nmcli connection modify connection-name ipv4.dns 114.114.114.114

#删除DNS

nmcli connection modify connection-name -ipv4.dns 114.114.114.114 (注意这里的减号)

#添加一个网关(GATEWAY)

nmcli connection modify connection-name ipv4.gateway 192.168.0.2

#可一块写入:

nmcli connection modify connection-name ipv4.dns 114.114.114.114 ipv4.gateway 192.168.0.2

#修改连接是否随开机激活
nmcli connection modify connection-name connection.autoconnect no/on

#配置静态路由,重启系统依然生效

nmcli connection modify connection-name +ipv4.routes “192.168.12.0/24 10.10.10.1”

这样会将 192.168.122.0/24 子网的流量指向位于 10.10.10.1 的网关,同时在 /etc/sysconfig/network-scripts/目录下生产一个route-connection-name的文件,这里记录了这个连接的路由信息

————————————————————–

8、重载connection
————————————————————–
#重载所有ifcfg到connection(不会立即生效,在通过配置文件更改后需要做这个操作让NM知道你做了更改,重新激活连接或重启NM服务后生效)
nmcli connection reload
————————————————————–
#重载指定ifcfg到connection(不会立即生效,重新激活连接或重启NM服务后生效)
nmcli connection load /etc/sysconfig/network-scripts/ifcfg-connection-name
nmcli connection load /etc/sysconfig/network-scripts/route-connection-name
————————————————————–

9、删除connection
————————————————————–
nmcli connection delete connection-name
————————————————————–

10、设置主机名
————————————————————–
#查询当前主机名
nmcli general hostname

#修改主机名
nmcli general hostname new-hostname

#重启hostname(主机名)服务
systemctl restart systemd-hostnamed
————————————————————–
注意:CentOS7 / Redhat7 下的主机名管理是基于系统服务systemd-hostnamed,服务自身提供了hostnamectl命令用于修改主机名,推荐这种方式进行修改;
使用nmcli命令更改主机名时,systemd-hostnamed服务并不知晓 /etc/hostname 文件被修改,因此需要重启服务去读取配置;

automatically connect OpenConnect VPN use a service file

i use a service file

/etc/systemd/system/myVpn.service

[Unit]
Description=My Vpn Connection
After=network.target

[Service]
Type=simple
Environment=password=correcthorsebatterystaple
 ExecStart=/bin/sh -c 'echo YourPasswordHere | sudo openconnect --protocol=nc YourServerHere --user=YourUserHere --passwd-on-stdin'

Restart=always

systemctl enable myVpn

systemctl start myVpn

快速分析 Apache 的 access log,抓出前十大網站流量兇手

說到 Log 分析大家都會先想到用 AWStats 來分析,沒錯這絕對是一個最好的解決方式,但如果你只是要簡單的分析一些資訊,就可以利用一些簡單的 shell 組合來撈出你要的資料


這篇主要是針對 Apache 的 access log 來進行分析,並提供以下範例給大家參考


取得前十名access 最多的IP 位址

cat access_log | awk'{print $ 1}'| sort | uniq -c | sort -nr | head -10


取得前十名 access 最多的網頁

cat access_log | awk'{print $ 11}'| sort | uniq -c | sort -nr | head -10


取得前十名下載流量最大的 zip 檔案

cat access.log | awk'($ 7〜/ \。zip /){print $ 10“” $ 1“” $ 4“” $ 7}'| sort -nr | head -10


取得前十名 Loading 最大的頁面 (大於60秒的 php 頁面)

cat access_log | awk'($ NF> 60 && $ 7〜/ \。php /){print $ 7}'| sort -n | uniq -c | sort -nr | head -10


取得前十名 User access 最久的頁面

cat access_log | awk'($ 7〜/ \。php /){print $ NF“” $ 1“” $ 4“” $ 7}'| sort -nr | head -10


取得access log 平均流量(GB)

cat access_log | awk'{sum + = $ 10} END {print sum / 1024/1024/1024}'


取得所有404 Link

awk'($ 9〜/ 404 /)'access_log | awk'{print $ 9,$ 7}'| 分類


取得所有 access code 的 stats 數量

cat access_log | awk -F'''$ 9 ==“ 400” || $ 9 ==“ 404” || $ 9 ==“ 408” || $ 9 ==“ 499” || $ 9 ==“ 500” || $ 9 ==“ 502” || $ 9 ==“ 504” {print $ 9}'| | 排序| uniq -c | 更多


以上只是簡單分析出常用的需求,也可以自行斟酌調整,然後再從中找到自己想要的分析模式

相信在日常的維護使用中可以幫上很大的忙。


希望是最淺顯易懂的 RxJS 教學

前言

關注 RxJS 已經好一段時間了,最早知道這個東西是因為 redux-observable,是一個 redux 的 middleware,Netflix 利用它來解決複雜的非同步相關問題,那時候我連redux-saga都還沒搞懂,沒想到就又有新的東西出來了。

半年前花了一些時間,找了很多網路上的資料,試圖想要搞懂這整個東西。可是對我來說,很多教學的步調都太快了,不然就是講得太仔細,反而讓初學者無所適從。

這次有機會在公司的新專案裡面嘗試導入redux-observable,身為提倡要導入的人,勢必要對這東西有一定的瞭解。秉持著這個想法,上週認真花了點時間再次把相關資源都研究了一下,漸漸整理出一套「我覺得應該可以把 RxJS 講得更好懂」的方法,在這邊跟大家分享一下。

在開始之前,要先大力稱讚去年 iT 邦幫忙鐵人賽的 Web 組冠軍:30 天精通 RxJS,這系列文章寫得很完整,感受得出來作者下了很多功夫在這上面。看完這篇之後如果對更多應用有興趣的,可以去把這系列的文章讀完。

好,那就讓我們開始吧!

請你先忘掉 RxJS

沒錯,你沒看錯。

要學會 RxJS 的第一件事情就是:忘記它。

忘記有這個東西,完全忘記,先讓我講幾個其他東西,等我們需要講到 RxJS 的時候我會再提醒你的。

在我們談到主角之前,先來做一些有趣的事情吧!

程式基礎能力測試

先讓我們做一個簡單的練習題暖身,題目是這樣的:

有一個陣列,裡面有三種類型的資料:數字、a~z組成的字串、數字組成的字串,請你把每個數字以及數字組成的字串乘以二之後加總
範例輸入:[1, 5, 9, 3, ‘hi’, ‘tb’, 456, ’11’, ‘yoyoyo’]

你看完之後應該會說:「這有什麼難的?」,並且在一分鐘以內就寫出下面的程式碼:

const source = [1, 5, 9, 3, 'hi', 'tb', 456, '11', 'yoyoyo'];
let total = 0;

for (let i = 0; i < source.length; i++) {
  let num = parseInt(source[i], 10);
  if (!isNaN(num)) {
    total += num * 2;
  }
}

相信大家一定都是很直覺的就寫出上面的程式碼,但如果你是個 functional programming 的愛好者,你可能會改用另外一種思路來解決問題:

const source = [1, 5, 9, 3, 'hi', 'tb', 456, '11', 'yoyoyo'];

let total = source
  .map(x => parseInt(x, 10))
  .filter(x => !isNaN(x))
  .map(x => x * 2)
  .reduce((total, value) => total + value )

一開始的例子叫做Imperative(命令式),用陣列搭配一堆函式的例子叫做Declarative(聲明式)。如果你去查了一下定義,應該會看到這兩個的解釋:

Imperative 是命令機器去做事情(how),這樣不管你想要的是什麼(what),都會按照你的命令實現;Declarative 是告訴機器你想要的是什麼(what),讓機器想出如何去做(how)

好,你有看懂上面這些在說什麼嗎?

我是沒有啦。

所以讓我們再看一個例子,其實 Declarative 你已經常常在用了,只是你不知道而已,那就是 SQL:

SELECT * from dogs INNER JOIN owners WHERE dogs.owner_id = owners.id

這句話就是:我要所有狗的資料加上主人的資料。

我只有說「我要」而已,那要怎麼拿到這些資料?我不知道,我也不用知道,都讓 SQL 底層決定怎麼去操作就好。

如果我要自己做出這些資料,在 JavaScript 裡面我必須這樣寫(程式碼取自声明式编程和命令式编程的比较):

//dogs = [{name: 'Fido', owner_id: 1}, {...}, ... ]
//owners = [{id: 1, name: 'Bob'}, {...}, ...]

var dogsWithOwners = []
var dog, owner

for(var di=0; di < dogs.length; di++) {
  dog = dogs[di]
  for(var oi=0; oi < owners.length; oi++) {
    owner = owners[oi]
    if (owner && dog.owner_id == owner.id) {
      dogsWithOwners.push({
        dog: dog,
        owner: owner
      })
    }
  }
}

應該可以大致體驗出兩者的差別吧?後者你必須自己一步步去決定該怎麼做,而前者只是僅僅跟你說:「我想要怎樣的資料」而已。

接著我們再把目光放回到把數字乘以二相加的那個練習。對我來說,最大的不同點是後面那個用陣列搭配函式的例子,他的核心概念是:

把原始資料經過一連串的轉換,變成你想要的資訊

這點超級重要,因為在一開始的例子中,我們是自己一步步去 parse,去檢查去相加,得出數字的總和。而後面的那個例子,他是把原始的資料(陣列),經過一系列的轉換(map, filter, reduce),最後變成了我們想要的答案。

畫成圖的話,應該會長這樣(請原諒我偷懶把乘二的部分拿掉了,但意思不影響):

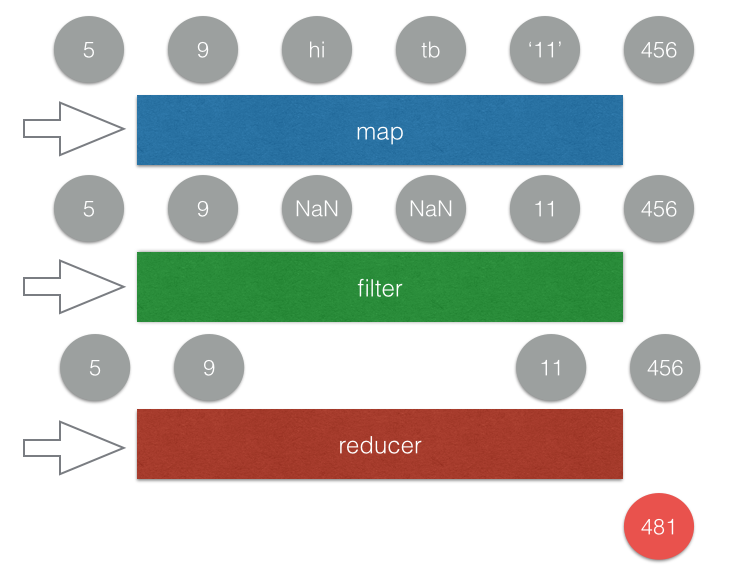
把原始資料經過一連串的轉換,最後變成你想要的答案,這點就是後者最大的不同。只要你有了這個基礎知識之後,再來看 RxJS 就不會覺得太奇怪了。

Reactive Programming

談到 RxJS 的時候,都會談到 Reactive 這個詞,那什麼是 Reactive 呢?可以從英文上的字義來看,這個單字的意思是:「反應、反應性的」,意思就是你要對一些事情做出反應。

所以 Reactive 其實就是在講說:「某些事情發生時,我能夠做出反應」。

讓我們來舉一個大家非常熟知的例子:

window.addEventListener('click', function(){
  console.log('click!');
})

我們加了一個 event listener 在 window 上面,所以我們可以監聽到這個事件,每當使用者點擊的時候就列印出 log。換句話說,這樣就是:「當 window 被點擊時,我可以做出反應」。

正式進入 RxJS

如果你去看 ReactiveX 的網頁,你會發現他有明確的定義 ReactiveX:

ReactiveX is a combination of the best ideas from
the Observer pattern, the Iterator pattern, and functional programming

第一個 Observer pattern 就像是 event listener 那樣,在某些事情發生時,我們可以對其作出反應;第二個 Iterator pattern 我們跳過不講,我認為暫時不影響理解;第三個就像是一開始的例子,我們可以把一個陣列經過多次轉換,轉換成我們想要的資料。

在 Reactive Programming 裡面,最重要的兩個東西叫做 Observable 跟 Observer,其實一開始讓我最困惑的點是因為我英文不好,不知道這兩個到底誰是觀察的誰是被觀察的。

先把它們翻成中文,Observable 就是「可被觀察的」,Observer 就是所謂的「觀察者」。

這是什麼意思呢?就如同上面的例子一樣,當(可被觀察的東西)有事情發生,(Observer,觀察者)就可以做出反應。

直接舉一個例子你就知道了:

Rx.Observable.fromEvent(window, 'click')
  .subscribe(e => {
    console.log('click~');
  })

上面這段程式碼跟我幫 window 加上 event listener 在做的事情完全一樣,只是這邊我們使用了 RxJS 提供的方法叫做fromEvent,來把一個 event 轉成 Observable(可被觀察的),並且在最後加上 subscribe。

這樣寫就代表說我訂閱了這個 Observable,只要有任何事情發生,就會執行我傳進去的 function。

所以到底什麼是 Observable?

Observable 就是一個可被觀察的對象,這個對象可以是任何東西(例如說上述例子就是 window 的 click 事件),當有新資料的時候(例如說新的點擊事件),你就可以接收到這個新資料的資訊並且做出反應。

比起 Observable 這個冷冰冰的說法,我更喜歡的一個說法是 stream,資料流。其實每一個 Observable 就是一個資料流,但什麼是資料流?你就想像成是會一直增加元素的陣列就好了,有新的事件發生就 push 進去。如果你喜歡更專業一點的說法,可以叫它:「時間序列上的一連串資料事件」(取自 Reactive Programming 簡介與教學(以 RxJS 為例)

或是我再舉一個例子,stream 的另外一個解釋就是所謂的「串流影片」,意思就是隨著你不斷播放,就會不斷下載新的片段進來。此時你腦中應該要有個畫面,就是像水流那樣,不斷有新的東西流進來,這個東西就叫做 stream。


(圖片取自 giphy

我理解資料流了,然後呢?

上面有說過,我們可以把任何一個東西轉成 Observable,讓它變成資料流,可是這不就跟 addEventListener 一樣嗎?有什麼特別的?

有,還真的比較特別。

希望你沒有忘記我們剛開始做的那個小練習,就是把一個陣列透過一系列轉換,變成我們要的資料的那個練習。我剛剛有說,你可以把 Observable 想成是「會一直增加元素的陣列」,這代表什麼呢?

代表我們也可以把 Observable 做一系列的轉換!我們也可以用那些用在陣列上的 function!

Rx.Observable.fromEvent(window, 'click')
  .map(e => e.target)
  .subscribe(value => {
    console.log('click: ', value)
  })

我們把 click 事件經過 map 轉換為點擊到的 element,所以當我們最後在 subscribe 的時候,收到的 value 就會是我們點擊的東西。

接著來看一個稍微進階一點的例子:

Rx.Observable.fromEvent(window, 'click')
  .map(e => 1)
  .scan((total, now) => total + now)
  .subscribe(value => {
    document.querySelector('#counter').innerText = value;
  })

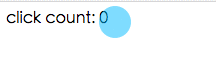
首先我們先把每一個 click 事件都透過map轉換成 1(或者你也可以寫成.mapTo(1)),所以每按一次就送出一個數字 1。scan的話其實就是我們一開始對陣列用的reduce,你可以想成是換個名字而已。透過scan加總以後傳給 subscriber,顯示在頁面上面。

就這樣簡單幾行,就完成了一個計算點擊次數的 counter。

可以用一個簡單的 gif 圖來表示上面的範例:

可是 Observable 不只這樣而已,接下來我們要進入到它最厲害的地方了。

威力無窮的組合技

如果把兩個陣列合併,會變成什麼?例如說[1, 2, 3][4, 5, 6]

這要看你指的「合併」是什麼,如果是指串接,那就是[1, 2, 3, 4, 5, 6],如果是指相加,那就是[5, 7, 9]

那如果把兩個 Observable 合併會變成什麼?

Observable 跟陣列的差別就在於多了一個維度:時間。

Observable 是「時間序列上的一連串資料事件」,就像我前面講的一樣,可以看成是一個一直會有新資料進來的陣列。

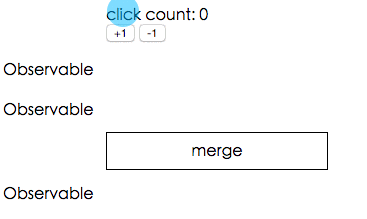
我們先來看看一張很棒的圖,很清楚地解釋了兩個 Observable 合併會變成什麼:


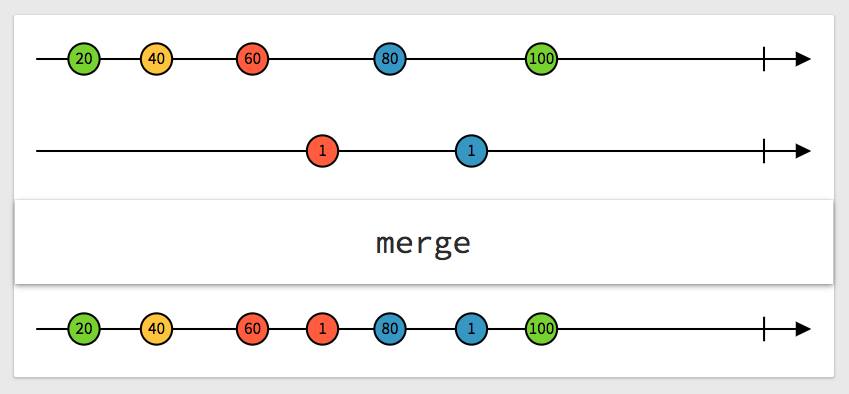
(取自:http://rxmarbles.com/#merge)

上面是一個 Observable,每一個圓點代表一個資料,下面也是一樣,把這兩個合併之後就變成最下面那一條,看圖解應該還滿好懂的,就像是把兩個時間軸合併一樣。

讓我們來看一個可以展現合併強大之處的範例,我們有 +1 跟 -1 兩個按鈕以及文字顯示現在的數字是多少:

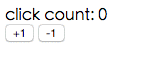
該怎麼達成這個功能呢?基本的想法就是我們先把每個 +1 的 click 事件都通過mapTo變成數字 1,取叫 Observable_plus1 好了。再做出一個 Observable_minus1 是把每個 -1 的 click 事件都通過mapTo變成數字 -1。

把這兩個 Observable 合併之後,再利用剛剛提到的scan加總,就是目前應該要顯示的數字了!

Rx.Observable.fromEvent(document.querySelector('input[name=plus]'), 'click')
  .mapTo(1)
  .merge(
    Rx.Observable.fromEvent(document.querySelector('input[name=minus]'), 'click')
      .mapTo(-1)
  )
  .scan((total, now) => total + now)
  .subscribe(value => {
    document.querySelector('#counter').innerText = value;
  })

如果你還是不懂的話,可以參考下面的精美範例,示範這兩個 Observable 是怎麼合在一起的(O代表點擊事件,+1-1則是mapTo之後的結果):

讓我們來比較一下如果不用 Observable 的話,程式碼會長怎樣:

var total = 0;
document.querySelector('input[name=plus]').addEventListener('click', () => {
  total++;
  document.querySelector('#counter').innerText = total;
})

document.querySelector('input[name=minus]').addEventListener('click', () => {
  total--;
  document.querySelector('#counter').innerText = total;
})

有沒有發覺兩者真的差別很大?就如同我之前所說的,是兩種完全不同的思考模式,所以 Reactive Programming 困難的地方不是在於理解,也不是在於語法(這兩者相信你目前都有些概念了),而是在於換一種全新的思考模式。

以上面的寫法來說,就是告訴電腦:「按下加的時候就把一個變數 +1,然後更改文字;按下減的時候就 -1 並且也更改文字」,就可以達成計數器的功能。

以 Reactive 的寫法,就是把按下加當成一個資料流,把按下減也當成一個資料流,再透過各種 function 把這兩個流轉換並且合併起來,讓最後的那個流就是我們想要的結果(計數器)。

你現在應該能體會到我一開始說的了:「把原始資料經過一連串的轉換,最後變成你想要的答案」,這點就是 Reactive Programming 最大的特色。

組合技中的組合技

我們來看一個更複雜一點的範例,是在 canvas 上面實現非常簡單的繪圖功能,就是滑鼠按下去之後可以畫畫,放開來就停止。

要實現這個功能很間單,canvas 提供lineTo(x, y)這個方法,只要在滑鼠移動時不斷呼叫這個方法,就可以不斷畫出圖形來。但有一點要注意的是當你在按下滑鼠時,應該先呼叫moveTo(x, y)把繪圖的點移到指定位置,為什麼呢?

假設我們第一次畫圖是在左上角,第二次按下滑鼠的位置是在右下角,如果沒有先用moveTo移動而是直接用lineTo的話,就會多一條線從左上角延伸到右下角。moveTolineTo的差別就是前者只是移動,後者會跟上次的點連接在一起畫成一條線。

var canvas = document.getElementById('canvas');
var ctx = canvas.getContext('2d');
ctx.beginPath(); // 開始畫畫

function draw(e){
  ctx.lineTo(e.clientX,e.clientY); // 移到滑鼠在的位置
  ctx.stroke(); // 畫畫
}

// 按下去滑鼠才開始偵測 mousemove 事件
canvas.addEventListener('mousedown', function(e){
  ctx.moveTo(e.clientX, e.clientY); // 每次按下的時候必須要先把繪圖的點移到那邊,否則會受上次畫的位置影響
  canvas.addEventListener('mousemove', draw);
})

// 放開滑鼠就停止偵測 
canvas.addEventListener('mouseup', function(e){
  canvas.removeEventListener('mousemove', draw);
})

那如果在 RxJS 裡面,該怎麼實作這個功能呢?

首先憑直覺,應該就是先加上mousedown的事件對吧!至少有個開頭。

Rx.Observable.fromEvent(canvas, 'mousedown')
  .subscribe(e => {
    console.log('mousedown');
  })

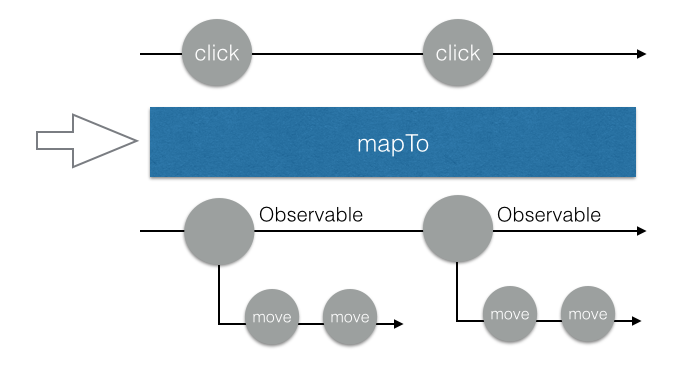
可是滑鼠按下去之後應該要變成什麼?這個時候應該要開始監聽mousemove對吧,所以我們這樣寫,用mapTo把每一個mousedown的事件都轉換成mousemove的 Observable:

Rx.Observable.fromEvent(canvas, 'mousedown')
  .mapTo(
    Rx.Observable.fromEvent(canvas, 'mousemove')
  )
  .subscribe(value => {
    console.log('value: ', value);
  })

接著你看一下 console,你會發現每當我點擊的時候,console 就會印出FromEventObservable {_isScalar: false, sourceObj: canvas#canvas, eventName: "mousemove", selector: undefined, options: undefined}

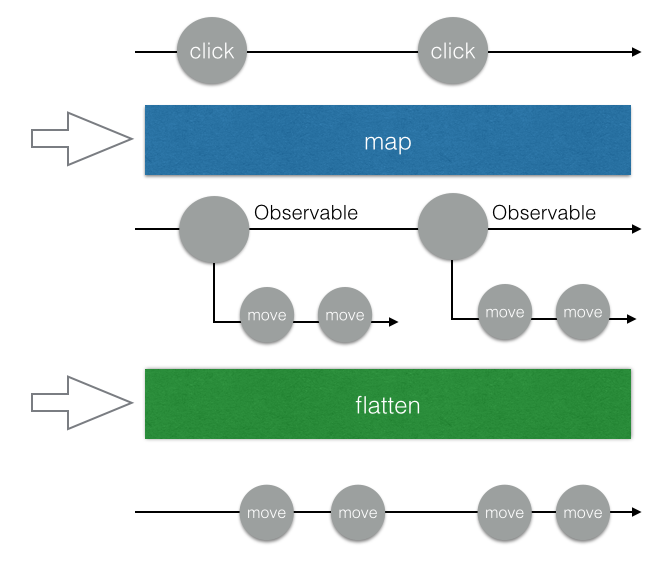
仔細想一下你會發現也滿合理的,因為我用mapTo把每一個滑鼠按下去的事件轉成一個 mousemove 的 Observable,所以用 subscribe 訂閱之後拿到的東西就會是這個 Observable。如果畫成圖,大概長得像這樣:

好了,那怎麼辦呢?我想要的其實不是 Observable 本身,而是屬於這個 Observable 裡面的那些東西啊!現在這個情形就是 Observable 裡面又有 Observable,有兩層,可是我想要讓它變成一層就好,該怎麼辦呢?

在此提供一個讓 Observable 變簡單的訣竅:

只要有問題,先想想 Array 就對了!

我前面有提過,可以把 Observable 看成是加上時間維度的進階版陣列,因此只要是陣列有的方法,Observable 通常也都會有。

舉例來說,一個陣列可能長這樣:[1, [2, 2.5], 3, [4, 5]]一共有兩層,第二層也是一個陣列。

如果想讓它變一層的話怎麼辦呢?壓平!

有用過 lodash 或是其他類似的 library 的話,你應該有聽過_.flatten這個方法,可以把這種陣列壓平,變成:[1, 2, 2.5, 3, 4, 5]

用 flat 這個關鍵字去搜尋 Rx 文件的話,你會找到一個方法叫做 FlatMap,簡單來說就是先map之後再自動幫你壓平。

所以,我們可以把程式碼改成這樣:

Rx.Observable.fromEvent(canvas, 'mousedown')
  .flatMap(e => Rx.Observable.fromEvent(canvas, 'mousemove'))            
  .subscribe(e => {
    console.log(e);
  })

當你點擊之後,會發現隨著滑鼠移動,console 會印出一大堆 log,就代表我們成功了。

畫成示意圖的話會變成這樣(為了方便說明,我把flatMap在圖片上變成mapflatten兩個步驟):

接下來呢?接下來我們要讓它可以在滑鼠鬆開的時候停止,該怎麼做呢?RxJS 有一個方法叫做takeUntil,意思就是拿到…發生為止,傳進去的參數必須是一個 Observable。

舉例來說,如果寫.takeUntil(window, 'click'),就表示如果任何window的點擊事件發生,這個 Observable 就會立刻終止,不會再送出任何資料。

應用在繪畫的例子上,我們只要把takeUntil後面傳的參數換成滑鼠鬆開就好!順便把subscribe跟畫畫的 function 也一起完成吧!

Rx.Observable.fromEvent(canvas, 'mousedown')
  .flatMap(e => Rx.Observable.fromEvent(canvas, 'mousemove'))
  .takeUntil(Rx.Observable.fromEvent(canvas, 'mouseup'))         
  .subscribe(e => {
    draw(e);
  })

改完之後馬上來實驗一下!滑鼠按下去之後順利開始畫圖,鬆開以後畫圖停止,完美!

咦,可是怎麼按下第二次就沒反應了?我們做出了一個「只能夠成功畫一次圖」的 Observable。

為什麼呢?我們可以先來看一下takeUntil的示意圖(取自:http://rxmarbles.com/#takeUntil)

以我們的情形來說,就是只要mouseup事件發生,「整個 Observable」就會停止,所以只有第一次能夠畫圖成功。但我們想要的其實不是這樣,我們想要的是只有mousemove停止而已,而不是整個都停止。

所以,我們應該把takeUntil放在mousemove的後面,也就是:

Rx.Observable.fromEvent(canvas, 'mousedown')
  .flatMap(e => Rx.Observable.fromEvent(canvas, 'mousemove')
      .takeUntil(Rx.Observable.fromEvent(canvas, 'mouseup'))  
  )
  .subscribe(e => {
    draw(e);
  })

這樣子裡面的那個mousemove的 Observable 就會在滑鼠鬆開時停止發送事件,而我們最外層的這個 Observable 監聽的是滑鼠按下,會一直監聽下去。

到這邊其實就差不多了,但還有一個小 bug 要修,就是我們沒有在mousedown的時候利用moveTo移動,造成我們一開始說的那個會把上次畫的跟這次畫的連在一起的問題。

那怎麼辦呢?我已經把mousedown事件轉成其他資料流了,我要怎麼在mousedown的時候做事?

有一個方法叫做do,就是為了這種情形而設立的,使用時機是:「你想做一點事,卻又不想影響資料流」,有點像是能夠針對不同階段 subscribe 的感覺,mousedown的時候 subscribe 一次,最後要畫圖的時候又 subscribe 一次。

Rx.Observable.fromEvent(canvas, 'mousedown')
  .do(e => {
    ctx.moveTo(e.clientX, e.clientY)
  })
  .flatMap(e => Rx.Observable.fromEvent(canvas, 'mousemove')
      .takeUntil(Rx.Observable.fromEvent(canvas, 'mouseup'))  
  )
  .subscribe(e => {
    draw(e);
  })

到這邊,我們就順利完成了畫圖的功能。

如果你想試試看你有沒有搞懂,可以實作看看拖拉移動物體的功能,原理跟這個很類似,都是偵測滑鼠的事件並且做出反應。

喝口水休息一下,下半場要開始了

上半場的目標在於讓你理解什麼是 Rx,並且掌握幾個基本概念:

  1. 一個資料流可以經過一系列轉換,變成另一個資料流
  2. 這些轉換基本上都跟陣列有的差不多,像是mapfilterflatten等等
  3. 你可以合併多個 Observable,也可以把二維的 Observable 壓平

下半場專注的點則是在於實戰應用,並且圍繞著 RxJS 最適合的場景之一:API。

前面我們有提到說可以把 DOM 物件的 event 變成資料流,但除了這個以外,Promise 其實也可以變成資料流。概念其實也很簡單啦,就是 Promise 被 resovle 的時候就發送一個資料,被 reject 的時候就終止。

讓我們來看一個簡單的小範例,每按一次按鈕就會發送一個 request

function sendRequest () {
  return fetch('https://jsonplaceholder.typicode.com/posts/1').then(res => res.json())
}

Rx.Observable.fromEvent(document.querySelector('input[name=send]'), 'click')
  .flatMap(e => Rx.Observable.fromPromise(sendRequest()))
  .subscribe(value => {
    console.log(value)
  })

這邊用flatMap的原因跟剛才的畫圖範例一樣,我們要在按下按鈕時,把原本的資料流轉換成新的資料流,如果只用map的話,會變成一個二維的 Observable,所以必須要用flatten把它壓平。

你可以試試看把flatMap改成map,你最後 subscribe 得到的值就會是一堆 Observable 而不是你想要的資料。

知道怎麼用 Rx 來處理 API 之後,就可以來做一個經典範例了:AutoComplete。

我在做這個範例的時候有極大部分參考30 天精通 RxJS(19): 實務範例 – 簡易 Auto Complete 實作Reactive Programming 簡介與教學(以 RxJS 為例)以及构建流式应用—RxJS详解,再次感謝這三篇文章。

為了要讓大家能夠體會 Reactive Programming 跟一般的有什麼不一樣,我們先用老方法做出這個 Auto Complete 的功能吧!

先來寫一下最底層的兩個函式,負責抓資料的以及 render 建議清單的,我們使用維基百科的 API 來當作範例:

function searchWikipedia (term) {
    return $.ajax({
        url: 'http://en.wikipedia.org/w/api.php',
        dataType: 'jsonp',
        data: {
            action: 'opensearch',
            format: 'json',
            search: term
        }
    }).promise();
}

function renderList (list) {
  $('.auto-complete__list').empty();
  $('.auto-complete__list').append(list.map(item => '<li>' + item + '</li>'))
}

這邊要注意的一個點是維基百科回傳的資料會是一個陣列,格式如下:

[你輸入的關鍵字, 關鍵字清單, 每個關鍵字的介紹, 每個關鍵字的連結]

// 範例:
[
  "dd",
  ["Dd", "DDR3 SDRAM", "DD tank"],
  ["", "Double data rate type three SDRAM (DDR3 SDRAM)", "DD or Duplex Drive tanks"],
  [https://en.wikipedia.org/wiki/Dd", "https://en.wikipedia.org/wiki/DDR3_SDRAM", "...略"]
]

在我們的簡單示範中,只需要取 index 為 1 的那個關鍵字清單就好了。而renderList這個 function 則是傳進一個陣列,就會把陣列內容轉成li顯示出來。

有了這兩個最基礎的 function 之後,就可以很輕易地完成 Auto Complete 的功能:

document.querySelector('.auto-complete input').addEventListener('input', (e) => {
  searchWikipedia(e.target.value).then((data) => {
    renderList(data[1])
  })
})

程式碼應該很好懂,就是每次按下輸入東西的時候去 call api,把回傳的資料餵給renderList去渲染。

最基本的功能完成了,我們要來做一點優化,因為這樣子的實作其實是有一些問題的。

第一個問題,現在只要每打一個字就會送出一個 request,可是這樣做其實有點浪費,因為使用者可能快速的輸入了:java想要找相關的資料,他根本不在乎jjajav這三個 request。

要怎麼做呢?我們就改寫成如果 250ms 裡面沒有再輸入新的東西才發送 request 就好,就可以避免這種多餘的浪費。

這種技巧稱作debounce,實作上也很簡單,就是利用setTimeoutclearTimeout

var timer = null;
document.querySelector('.auto-complete input').addEventListener('input', (e) => {
  if (timer) {
    clearTimeout(timer);
  }
  timer = setTimeout(() => {
    searchWikipedia(e.target.value).then((data) => {
      renderList(data[1])
    })
  }, 250)
})

在 input 事件被觸發之後,我們不直接做事情,而是設置了一個 250ms 過後會觸發的 timer,如果 250ms 內 input 再次被觸發的話,我們就把上次的 timer 清掉,再重新設置一個。

如此一來,就可以保證使用者如果在短時間內不斷輸入文字的話,不會送出相對應的 request,而是會等到最後一個字打完之後的 250 ms 才發出 request。

解決了第一個問題之後,還有一個潛在的問題需要解決。

假設我現在輸入a,接著刪除然後再輸入b,所以第一個 request 會是a的結果,第二個 request 會是b的結果。我們假設 server 出了一點問題,所以第二個的 response 反而比第一個還先到達(可能b的搜尋結果有 cache 但是a沒有),這時候就會先顯示b的內容,等到第一個 response 回來時,再顯示a的內容。

可是這樣 UI 就有問題了,我明明輸入的是b,怎麼 auto complete 的推薦關鍵字是a開頭?

所以我們必須要做個檢查,檢查返回的資料跟我現在輸入的資料是不是一致,如果一致的話才 render:

var timer = null;
document.querySelector('.auto-complete input').addEventListener('input', (e) => {
  if (timer) {
    clearTimeout(timer);
  }
  timer = setTimeout(() => {
    searchWikipedia(e.target.value).then((data) => {
      if (data[0] === document.querySelector('.auto-complete input').value) {
        renderList(data[1])
      }
    })
  }, 250)
})

到這裡應該就差不多了,該有的功能都有了。

接著,讓我們來挑戰用 RxJS 實作吧!

首先,先從簡單版的開始做,就是不包含 debounce 跟上面 API 順序問題的實作,監聽 input 事件轉換成 request,然後用flatMap壓平,其實就跟上面的流程差不多:

Rx.Observable
  .fromEvent(document.querySelector('.auto-complete input'), 'input')
  .map(e => e.target.value)
  .flatMap(value => {
    return Rx.Observable.from(searchWikipedia(value)).map(res => res[1])
  })
  .subscribe(value => {
    renderList(value);
  })

這邊用了兩個map,一個是把e轉成e.target.value,一個是把傳回來的結果轉成res[1],因為我們只需要關鍵字列表,其他的東西其實都不用。

那要如何實作debounce的功能呢?

RxJS 已經幫你實作好了,所以你只要加上.debounceTime(250)就好了,就是這麼簡單。

Rx.Observable
  .fromEvent(document.querySelector('.auto-complete input'), 'input')
  .debounceTime(250)
  .map(e => e.target.value)
  .flatMap(value => {
    return Rx.Observable.from(searchWikipedia(value)).map(res => res[1])
  })
  .subscribe(value => {
    renderList(value);
  })

還有最後一個問題要解決,那就是剛才提到的 request 的順序問題。

Observable 有一個不同的解法,我來解釋給大家聽聽。

其實除了flatMap以外,還有另外一種方式叫做switchMap,他們的差別在於要怎麼把 Observable 給壓平。前者我們之前介紹過了,就是會把每一個二維的 Observable 都壓平,並且「每一個都執行」。

switchMap的差別在於,他永遠只會處理最後一個 Observable。拿我們的例子來說,假設第一個 request 還沒回來的時候,第二個 request 就發出去了,那我們的 Observable 就只會處理第二個 request,而不管第一個。

第一個還是會發送,還是會接收到資料,只是接收到資料以後不會再把這個資料 emit 到 Observable 上面,意思就是根本沒人理這個資料了。

可以看一下簡陋的圖解,flatMap每一個 promise resolve 之後的資料都會被發送到我們的 Observable 上面:

switchMap只會處理最後一個:

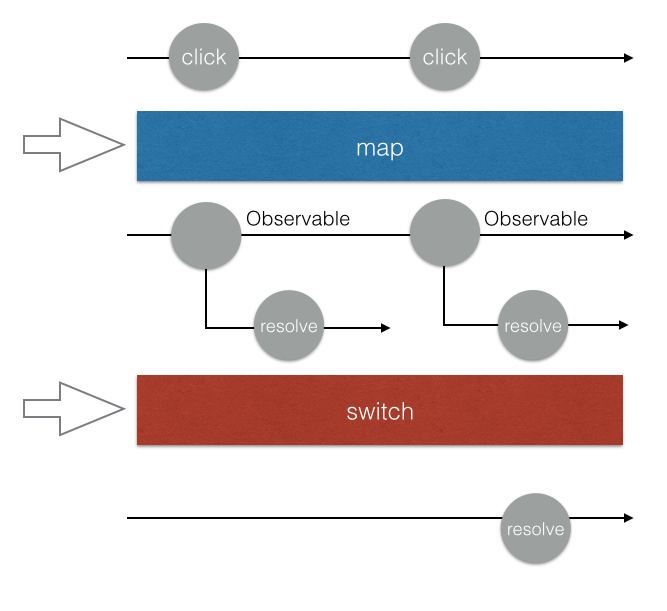
所以我們只要把flatMap改成switchMap,就可以永遠只關注最後一個發送的 request,不用去管 request 傳回來的順序,因為前面的 request 都跟這個 Observable 無關了。

Rx.Observable
  .fromEvent(document.querySelector('.auto-complete input'), 'input')
  .debounceTime(250)
  .map(e => e.target.value)
  .switchMap(value => {
    return Rx.Observable.from(searchWikipedia(value)).map(res => res[1])
  })
  .subscribe(value => {
    renderList(value);
  })

做到這邊,就跟剛剛實作的功能一模一樣了。

但其實還有地方可以改進,我們來做個小小的加強好了。現在的話當我輸入abc,會出現abc的相關關鍵字,接著我把abc全部刪掉,讓 input 變成空白,會發現 API 這時候回傳一個錯誤:The "search" parameter must be set.

因此,我們可以在 input 是空的時候,不發送 request,只回傳一個空陣列,而回傳空陣列這件事情可以用Rx.Observable.of([])來完成,這樣會創造一個會發送空陣列的 Observable:

Rx.Observable
  .fromEvent(document.querySelector('.auto-complete input'), 'input')
  .debounceTime(250)
  .map(e => e.target.value)
  .switchMap(value => {
    return value.length < 1 ? Rx.Observable.of([]) : Rx.Observable.from(searchWikipedia(value)).map(res => res[1])
  })
  .subscribe(value => {
    renderList(value);
  })

還有一個點擊關鍵字清單之後把文字設定成關鍵字的功能,在這邊就不示範給大家看了,但其實就是再創造一個 Observable 去監聽點擊事件,點到的時候就設定文字並且把關鍵字清單給清掉。

我直接附上參考程式碼:

Rx.Observable
  .fromEvent(document.querySelector('.auto-complete__list'), 'click')
  .filter(e => e.target.matches('li'))
  .map(e => e.target.innerHTML)
  .subscribe(value => {
    document.querySelector('.auto-complete input').value = value;
    renderList([])
  })

雖然我只介紹了最基本的操作,但 RxJS 的強大之處就在於除了這些,你甚至還有retry可以用,只要輕鬆加上這個,就能夠有自動重試的功能。

相關的應用場景還有很多,只要是跟 API 有關連的幾乎都可以用 RxJS 很優雅的解決。

React + Redux 的非同步解決方案:redux-observable

這是我們今天的最後一個主題了,也是我開場所提到的。

React + Redux 這一套非常常見的組合,一直都有一個問題存在,那就是沒有規範非同步行為(例如說 API)到底應該怎麼處理。而開源社群也有許多不同的解決方案,例如說 redux-thunk、redux-promise、redux-saga 等等。

我們前面講了這麼多東西,舉了這麼多範例,就是要證明給大家看 Reactive programming 很適合拿來解決複雜的非同步問題。因此,Netflix 就開源了這套redux-observable,用 RxJS 來處理非同步行為。

在瞭解 RxJS 之後,可以很輕鬆的理解redux-observable的原理。

在 redux 的應用裡面,所有的 action 都會通過 middleware,你可以在這邊對 action 做任何處理。或者我們也可以把 action 看做是一個 Observable,例如說:

// 範例而已
Rx.Observable.from(actionStreams)
  .subscribe(action => {
    console.log(action.type, action.payload)
  })

有了這個以後,我們就可以做一些很有趣的事情,例如說偵測到某個 action 的時候,我們就發送 request,並且把 response 放進另外一個 action 裡面送出去。

Rx.Observable.from(actionStreams)
  .filter(action => action.type === 'GET_USER_INFO')
  .switchMap(
    action => Rx.Observable.from(API.getUserInfo(action.payload.userId))
  )
  .subscribe(userInfo => {
    dispatch({
      type: 'SET_USER_INFO',
      payload: userInfo
    })
  })

上面就是一個簡單的例子,但其實redux-observable已經幫我們處理掉很多東西了,所以我們只要記得一個概念:

action in, action out

redux-observable 是一個 middleware,你可以在裡面加上很多epic,每一個epic就是一個 Observable,你可以監聽某一個指定的 action,做一些處理,再轉成另外一個 action。

直接看程式碼會比較好懂:

import Actions from './actions/user';
import ActionTypes from './actionTypes/user'

const getUserEpic = action$ =>
  action$.ofType(actionTypes.GET_USER)
    .switchMap(
      action => Rx.Observable.from(API.getUserInfo(action.payload.userId))
    ).map(userInfo => Actions.setUsers(userInfo))

大概就是像這樣,我們監聽一個 action type(GET_USER),一接收到的時候就發送 request,並且把結果轉為setUsers這個 action,這就是所謂的 action in, action out。

這樣的好處是什麼?好處是明確制定了一個規範,當你的 component 需要資料的時候,就送出一個 get 的 action,這個 action 經過 middleware 的時候會觸發 epic,epic 發 request 給 server 拿資料,轉成另外一個 set 的 action,經過 reducer 設定資料以後更新到 component 的 props。

可以看這張流程圖:

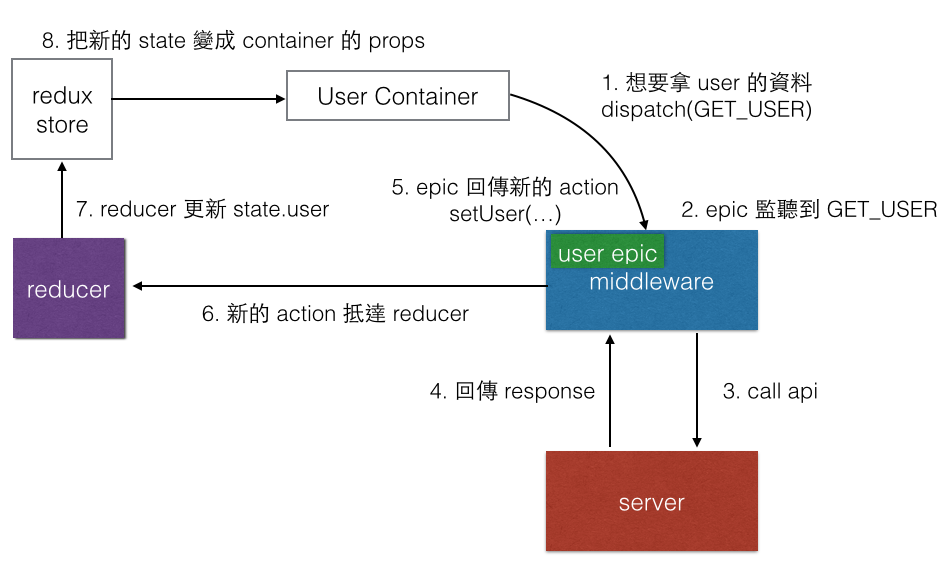
總之呢,epic就是一個 Observable,你只要確保你最後回傳的東西是一個 action 就好,那個 action 就會被送到 reducer 去。

礙於篇幅的關係,今天對於redux-observable只是概念性的帶過去而已,沒有時間好好示範,之後再來找個時間好好寫一下redux-observable的實戰應用。

結論

從一開始的陣列講到 Observable,講到畫圖的範例再講到經典的 Auto Complete,最後還講了redux-observable,這一路的過程中,希望大家有體會到 Observable 在處理非同步行為的強大之處以及簡潔。

這篇的目的是希望能讓大家理解 Observable 大概在做什麼,以及介紹一些簡單的應用場景,希望能提供一篇簡單易懂的中文入門文章,讓更多人能體會到 Observable 的威力。

喜歡這篇的話可以幫忙分享出去,發現哪邊有寫錯也歡迎留言指正,感謝。

參考資料:

30 天精通 RxJS (01):認識 RxJS
Reactive Programming 簡介與教學(以 RxJS 為例)
The introduction to Reactive Programming you’ve been missing
构建流式应用—RxJS详解
Epic Middleware in Redux
Combining multiple Http streams with RxJS Observables in Angular2

影片:
Netflix JavaScript Talks – RxJS + Redux + React = Amazing!
RxJS Quick Start with Practical Examples
RxJS Observables Crash Course
Netflix JavaScript Talks – RxJS Version 5
RxJS 5 Thinking Reactively | Ben Lesh

一次搞懂OAuth與SSO在幹什麼?

一次搞懂OAuth與SSO在幹什麼?

最近的Line Notify、Line Login,以及前一陣子的Microsoft Graph API,全都使用到了OAuth作為用戶身分驗證以及資源存取的基礎。但很多讀者會卡在OAuth的運作流程上,根本的原因是不理解OAuth到底是幹嘛的?其存在的目的為何?以及如何應用?

因此,我想花一個篇幅,盡可能短的介紹一下OAuth與SSO,但,與坊間文章不同的是,我希望從應用情境的角度(而非技術)切入談這件事情,冀望能夠讓開發人員對OAuth有個最基本的認識。

OAuth的背景

我們回頭看Line Login與Line Notify中的例子,OAuth在這邊最簡單的應用情境,就是身分驗證。典型的情境中有幾個角色,分別是:

  1. 網站或App的開發單位 : 也就是各位開發人員
  2. OAuth服務的提供者(Provider) : 也就是Line(或Google、Microsoft…etc.)
  3. 終端用戶(End-User) : 網站使用者、Line使用者、消費者、客戶…etc.

上面這三者的關係是什麼?

當我們建立一個網站(例如Pc Home購物)、或App(例如一個手機遊戲),都非常有可能需要建立一組會員機制,這些機制包含:

  1. 登入(包含身分驗證,帳號、密碼保存…等)
  2. 個資管理(用戶名稱、地址、電話、暱稱、手機…等)

以往,幾乎都是每一個網站自己做一套,但這樣有很多麻煩事,首先用戶要記得很多組帳號密碼,而每一個網站都自己搞一套會員機制,網站開發人員自己也很辛苦,加上最近這幾年大家都很重視個資,網站儲存(保管)了很多帳號密碼與個人資料,總是會有被駭的風險。因此,這十年來,很多大廠開始提供登入(與身分驗證)機制服務。

也就是說,小網站你不用自己做登入和會員管理了,你連過來我這邊,我是大網站,我已經有幾百萬上億的用戶,(例如全台灣都用Line),而且早就做了超級安全的會員管理機制,你這小網站何必自己做會員管理呢?你跟我連結不就得了,我大網站來幫你管理個資,提供你登入的服務,你把會員資料通通存我這裡,用戶也不需要記得很多組帳密,只需要記得我大網站的帳密,一樣可以登入你小網站(或稱為第三方應用)來使用你提供的服務,這樣皆大歡喜。

因此,大家就這麼做了。

但提供這樣服務的大廠越來越多,Google、Microsoft、Yahoo…都提供了這樣的服務,導致小網站為了對使用者更貼心,可能要同時連結上很多這種提供身分服務的大網站,如果每一家連結方式都不同,就很煩。因此,業界就開了幾個會,共同決定了一套工業標準,就是OAuth了。

有哪些功能?

所以你會發現,基本上網站開發人員有兩種身分,一種是OAuth服務的提供者(像是Google、微軟、Line),另一種是OAuth服務的使用者,像是一般的小網站(trello)。而終端用戶只需要在大網站申請過帳號,就可以登入小網站來使用服務。

但,大網站當然不能給你(小網站)用戶的帳號和密碼,否則多麼不安全呢?因此OAuth工業標準讓服務提供者(大網站)透過一種標準的作法,在用戶驗證過身分之後,提供一組會過期的令牌給小網站,這就是token。

小網站拿著這個令牌,就可以跟大網站取得用戶的個資,或是其他需要的資料。小網站也可以拿著這個令牌,跟大網站確認該令牌是否已經到期。

所以,整個流程大概是底下這樣:

由於上述過程中的(2),登入畫面是大網站提供的,因此你小網站不會得知用戶的帳號密碼,大網站只會在登入成功後,把一個具有有效期限的Token傳給你小網站,一旦你需要存取用戶的資料,就拿這個token去跟大網站溝通。

當然,實際上的OAuth操作步驟又更複雜,如果你參考我們前面介紹的Line Login那篇,就會知道,用戶被引導到大網站完成登入之後,你小網站是無法直接取得token的,而是取得一個code,再去用這個code跟大網站換得一個token。為何要多這一道手續?因為,網際網路是個不安全的所在,在網路上傳遞的任何東西,都可能被路上經手的路由器或其他設備給擷取、偽造、變更,因此要確保安全,得更加小心一點。

因此一般的OAuth流程,其實應該長得像是底下這樣(這是微軟Graph API的OAuth Auth Authorization Code Flow流程) :

還有更複雜的、更進階的。

如果大網站除了提供用戶的個資之外,還要可以讓小網站有權限做一些額外的事情,像是變更用戶大頭照、取得用戶上傳的檔案、幫用戶book一個行事曆…這都是Office 365/Google Apps裡面典型的情境,如此一來,終端使用者(end-user)可能就要授權小網站,到底能夠使用該用戶在大網站中多少資料,也就是大網站的用戶要賦予小網站多大的權限,來存取該終端用戶的個資? 這部分,一般稱之為 Permission Scope。

所以,OAuth除了提供登入身分驗證之外,也逐漸開始負擔了網站合作之間的授權管理功能。

好,現在回過頭來看,請參考Line Login與Line Notify這兩篇中的例子,你會發現一開始我們都只是組出一個URL,來取得Authorization Code,這一段取得的code是明碼,走的是http get,透過瀏覽器網址列來傳遞,所以在網際網路上是可以被任何人擷取看到的(因此你當然應該加上SSL),但你會發現接下來小網站取得Authorization Code之後,要透過http post,從後端走另一個路徑去跟大網站換得token,這一段並不是走瀏覽器http get,而是在小網站的伺服器端走另一個https路徑,去跟大網站溝通。由於這一段往往是在背後做的(伺服器端對伺服器端,不會經過用戶端),因此安全性相對高(OAuth也有實作成在前端取token的implicit flow,但走後端相對安全點)。如果從後端換取Token,不管是瀏覽器或用戶本身都無法得知token,就算你的用戶被人在瀏覽器或電腦中安裝了木馬也無法得知,再加上Token還有期限,因此相對安全。

這也是我們前面說的,實務上小網站被導引到大網站完成登入之後,並非直接取得token而是取得一個Authorization Code的原因。

所以你也不難理解,既然Token會到期,就衍生出需要更新(refresh)token、判斷token的有效性、設定Token的生命長度…等相關議題,但在這邊就先不介紹了。

更進一步實現SSO

好的,假設網路世界的身分驗證,都是某一個大網站(例如Google)提供的,而其他服務的小網站(網站A、網站B、網站C…),都使用Google提供的身分驗證服務,那這世界就很單純了,一旦用戶登入了網站B,用著用著,連結到了網站A,還需要重新登入一次嗎? 不需要,因為在網站B已經登入過了,這就是SSO(Single Sign On)在internet上的實現。

一旦OAuth提供者和使用者(也就是大小網站),都有實作這樣的功能,那用戶翱翔於網際網路上時,就只需要記得一組帳號密碼了,這世界多麼美好…

當然,現實世界不是這樣的,你想想,當個大網站將會擁有所有人的個資耶,這意味著什麼呢? 不用大腦想也知道。 所以,只有你想做大網站? 不,每個人都想做。因此只要稍具規模網際網路服務提供者,都希望自己是最大的那個身分驗證提供者。

現在、連Line這個IM界的新玩家(相對What’s app、skype來說,真的算是新的),挾著在亞洲(其實也只有台灣、日本、和韓國…)的超人氣,都開始提供OAuth Provider服務了,你說,Line這家公司它還不夠任性嗎?
#搞懂了OAuth和SSO,不妨接著玩玩Line NotifyLine Login,很好玩唷… Smile

從零開始建造一個vue項目

準備工作

環境依賴:Node.js; vue官方腳手架:  vue-cli

具體怎麼安裝nodejs和vue-cli的部分就不再具體說明了,請查看官方文檔按步驟執行即可(安裝nodejs會安裝npm(包管理工具),vue-cli依賴npm來安裝,注意這個先後關係)。

背景知識

vue.js核心  框架

webpack  打包工具,使用vue-cli初始化項目的時候,我們選擇webpack作為我們的模塊打包工具

開始動手

初始化項目,選擇webpack作為打包工具,項目名稱是my-project,然後按照提示進行一些配置,過程中可以選擇使用vue-router(推薦使用);這些配置最終會寫到項目的package.json中和安裝相應的模塊

vue init webpack my-project
复制代码

接下來使用自己熟悉的編輯器打開項目,目錄結構大致是這樣的

構建和配置目錄:webpack打包的相關配置文件

src目錄:我們最終編寫業務代碼的地方

static目錄:我也不知道幹嘛用的

package.json

package.json是項目最基礎的配置文件。可以發現裡面的很多內容,例如名稱,作者,描述等就是剛才初始化項目時我們填充的值; dependencies和devDependencies是項目依賴的包,運行項目之前需要先執行npm install來安裝項目所依賴的包

npm install复制代码

然後我們來重點關註一下scripts

npm允許在package.json文件裡面,使用scripts分區定義腳本命令。其中dev和start都是啟動本地開發環境的,lint是做語法校正的,build是打包最終在線代碼的

{
  "name": "my-project",
  "version": "1.0.0",
  "description": "A Vue.js project",
  "author": "ideagay <[email protected]>",
  "private": true,
  "scripts": {
    "dev": "webpack-dev-server --inline --progress --config build/webpack.dev.conf.js",
    "start": "npm run dev",
    "lint": "eslint --ext .js,.vue src",
    "build": "node build/build.js"
  },
  "dependencies": {
    "vue": "^2.5.2",
    "vue-router": "^3.0.1"
  },
  "devDependencies": {...},
  "engines": {
    "node": ">= 6.0.0",
    "npm": ">= 3.0.0"
  },
  "browserslist": [
    "> 1%",
    "last 2 versions",
    "not ie <= 8"
  ]
}

复制代码

為了統一團隊內的代碼風格,我們一般會選擇一些語法校驗插件來實現代碼風格的統一。這裡我們選擇eslint作為我們的代碼檢查插件。首先我們來改一下eslint(語法校驗)的相關配置, :根目錄下的.eslintrc.js,在規則下面加一個結尾分號的配置,強制末尾要加分號,養成好習慣;然後把src下面所有文件裡的代碼所在分號的補全,不然編譯會不通過;其他風格根據習慣自己配置吧。

"semi": [
  2,
  "always"
]复制代码

運行項目看下效果

:命令行工具,在當前目錄下執行以下命令,一切順利的話,會自動打開在瀏覽器上打開localhost:8080

# 默认8080端口
npm run dev

# 也可以指定端口
PORT=8090 npm run dev复制代码

添加業務代碼

src目錄是我們主要編寫業務代碼的地方,可參考以下目錄結構配置

資產js,css,圖片等資源目錄

組件公共組件目錄

路由器vue-router配置目錄

views頁面組件目錄

main.js程序主入口,一般在這裡添加插件,如吐司,裝載等,可自己編寫或使用第三方,如ui

App.vue根組件

main.js

import Vue from 'vue';
import App from './App';
import ElementUI from 'element-ui';
import 'element-ui/lib/theme-chalk/index.css';
import router from './router';

Vue.config.productionTip = false;

Vue.use(ElementUI);

/* eslint-disable no-new */
new Vue({
  el: '#app',
  router,
  components: { App },
  template: '<App/>'
});复制代码

路由

往router / index.js裡添加首頁的配置

import Vue from 'vue';
import Router from 'vue-router';
import Home from '@/views/index';

Vue.use(Router);

export default new Router({
  routes: [
    {
      path: '/',
      name: 'home',
      component: Home
    }
  ]
});复制代码

網絡請求

網絡請求可以使用axios,然後根據業務再進行一些封裝

資產/js/api/ajax.js

import axios from 'axios';
var qs = require('qs');

var instance = axios.create({
   baseURL: 'http://xxx.com/',
   timeout: 20000,
   headers: {
      'Content-Type': 'application/x-www-form-urlencoded'
   }
});

const ajax = (url, params) => {
   return new Promise((resolve, reject) => {
      instance({
         url: url,
         method: 'post',
         data: qs.stringify(params)
      }).then(res => {
         console.log(res);
         if (res.data.success === true) {
            resolve(res.data.data);
         } else {
            throw res;
         }
      }).catch(err => {
         console.error(err);
         reject(err);
      })
   })
};

export default ajax;复制代码
import Ajax from '@/assets/js/api/ajax.js';
Ajax(`/tui/search`, {
   'key': this.keyword
}).then(res => {
   console.log(res);
});
复制代码

樣式

使用normalize.css重置基礎樣式,消除不同瀏覽器間的差異,在根組件App.vue中約會就好了

<script>
import 'normalize.css';

export default {
   name: 'App'
}
</script>复制代码

現在一般業務所需的框架已經基本建造完成。

作者:ideagay
链接:https://juejin.im/post/5a7c18d36fb9a0633e51c458
来源:掘金
著作权归作者所有。商业转载请联系作者获得授权,非商业转载请注明出处。

How to Use MQTT With the Raspberry Pi and ESP8266

How to Use MQTT With the Raspberry Pi and ESP8266

In this Instructable, I will explain what the MQTT protocol is and how it is used to communicate between devices.Then, as a practical demonstration, I shall show you how to setup a simple two client system, where an ESP8266 module will send a message to a Python program when a button is pushed. Specifically, I am using an Adafruit HUZZAH module for this project, a Raspberry Pi and a desktop computer. The Raspberry Pi will be acting as the MQTT broker, and the Python client will be run from a separate desktop computer (optional, as this could be run on the Raspberry Pi).

To follow along with this Instructable, you will need to have some basic knowledge of electronics, and how to use the Arduino software. You should also be familiar with using a command line interface (for the Raspberry Pi). Hopefully, once you’ve gained the knowledge of what MQTT is, and how to use it in a basic scenario, you will be able to create your own IoT projects!

Required Parts

  • 1 x Raspberry Pi, connected to a local network (running Jessie)
  • 1 x ESP8266 Module (Adafruit HUZZAH)
  • 1 x Breadboard
  • 3 x Jumper Wires (Male-to-Male)
  • 1 x Pushbutton
  • 1 x 10k Ohm Resistor (Brown-Black-Orange colour code)

I’ve created this Instructable, as MQTT has always interested me as a protocol and there are many different ways it could be used. However, I couldn’t seem to get my head around how to code devices to use it. This was because I didn’t know/understand what was actually going on to take my “Hello, World!” from device A and send it to device B. Hence, I decided to write this Instructable to (hopefully) teach you how it works, and to also reinforce my own understanding of it!


Step 1: What Is MQTT?

What Is MQTT?

MQTT, or MQ Telemetry Transport, is a messaging protocol which allows multiple devices to talk to each other. Currently, it is a popular protocol for the Internet of Things, although it has been used for other purposes – for example, Facebook Messenger. Interestingly MQTT was invented in 1999 – meaning it’s as old as me!

MQTT is based around the idea that devices can publish or subscribe to topics. So, for example. If Device #1 has recorded the temperature from one of its sensors, it can publish a message which contains the temperature value it recorded, to a topic (e.g. “Temperature”). This message is sent to an MQTT Broker, which you can think of as a switch/router on a local area network. Once the MQTT Broker has received the message, it will send it to any devices (in this case, Device #2) which are subscribed to the same topic.

In this project, we will be publishing to a topic using an ESP8266, and creating a Python script that will subscribe to this same topic, via a Raspberry Pi which will act as the MQTT Broker. The great thing about MQTT is that it is lightweight, so it perfect for running on small microcontrollers such as an ESP8266, but it is also widely available – so we can run it on a Python script as well.

Hopefully, at the end of this project, you will have an understanding of what MQTT is and how to use it for your own projects in the future.

Step 2: Installing the MQTT Broker on the Raspberry Pi

Installing the MQTT Broker on the Raspberry Pi

To setup our MQTT system, we need a broker, as explained in the previous step. For the Raspberry Pi, we will be using the “Mosquitto” MQTT broker. Before we install this, it is always best to update our Raspberry Pi.

sudo apt-get update
sudo apt-get upgrade

Once you’ve done this, install mosquitto and then the mosquitto-clients packages.

sudo apt-get install mosquitto -y
sudo apt-get install mosquitto-clients -y

When you’ve finished installing these two packages, we are going to need to configure the broker. The mosquitto broker’s configuration file is located at /etc/mosquitto/mosquitto.conf, so open this with your favourite text editor. If you don’t have a favourite text editor or don’t know how to use any of the command line editors, I’ll be using nano so you can follow along:

sudo nano /etc/mosquitto/mosquitto.conf

At the bottom of this file, you should see the line:

include_dir /etc/mosquitto/conf.d

Delete this line. Add the following lines to the bottom of the file.

allow_anonymous false
password_file /etc/mosquitto/pwfile
listener 1883

By typing those lines, we’ve told mosquitto that we don’t want anyone connecting to our broker who doesn’t supply a valid username and password (we’ll get on to set these in a second) and that we want mosquitto to listen for messages on port number 1883.

If you don’t want the broker to require a username and password, don’t include the first two lines that we added (i.e. allow_anonymous… and password_file…). If you have done this, then skip to rebooting the Raspberry Pi.

Now close (and save) that file. If you are following along with the nano example, press CTRL+X, and type Y when prompted.

Because we’ve just told mosquitto that users trying to use the MQTT broker need to be authenticated, we now need to tell mosquitto what the username and password are! So, type the following command – replacing username with the username that you would like – then enter the password you would like when prompted (Note: if, when editing the configuration file, you specified a different password_file path, replace the path below with the one you used).

sudo mosquitto_passwd -c /etc/mosquitto/pwfile username

As we’ve just changed the mosquitto configuration file, we should reboot the Raspberry Pi.

sudo reboot

Once the Raspberry Pi has finished rebooting, you should have a fully functioning MQTT broker! Next, we are going to try to interact with it, using a number of different devices/methods!

Step 3: Testing the Broker

Testing the Broker

Once you’ve installed mosquitto on the Raspberry Pi, you can give it a quick test – just to make sure everything is working correctly. For this purpose, there are two commands that we can use on the command line. mosquitto_pub and mosquitto_sub. In this step, I will guide you through using each of these to test our broker.

In order to test the broker, you will need to open two command line windows. If you are using Putty or another SSH client, this is as simple as opening another SSH window and logging in as usual. If you are accessing your Pi from a UNIX terminal, this is exactly the same. If you are using the Raspberry Pi directly, you will need to open two terminal windows in the GUI mode (the command startxcan be used to start the GUI).

Now that you have opened two windows, we can get started on the testing. In one of the two terminals, type the following command, replacing username and password with the ones you setup in the previous step.

mosquitto_sub -d -u username -P password -t test

If you decided not to set a username and password in the previous step, then from now on, ignore the -u and -P flags in the commands. So, as an example, the mosquitto_sub command would now be:

mosquitto_sub -d -t test

The mosquitto_sub command will subscribe to a topic, and display any messages that are sent to the specified topic in the terminal window. Here, -d means debug mode, so all messages and activity will be output on the screen. -u and -P should be self-explanatory. Finally, -t is the name of the topic we want to subscribe to – in this case, “test”.

Next, in the other terminal window, we are going to try and publish a message to the “test” topic. Type the following, remembering again to change username and password:

mosquitto_pub -d -u username -P password -t test -m "Hello, World!"

When you press enter, you should see your message “Hello, World!” appear in the first terminal window we used (to subscribe). If this is the case, you’re all set to start working on the ESP8266!

Step 4: Setting Up the ESP8266 (Adafruit HUZZAH)

Setting Up the ESP8266 (Adafruit HUZZAH)

This step if specific to the Adafruit HUZZAH (as that is what I am using to complete this project). If you are using a different Arduino / ESP8266 device, you may wish to skip this step. However, I would advise you skim read it, just in case there is any information here that may be relevant to you.

For this project, I am going to be programming the HUZZAH with the Arduino software. So, if you haven’t already, make sure to install the Arduino software (newer than 1.6.4). You can download it here.

Once you have installed the Arduino software, open it and navigate to File->Preferences. Here you should see (near the bottom of the window) a text box with the label: “Additional Boards Manager URLs”. In this text box, copy and paste the following link:

http://arduino.esp8266.com/stable/package_esp8266com_index.json

Click OK to save your changes. Now open the Board Manager (Tools->Board->Board Manager) and search for ESP8266. Install the esp8266 by ESP8266 Community package. Restart the Arduino software.

Now, before we can program the board, we need to select a few different options. In the Tools menu option, select Adafruit HUZZAH ESP8266 for Board, 80 MHz for the CPU Frequency (you can use 160 MHz if you wish to overclock it, but for now I’m going to use 80 MHz), 4M (3M SPIFFS) for the Flash Size, and 115200 for the Upload Speed. Also, make sure to select the COM port that you are using (this will depend on your setup).

Before you can upload any code, you need to make sure that the HUZZAH is in bootloader mode. To enable this, hold down the button on the board marked GPIO0, and whilst this is held, hold down the Reset button as well. Then, release the Reset button, and then GPIO0. If you have done this correctly, the red LED that came on when you pressed GPIO0 should now be dimly lit.

To upload code to the microcontroller, first make sure the HUZZAH is in bootloader mode, then simply click the upload button in the Arduino IDE.

If you are having any trouble setting up the HUZZAH, further information can be found at Adafruit’s own tutorial.

Step 5: Programming the ESP8266

Programming the ESP8266

Now we will begin to program the ESP8266, but before we can start, you will need to install the following libraries in the Arduino Library manager (Sketch->Include Libraries->Manage Libraries)

  • Bounce2
  • PubSubClient

Once you’ve installed those libraries, you will be able to run the code I’ve included in this Instructable (MQTT_Publish.zip). I’ve made sure to comment it so that you can understand what each section is doing, and this should hopefully enable you to adapt it to your needs.

Remember to change the constants at the top of the code so that your ESP8266 can connect to your WiFi network and your MQTT Broker (the Raspberry Pi).

If you decided not to set a username and password for the MQTT Broker, then download the MQTT_PublishNoPassword.zip file instead.

Attachments

Step 6: Installing Python Client (paho-mqtt)

Installing Python Client (paho-mqtt)

Thankfully, this step is very simple! To install the mosquitto python client, you just need to type the following into the command line (Linux/Mac) or even command prompt (Windows).

pip install paho-mqtt

Note: Windows command prompt may have an issue running the pip command if you didn’t specify that you wanted pip installed and python added to your PATH variable when you installed Python. There are a number of ways of fixing this, but I think just reinstalling Python is the easiest way. If in doubt – give it a google!

Step 7: Python Client – Subscribing

Python Client - Subscribing

In this step, we are going to setup the Python script (either on the Raspberry Pi itself or on another computer connected to the network) to handle all of the messages that are sent (published) by the ESP8266 to the MQTT topic.

I have included the python code below (PythonMQTT_Subscribe.py), which has been commented to help you understand what is going on, but I will explain some of the main features here as well.

If you didn’t set a username and password for the MQTT connection earlier, download the PythonMQTT_SubscribeNoPassword.py file instead.

Attachments

Step 8: Communicating Between ESP8266 Devices

Communicating Between ESP8266 Devices

If you want to set up an IoT network, for example, you may wish to communicate between ESP8266 devices. Thankfully, this isn’t much more complex than the code we’ve written before, however, there are a couple of notable changes.

For one ESP to send data to another, the first ESP will need to publish to the topic, and the second ESP will need to subscribe to that topic. This setup will allow for a one-way conversation – ESP(1) to ESP(2). If we want ESP(2) to talk back to ESP(1), we can create a new topic, to which ESP(2) will publish, and ESP(1) will subscribe. Thankfully, we can have multiple subscribers on the same topic, so if you want to send data to a number of systems, you will only need one topic (to which they all subscribe, except the device which is sending the data, as that will be publishing).

If you need help figuring out what each device needs to do, think about the system as a room of people. If ESP(1) is publishing, you can imagine this device as a “speaker”, and any devices that are subscribing to the topic are “listeners” in this example.

I have included some example code below, which demonstrates how an ESP8266 can subscribe to a topic, and listen for certain messages – 1 and 0. If 1 is received, the on-board LED (for the HUZZAH – GPIO 0) is switched on. If 0 is received, this LED is switched off.

If you want to process more complex data, this should be done in the ReceivedMessage function (see code).

For your own projects, if you need to both send and receive data, you can incorporate the publish function from the previous example into the code included in this step. This should be handled in the main Arduino loop() function.

Remember to change the variables at the top of the code to suit your network!

IoT based Smart Irrigation System using Soil Moisture Sensor and ESP8266 NodeMCU

IoT based Smart Irrigation System using Soil Moisture Sensor and ESP8266 NodeMCUIoT based Smart Irrigation System using Soil Moisture Sensor and ESP8266 NodeMCU

Most of the farmers use large portions of farming land and it becomes very difficult to reach and track each corner of large lands. Sometime there is a possibility of uneven water sprinkles. This result in the bad quality crops which further leads to financial losses. In this scenario the Smart Irrigation System using Latest IoT technology is helpful and leads to ease of farming.

The Smart irrigation System has wide scope to automate the complete irrigation system. Here we are building a IoT based Irrigation System using ESP8266 NodeMCU Module and DHT11 Sensor. It will not only automatically irrigate the water based on the moisture level in the soil but also send the Data to ThingSpeak Server to keep track of the land condition. The System will consist a water pump which will be used to sprinkle water on the land depending upon the land environmental condition such as Moisture, Temperature and Humidity.

We previously build similar Automatic Plant Irrigation System which sends alerts on mobile but not on IoT cloud. Apart from this, Rain alarm and soil moisture detector circuit can also be helpful in building Smart Irrigation system.

Before starting, it is important to note that the different crops require different Soil Moisture, Temperature and Humidity Condition. So in this tutorial we are using such a crop which will require a soil moisture of about 50-55%. So when the soil loses its moisture to less than 50% then Motor pump will turn on automatically to sprinkle the water and it will continue to sprinkle the water until the moisture goes upto 55% and after that the pump will be turned off. The sensor data will be sent to ThingSpeak Server in defined interval of time so that it can be monitored from anywhere in the world.

Components Required

  • NodeMCU ESP8266
  • Soil Moisture Sensor Module
  • Water Pump Module
  • Relay Module
  • DHT11
  • Connecting Wires

You can buy all the components required for this project.

Circuit Diagram

Circuit diagram for this IoT Smart Irrigation System is given below:

Circuit Diagram for IoT based Smart Irrigation System using Soil Moisture Sensor and ESP8266 NodeMCU

Circuit Hardware for IoT based Smart Irrigation System using Soil Moisture Sensor and ESP8266 NodeMCU

Programming ESP8266 NodeMCU for Automatic Irrigation System

For programming the ESP8266 NodeMCU module, only the DHT11 sensor library is used as external library. The moisture sensor gives analog output which can be read through the ESP8266 NodeMCU analog pin A0. Since the NodeMCU cannot give output voltage greater than 3.3V from its GPIO so we are using a relay module to drive the 5V motor pump. Also the Moisture sensor and DHT11 sensor is powered from external 5V power supply.

Complete code with a working video is given at the end of this tutorial, here we are explaining the program to understand the working flow of the project.

Start with including necessary library.

#include <DHT.h>
#include <ESP8266WiFi.h>

Since we are using the ThingSpeak Server, the API Key is necessary in order to communicate with server. To know how we can get API Key from ThingSpeak you can visit previous article on Live Temperature and Humidity Monitoring on ThingSpeak.

String apiKey = "X5AQ445IKMBYW31H
const char* server = "api.thingspeak.com"; 

The next Step is to write the Wi-Fi credentials such as SSID and Password.

const char *ssid =  "CircuitDigest";     
const char *pass =  "xxxxxxxxxxx"; 

Define the DHT Sensor Pin where the DHT is connected and Choose the DHT type.

#define DHTPIN D3          
DHT dht(DHTPIN, DHT11);

The moisture sensor output is connected to Pin A0 of ESP8266 NodeMCU. And the motor pin is connected to D0 of NodeMCU.

const int moisturePin = A0;
const int motorPin = D0;

We will be using millis() function to send the data after every defined interval of time here it is 10 seconds. The delay() is avoided since it stops the program for a defined delay where microcontroller cannot do other tasks. Learn more about the difference between delay() and millis() here.

unsigned long interval = 10000;
unsigned long previousMillis = 0;

Set motor pin as output, and turn off the motor initially. Start the DHT11 sensor reading.

pinMode(motorPin, OUTPUT);
digitalWrite(motorPin, LOW); // keep motor off initally
dht.begin();

Try to connect Wi-Fi with given SSID and Password and wait for the Wi-Fi to be connected and if connected then go to next steps.

WiFi.begin(ssid, pass);
  while (WiFi.status() != WL_CONNECTED)
  {
    delay(500);
    Serial.print(".");
  }
  Serial.println("");
  Serial.println("WiFi connected");
}

Define the current time of starting the program and save it in a variable to compare it with the elapsed time.

unsigned long currentMillis = millis();

Read temperature and humidity data and save them into variables.

float h = dht.readHumidity();
float t = dht.readTemperature();

If DHT is connected and the ESP8266 NodeMCU is able to read the readings then proceed to next step or return from here to check again.

if (isnan(h) || isnan(t))
  {
    Serial.println("Failed to read from DHT sensor!");
    return;
  }

Read the moisture reading from sensor and print the reading.

moisturePercentage = ( 100.00 - ( (analogRead(moisturePin) / 1023.00) * 100.00 ) );
  Serial.print("Soil Moisture is  = ");
  Serial.print(moisturePercentage);
  Serial.println("%");

If the moisture reading is in between the required soil moisture range then keep the pump off or if it goes beyond the required moisture then turn the pump ON.

if (moisturePercentage < 50) {
    digitalWrite(motorPin, HIGH);
  }
   if (moisturePercentage > 50 && moisturePercentage < 55) {
    digitalWrite(motorPin, HIGH);
  }
 if (moisturePercentage > 56) {
    digitalWrite(motorPin, LOW);
  }

Now after every 10 seconds call the sendThingspeak() function to send the moisture, temperature and humidity data to ThingSpeak server.

  if ((unsigned long)(currentMillis - previousMillis) >= interval) {
    sendThingspeak();
    previousMillis = millis();
    client.stop();
  }

In the sendThingspeak() function we check if the system is connected to server and if yes then we prepare a string where moisture, temperature, humidity reading is written and this string will be sent to ThingSpeak server along with API key and server address.

if (client.connect(server, 80))
    {
      String postStr = apiKey;
      postStr += "&field1=";
      postStr += String(moisturePercentage);
      postStr += "&field2=";
      postStr += String(t);
      postStr += "&field3=";
      postStr += String(h);      
      postStr += "\r\n\r\n";

Finally the data is sent to ThingSpeak server using client.print() function which contains API key, server address and the string which is prepared in previous step.

client.print("POST /update HTTP/1.1\n");
      client.print("Host: api.thingspeak.com\n");
      client.print("Connection: close\n");
      client.print("X-THINGSPEAKAPIKEY: " + apiKey + "\n");
      client.print("Content-Type: application/x-www-form-urlencoded\n");
      client.print("Content-Length: ");
      client.print(postStr.length());
      client.print("\n\n");
      client.print(postStr);

Finally this is how the data looks on ThingSpeak Dashboard

Getting Data on ThingSpeak for IoT based Smart Irrigation System

This last step finishes the complete tutorial on IoT based Smart Irrigation System. Note that it is important to switch off the motor when the soil moisture has reached the required level after water sprinkle. You can make a more smart system which can contain different control for different crops.

If you face any issues while doing this project then comment below or reach to our forums for more relevant questions and their answers.

Find the complete program and demonstration Video for this project below.

Code

#include <DHT.h>
#include <ESP8266WiFi.h>
String apiKey = “X5AQ3EGIKMBYW31H”;     //  Enter your Write API key here
const char* server = “api.thingspeak.com”;
const char *ssid =  “CircuitLoop”;     // Enter your WiFi Name
const char *pass =  “circuitdigest101”; // Enter your WiFi Password
#define DHTPIN D3          // GPIO Pin where the dht11 is connected
DHT dht(DHTPIN, DHT11);
WiFiClient client;

const int moisturePin = A0;             // moisteure sensor pin
const int motorPin = D0;
unsigned long interval = 10000;
unsigned long previousMillis = 0;
unsigned long interval1 = 1000;
unsigned long previousMillis1 = 0;
float moisturePercentage;              //moisture reading
float h;                  // humidity reading
float t;                  //temperature reading

void setup()
{
Serial.begin(115200);
delay(10);
pinMode(motorPin, OUTPUT);
digitalWrite(motorPin, LOW); // keep motor off initally
dht.begin();
Serial.println(“Connecting to “);
Serial.println(ssid);
WiFi.begin(ssid, pass);
while (WiFi.status() != WL_CONNECTED)
{
delay(500);
Serial.print(“.”);              // print … till not connected
}
Serial.println(“”);
Serial.println(“WiFi connected”);
}

void loop()
{
unsigned long currentMillis = millis(); // grab current time

h = dht.readHumidity();     // read humiduty
t = dht.readTemperature();     // read temperature

if (isnan(h) || isnan(t))
{
Serial.println(“Failed to read from DHT sensor!”);
return;
}

moisturePercentage = ( 100.00 – ( (analogRead(moisturePin) / 1023.00) * 100.00 ) );

if ((unsigned long)(currentMillis – previousMillis1) >= interval1) {
Serial.print(“Soil Moisture is  = “);
Serial.print(moisturePercentage);
Serial.println(“%”);
previousMillis1 = millis();
}

if (moisturePercentage < 50) {
digitalWrite(motorPin, HIGH);         // tun on motor
}
if (moisturePercentage > 50 && moisturePercentage < 55) {
digitalWrite(motorPin, HIGH);        //turn on motor pump
}
if (moisturePercentage > 56) {
digitalWrite(motorPin, LOW);          // turn off mottor
}

if ((unsigned long)(currentMillis – previousMillis) >= interval) {

sendThingspeak();           //send data to thing speak
previousMillis = millis();
client.stop();
}

}

void sendThingspeak() {
if (client.connect(server, 80))
{
String postStr = apiKey;              // add api key in the postStr string
postStr += “&field1=”;
postStr += String(moisturePercentage);    // add mositure readin
postStr += “&field2=”;
postStr += String(t);                 // add tempr readin
postStr += “&field3=”;
postStr += String(h);                  // add humidity readin
postStr += “\r\n\r\n”;

client.print(“POST /update HTTP/1.1\n”);
client.print(“Host: api.thingspeak.com\n”);
client.print(“Connection: close\n”);
client.print(“X-THINGSPEAKAPIKEY: ” + apiKey + “\n”);
client.print(“Content-Type: application/x-www-form-urlencoded\n”);
client.print(“Content-Length: “);
client.print(postStr.length());           //send lenght of the string
client.print(“\n\n”);
client.print(postStr);                      // send complete string
Serial.print(“Moisture Percentage: “);
Serial.print(moisturePercentage);
Serial.print(“%. Temperature: “);
Serial.print(t);
Serial.print(” C, Humidity: “);
Serial.print(h);
Serial.println(“%. Sent to Thingspeak.”);
}
}

ADS1115 analog-to-digital converter and ESP8266

The ADS1115 device is a precision, low-power, 16-bit, I2C-compatible, analog-to-digital converters (ADCs) offered in an ultra-small, leadless, X2QFN-10 package, and a VSSOP-10 package. The ADS1115 device incorporates a low-drift voltage reference and an oscillator. The ADS1115 also incorporate a programmable gain amplifier and a digital comparator. These features, along with a wide operating supply range, make the ADS1115 well suited for power- and space-constrained, sensor measurement applications.

The ADS1115 perform conversions at data rates up to 860 samples per second (SPS). The PGA offers input ranges from ±256 mV to ±6.144 V, allowing precise large- and small-signal measurements. The ADS1115 features an input multiplexer  that allows two differential or four single-ended input measurements. Use the digital comparator in the ADS1115 for under- and overvoltage detection.

The ADS1115 operates in either continuous-conversion mode or single-shot mode. The devices are automatically powered down after one conversion in single-shot mode; therefore, power consumption is significantly reduced during idle periods.

Features

Wide Supply Range: 2.0 V to 5.5 V
Low Current Consumption: 150 µA
(Continuous-Conversion Mode)
Programmable Data Rate: 8 SPS to 860 SPS
Single-Cycle Settling
Internal Low-Drift Voltage Reference
Internal Oscillator
I2C Interface: Four Pin-Selectable Addresses
Four Single-Ended or Two Differential Inputs (ADS1115)
Programmable Comparator (ADS1114 and ADS1115)
Operating Temperature Range: –40°C to +125°C

Parts List

This module will cost less than $2

Amount Part Type
1 ADS1115
1 Wemos D1 mini V2


Schematics/Layout


In the layout below we just show basic connection between Wemos Mini and ADS1115 – you can add a pot, connect an LDR to one of the A0 – A3 inputs of the ADS1115

esp8266 and ads1115
esp8266 and ads1115


Code

Again we use a library and again its an adafruit one – https://github.com/adafruit/Adafruit_ADS1X15

#include <Wire.h>
#include <Adafruit_ADS1015.h>
 
Adafruit_ADS1115 ads(0x48);
 
void setup(void)
{
Serial.begin(9600);
Serial.println("Hello!");
 
Serial.println("Getting single-ended readings from AIN0..3");
Serial.println("ADC Range: +/- 6.144V (1 bit = 3mV/ADS1015, 0.1875mV/ADS1115)");
 
ads.begin();
}
 
void loop(void)
{
int16_t adc0, adc1, adc2, adc3;
 
adc0 = ads.readADC_SingleEnded(0);
adc1 = ads.readADC_SingleEnded(1);
adc2 = ads.readADC_SingleEnded(2);
adc3 = ads.readADC_SingleEnded(3);
Serial.print("AIN0: ");
Serial.println(adc0);
Serial.print("AIN1: ");
Serial.println(adc1);
Serial.print("AIN2: ");
Serial.println(adc2);
Serial.print("AIN3: ");
Serial.println(adc3);
Serial.println(" ");
 
delay(1000);
}


Links

http://www.ti.com/lit/ds/symlink/ads1115.pdf

I2C ADS1115 16 Bit ADC 4 channel Module with Programmable Gain Amplifier 2.0V to 5.5V RPi

How to Setup VyprVPN on the Raspberry Pi

In this tutorial, I will be going through all the steps to setting up Raspberry Pi VyprVPN.

Raspberry Pi VyprVPN

This tutorial is handy if you’re looking to connect your Pi to the VyprVPN service.

There are many reasons why you may want to set up a VPN on the Raspberry Pi. The most common is that you want an extra layer of security and anonymity to your network activities. These benefits are handy for a range of different Raspberry Pi projects.

Most of our projects have been tested for the latest version of Raspbian. I recommend upgrading to the most recent for the best experience when following this tutorial.

If VyprVPN doesn’t take your fancy, then we do have other tutorials that cover services such as ExpressVPN or NordVPN.

You can find the tutorial right below if you have any issues then be sure to let us know over at our forum.

 Equipment

All the equipment that you need to set up this Raspberry Pi VyprVPN tutorial is listed right below.

Recommended

 Raspberry Pi

 Micro SD Card

 Ethernet Cable or WiFi dongle (Pi 3 has WiFi inbuilt)

 Power Adapter

 VyprVPN Subscription

Optional

 Raspberry Pi Case

 USB Keyboard

 USB Mouse

 Installing VyprVPN to the Raspberry Pi

VyprVPN isn’t much different to installing most VPN services on the Raspberry Pi as most make use of the OpenVPN software.

1. If you haven’t already, then you will need to sign up to VyprVPN.

2. Load the terminal on the Raspberry Pi or make use of SSH to remotely it access.

3. Update the Raspbian to the latest packages.

sudo apt-get update
sudo apt-get upgrade

4. Now, let’s install the OpenVPN package, you can do this by entering the following command.

sudo apt-get install openvpn

5. Change directory to the OpenVPN directory by entering the following.

cd /etc/openvpn/

6. We will now need to download the VyprVPN ovpn files.

sudo wget -O vyprvpn.zip \
https://support.goldenfrog.com/hc/article_attachments/360008728172/GF_OpenVPN_10142016.zip

7. Next, we will now need to extract the files that we need.

sudo unzip vyprvpn.zip

8. Now let’s move all the files to the base directory and delete VyprVPN directory.

sudo mv /etc/openvpn/OpenVPN256/* /etc/openvpn/
sudo rm -r /etc/openvpn/OpenVPN256

9. To connect to VyprVPN simply use the following command.

sudo openvpn file_name

Replace file_name with the location of where you wish to connect. For example, If I wanted Canada for example, then I will use Canada.ovpn. You can view all the locations by using the following command.

ls -l /etc/openvpn

Below is an example of connecting to Canada.

sudo openvpn /etc/openvpn/Canada.ovpn

10. It will now ask for your credentials, and you will need to enter them to be able to connect to VyprVPN. Test your connection by going ipleak.net. You should have a different IP to your usual one.

11. If you need to disconnect, then you can easily use either ctrl+c or the following command.

sudo killall openvpn

 Auto Start VyprVPN

Most of us love to reduce the amount of manual input required for when it comes to technology. The following steps will show you how to set up VyprVPN to connect automatically on bootup.

1. Firstly, we will need to save both our username and password in a file.

sudo nano /etc/openvpn/auth.txt

2. In this file, add your chosen username and password for the service. Make sure the username and password are both on separate lines.

username
password

3. Save and exit by pressing ctrl+x, then y and lastly enter.

4. Now we will need to copy the ovpn file, simplify its name at the same time.

sudo cp "/etc/openvpn/Australia - Sydney.ovpn" /etc/openvpn/aussyd.conf

5. Now let’s edit this new file.

sudo nano /etc/openvpn/aussyd.conf

6. We will only need to do a straightforward edit in this file.

Find

auth-user-pass

Replace with

auth-user-pass auth.txt

7. Finally, we need to setup OpenVPN to auto start using our ovpn file.

sudo nano /etc/default/openvpn

Find

#AUTOSTART="all"

Replace with

AUTOSTART="aussyd"

Replace aussyd with the filename you set.

8. Save and exit.

9. Reboot the Raspberry Pi to test out our new configuration.

sudo reboot

10. Now test the VPN by going to ipleak.net or a similar website. The IP should be VyprVPNs and not your own. Doing this step will confirm that we have successfully set up VyprVPN on the Raspberry Pi.

 Preventing DNS Leaks

To ensure that your DNS isn’t leaking your location you will need to do a tweak on your Pi. To fix this, we will simply force our DNS to run through Cloudflare’s public DNS rather than our internet service providers (ISP) DNS. This process is pretty easy and won’t take long to do.

1. Firstly, load into the dhcpcd configuration file and update the following line.

Open

sudo nano /etc/dhcpcd.conf

Find

#static domain_name_servers=192.168.0.1

Replace with

static domain_name_servers=1.1.1.1

2. Save & exit the file.

3. Now reboot your Pi by entering the following command.

sudo reboot

4. Go to ipleak.net and check that your DNS is no longer leaking. If you’re still leaking. then you might want to look at this page on WebRTC requests for more information.

 Troubleshooting

If you run into trouble while setting up Raspberry Pi VyprVPN then the troubleshooting tips might help you out.

  • You’re able to start and stop your VPN by using the following command. Replacing stop with start will start the VPN backup. This command will only work if you have it set up for autostart.
sudo systemctl stop openvpn
  • It’s important to be aware that we are storing credentials in plain text. This lack of security makes it essential that you keep your Pi secure against unauthorized access. Just changing the default password will heavily improve your security.

As I mentioned above, there is plenty of other projects that work great with a VPN. Something as simple as a Torrentbox will benefit. Just make sure your VPN provider allows torrenting as some will ban you for using up too much bandwidth.

Hopefully, by the end of this Raspberry Pi VyprVPN tutorial, you have everything set up and working as it should be. If you require further help, then I highly recommend that you leave a comment.