XHTML MP Headings

The elements <h1>, <h2>, <h3>, <h4>, <h5>, and <h6> are used to specify headings (level 1 to level 6) in an XHTML MP page. WAP browsers will try to display headings of different levels with different font sizes and styles. However, some WAP devices do not have so many sizes and styles of fonts and so headings of different levels may look the same on the screen.


<?xml version=”1.0″?>
<!DOCTYPE html PUBLIC “-//WAPFORUM//DTD XHTML Mobile 1.0//EN” “http://www.wapforum.org/DTD/xhtml-mobile10.dtd”>

<html xmlns=”http://www.w3.org/1999/xhtml”>
  <head>
    <title>Headings Test</title>
  </head>

  <body>
    <h1>Level 1 Heading</h1>
    <h2>Level 2 Heading</h2>
    <h3>Level 3 Heading</h3>
    <h4>Level 4 Heading</h4>
    <h5>Level 5 Heading</h5>
    <h6>Level 6 Heading</h6>
  </body>
</html>


This is the result of the above XHTML MP example in some WAP browsers:


Sony Ericsson T610


Nokia Mobile Browser 4.0


Comments in XHTML MP

Comments are placed inside <!– –> in XHTML MP. This is the same as HTML and WML 1.x. For example, the following lines are comments. WAP browsers ignore all comments.


<!– This is a comment in XHTML MP –>


<!– This is a multi-line
     comment –>


Line Breaking in XHTML MP


<br/> is the line breaking tag in XHTML MP, which is the same as that in HTML and WML 1.x. The following example demonstrates the usage of line breaks:


<?xml version=”1.0″?>
<!DOCTYPE html PUBLIC “-//WAPFORUM//DTD XHTML Mobile 1.0//EN” “http://www.wapforum.org/DTD/xhtml-mobile10.dtd”>

<html xmlns=”http://www.w3.org/1999/xhtml”>
  <head>
    <title>Line Break</title>
  </head>

  <body>
    <p>
      Line 1<br/>
      Line 2<br/><br/>
      Line 3
    </p>
  </body>
</html>


The result should look like this in WAP browsers:


Sony Ericsson T610


Nokia Mobile Browser 4.0


XHTML MP Horizontal Rules


The <hr/> tag is used to add a horizontal rule to your XHTML MP page. Note that <hr/> should not be enclosed in the <p></p> tag pair.


The following example demonstrates the usage of horizontal rules in XHTML MP:


<?xml version=”1.0″?>
<!DOCTYPE html PUBLIC “-//WAPFORUM//DTD XHTML Mobile 1.0//EN” “http://www.wapforum.org/DTD/xhtml-mobile10.dtd”>

<html xmlns=”http://www.w3.org/1999/xhtml”>
  <head>
    <title>XHTML MP Tutorial</title>
  </head>

  <body>
    <p>
      Table of Contents:<br/>
    </p>
    <hr/>
    <p>
      Part 1 XHTML MP Introduction<br/>
      Part 2 Development of Wireless Markup Languages<br/>
      Part 3 Advantages of XHTML MP<br/>
      Part 4 WML Features Lost in XHTML MP
    </p>
  </body>
</html>


The following screenshots show the result of the above XHTML MP example in some mobile phone browsers:


Sony Ericsson T610


Nokia Mobile Browser 4.0

XHTML MP Generic Metadata

You can specify some generic metadata for your XHTML MP file using the <meta/> tag. The <meta/> tag should be enclosed within the <head></head> tags. A WAP browser will just ignore the metadata if it does not understand the metadata’s meaning. You can specify metadata of any sort in an XHTML MP file without affecting the look of the page. For example, you may want to state the author name in your XHTML MP file but without displaying it on the screen.


<?xml version=”1.0″?>
<!DOCTYPE html PUBLIC “-//WAPFORUM//DTD XHTML Mobile 1.0//EN” “http://www.wapforum.org/DTD/xhtml-mobile10.dtd”>

<html xmlns=”http://www.w3.org/1999/xhtml”>
  <head>
    <title>XHTML MP Tutorial</title>
    <meta name=”author” content=”Andrew”/>
  </head>

  <body>
    <p>Hello world. Welcome to our XHTML MP tutorial.</p>
  </body>
</html>


XHTML MP Document Structure


Hello World XHTML MP Example


<?xml version=”1.0″?>
<!DOCTYPE html PUBLIC “-//WAPFORUM//DTD XHTML Mobile 1.0//EN” “http://www.wapforum.org/DTD/xhtml-mobile10.dtd”>

<html xmlns=”http://www.w3.org/1999/xhtml”>
  <head>
    <title>XHTML MP Tutorial</title>
  </head>

  <body>
    <p>Hello world. Welcome to our XHTML MP tutorial.</p>
  </body>
</html>


This is what you will see in some mobile phone emulators:


Sony Ericsson T610


Nokia Mobile Browser 4.0


XHTML MP documents start with the prolog, which contains the XML declaration and DOCTYPE declaration.


<?xml version=”1.0″?>
<!DOCTYPE html PUBLIC “-//WAPFORUM//DTD XHTML Mobile 1.0//EN” “http://www.wapforum.org/DTD/xhtml-mobile10.dtd”>


The prolog components are not XHTML MP elements and they should not be closed, i.e. you should not give them an end tag or finish them with />.


The rest of the document is the same as an ordinary HTML document, except that there should be no xmlns attribute for the <html> tag in HTML.


XHTML MP documents must contain the <html>, <head>, <title>, and <body> elements.

Syntax Rules of XHTML MP

XHTML MP is a subset of XHTML. The syntax rules of XHTML MP follow that of XHTML.


As mentioned before in this XHTML MP tutorial, XHTML is just a stricter and cleaner form of HTML. If you have already learned HTML, you can immediately start writing XHTML MP markup code by following the XHTML MP syntax rules below.


  1. Tags must be closed properly


  2. Tags and attributes must be in lowercase


  3. Value of attributes must be enclosed within quotation marks


  4. No attribute minimization is allowed


  5. Tags must be nested properly


XHTML MP Syntax Rule 1: Tags Must Be Closed Properly


All tags in XHTML MP must be closed properly. For example, the following code is not correct in XHTML MP since the </p> end tag is missing. (In case you do not know, the <p></p> tags are used to enclose a paragraph of text.)


<p>XHTML MP tutorial paragraph 1
<p>XHTML MP tutorial paragraph 2
<p>XHTML MP tutorial paragraph 3


This is correct in XHTML MP:


<p>XHTML MP tutorial paragraph 1</p>
<p>XHTML MP tutorial paragraph 2</p>
<p>XHTML MP tutorial paragraph 3</p>


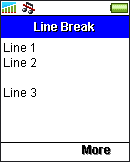
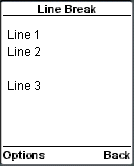
Some tags in XHTML MP do not come in pairs since there is no content to be enclosed. One example is the <br> tag that is used for line breaking. To close such tags, you put a “/” at the end of the tag before “>”. For example, the closed version of <br> is <br/>.


The following markup code is not correct in XHTML MP since the <br> tag is not self-closed.


Line break<br>


This is correct in XHTML MP:


Line break<br/>


Note that to make the XHTML MP markup code compatible with some older web browsers on the PC, you have to leave a space before />, like this:


Line break<br />


XHTML MP Syntax Rule 2: Tags and Attributes Must Be in Lowercase


XHTML MP markup code is case-sensitive. All tags and attributes in XHTML MP must be in lowercase. The following markup code is not correct in XHTML MP since tags (<P></P>) and attributes (ID) are in uppercase.


<P ID=”p1″>XHTML MP tutorial paragraph 1</P>
<P ID=”p2″>XHTML MP tutorial paragraph 2</P>
<P ID=”p3″>XHTML MP tutorial paragraph 3</P>


The following markup code is correct in XHTML MP.


<p id=”p1″>XHTML MP tutorial paragraph 1</p>
<p id=”p2″>XHTML MP tutorial paragraph 2</p>
<p id=”p3″>XHTML MP tutorial paragraph 3</p>


XHTML MP Syntax Rule 3: Value of Attributes Must Be Enclosed within Quotation Marks


Value of attributes must be enclosed within quotation marks in XHTML MP. You can either use single quotes or double quotes. The following markup code is incorrect in XHTML MP.


<p id=p1>XHTML MP tutorial paragraph 1</p>
<p id=p2>XHTML MP tutorial paragraph 2</p>
<p id=p3>XHTML MP tutorial paragraph 3</p>


This is correct in XHTML MP:


<p id=“p1”>XHTML MP tutorial paragraph 1</p>
<p id=“p2”>XHTML MP tutorial paragraph 2</p>
<p id=“p3”>XHTML MP tutorial paragraph 3</p>


You can also use single quotes to enclose attribute values.


<p id=‘p1’>XHTML MP tutorial paragraph 1</p>
<p id=‘p2’>XHTML MP tutorial paragraph 2</p>
<p id=‘p3’>XHTML MP tutorial paragraph 3</p>


XHTML MP Syntax Rule 4: No Attribute Minimization is Allowed


For some attributes, there is only one possible value. In HTML, you can leave out the attribute value in such cases. This is called attribute minimization. For example, in the following markup code, we define a check box that is initially in the checked state. As the checked attribute can only take the “checked” value, you can omit the “checked” value in HTML. The web browser knows that the value of the checked attribute must be “checked”.


<input type=”checkbox” checked />


However, attribute minimization is not allowed in XHTML MP. The above markup code is incorrect in XHTML MP. To correct it, you must write the attribute-value pair in full, like this:


<input type=”checkbox” checked=”checked” />


Below is another example. The following markup code defines a selection list with three options: “XHTML MP Tutorial Part 1”, “XHTML MP Tutorial Part 2” and “XHTML MP Tutorial Part 3”. The multiple attribute is used to enable multiple item selection in the selection list, and the selected attribute is used to select the “XHTML MP Tutorial Part 2” option initially.


<select multiple>
  <option>XHTML MP Tutorial Part 1</option>
  <option selected>XHTML MP Tutorial Part 2</option>
  <option>XHTML MP Tutorial Part 3</option>
</select>


The above markup code is correct in HTML but not in XHTML MP. To correct it, you need to write the attribute-value pair in full, like this:


<select multiple=”multiple”>
  <option>XHTML MP Tutorial Part 1</option>
  <option selected=”selected”>XHTML MP Tutorial Part 2</option>
  <option>XHTML MP Tutorial Part 3</option>
</select>


XHTML MP Syntax Rule 5: Tags Must Be Nested Properly


Tags must be nested properly in XHTML MP. Tag overlapping is not allowed. The following markup code is wrong in XHTML MP since the tags overlap. (<b></b> and <i></i> tags are used to change the text style to bold and italic respectively.)


<p><b>XHTML MP tutorial paragraph 1</p></b>
<i><p>XHTML MP tutorial paragraph 2</i></p>
<p><b><i>XHTML MP tutorial paragraph 3</p></i></b>


The following code is correct in XHTML MP. The tags are nested properly.


<p><b>XHTML MP tutorial paragraph 1</b></p>
<p><i>XHTML MP tutorial paragraph 2</i></p>
<p><b><i>XHTML MP tutorial paragraph 3</i></b></p>

XHTML MP MIME Types and File Extension

MIME Types


The following three MIME types can be used for XHTML MP documents:


  1. application/vnd.wap.xhtml+xml


  2. application/xhtml+xml


  3. text/html


The MIME type specified by the Open Mobile Alliance [OMA] for XHTML MP documents is “application/vnd.wap.xhtml+xml”. This MIME type is required for some WAP browsers (for example, some Nokia Series 60 browsers) to display XHTML MP documents correctly.


Another choice is the “application/xhtml+xml” MIME type. It is the MIME type for XHTML Family document types.


The “text/html” MIME type is also a possible choice. It is the MIME type of HTML documents. Using “text/html” for XHTML MP documents has the benefit that your XHTML MP pages will be viewable on ordinary web browsers without any problems. (Some web browsers like IE 6 do not show documents with MIME types “application/vnd.wap.xhtml+xml” or “application/xhtml+xml” but will bring up a dialog box to let you open the file in an external program or choose a location to save the file.) The drawback is that the user agent will not treat your XHTML MP pages as XML documents, which means the user agent may not complain even if the markup code does not follow strictly the XML rules.


Choosing MIME Types Dynamically


Another option is to detect the MIME types that can be handled by a user agent and choose the MIME type dynamically. For example, if your server finds out that a certain user agent can handle the “application/vnd.wap.xhtml+xml” MIME type, then all your XHTML MP documents will be delivered as “application/vnd.wap.xhtml+xml” to this user agent.


To choose the MIME type dynamically, you need to write a few lines of code using a server-side scripting language (e.g. ASP, JSP, Perl, PHP). The pseudo-code is shown below:


  1. Obtain the accept header value of the HTTP request received. The accept header contains all MIME types that can be handled by the client user agent that sends the request.


  2. If the accept header value contains “application/vnd.wap.xhtml+xml”, set the MIME type of the XHTML MP document to “application/vnd.wap.xhtml+xml”.
    Else if the accept header value contains “application/xhtml+xml”, set the MIME type of the XHTML MP document to “application/xhtml+xml”.
    Else set the MIME type of the XHTML MP document to “text/html”.


The following example demonstrates how to use JSP to write the code. If you use a server-side technology other than JSP, the code will be slightly different but the idea is the same.


<%
String acceptHeader = request.getHeader(“accept”);

if (acceptHeader.indexOf(“application/vnd.wap.xhtml+xml”) != -1)
  response.setContentType(“application/vnd.wap.xhtml+xml”);
else if (acceptHeader.indexOf(“application/xhtml+xml”) != -1)
  response.setContentType(“application/xhtml+xml”);
else
  response.setContentType(“text/html”);
%>


Here are some descriptions of the above JSP code:


1. The accept header value is obtained from the HTTP request. It is then stored in the variable acceptHeader.


String acceptHeader = request.getHeader(“accept”);


2. After that, the variable acceptHeader is checked to see if it contains the words “application/vnd.wap.xhtml+xml” or “application/xhtml+xml”. The indexOf(String str) method of the String object returns the index of the first occurrence of the str substring. If str is not found, -1 is returned by the indexOf(String str) method. In other words, if str is found, the return value will not be -1.


if (acceptHeader.indexOf(“application/vnd.wap.xhtml+xml”) != -1)

else if (acceptHeader.indexOf(“application/xhtml+xml”) != -1)


3. The method


response.setContentType(…);


is used to set the MIME type of a document.


The following example illustrates how to use the JSP code in an actual XHTML MP document. What you need to do is very simple — Just copy and paste the JSP code into the XHTML MP document and use “.jsp” as the file extension. (The XHTML MP markup in this example will be discussed in detail in the following sections.)


<?xml version=”1.0″?>
<!DOCTYPE html PUBLIC “-//WAPFORUM//DTD XHTML Mobile 1.0//EN” “
http://www.wapforum.org/DTD/xhtml-mobile10.dtd“>


<html xmlns=”http://www.w3.org/1999/xhtml“>
  <head>
    <title>XHTML MP Tutorial</title>
  </head>


  <body>
    <p>Hello world. Welcome to our XHTML MP tutorial.</p>
  </body>
</html>
<%
String acceptHeader = request.getHeader(“accept”);


if (acceptHeader.indexOf(“application/vnd.wap.xhtml+xml”) != -1)
  response.setContentType(“application/vnd.wap.xhtml+xml”);
else if (acceptHeader.indexOf(“application/xhtml+xml”) != -1)
  response.setContentType(“application/xhtml+xml”);
else
  response.setContentType(“text/html”);
%>


File Extension


The file extensions of static XHTML MP documents are “.xhtml”, “.html” and “.htm” typically. You can use other file extensions you like, as long as the MIME type associated with the file extension is set correctly at your WAP server’s configuration file. If you are going to use a server-side technology such as ASP, JSP, Perl, PHP or SSI (Server Side Includes) to add content to XHTML MP documents dynamically, you may need to change the file extension of your XHTML MP documents to that used by the server-side technology. For example, the typical file extension used by PHP is “.php”, while that used by SSI is “.shtml”.

Connection reset by peer:jvm_recv in socket


am programming in Jbuilder7 and weblogic 7. I created a jdbc datasource of a postgres database. In the ejb, I lookup the jndi and get connection to execute a query to get some data and return the ArrayList of data. I also created a servlet to lookup the ejb and get the ArrayList. It always work fine after I restart computer that the server is running. But if I leave it 4 or 5 hours, in the server window, it always appear error in the ejb function “executequery” after I lookup the jndi, get connection and createstatement. The error is:

An I/O error occured while reading from backend – Exception: java.net.S
ocketException: Connection reset by peer: JVM_recv in socket input stream read
Stack Trace:

java.net.SocketException: Connection reset by peer: JVM_recv in socket input str
eam read
at java.net.SocketInputStream.socketRead(Native Method)
at java.net.SocketInputStream.read(SocketInputStream.java:85)
at java.io.BufferedInputStream.fill(BufferedInputStream.java:181)
at java.io.BufferedInputStream.read(BufferedInputStream.java:199)
at org.postgresql.PG_Stream.ReceiveChar(PG_Stream.java:141)
at org.postgresql.core.QueryExecutor.execute(QueryExecutor.java:68)
at org.postgresql.Connection.ExecSQL(Connection.java:398)
at org.postgresql.jdbc2.Statement.execute(Statement.java:130)
at org.postgresql.jdbc2.Statement.executeQuery(Statement.java:54)
at weblogic.jdbc.pool.Statement.executeQuery(Statement.java:863)
at weblogic.jdbc.rmi.internal.StatementImpl.executeQuery(StatementImpl.j
ava:81)
at weblogic.jdbc.rmi.SerialStatement.executeQuery(SerialStatement.java:8
3)
at com.panda.ejb.categorydatamanager.CategoryBean.GetCategory(CategoryBe
an.java:88)
at com.panda.ejb.categorydatamanager.CategoryBean_9ra2ge_EOImpl.GetCateg
ory(CategoryBean_9ra2ge_EOImpl.java:201)
at com.panda.ejb.categorydatamanager.CategoryBean_9ra2ge_EOImpl_WLSkel.i
nvoke(Unknown Source)

Please help me. I have not any ideas about it. Thanks.


RE:Connection reset by peer:jvm_recv in socket


Hi!

Do you have a firewall in the network between the application and database server? Maybe this error is due to the closing of the connection by the firewall (timeout after inactivation).

I am having the same problem, but it had never happened before after 3 years of production use of a connection pooling framework. In fact, the database and application servers are separated by the Internet…

I am trying to find a way to check for a link-failure event in Java.

You should also watch topic “ORACLE driver: timeout => Connection reset by peer: socket write error ?”


RE:

from http://java.sun.com/features/2002/08/j2se-network.html

Connection Reset by Peer :

One of the issues that developers frequently run into is the Connection reset by peer exception:

Exception in thread “main” java.net.SocketException:
Connection reset by peer: JVM_recv in socket input stream read.

This basically means that a network error occurred while the client was receiving data from the server. But what is really happening is that the server actually accepts the connection, processes the request, and sends a reply to the client. However, when the server closes the socket, the client believes that the connection has been terminated abnormally because the socket implementation sends a TCP reset segment telling the client to throw away the data and report an error.

Sometimes, this problem is caused by not properly closing the input/output streams and the socket connection. Make sure you close the input/output streams and socket connection properly. If everything is closed properly, however, and the problem persists, you can work around it by adding Thread.sleep(1000) before closing the streams and the socket. This technique, however, is not reliable and may not work on all systems.


RE:


Try to have a look at this similar topic, expecially at answer 1.
http://forum.java.sun.com/thread.jsp?forum=48&thread=424393

Bye

永久免費使用NOD32殺毒軟件(更新12月19日)

本方法利用官方服務器的後門,不同于以前那種延長試用期的方法,是真正完美的NOD32破解。

既能更新病毒庫,又能更新程序組件!


不需要任何ID、升級外挂等!


0.如果你已經安裝NOD32,不管是什麽版本,都要先卸載,然後重啓!因為只有以下版本能用這個方法,彆的版本都不行!


1.下載NOD32安裝包


http://www.strongd.net/file/200709/nentcsst.exe


2.安裝前斷開網絡!安裝完成後重啓,打開NOD32控制中心,到“更新”頁面,可以看見一個“購買完全版”按鈕,説明現在是試用版。彆急,現在我們來破解他。


3.點設定——服務器——新增——填入:


http://www.nod32.com/nod_upd


新加NOD32中國非官方論壇專用升級服務器


http://u1.chinanod32.com (電信)


http://www.strongd.net/nod32 (本站更新地址)


http://u2.chinanod32.com (網通)[點確定,把它設成默認的更新服務器,再確定,連上網絡。


等到更新完成,你會發現“完全版”按鈕神奇消失了!就變成正版了!


聲明:這種方法不是用代理!不信你在IE裏打開http://www.nod32.com看看!是正宗的官網


upgrading SVN or remove SVN REPO


  1. Shut down svnserve, Apache, and anything else that might be accessing the repository.
  2. svnadmin dump /path/to/repository > dumpfile.txt , using version X of svnadmin.
  3. mv /path/to/repository /path/to/saved-old-repository
  4. Now upgrade to Subversion Y (i.e., build and install Y, replacing X).
  5. svnadmin create /path/to/repository, using version Y of svnadmin.
  6. svnadmin load /path/to/repository < dumpfile.txt , again using version Y of svnadmin.
  7. Copy over hook scripts, etc, from the old repository to the new one.
  8. Restart svnserve, Apache, etc.

simultaneous-build-throttle resin config

對系統做壓力測試時經常出現以下問題,測試就不通過.

We are already in the process of making 6 connections and the number of simultaneous builds has be
en throttled to 5


但在400個用戶時沒有很問題.一超過400就會有40來個錯誤,,,查看系統記錄,發現了上面的問題.


查了一個官方的資料,問題解決了!


In http://proxool.sourceforge.net/properties.html is Say:


simultaneous-build-throttle:
This is the maximum number of connections we can be building at any one time. That is, the number of new connections that have been requested but aren’t yet available for use. Because connections can be built using more than one thread (for instance, when they are built on demand) and it takes a finite time between deciding to build the connection and it becoming available we need some way of ensuring that a lot of threads don’t all decide to build a connection at once. (We could solve this in a smarter way – and indeed we will one day) Default is 10.


<simultaneous-build-throttle>5</simultaneous-build-throttle>

改成

<simultaneous-build-throttle>20</simultaneous-build-throttle>


問題就不再出現了!