忘記mysql 密碼的取回方法

如果 MySQL 正在運行,
首先殺之: killall -TERM mysqld(如果是windows,直接調出進程管理器,結束之)
以安全模式啓動 MySQL :
/usr/bin/safe_mysqld –skip-grant-tables &
(windows 下 mysql安裝所以盤/mysql/bin/safe_mysqld –skip-grant-tables )
就可以不需要密碼就進入 MySQL 了。
然後就是
>use mysql
>update user set password=password("new_pass") where user="root&quot$$
>flush privileges;
重新殺 MySQL ,用正常方法啓動 MySQL 。

在AS4下安裝/升級MySql5問題.

 安裝MySQL 5出錯
1. 既便安裝RHEL時没有選擇安裝MySQL,在安裝MySQL5時也會出錯,説與MySQL4衝突

2. 實際上RHEL安裝了一些MySQL相關的DBD、OBDC、PHP-MySQL等

3.1.2 卸載MySQL4

1. 使用“rpm -qa | grep mysql”查看MySQL4及其相關的安裝軟件

2. 逐個使用rpm –e ––nodeps 强制卸載MySQL4

3.1.3 安裝MySQL5

使用rpm –ivh正常安裝即可。

3.1.4 MySQL5無法啓動

是因為SELinux(安全Linux)使能了,導致MySQL5没有訪問權限。

關閉SELinux或配置相應的目録權限即可。

3.1.5 遠程訪問MySQL

不管用何種方式(用自己寫的程序和MySQL Query Browser),都無法連接mysql數據庫,提示如下:

Could not connect to the specified instance.

Mysql error number 1130

#HY000Host ‘hostname’ is not allowed to connect to this MySQL server

權限問題,打開mysql數據庫中的user表,把你用來連接數據庫的用户所在那條記録的host字段改成%就行了。

%表示可重任何地方連接到mysql服務器,LOCALHOST表示只能在mysql所在服務器進行連接。在用户授權時是可能限定ip地址或地址段進行連接的。

你可以查閲mysql用户授權相關資料,另外當用户授權項發生變化時請更新授權表,否則不會生效。

3.2 如何重啓MySQL

#service mysql restart

3.3 停止與啓動MySQL

要啓動 MySQL 的方法:(以本文將 MySQL 安裝在 /usr/local/mysql 為例)
# /usr/local/mysql/share/mysql.server start

Java SE 6 新特性: Java DB 和 JDBC 4.0

2006 年底,Sun 公司发布了 Java Standard Edition 6(Java SE 6)的最终正式版,代号 Mustang(野马)。跟 Tiger(Java SE 5)相比,Mustang 在性能方面有了不错的提升。与 Tiger 在 API 库方面的大幅度加强相比,虽然 Mustang 在 API 库方面的新特性显得不太多,但是也提供了许多实用和方便的功能:在脚本,WebService,XML,编译器 API,数据库,JMX,网络和 Instrumentation 方面都有不错的新特性和功能加强。 本系列 文章主要介绍 Java SE 6 在 API 库方面的部分新特性,通过一些例子和讲解,帮助开发者在编程实践当中更好的运用 Java SE 6,提高开发效率。

本文是系列文章的第 5 篇,介绍了 Java SE 6 在数据库编程方面的新特性。

长久以来,由于大量(甚至几乎所有)的 Java 应用都依赖于数据库,如何使用 Java 语言高效、可靠、简洁地访问数据库一直是程序员们津津乐道的话题。新发布的 Java SE 6 也在这方面更上层楼,为编程人员提供了许多好用的新特性。其中最显著的,莫过于 Java SE 6 拥有了一个内嵌的 100% 用 Java 语言编写的数据库系统。并且,Java 6 开始支持 JDBC 4.0 的一系列新功能和属性。这样,Java SE 在对持久数据的访问上就显得更为易用和强大了。

Java DB:Java 6 里的数据库

新安装了 JDK 6 的程序员们也许会发现,除了传统的 bin、jre 等目录,JDK 6 新增了一个名为 db 的目录。这便是 Java 6 的新成员:Java DB。这是一个纯 Java 实现、开源的数据库管理系统(DBMS),源于 Apache 软件基金会(ASF)名下的项目 Derby。它只有 2MB 大小,对比动辄上 G 的数据库来说可谓袖珍。但这并不妨碍 Derby 功能齐备,支持几乎大部分的数据库应用所需要的特性。更难能可贵的是,依托于 ASF 强大的社区力量,Derby 得到了包括 IBM 和 Sun 等大公司以及全世界优秀程序员们的支持。这也难怪 Sun 公司会选择其 10.2.2 版本纳入到 JDK 6 中,作为内嵌的数据库。这就好像为 JDK 注入了一股全新的活力:Java 程序员不再需要耗费大量精力安装和配置数据库,就能进行安全、易用、标准、并且免费的数据库编程。在这一章中,我们将初窥 Java DB 的世界,来探究如何使用它编写出功能丰富的程序。

Hello, Java DB:内嵌模式的 Derby

既然有了内嵌(embedded)的数据库,就让我们从一个简单的范例(代码在 清单 1 中列出)开始,试着使用它吧。这个程序做了大多数数据库应用都可能会做的操作:在 DBMS 中创建了一个名为 helloDB 的数据库;创建了一张数据表,取名为 hellotable;向表内插入了两条数据;然后,查询数据并将结果打印在控制台上;最后,删除表和数据库,释放资源。

清单 1. HelloJavaDB 的代码

public class HelloJavaDB {
public static void main(String[] args) {
try { // load the driver
Class.forName("org.apache.derby.jdbc.EmbeddedDriver").newInstance();
System.out.println("Load the embedded driver");
Connection conn = null;
Properties props = new Properties();
props.put("user", "user1");
props.put("password", "user1");
//create and connect the database named helloDB
conn=DriverManager.getConnection("jdbc:derby:helloDB;create=true", props);
System.out.println("create and connect to helloDB");
conn.setAutoCommit(false);
// create a table and insert two records
Statement s = conn.createStatement();
s.execute("create table hellotable(name varchar(40), score int)");
System.out.println("Created table hellotable");
s.execute("insert into hellotable values(`Ruth Cao`, 86)");
s.execute("insert into hellotable values (`Flora Shi`, 92)");
// list the two records
ResultSet rs = s.executeQuery(
"SELECT name, score FROM hellotable ORDER BY score");
System.out.println("name\t\tscore");
while(rs.next()) {
StringBuilder builder = new StringBuilder(rs.getString(1));
builder.append("\t");
builder.append(rs.getInt(2));
System.out.println(builder.toString());
}
// delete the table
s.execute("drop table hellotable");
System.out.println("Dropped table hellotable");
rs.close();
s.close();
System.out.println("Closed result set and statement");
conn.commit();
conn.close();
System.out.println("Committed transaction and closed connection");
try { // perform a clean shutdown
DriverManager.getConnection("jdbc:derby:;shutdown=true");
} catch (SQLException se) {
System.out.println("Database shut down normally");
}
} catch (Throwable e) {
// handle the exception
}
System.out.println("SimpleApp finished");
}
}

随后,我们在命令行(本例为 Windows 平台,当然,其它系统下稍作改动即可)下键入以下命令:

清单 2. 运行 HelloJavaDB 命令

                java –cp .;%JAVA_HOME%\db\lib\derby.jar HelloJavaDB

程序将会按照我们预想的那样执行,图 1 是执行结果的一部分截屏:

图 1. HelloJavaDB 程序的执行结果

上述的程序和以往没什么区别。不同的是我们不需要再为 DBMS 的配置而劳神,因为 Derby 已经自动地在当前目录下新建了一个名为 helloDB 的目录,来物理地存储数据和日志。需要做的只是注意命名问题:在内嵌模式下驱动的名字应为 org.apache.derby.jdbc.EmbeddedDriver;创建一个新数据库时需要在协议后加入 create=true。另外,关闭所有数据库以及 Derby 的引擎可以使用以下代码:

清单 3. 关闭所有数据库及 Derby 引擎

                DriverManager.getConnection("jdbc:derby:;shutdown=true");

如果只想关闭一个数据库,那么则可以调用:

清单 4. 关闭一个数据库

                DriverManager.getConnection("jdbc:derby:helloDB;shutdown=true ");

这样,使用嵌入模式的 Derby 维护和管理数据库的成本接近于 0。这对于希望专心写代码的人来说不失为一个好消息。然而有人不禁要问:既然有了内嵌模式,为什么大多数的 DBMS 都没有采取这样的模式呢?不妨做一个小实验。当我们同时在两个命令行窗口下运行 HelloJavaDB 程序。结果一个的结果与刚才一致,而另一个却出现了错误,如 图 2 所示。

图 2. 内嵌模式的局限
图 2. 内嵌模式的局限

错误的原因其实很简单:在使用内嵌模式时,Derby 本身并不会在一个独立的进程中,而是和应用程序一起在同一个 Java 虚拟机(JVM)里运行。因此,Derby 如同应用所使用的其它 jar 文件一样变成了应用的一部分。这就不难理解为什么在 classpath 中加入 derby 的 jar 文件,我们的示例程序就能够顺利运行了。这也说明了只有一个 JVM 能够启动数据库:而两个跑在不同 JVM 实例里的应用自然就不能够访问同一个数据库了。

鉴于上述的局限性,和来自不同 JVM 的多个连接想访问一个数据库的需求,下一节将介绍 Derby 的另一种模式:网络服务器(Network Server)。

网络服务器模式

如上所述,网络服务器模式是一种更为传统的客户端/服务器模式。我们需要启动一个 Derby 的网络服务器用于处理客户端的请求,不论这些请求是来自同一个 JVM 实例,还是来自于网络上的另一台机器。同时,客户端使用 DRDA(Distributed Relational Database Architecture)协议连接到服务器端。这是一个由 The Open Group 倡导的数据库交互标准。图 3 说明了该模式的大体结构。

由于 Derby 的开发者们努力使得网络服务器模式与内嵌模式之间的差异变小,使得我们只需简单地修改 清单 1 中的程序就可以实现。如 清单 5所示,我们在 HelloJavaDB 中增添了一个新的函数和一些字符串变量。不难看出,新的代码只是将一些在 上一节中特别指出的字符串进行了更改:驱动类为 org.apache.derby.jdbc.ClientDriver,而连接数据库的协议则变成了 jdbc:derby://localhost:1527/。这是一个类似 URL 的字符串,而事实上,Derby 网络的客户端的连接格式为:jdbc:derby://server[:port]/databaseName[;attributeKey=value]。在这个例子中,我们使用了最简单的本地机器作为服务器,而端口则是 Derby 默认的 1527 端口。

图 3. Derby 网络服务器模式架构

清单 5. 网络服务器模式下的 HelloJavaDB

public class HelloJavaDB {
public static String driver = "org.apache.derby.jdbc.EmbeddedDriver"$$
public static String protocol = "jdbc:derby:"$$
public static void main(String[] args) {
// same as before
}
private static void parseArguments(String[] args) {
if (args.length == 0 || args.length > 1) {
return;
}
if (args[0].equalsIgnoreCase("derbyclient")) {
framework = "derbyclient"$$
driver = "org.apache.derby.jdbc.ClientDriver"$$
protocol = "jdbc:derby://localhost:1527/"$$
}
}
}

当然,仅仅有客户端是不够的,我们还需要启动网络服务器。Derby 中控制网络服务器的类是 org.apache.derby.drda.NetworkServerControl,因此键入以下命令即可。如果想了解 NetworkServerControl 更多的选项,只要把 start 参数去掉就可以看到帮助信息了。关于网络服务器端的实现,都被 Derby 包含在 derbynet.jar 里。

清单 6. 启动网络服务器

java -cp .;"C:\Program Files\Java\jdk1.6.0\db\lib\derby.jar"$$
"C:\Program Files\Java\jdk1.6.0\db\lib\derbynet.jar"
org.apache.derby.drda.NetworkServerControl start

相对应的,网络客户端的实现被包含在 derbyclient.jar 中。所以,只需要在 classpath 中加入该 jar 文件,修改后的客户端就可以顺利地读取数据了。再一次尝试着使用两个命令行窗口去连接数据库,就能够得到正确的结果了。如果不再需要服务器,那么使用 NetworkServerControl 的 shutdown 参数就能够关闭服务器。

更多

至此,文章介绍了 Java SE 6 中的新成员:Java DB(Derby),也介绍了如何在内嵌模式以及网络服务器模式下使用 Java DB。当然这只是浅尝辄止,更多高级的选项还需要在 Sun 和 Derby 的文档中寻找。在这一章的最后,我们将简单介绍几个 Java DB 的小工具来加快开发速度。它们都位于 org.apache.derby.tools 包内,在开发过程中需要获取信息或者测试可以用到。

  • ij:一个用来运行 SQL 脚本的工具;
  • dblook:为 Derby 数据库作模式提取(Schema extraction),生成 DDL 的工具;
  • sysinfo:显示系统以及 Derby 信息的工具类;


回页首

JDBC 4.0:新功能,新 API

如果说上一章介绍了 Java 6 中的一个新成员,它本来就存在,但是没有被加入进 JDK。那么这一章,我们将关注在 JDBC 4.0 中又增加了哪些新功能以及与之相对应的新 API。

自动加载驱动

在 JDBC 4.0 之前,编写 JDBC 程序都需要加上以下这句有点丑陋的代码:

清单 7. 注册 JDBC 驱动

                Class.forName("org.apache.derby.jdbc.EmbeddedDriver").newInstance();

Java.sql.DriverManager 的内部实现机制决定了这样代码的出现。只有先通过 Class.forName 找到特定驱动的 class 文件,DriverManager.getConnection 方法才能顺利地获得 Java 应用和数据库的连接。这样的代码为编写程序增加了不必要的负担,JDK 的开发者也意识到了这一点。从 Java 6 开始,应用程序不再需要显式地加载驱动程序了,DriverManager 开始能够自动地承担这项任务。作为试验,我们可以将 清单 1 中的相关代码删除,重新编译后在 JRE 6.0 下运行,结果和原先的程序一样。

好奇的读者也许会问,DriverManager 为什么能够做到自动加载呢?这就要归功于一种被称为 Service Provider 的新机制。熟悉 Java 安全编程的程序员可能对其已经是司空见惯,而它现在又出现在 JDBC 模块中。JDBC 4.0 的规范规定,所有 JDBC 4.0 的驱动 jar 文件必须包含一个 java.sql.Driver,它位于 jar 文件的 META-INF/services 目录下。这个文件里每一行便描述了一个对应的驱动类。其实,编写这个文件的方式和编写一个只有关键字(key)而没有值(value)的 properties 文件类似。同样地,‘#’之后的文字被认为是注释。有了这样的描述,DriverManager 就可以从当前在 CLASSPATH 中的驱动文件中找到,它应该去加载哪些类。而如果我们在 CLASSPATH 里没有任何 JDBC 4.0 的驱动文件的情况下,调用 清单 8 中的代码会输出一个 sun.jdbc.odbc.JdbcOdbcDriver 类型的对象。而仔细浏览 JDK 6 的目录,这个类型正是在 %JAVA_HOME%/jre/lib/resources.jar 的 META-INF/services 目录下的 java.sql.Driver 文件中描述的。也就是说,这是 JDK 中默认的驱动。而如果开发人员想使得自己的驱动也能够被 DriverManager 找到,只需要将对应的 jar 文件加入到 CLASSPATH 中就可以了。当然,对于那些 JDBC 4.0 之前的驱动文件,我们还是只能显式地去加载了。

清单 8. 罗列本地机器上的 JDBC 驱动

Enumeration<Driver> drivers = DriverManager.getDrivers();
while(drivers.hasMoreElements()) {
System.out.println(drivers.nextElement());
}

RowId

熟悉 DB2、Oracle 等大型 DBMS 的人一定不会对 ROWID 这个概念陌生:它是数据表中一个“隐藏”的列,是每一行独一无二的标识,表明这一行的物理或者逻辑位置。由于 ROWID 类型的广泛使用,Java SE 6 中新增了 java.sql.RowId 的数据类型,允许 JDBC 程序能够访问 SQL 中的 ROWID 类型。诚然,不是所有的 DBMS 都支持 ROWID 类型。即使支持,不同的 ROWID 也会有不同的生命周期。因此使用 DatabaseMetaData.getRowIdLifetime 来判断类型的生命周期不失为一项良好的实践经验。我们在 清单 1 的程序获得连接之后增加以下代码,便可以了解 ROWID 类型的支持情况。

清单 9. 了解 ROWID 类型的支持情况

DatabaseMetaData meta = conn.getMetaData();System.out.println(meta.getRowIdLifetime());

Java SE 6 的 API 规范中,java.sql.RowIdLifetime 规定了 5 种不同的生命周期:ROWID_UNSUPPORTED、ROWID_VALID_FOREVER、ROWID_VALID_OTHER、ROWID_VALID_SESSION 和 ROWID_VALID_TRANSACTION。从字面上不难理解它们表示了不支持 ROWID、ROWID 永远有效等等。具体的信息,还可以参看相关的 JavaDoc。读者可以尝试着连接 Derby 进行试验,会发现运行结果是 ROWID_UNSUPPORTED ,即 Derby 并不支持 ROWID。

既然提供了新的数据类型,那么一些相应的获取、更新数据表内容的新 API 也在 Java 6 中被添加进来。和其它已有的类型一样,在得到 ResultSet 或者 CallableStatement 之后,调用 get/set/update 方法得到/设置/更新 RowId 对象,示例的代码如 清单 10 所示。

清单 10. 获得/设置 RowId 对象

// Initialize a PreparedStatement
PreparedStatement pstmt = connection.prepareStatement(
"SELECT rowid, name, score FROM hellotable WHERE rowid = ?");
// Bind rowid into prepared statement.
pstmt.setRowId(1, rowid);
// Execute the statement
ResultSet rset = pstmt.executeQuery();
// List the records
while(rs.next()) {
RowId id = rs.getRowId(1);
// get the immutable rowid object
String name = rs.getString(2);
int score = rs.getInt(3);
}

鉴于不同 DBMS 的不同实现,RowID 对象通常在不同的数据源(datasource)之间并不是可移植的。因此 JDBC 4.0 的 API 规范并不建议从连接 A 取出一个 RowID 对象,将它用在连接 B 中,以避免不同系统的差异而带来的难以解释的错误。而至于像 Derby 这样不支持 RowId 的 DBMS,程序将直接在 setRowId 方法处抛出 SQLFeatureNotSupportedException。

SQLXML

SQL:2003 标准引入了 SQL/XML,作为 SQL 标准的扩展。SQL/XML 定义了 SQL 语言怎样和 XML 交互:如何创建 XML 数据;如何在 SQL 语句中嵌入 XQuery 表达式等等。作为 JDBC 4.0 的一部分,Java 6 增加了 java.sql.SQLXML 的类型。JDBC 应用程序可以利用该类型初始化、读取、存储 XML 数据。java.sql.Connection.createSQLXML 方法就可以创建一个空白的 SQLXML 对象。当获得这个对象之后,便可以利用 setString、setBinaryStream、setCharacterStream 或者 setResult 等方法来初始化所表示的 XML 数据。以 setCharacterStream 为例,清单 11 表示了一个 SQLXML 对象如何获取 java.io.Writer 对象,从外部的 XML 文件中逐行读取内容,从而完成初始化。

清单 11. 利用 setCharacterStream 方法来初始化 SQLXML 对象

SQLXML xml = con.createSQLXML();
Writer writer = xml.setCharacterStream();
BufferedReader reader = new BufferedReader(new FileReader("test.xml"));
String line= null;
while(
(line = reader.readLine() != null) {
writer.write(line);
}

由于 SQLXML 对象有可能与各种外部的资源有联系,并且在一个事务中一直持有这些资源。为了防止应用程序耗尽资源,Java 6 提供了 free 方法来释放其资源。类似的设计在 java.sql.Array、Clob 中都有出现。

至于如何使用 SQLXML 与数据库进行交互,其方法与其它的类型都十分相似。可以参照 RowId 一节 中的例子在 Java SE 6 的 API 规范中找到 SQLXML 中对应的 get/set/update 方法构建类似的程序,此处不再赘述。

SQLExcpetion 的增强

在 Java SE 6 之前,有关 JDBC 的异常类型不超过 10 个。这似乎已经不足以描述日渐复杂的数据库异常情况。因此,Java SE 6 的设计人员对以 java.sql.SQLException 为根的异常体系作了大幅度的改进。首先,SQLException 新实现了 Iterable<Throwable> 接口。清单 12 实现了 清单 1 程序的异常处理机制。这样简洁地遍历了每一个 SQLException 和它潜在的原因(cause)。

清单 12. SQLException 的 for-each loop

// Java 6 code
catch (Throwable e) {
if (e instanceof SQLException) {
for(Throwable ex : (SQLException)e ){
System.err.println(ex.toString());
}
}
}

此外,图 4 表示了全部的 SQLException 异常体系。除去原有的 SQLException 的子类,Java 6 中新增的异常类被分为 3 种:SQLReoverableException、SQLNonTransientException、SQLTransientException。在 SQLNonTransientException 和 SQLTransientException 之下还有若干子类,详细地区分了 JDBC 程序中可能出现的各种错误情况。大多数子类都会有对应的标准 SQLState 值,很好地将 SQL 标准和 Java 6 类库结合在一起。

图 4. SQLException 异常体系

在众多的异常类中,比较常见的有 SQLFeatureNotSupportedException,用来表示 JDBC 驱动不支持某项 JDBC 的特性。例如在 Derby 下运行 清单 10 中的程序,就可以发现 Derby 的驱动并不支持 RowId 的特性。另外值得一提的是,SQLClientInfoException 直接继承自 SQLException,表示当一些客户端的属性不能被设置在一个数据库连接时所发生的异常。


回页首

小结:更多新特性与展望

在本文中,我们已经向读者介绍了 Java SE 6 中 JDBC 最重要的一些新特性:它们包括嵌在 JDK 中的 Java DB (Derby)和 JDBC 4.0 的一部分。当然,还有很多本文还没有覆盖到的新特性。比如增加了对 SQL 语言中 NCHAR、NVARCHAR、LONGNVARCHAR 和 NCLOB 类型的支持;在数据库连接池的环境下为管理 Statement 对象提供更多灵活、便利的方法等。

此外,在 Java SE 6 的 beta 版中,曾经将 Annotation Query 的特性包含进来。这项特性定义了一系列 Query 和 DataSet 接口,程序员可以通过撰写一些 Annotation 来自定义查询并获得定制的数据集结果。但是,由于这一特性的参考实现最终不能满足 JDK 的质量需求,Sun 公司忍痛割爱,取消了在 Java SE 6 中发布其的计划。我们有理由相信,在以后的 JDK 版本中,这一特性以及更多新的功能将被包含进来,利用 Java 语言构建数据库的应用也会变得更为自然、顺畅。

参考资料

Extract from Abstract Syntax Notation One (ASN.1)

E.1 What is ASN.1?

ASN.1 is the acronym for Abstract Syntax Notation One, a language for describing structured information; typically, information intended to be conveyed across some interface or communication medium. ASN.1 has been standardised internationally. It is widely used in the specification of communication protocols.

Prior to ASN.1, information to be conveyed in communication protocols was typically specified by ascribing meanings to particular bits and bytes in protocol messages, much as programmers, before the advent of high level languages, had to deal with the bits and bytes of storage layout.

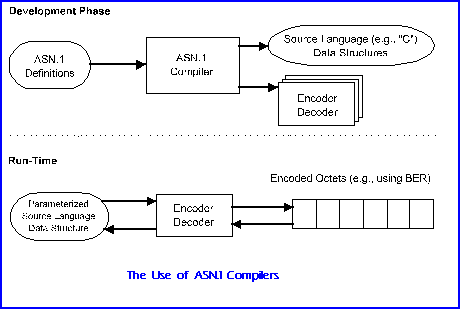
With ASN.1, the protocol designer can view and describe the relevant information and its structure at a high level and need not be unduly concerned with how it is represented while in transit .Compilers can provide run-time code to convert an instance of user or protocol information to bits on the line.

ASN.1 comes into its own when the information being described is complex. This is because the language allows arbitrarily complex structures to be built up in a uniform way from simpler components, and ultimately from a few simple information types. ASN.1 is, in effect, a data definition language, allowing a designer to define the parameters in a protocol data unit without concern as to how they are encoded for transmission. He merely states a need for an Integer followed by text, followed by a floating point number, etc. They can be named and tagged such that two integers can be differentiated as meaning “filesize” or “record number”, for example.


Given any ASN.1 description of a message, a representation can be derived mechanically by applying a set of encoding rules. While many such sets could be imagined, initially only a single set, the Basic Encoding Rules (BER), were standardised as a companion standard to ASN.1 itself. Subsequently two subsets of the basic rules have been approved. These are the Canonical and the Distinguished Encoding Rules. These are exact subsets of the BER, but where it has choices the subsets restrict these to a single possible encoding. In addition, a completely new set of encoding rules has been devised in response to the criticism that BER is highly inefficient, e.g., three bytes to encode a boolean. These are called the packed encoding rules

The “One” was added to the ASN name by ISO to leave open the future possibility of a better language for expressing abstract syntaxes. However, an “ASN.2”, should it ever be considered necessary, will have to be significantly more powerful than ASN.1 to be worth inventing.

E.1.1 Abstract Syntax

To illustrate the concept of abstract syntax consider, for example, ameteorological station, which reports on the prevailing atmospheric conditions to a monitoring centre. At the monitoring centre, the information is input to a weather forecasting program.

With abstract syntax the concern is solely with the information conveyed between the application program running in the computer at the weather station and the application program running in the computer at the monitoring centre.

For different reasons, both programs need to “know” what information is included in a report. The application in the weather station needs to know so that it can create reports from the appropriate sensor readings. The application in the centre needs to know because it must be able to analyse reports and make weather forecasts.

This knowledge, which is essential for the programs to be written, is that of the abstractsyntax; the set of all possible (distinct) reports. The designer of the abstract syntax also defines the meaning of each possible report, and this allows the developers of the programs at each end to implement the appropriate actions.

It would be very unusual for a designer to define the abstract syntax of a message type by explicitly listing all possible messages. This is because any realistic message type will allow an infinite number of distinct possibilities, integer as a simple example of this. Instead, the abstract syntax will generally be structured. The set of possible messages and their meanings can then be inferred from knowledge of the possibilities for each of the components of the structure.

ASN.1 notation is recognisable as a high level definition language. It is constructed in modules with unique identifiers. There are over 20 built data types such as:


Simple data types Character strings Useful Types
BOOLEAN  NumericString  GeneralizedTime
INTEGER  PrintableString  UTCTime
ENUMERATED  TeletexString  EXTERNAL 
REAL  IA5String ObjectDescriptor
BIT STRING GraphicString
OCTET STRING GeneralString
NULL
Arbitrarily complex structures can be built up from these data types using constructors such as:

  • SET{} – order not significant
  • SEQUENCE{} – fixed order
and other useful modifiers such as: OPTIONAL and IMPLICIT

Using ASN.1, the weather report abstract syntax could be expressed as follows:

 WeatherReport                  
::=SEQUENCE {      stationNumber             
INTEGER (1..99999),      timeOfReport              
UTCTime      pressure                  
INTEGER (850..1100)      temperature               
INTEGER (-100..60)      humidity                  
INTEGER (0..100)      windVelocity              
INTEGER (0..500)      windDirection             
INTEGER (0..48) }
A simple protocol data unit might take the form
File-Open-Request
::=SEQUENCE {       filename         
[0]  INTEGER       password         
[1]  Password         OPTIONAL      
mode             
BITSTRING            
{read o,                                              
write 1′                                              
delete 2} Password ::=CHOICE {OCTETSTRING, PrintableString}

E.1.2 Transfer Syntax

Earlier standards such as ASCII and EBCDIC specified both the abstract syntax (the letter A) and the encoding, or transfer syntax, (hexadecimal 21 or 41). ASN.1 separates these two concepts, such that at connect time you can chose to encode the data. Youcan chose an encoding which is efficient on the line or reliable or easy to decode. The first defined for ASN.1 was the Basic Encoding Rules (BER)

The BER allow the automatic derivation of a transfer syntax for every abstract syntax defined using ASN.1. Transfer syntaxes produced by application of the BER can be used over any communications medium which allows the transfer of strings of octets. The encoding rules approach to transfer syntax definition results in considerable saving of effort for application protocol designers. This is particularly pronounced where the messages involved are complex. Perhaps even more important than the savings to the designers are the potential savings to implementors, through the ability to develop general-purpose run-time support. Thus, for example, encoding and decoding subroutines can be developed once and then used in a wide range of applications.

A set of encoding rule can only be developed in the context of an agreed set ofconcepts such as those provided by ASN.1. For example, the concepts required in designing the weather report abstract syntax included the ability to create a message from a sequence of fields, and the concepts of integer and whole number (restricted to certain ranges).

As the structure of ASN.1 is hierarchical, the basic encoding rules follow this structure. They operate on a Tag, Length Value (TLV) scheme. This is actually known in ASN.1 as Identifier, Length, Contents. (ILC). The structure is therefore recursive such that the contents can be a series of ILCs. This bottoms out with genuine contents such as a text string or an integer.

E.2 Basics of ASN.1


E.2.1 Types and Values

The fundamental concepts of ASN.1 are the inter-related notions of type and value. A type is a (non-empty) set of values, and represents a potential for conveying information. Only values are actually conveyed, but their type governs the domain of possibilities. It is by selecting one particular value of the type, rather than the others, that the sender of a message conveys information. The type may have only a

few values, and therefore be capable of conveying only a few distinctions. An example of such a type is Boolean, which has only the two values true and false, with nothing in between. On the other hand, some types, such as Integer and Real, have an infinite number of values and can thus express arbitrarily fine distinctions.

An abstract syntax can be defined as a type, normally a structured type. Its values are precisely the set of valid messages under that abstract syntax. Should the messages be structured, as they commonly are, into fields, then the various fields themselves are defined as types. The values of such a type, in turn, are the set of permitted contents of that field.

A type is a subtype of another, its parent (type), if its values are a subset of those of the parent. Thus, for example, a type “whole number”” whose values are the non-negative integers, could be defined as a subtype of Integer. (ASN.1 does not provide such a type, but one could be defined by the user if needed). Another example would be to define the YEAR as the twelve months and the subtype SPRING as March, April and May.

A type may be simple or structured. The simple types are the basic building blocks of ASN.1, and include types like Boolean and integer. A simple type will generally be used to describe a single aspect of something. A structured type, on the other hand, is defined in terms of other types – its components – and its values are made up of values of the component types. Each of these components may itself be simple or structured, and this nesting can proceed to an arbitrary depth, to suite the needs of the application. All structured types are ultimately defined in terms of simple types.

ASN.1 makes available to the abstract syntax designer a number of simple types, as well as techniques for defining structured types and subtypes. The designer employs these types by using the type notation which ASN.1 provides for each such type. ASN.1 also provides value notation which allows arbitrary values of these types to be written down.

Any type ( or indeed value) which can be written down can be given a name by which it can be referenced. This allows users to define and name types and values that are useful within some enterprise or sphere of interest. These defined types (or defined values) can than be made available for use by others. The defined types within some enterprise can be seen as supplementing the built-in types – those provided directly by ASN.1. ASN.1 also provides a small number of useful types, types which have been defined in terms of the built-in types but which are potentially of use across a wide range of enterprises.

A type is defined by means of a type assignment, and a value is defined by a value assignment. A type assignment has three syntactic components: the type reference (the name being allocated to the new type); the symbol “::=”, which can be read as “is defined as”; and the appropriate type notation. For example:

 WeatherReport ::=SEQUENCE {     
stationNumber             
INTEGER (1..99999),      timeOfReport              
UTCTime      pressure                  
INTEGER (850..1100)      temperature               
INTEGER (-100..60)      humidity                  
INTEGER (0..100)      windVelocity              
INTEGER (0..500)      windDirection             
INTEGER (0..48) }
defines a type called WeatherReport. Everything following the “::=” constitutes valid type notation (for a structured type which comprises a sequence of simple and structured types).

A value assignment is similar, but has an additional syntactic component: the type to which the value belongs. This appears between the value reference (the name being allocated to the value), and the “::=”. For example:

 sampleReport WeatherReport::=SEQUENCE {     
stationNumber             
73290      timeOfReport              
“900102125703Z”,      pressure                  
1056,      temperature               
-3,      humidity                  
26,      windVelocity              
15,      windDirection             
0 }
defines a value of type WeatherReport called sampleReport. The characters after the “::=” constitute valid notation for a value of WeatherReport.

The definition of types and values is almost the only thing that ASN.1 users do. Of these two, the definition of types predominates. This is because an abstract syntax itself is a type, as are its components, and their components, and so on. In a specification, it is the types, the sets of possible values, which are most significant. Individual values only appear as examples and defaults. Consider how much more useful in a specification is the type INTEGER than the particular value 314 (or any other integer value for that matter). Conversely, in instances of communication it is values which are significant.

E.2.2 Subtypes

Frequently the designer intends only some subset of the values of an ASN.1 type to be valid in some situation. For instance, in conveying a measure of humidity as a percentage, only numbers in the range 0 to 100 are valid, or when conveying a postal code only strings with certain characters and whose length falls within a certain range are to be permitted. Perhaps when some protocol message is used in a certain context, the optional checksum field is to be absent.

These are all examples of constraints which can be expressed by defining a subtype of a suitable parent type. This is done by appending to the notation for the parent a suitable subtype specification. The result is itself a type and can be used anywhere a type is allowed. (Thus a subtype specification can also be applied to a subtype, in which case it may serve to further reduce the set of values).

A subtype specification consists of one or more subtype value sets, separated by “|” (pronounced “or”). The whole list is in round brackets(()).

For example in:

Weekend ::= DaysOfTheWeek
(saturday | sunday)
the type Weekend is defined by appending a subtype specification to a parent type DaysOfThe Week. The subtype specification (the expression in round brackets) defines which of the values of DaysOfTheWeek are also to be values of Weekend.

There are six different value set notations. Two of these are applicable to all parent types, others to only certain parent types.

The value set notations that are applicable to all parent types are single value and contained subtype. The former notation is simply some value of the a parent type, the resulting value set consisting of that value alone. Examples of this are “saturday” and “sunday” above, each of which is a single value of DaysOfTheWeek. The contained subtype notation comprises the keyword INCLUDES, followed by some other subtype of the same parent type, and denotes the value set consisting of all the values in that subtype.

For example, given:

LongWeekend ::= DaysOfTheWeek         
(INCLUDES Weekend | monday)
the type LongWeekend includes the three values saturday, sunday, and monday, the union of the value sets used in its definition

Each value set defines some subset of the values of the parent type. The resulting subtype has the values in the union of these subsets, which must be non-empty..

The value range notation can be used to subtype any type whose values are ordered (for example, the integer type). It involves specifying the lower and upper bounds of the range.

A size range can be included for any type whose values have a defined size (for example, the bit string type). Here the value set includes all of the values whose size, measured in the appropriate units, is within the designated range.

An alphabet limitation can be applied only to character string types and allows only the values formed from some subset of the characters.

Finally, inner subtyping can be employed to define value sets of structured types (for example, set and set-of-types). Here the value set includes all those values whose component values meet certain constraints.

E.2.3 Names

Several categories of object in ASN.1 have names by which they can be referenced.We have actually met examples of each of these kinds of name above, as follows:


type reference:  WeatherReport
value reference:  sampleReport
identifier: humidity
It is very important that names are chosen, as in these examples, to have significance to the human reader. Indeed, if names are chosen correctly (and appropriate layout conventions followed), then the essence of some piece of ASN.1 can often be grasped, even by someone unskilled in the language.

All names in ASN.1 are character strings drawn from the same set of characters, namely:


upper-case letters:  ABCDEFGHIJKLMNOPQRSTUVWXYZ
lower-case letters:  abcdefghijklmnopqrstuvwxyz 
decimal digits:  0123456789
hyphen: 
The first character in a name must be a letter. The case of the letters in a name is significant, so that “borders” and “Borders” are different names. In fact the case of the initial letter is of special significance, as type references (and also module references, see below) must start with an upper-case letter, while value references and identifiers must start with a lower-case letter. It is not a good idea, however, to use two or more names which differ only by the case of some of their letters.

The names chosen by users must be chosen so as to avoid clashing with the reserved words of ASN.1 (which include most of the keywords of the language). Since the keywords are generally in upper-case, the use of lower-case letters in names makes it easy to adhere to this, and also generally makes the names more readable. There is no upper limit on the length of names, and this allows the use of an appropriate phrase as the name of an object.

Examples of legal (and probably appropriate) names are:


UnformattedPostalAddress
Access-control-list
ACL
Temperature
MverifyPDU
recordLow
ib-g3facsimile-non-basic-parameters
The first few of these examples are valid for use as type references, the others as identifiers or value references.

Notice that two different conventions are used in these examples for forming multi-word names, since spaces are not valid in names and thus can not be used to separate the individual works.

E.2.4 Modules

As with any modern programming language ASN.1 is modular. A module is a named collection of definitions of types and values (and macros – see next section). A module normally groups together a set of related definitions, such as all those used in defining some abstract syntax. However, the basis for grouping definitions into modules is entirely in the hands of the designer, who could put all definitions into one module, or organise them into several modules, according to taste.

Within a module, definitions can appear in any order, with none of the restrictions sometimes found in programming languages, such as “define before use”. It is up to the designer to organise the definitions to make the result most understandable to the reader.

All types and values defined in a single module must be allocated distinct references, and within the module such a reference unambiguously identifies the applicable type or value.

A module consists of, in order: the module identifier; the keyword DEFINITIONS; optionally, the tag style default; the symbol “::=”; the module body. The module body consists of the exports and imports statements, if any, followed by the type and value assignments, all enclosed between BEGIN and END.

An example of a module is as follows. The component parts – what should be inside the second and third curly brackets – are omitted, but see Section E.2.1 for what would be entered.

WeatherReporting
{2 6 6 247 1} DEFINITIONS ::=  BEGIN     WeatherReport ::=
SEQUENCE { ….. }     sampleReport WeatherReport ::= { …..}
END
The module identifier (which precedes the keyword DEFINITIONS) constitutes the complete and unambiguous identification of the module. It consists of two components, the first a module reference and the second an object identifier value; in the example they are WeatherReporting and {2 6 6 247 1} respectively.

A module reference is the same (syntactically) as a type reference. The module reference should be chosen so as to be suggestive of the contents of the module in some way, and, if possible, unambiguous.

The other component, the object identifier value, is a globally unique identification for the module, made up of a sequence of non-negative numbers.

Object Identifier was originally developed as part of the ASN.1 standard, but is now ubiquitous. It is essential in any global network as it is a unique naming space. It allows any communications object to be uniquely identified. It is a hierarchical naming space, with the authority to specify Object Identifiers being passed down the hierarchy. Thus an enterprise may register itself and then sub-allocate number space to its branches or subsidiaries.

Specifically Object Identifiers are becoming used more and more to identify Managed Objects whether these are SMTP or ISO Managed Objects. This allows for global network management on the basis that every type of object has a unique identification.

While the object identifier value is optional, this is largely for backwards compatibility reasons, because it was not present in the first version of ASN.1. In practice it is not a good idea to omit it.

E.3 Macros

ASN.1 provides a mechanism whereby users can extend the notation for their own use, or for use by others. This allows the designer to extend the language to define a new “object” such as a modem or a switch. These have “normal” ASN.1 properties and additional properties such as parenthood and physical location. For example an “asynchronous modem” may have “generic modem” as a parent. It inherits properties from the parent. A modem may physically be in the same rack as others and we have a second hierarchy of physical location. ASN.1 itself can be used to define properties such as:
modem
::= SEQUENCE {      speed              
INTEGER      modulation         
IA5 String      manufacturer       
IA5 String }
but the additional features require the MACRO extensions to specify them. This generates a form of “template” for the designer to fill in.

A user extending the notation does so by defining one or more macros, using the macro definition notation (MDN). Each macro has a macro reference (like a type reference except that all letters, not just the first, must be in upper-case), and grammars for type and value notation. These grammars are defined by the macro designer using Baccus Naur Format (BNF).

A macro definition can be imported and exported by means of its macroreference, just as with type and value definitions.

The macro capability provides fairly powerful abilities for the definition of new type and value notation within ASN.1 modules, with the full power of BNF available to the designer, as well as some powerful built-in symbols, such as for types and values.

The macro defines a kind of definition form or template for a concept which is more complex than just an ASN.1 type and value. In fact it is an assemblage of related types and values, related through being aspects of the same operation.

Such a form or template could clearly have been defined by means outside of ASN.1. However, because many or all of the aspects of such a concept are specified using ASN.1, it proves very convenient to be able to include the definition within an ASN.1, module along with the definitions of the types and values involved. Furthermore, because the use of macros results in ASN.1 types and values, they can be given reference names, can be included in modules, and can be imported and exported using all of the same mechanisms already provided in ASN.1.

The macro corresponds to some concept, more complex than a data type, of which users can define instances. The type notation defines the form or template, with all of the appropriate degrees of freedom provided. The value notation is almost always an integer or object identifier value which is the delivered value, and which constitutes the “run-time” identification of the instance.

E.4 Encoding Rules

When the encoding rules were separated from the notation, they were dubbed the Basic Encoding Rules (BER), with the idea that there might be justification for defining different sets of encoding rules. Such encoding rules would not just be different for the sake of being different, but would be designed to meet some functional requirement, such as optimising compactness of encoding at the expense of computational overhead, or vice versa.

Thus additional rules were defined in subsequent revisions. These are in two flavours. The first, Canonical and Distinguished Encoding Rules, are designed to reduce options for encoding and thus reduce decoding computational overhead. The second are exactly targeted at reducing line overhead. They provide line efficiency at the cost of processing overhead.

It is worth noting that a clear advantage of the use of encoding rules such as the BER rather than hand-crafting transfer syntaxes is that application designers do not need to be familiar with their details; indeed neither do most implementors. This is analogous with the way that programmers using high-level languages do not have to know in detail how data structures are held in memory. However in both cases it helps to have a general awareness, if for no other reason than to know how “expensive” various constructs are.

The BER generate encodings which are of a class known as type – length – value (TLV), so called because the basis of encoding is a structure made up of those three parts. Many protocols employ encoding schemes of this general kind. However, few apply the idea so consistently as the BER.

With BER, the encoding of every data value in an abstract syntax, whether an entire PDU or some component of it, is constructed in TLV style. The three parts are actually termed identifier (I), length (L) and contents (C).

The identifier conveys three pieces of information: the tag class of the data value being conveyed; the tag number, the formof the encoding – whether it is primitive or constructed.

The length (together with the form) allows the end of the contents to be found. The receiving system need not understand the tag to find the end of the contents, and this allows an encoding to be skipped if it cannot (yet) be decoded.

The contents is the substance of the encoding, conveying the actual value. When the form of the encoding is primitive, the contents is simply a series of octets (zero or more) and when the form is constructed, the contents is a series of nested encodings, each itself having identifier, length and contents.

This nesting can be as deep or as shallow as needed; its primary purpose is to convey values which have components which themselves have components, and so on, to any depth. Nesting stops either with a primitive encoding, or with a constructed encoding with empty contents. Each part of the encoding (and therefore also the encoding as a whole) is an integral number of octets.

E.5 ASN.1 Developments

ASN.1 is at the core of open systems applications today and has been revised to include a replacement for the MACRO mechanism and additional encoding rules. The main parts of the standard are summarized below. ASN.1 is now ubiquitous and even used by the Internet network management protocol, SNMP.


X.680  ISO/IEC 8824-1  Basic ASN.1 Notation
X.681 ISO/IEC 8824-2 Information Objects Specification
X.682 ISO/IEC 8824-3  Constraint Specification
X.683  ISO/IEC 8824-4 Parameterization
X.690  ISO/IEC 8825-1 Basic, Canonical and Distinguished Encoding Rules
X.691 SO/IEC 8825-2 Packed Encoding Rules
Amendment 1  Rules for Extensibility

[This chapter is based on extracts from Doug Steedman’s book Abstract Syntax Notation One (ASN.1) – The Tutorial and Reference, published by Technology Appraisals]

Further Reading

[1] Steedman, Douglas., Abstract Syntax Notation One (ASN.1) – The Tutorial and Reference, Technology Appraisals, 1990.

(C) Technology Appraisals Limited 1990, 1996


Developing Struts Web Module

In this section we will build and test our Struts Hibernate Integration application.


Compiling and packaging application


Since we are using ant build tool, so the compiling and packaging will done by ant tool. To compile and create war file for deployment, open console and go to “C:\Struts-Hibernate-Integration\code\WEB-INF\src” directory. Then just type ant, ant will create strutshibernate.war in the “C:\Struts-Hibernate-Integration\dist” directory.


Deploying and testing application


Copy strutshibernate.war  to the webapps directory of tomcat and start tomcat server. Now open the browser and type http://localhost:8080/strutshibernate/ in the browser. You browser should look like:


Now click on “Click here to test Search Tutorials” link.


Enter some search term say “java” and click on search button. You browser should display the search result as shown below.


Congratulations now you have successfully integrated your struts application with hibernate using Hibernate Struts Plugin.


You can download the code of this application from here.


Developing Struts Web Module

In this we will be creating search interface for enabling the user to search tutorials. This example is an client to test our Struts Hibernate Plugin.


The web component of the application consists of the following files:


1. Search Tutorial Form (SearchTutorial.jsp):


This file is used to display the search form to the user. Here is the code of search form:


<%@ taglib uri=”/tags/struts-bean” prefix=”bean” %>

<%@ taglib uri=”/tags/struts-html” prefix=”html” %>
<html:html locale=”true”>
<head>
<title><bean:message key=”welcome.title”/></title>
<html:base/>
</head>
<body bgcolor=”white”>

<html:form action=”/searchTutorial”>

<html:errors/>

<table>

<tr>
<td align=”right”>
Search Tutorial
</td>
<td align=”left”>
<html:text property=”keyword” size=”30″ maxlength=”30″/>
</td>
</tr> 
<tr>
<td align=”right”>
<html:submit>Search</html:submit>
</td>
</tr>
</table>
</html:form>
</body>
</html:html>


Save SearchTutorial.jsp in to “C:\Struts-Hibernate-Integration\code\pages” directory.


2. Search Result Page (SearchResultPage.jsp)
This page is used to display the search result. Here is the code of search result page:


        <%@page language=”java” import=”java.util.*”%>
<%@ taglib uri=”/tags/struts-bean” prefix=”bean” %>
<%@ taglib uri=”/tags/struts-html” prefix=”html” %>
<p><font size=”4″ color=”#800000″ face=”Arial”>Search Results</font></p>

<%
List searchresult = (List) request.getAttribute(“searchresult”);
%>
<%
for (Iterator itr=searchresult.iterator(); itr.hasNext(); )
{
roseindia.net.dao.hibernate.Tutorial tutorial =
(roseindia.net.dao.hibernate.Tutorial)itr.next();
%>
<p><a href=”<%=tutorial.getPageurl()%>”>
<font face=”Arial” size=”3″><%=tutorial.getShortdesc()%></font></a><br>
<font face=”Arial” size=”2″><%=tutorial.getLongdesc()%></font></p>

<%
}
%>
<html:link page=”/pages/SearchTutorial.jsp”>Back to Search Page</html:link>


Save SearchResultPage.jsp in to “C:\Struts-Hibernate-Integration\code\pages” directory.


3. Search Java Form (SearchTutorialActionForm.java)
This is the Struts action form class. Here is the code of the Action Form:


package roseindia.web;

import javax.servlet.http.HttpServletRequest;

import org.apache.struts.action.*;

public class SearchTutorialActionForm extends ActionForm
{
  private String keyword=null;

public void setKeyword(String keyword){
    this.keyword=keyword;
  }

  public String getKeyword(){
    return this.keyword;
  }

   public void reset(ActionMapping mapping, HttpServletRequest request) {
    this.keyword=null;
    }
   public ActionErrors validate
      ActionMapping mapping, HttpServletRequest request ) {
      ActionErrors errors = new ActionErrors();
      
      ifgetKeyword() == null || getKeyword().length() ) {
        errors.add(“keyword”,new ActionMessage(“error.keyword.required”));
     }

      return errors;
  }

}

 4. Search Action Class (SearchTutorialAction.java)


This is Struts Action Class of our application. Here is the code of the Action Class:


package roseindia.web;

import javax.servlet.http.HttpServletRequest;
import javax.servlet.http.HttpServletResponse;
import javax.servlet.ServletContext;

import java.util.List;

import org.apache.struts.action.Action;
import org.apache.struts.action.ActionForm;
import org.apache.struts.action.ActionForward;
import org.apache.struts.action.ActionMapping;

import roseindia.net.plugin.HibernatePlugIn;

import roseindia.net.dao.hibernate.Tutorial;

import org.hibernate.SessionFactory;
import org.hibernate.Session;
import org.hibernate.criterion.Restrictions;
import org.hibernate.Criteria;


public class SearchTutorialAction extends Action
{
  public ActionForward execute(
    ActionMapping mapping,
    ActionForm form,
    HttpServletRequest request,
    HttpServletResponse responsethrows Exception{
  SearchTutorialActionForm formObj = (SearchTutorialActionForm)form;

   System.out.println(“Getting session factory”);
   /*Get the servlet context */
   ServletContext context = request.getSession().getServletContext();
   /*Retrieve Session Factory */
   SessionFactory _factory = (SessionFactory)  
   context.getAttribute
(HibernatePlugIn.SESSION_FACTORY_KEY);
   /*Open Hibernate Session */
   Session  session = _factory.openSession();
     //Criteria Query Example
     Criteria crit = session.createCriteria(Tutorial.class);
     crit.add(Restrictions.like(“shortdesc”“%” + formObj.getKeyword() +“%”))//Like condition

   //Fetch the result from database
   List tutorials= crit.list();
   request.setAttribute(“searchresult”,tutorials);
   
    /*Close session */
      session.close();
    System.out.println(“Hibernate Session Closed”);
      return mapping.findForward(“success”);
  }
}

5. Entries into struts-config.xml


Add the following lines into your struts-config.xml file.


Form Bean: 
<form-bean
name=”TutorialSearch”
type=”roseindia.web.SearchTutorialActionForm”>
</form-bean>


Action Entry:
<action
path=”/searchTutorial”
type=”roseindia.web.SearchTutorialAction”
name=”TutorialSearch”
scope=”request”
validate=”true”
input=”/pages/SearchTutorial.jsp”>
<forward name=”success” path=”/pages/SearchResultPage.jsp”/>
</action>


Now we have created all the required stuffs for the web client. In the next section we will test our application.


Developing Struts Hibernate Plugin

In this section we will develop java code for Struts Hibernate Plugin. Our Hibernate Plugin will create Hibernate Session factory and cache it in the servlet context. This strategy enhances the performance of the application.


Source Code Of Hibernate Struts Plugin:


package roseindia.net.plugin;

import java.net.URL;
import javax.servlet.ServletContext;
import javax.servlet.ServletException;
import org.hibernate.SessionFactory;
import org.hibernate.cfg.Configuration;
import org.apache.commons.logging.Log;
import org.apache.commons.logging.LogFactory;
import org.apache.struts.action.ActionServlet;
import org.apache.struts.action.PlugIn;
import org.apache.struts.config.ModuleConfig;
import org.hibernate.HibernateException;


public class HibernatePlugIn implements PlugIn {
   private String _configFilePath = “/hibernate.cfg.xml”;

    /**
     * the key under which the <code>SessionFactory</code> instance is stored
     * in the <code>ServletContext</code>.
     */
    public static final String SESSION_FACTORY_KEY 
            = SessionFactory.class.getName();

  private SessionFactory _factory = null;

   public void destroy() {
     try{
       _factory.close();
     }catch(HibernateException e){
      System.out.println(“Unable to close Hibernate Session Factory: ” + e.getMessage());
     }
       
   }

   public void init(ActionServlet servlet, ModuleConfig configthrows ServletException {
     System.out.println(“*************************************”);
   System.out.println(“**** Initilizing HibernatePlugIn   **********”);
        Configuration configuration = null;
        URL configFileURL = null;
        ServletContext context = null;

   try{
            configFileURL = HibernatePlugIn.class.getResource(_configFilePath);
            context = servlet.getServletContext();
            configuration = (new Configuration()).configure(configFileURL);
            _factory = configuration.buildSessionFactory();
      //Set the factory into session
      context.setAttribute(SESSION_FACTORY_KEY, _factory);

   }catch(HibernateException e){
    System.out.println(“Error while initializing hibernate: ” + e.getMessage());
   }
   System.out.println(“*************************************”);

   }

    /**
     * Setter for property configFilePath.
     @param configFilePath New value of property configFilePath.
     */
    public void setConfigFilePath(String configFilePath) {
        if ((configFilePath == null|| (configFilePath.trim().length() == 0)) {
            throw new IllegalArgumentException(
                    “configFilePath cannot be blank or null.”);
        }
        
        System.out.println(“Setting ‘configFilePath’ to ‘”  + configFilePath + “‘…”);
        _configFilePath = configFilePath;
    }


/*(SessionFactory) servletContext.getAttribute
(HibernatePlugIn.SESSION_FACTORY_KEY);
*/
  
}


In our plugin class we have define a variable _configFilePath to hold the name of Hibernate Configuration file.


private String _configFilePath = “/hibernate.cfg.xml”;


Following code define the key to store the session factory instance in the Servlet context.


public static final String SESSION_FACTORY_KEY = SessionFactory.class.getName();


The init() is called on the startup of the Struts Application. On startup the session factory is initialized and cached in the Servlet context.


configFileURL = HibernatePlugIn.class.getResource(_configFilePath);
context = servlet.getServletContext();
configuration = (new Configuration()).configure(configFileURL);
_factory = configuration.buildSessionFactory();
//Set the factory into session
context.setAttribute(SESSION_FACTORY_KEY, _factory);


Changes to be done in struts-config.xml file


Configuring Hibernate with Struts is very simple work it requires you to have hibernate.cfg.xml in your WEB-INF/classes directory, and to add the following line to the struts-config.xml file.


<plug-in className=”roseindia.net.plugin.HibernatePlugIn”></plug-in>


Testing the Plugin


Build your application and deploy on the tomcat server. Start tomcat server and observe the console output. It should display the following line:


 log4j:WARN Please initialize the log4j system properly.
*************************************
**** Initilizing HibernatePlugIn **********
*************************************
Aug 7, 2006 10:09:53 AM org.apache.struts.tiles.TilesPlugin initD
  

This means you have successfully configured your Struts Hibernate Plugin with struts application.


Writing Hibernate Configuration Files

In the previous section we completed the database setup and created required table and populated with the data. In this section we will write required hibernate configuration files.


For this tutorial we need following Hibernate configuration files:


Hibernate Configuration File


Hibernate configuration file (hibernate.cfg.xml) is used to provide the information which is necessary for making database connections. The mapping details for mapping the domain objects to the database tables are also a part of Hibernate configuration file. 


Here is the code of our Hibernate Configuration File:


<?xml version=’1.0′ encoding=’utf-8′?>
<!DOCTYPE hibernate-configuration PUBLIC
“-//Hibernate/Hibernate Configuration DTD//EN”
“http://hibernate.sourceforge.net/hibernate-configuration-3.0.dtd”>

<hibernate-configuration>
<session-factory>
<property name=”hibernate.connection.driver_class”>com.mysql.jdbc.Driver</property>
<property name=”hibernate.connection.url”>jdbc:mysql://localhost/struts-hibernate</property>
<property name=”hibernate.connection.username”>root</property>
<property name=”hibernate.connection.password”></property>
<property name=”hibernate.connection.pool_size”>10</property>
<property name=”show_sql”>true</property>
<property name=”dialect”>org.hibernate.dialect.MySQLDialect</property>
<property name=”hibernate.hbm2ddl.auto”>update</property>
<!– Mapping files –>
<mapping resource=”/roseindia/net/dao/hibernate/Tutorial.hbm.xml”/>
</session-factory>
</hibernate-configuration> 


Place hibernate.cfg.xml file in the source directory e.g. “C:\Struts-Hibernate-Integration\code\src\java”


The <mapping resource=”> tag is used to specify the mapping file:


<mapping resource=”/roseindia/net/dao/hibernate/Tutorial.hbm.xml”/>


Code of Tutorial.hbm.xml:


 <?xml version=”1.0″ encoding=”UTF-8″?>
<!DOCTYPE hibernate-mapping PUBLIC “-//Hibernate/Hibernate Mapping DTD//EN”
“http://hibernate.sourceforge.net/hibernate-mapping-3.0.dtd”>

<hibernate-mapping auto-import=”true” default-lazy=”false”>

<class 
name=”roseindia.net.dao.hibernate.Tutorial” 
table=”tutorials”
>

<id
name=”id”
type=”java.lang.Integer”
column=”id”
>
<generator class=”increment” />
</id>

<property
name=”shortdesc”
type=”java.lang.String”
column=”shortdesc”
not-null=”true”
length=”50″
/>
<property
name=”longdesc”
type=”java.lang.String”
column=”longdesc”
not-null=”true”
length=”250″
/>
<property
name=”pageurl”
type=”java.lang.String”
column=”pageurl”
not-null=”true”
length=”100″
/>


</class>
</hibernate-mapping>

Place Tutorial.hbm.xml file in the source directory e.g. “C:\Struts-Hibernate-Integration\code\src\java\roseindia\net\dao\hibernate\” 


POJO Object
Here is the code of Java Bean object (Tutorial.java) used to store and retrieve the data from database.


package roseindia.net.dao.hibernate;

import java.io.Serializable;


public class Tutorial implements Serializable {

    /** identifier field */
    private Integer id;

    /** persistent field */
    private String shortdesc;

    /** persistent field */
    private String longdesc;

    /** persistent field */
    private String pageurl;

    /** full constructor */
    public Tutorial(Integer id, String shortdesc, String longdesc, String pageurl) {
        this.id = id;
        this.shortdesc = shortdesc;
        this.longdesc = longdesc;
        this.pageurl = pageurl;
    }

    /** default constructor */
    public Tutorial() {
    }

    public Integer getId() {
        return this.id;
    }

    public void setId(Integer id) {
        this.id = id;
    }

    public String getShortdesc() {
        return this.shortdesc;
    }

    public void setShortdesc(String shortdesc) {
        this.shortdesc = shortdesc;
    }

    public String getLongdesc() {
        return this.longdesc;
    }

    public void setLongdesc(String longdesc) {
        this.longdesc = longdesc;
    }

    public String getPageurl() {
        return this.pageurl;
    }

    public void setPageurl(String pageurl) {
        this.pageurl = pageurl;
    }

}

In this section we have created all the Hibernate related stuffs.


Downloading Struts & Hibernate


In this we will download Struts & Hibernate and setup the development environment.


Downloading Hibernate


Hibernate is free open source software it can be download from http://www.hibernate.org/. Visit http://www.hibernate.org/ and then click on the Download link to go to the download page. From the download page download the current latest release of Hibernate Core. For this tutorial I have downloaded Hibernate hibernate-3.1.1.zip.


Download Struts


The latest release of Struts can be downloaded from http://struts.apache.org/download.cgi. For this tutorial I have download struts-1.2.9-bin.zip. Save downloaded file into your hard disk.


Downloading Ant


Ant is a free tool under GNU Licence and is freely available at http://jakarta.apache.org/ant/ , current version of ant is 1.6.5. Ant allows the developer to automate the repeated process involved in the development of J2EE application. Developers can easily write the script to automate the build process like compilation, archiving and deployment. For this tutorial I am using apache-ant-1.6.5.


Download MySQL JDBC Driver
Download mysql-connector-java-3.0.16-ga-bin.jar from here mysql-connector-java or you can download and use the latest version of mysql jdbc driver. Copy the JDBC driver file (mysql-connector-java-3.0.16-ga-bin.jar or latest version) to the jakarta-tomcat-5.5.9\common\lib directory of your tomcat installation. This will add the MySQL JDBC driver to the tomcat server.


Setting Up Development Environment


First we will create necessary directories and moved the required files to the appropriate directory. Follow the following steps to accomplish this:


  1. Create a directory in you c: drive called Struts-Hibernate-Integration.
      
  2. Unzip Downloaded file in the directory you have downloaded Struts.
      
  3. Go to the “struts-1.2.9-bin\webapps” directory and you will find struts-blank.war, struts-documentation.war, struts-examples.war, struts-mailreader.war and tiles-documentation.war files in the directory. Open struts-blank.war with WinZip and then click on the “Extract” button. WinZip asks for the directory for extracting the file, enter “C:\Struts-Hibernate-Integration” and click on Extract button.

      
  4. A new directory will created “C:\Struts-Hibernate-Integration\code” and the content of struts-blank.war is extracted in the code directory.
      
  5. Now we will add the hibernate code to our development environment. Extract hibernate-3.1.1.zip in the directory where you have downloaded. 
       
  6. Copy “hibernate3.jar” from <your downoaded direvory>\hibernate-3.1  into C:\Struts-Hibernate-Integration\code\WEB-INF\lib directory.
       
  7. Copy all the library files from “hibernate-3.1\lib” to “C:\Struts-Hibernate-Integration\code\WEB-INF\lib” directory.
      
  8. Create an directory libext under “C:\Struts-Hibernate-Integration\code\WEB-INF\” . We will used this directory to put extra jar files. Copy servlet-api.jar file your tomcat directory to “C:\Struts-Hibernate-Integration\code\WEB-INF\libext” directory. 
      
  9. Change in the build.xml file: Open “C:\Struts-Hibernate-Integration\code\WEB-INF\src\build.xml” file in your favourite editor and change as instructed below:
    a) Find “<property name=”servlet.jar” value=”/javasoft/lib/servlet.jar”/>” in the build.xml file and change it to “<property name=”servlet.jar” value=”./libext/servlet-api.jar”/>
    b) Find “<property name=”distpath.project” value=”/projects/lib”/>” and change it to “<property name=”distpath.project” value=”../../dist”/>
    c) Change “<property name=”jdbc20ext.jar” value=”/javasoft/lib/jdbc2_0-stdext.jar”/>” to “<property name=”jdbc20ext.jar” value=”./libext/jdbc2_0-stdext.jar”/>“.
    d) Change “<property name=”project.title” value=”Jakarta Struts Blank “/>” to “<property name=”project.title” value=”RoseIndia.net Struts Hibernate Integration Tutorial “/>
    e) Change “<property name=”project.distname” value=”blank”/>” to “<property name=”project.distname” value=”strutshibernate”/>
    e) Change “<target name=”project” depends=”clean,prepare,compile,javadoc”/>” to “<!–<target name=”project” depends=”clean,prepare,compile”/>–>
    You can download my build.xml fom here.
      
  10. Open console and go to the “C:\Struts-Hibernate-Integration\code\WEB-INF\src” directory  and type ant to compile the project. This show the following out put:

    C:\Struts-Hibernate-Integration\code\WEB-INF\src>ant
    Buildfile: build.xml

    clean:
    [delete] Deleting directory C:\Struts-Hibernate-Integration\code\WEB-INF\clas
    ses
    [mkdir] Created dir: C:\Struts-Hibernate-Integration\code\WEB-INF\classes

    prepare:

    resources:
    [copy] Copying 1 file to C:\Struts-Hibernate-Integration\code\WEB-INF\class
    es

    compile:

    project:

    dist:
    [jar] Building jar: C:\Struts-Hibernate-Integration\dist\strutshibernate.j
    ar
    [war] Building war: C:\Struts-Hibernate-Integration\dist\strutshibernate.w
    ar
    [war] Warning: selected war files include a WEB-INF/web.xml which will be
    ignored (please use webxml attribute to war task)

    all:

    BUILD SUCCESSFUL
    Total time: 3 seconds
    C:\Struts-Hibernate-Integration\code\WEB-INF\src>


    and it will create C:\Struts-Hibernate-Integration\dist\strutshibernate.war file which you can deploy on application server to test. You can ignore the warning generated while running the ant build tool.
       
  11. To test the application copy the strutshibernate.war to your tomcat webapps dirctory and start tomcat.
      
  12. Open browser and type http://localhost:8080/strutshibernate/. You browser page should look like: 


    This means you have successfully configured your development environment.

Setting up MySQL Database and Tables

I am assuming that you have running instance of MySQL Database and you know how to work with the MySQL database. To access the database you should have valid user name and password. 


Let’s now start by creating the database for our struts- hibernate integration tutorial. Our application is very very simple and it searches for the keywords typed by user in the table. The database will contain one table ‘tutorials’ for holding the tutorials links and descriptions. Here is the complete sql script for setting up the database.


 CREATE DATABASE `struts-hibernate` ;

CREATE TABLE `tutorials` (

`id` INT NOT NULL AUTO_INCREMENT ,
`shortdesc` VARCHAR( 50 ) NOT NULL ,
`longdesc` VARCHAR( 250 ) NOT NULL ,
`pageurl` VARCHAR( 100 ) NOT NULL ,
PRIMARY KEY ( `id` )
) TYPE = MYISAM ;

The above table holds the short description, long description and url of the tutorials. The field ‘id‘ is the unique identifier for records in the articles table.


Here are the details of the each of the fields in the table:


id: Unique key for the table


shortdesc: This fields stores the short description of the tutorial.


longdesc: This field stores the full description about the tutorial


pageurl: This field is stores the url of the tutorial


Run the following query to populate table with tutorials data:


INSERT INTO `tutorials` VALUES (1, ‘JSP Tutorials, Hibernate and struts Tutorials’, ‘This site contains many quality Java, JSP Tutorials, Hibernate Tutorials, Struts Tutorials, JSF Tutorials, RMI, MySQL Tutorials, Spring Tutorials, source codes and links to other java resources. We have large number of links to the tutorials on java’, ‘http://roseindia.net/’);


INSERT INTO `tutorials` VALUES (2, ‘JSP Tutorial’, ‘Java Server Pages or JSP for short is Sun”s solution for developing dynamic web sites. JSP provide excellent server side scripting support for creating database driven web applications.’, ‘http://www.roseindia.net/jsp/jsp.shtml’);


INSERT INTO `tutorials` VALUES (3, ‘Struts Tutorials – Jakarta Struts Tutorial’, ‘This complete reference of Jakarta Struts shows you how to develop Struts applications using ant and deploy on the JBoss Application Server. Ant script is provided with the example code. Many advance topics like Tiles, Struts Validation Framework, Ja’, ‘http://www.roseindia.net/struts/index.shtml’);


INSERT INTO `tutorials` VALUES (4, ‘The Complete Spring Tutorial’, ‘Spring is grate framework for development of Enterprise grade applications. Spring is a light-weight framework for the development of enterprise-ready applications. Spring can be used to configure declarative transaction management, remote access to’, ‘http://www.roseindia.net/spring/index.shtml’);


INSERT INTO `tutorials` VALUES (5, ‘Java Server Faces (JSF) Tutorial’, ‘JavaServer Faces or JSF is grate technology for the development of user interfaces for web applications. The Java Server Faces specification is defined by JSR 127 of the Java Community Process.’, ‘http://www.roseindia.net/jsf/’);


INSERT INTO `tutorials` VALUES (6, ‘Jboss 3.0 Tutorial’, ‘ This lesson shows you how to build you web application and install on the Jboss 3.0 application server. After the completion of this lesson you will be able to compile, assemble and deploy your J2EE application on Jboss 3.0 application server.’, ‘http://www.roseindia.net/jboss/index.shtml’);


In the above steps we have setup our database. In the next section we will write java stuffs to integrate struts and hibernate.