upgrade tomcat6xx to tomcat7xx with 3 problem3

今天把tomcat从6.0.18升级到7.0.25,发现了两个问题

问题1

java.lang.ClassNotFoundException: org.apache.catalina.mbeans.ServerLifecycleListener

发现居然找不到这个类,然后把catatina.jar下载下来反编译一看mbenas这个文件夹居然是空的

解决办法

6.0.18以前,conf/server.xml里面的配置有这项

注释掉就可以了

问题2

严重: Begin event threw exception
java.lang.IllegalArgumentException: taglib definition not consistent with specification version

tomcat 6.0.18里面的web.xml里面的tab配置如下
http://java.sun.com/jstl/core
/WEB-INF/c.tld

tomcat 7.0.25里面web.xml的tag配置应该如下所示

http://java.sun.com/jstl/core
/WEB-INF/c.tld


问题2

Aug 11, 2015 10:41:11 AM org.apache.jasper.compiler.JDTCompiler$1 findType
SEVERE: Compilation error
org.eclipse.jdt.internal.compiler.classfmt.ClassFormatException


原来是JDK的版本问题,系统自是OpenJDK 1.8,

要改回OpenJDK 1.6

yum install java-1.6.0-openjdk

用bash解决hadoop的磁盘空间检查性能问题

项目使用的hadoop已经存放了3000W+的文件,

为了节省成本,当时抢建平台时,使用了组装服务器+普通硬盘

hadoop每次做du操作都非常耗时,于是把hadoop代码改了一个

使用一个bash脚本替代原来du操作。

bash:

#/bin/sh
mydf=$(df $2 | grep -vE ‘^Filesystem|tmpfs|cdrom’ | awk ‘{ print $3 }’)
echo -e “$mydf\t$2”

java:hadoop\src\core\org\apache\hadoop\fs\DU.java:168行的toString()及getExecString()方法

public String toString() {
return
“mydu -sk ” + dirPath +”\n” +
used + “\t” + dirPath;
}

protected String[] getExecString() {
return new String[] {“mydu”, “-sk”, dirPath};
}

改造后,原来的du操作其他不耗时。

只是存在统计不准确的问题,不过并不影响hadoop运作。

NginX 1.2.0 versus Resin 4.0.29 performance tests

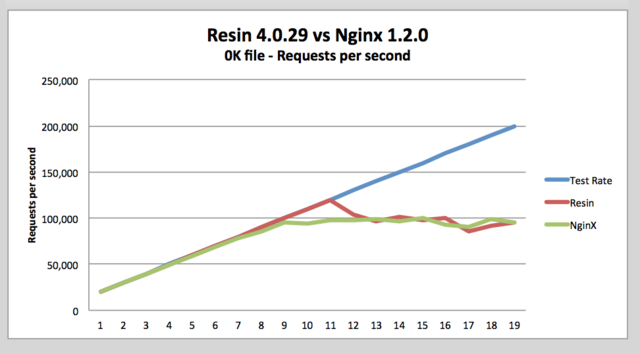
Recently, we decided to spend some extra time improving Resin’s performance and scalability. Since we like challenges, we set a goal of meeting or beating nginx, a fast C-based web server. When working on performance, we use benchmarks to see which proposed changes improve Resin’s performance, and which proposed changes do not. The autobench/httperf benchmark is particularly interesting because it simulates high load rates and exposes scalability issues better than some other benchmarks like ab. After completing the Resin performance work, it turned out that we exceeded our goal and were actually able to beat nginx, and thought we’d share our results.

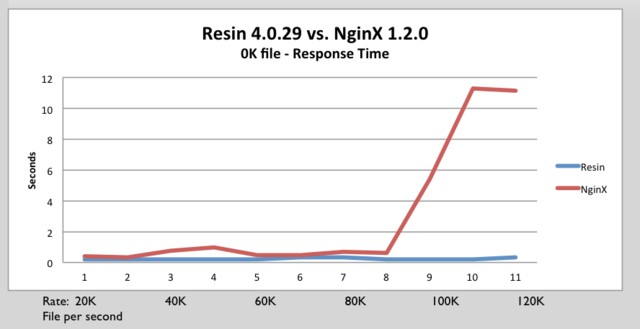
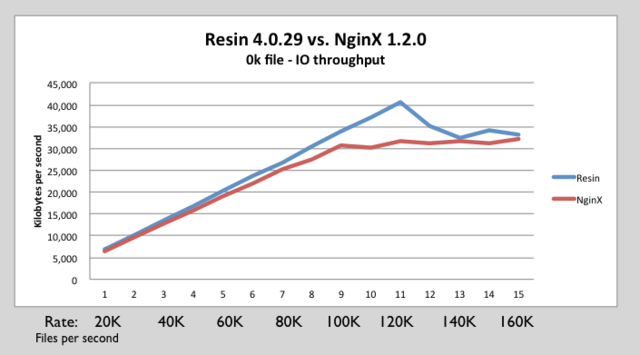
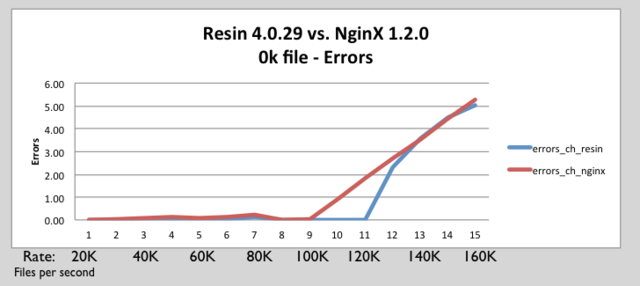
We have recently run some performance benchmarks comparing Resin 4.0.29 versus NginX 1.2.0. These benchmarks show that Resin Pro matches or exceeds NginX’s throughput.

We tested 0k (empty HTML page), 1K, 8K and 64K byte files. At every level Resin matched or exceeded NginX performance.


Contents

Benchmark tools

The benchmark tests used the following tools:

  • httperf
  • AutoBench


httperf

httperf is tool produced by HP for measuring web server performance. The httperf tool supports HTTP/1.1 keepalives and SSL protocols.


AutoBench

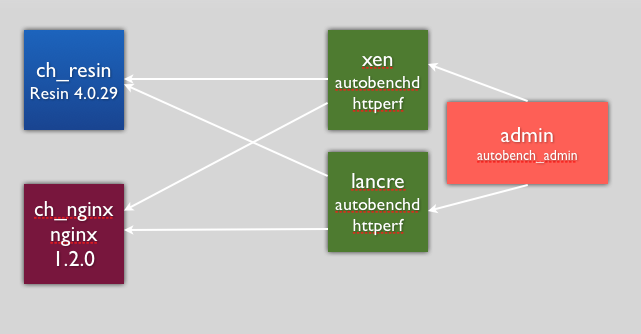
Autobench is a tool for automating the process of performing a comparative benchmark test against two a web servers. Autobench uses httperf. Autobench runs httperf against each host. AutoBench increases the number of requests per seconds on each iteration. AutoBench delivers output in a format that can be easily consumed by spreadsheet tools. AutoBench has a mode where it can drive multiple clients against a set of servers to minimize the possibility of testing your client throughput instead of server throughput. The command autobenchd is used to run a daemon on client machines. The autobench_admincommand drives many clients to run test at same time by communicating with autobenchd.

Setup Overview

Setup benchmark diagram.png

Configuration

The only change that was made was the worker_processes were set to 8 for NginX to improve throughput.

Hardware Software Specifications

Client HW/OS specs:

  • i7 4 core / 8 HT, 2.8 GHZ, 8Meg Cache, 8 GB RAM.
  • Ubuntu 12 / Linux Kernel 3.2.0-26-generic

Server HW specs:

  • i7 4 core / 8 HT, 2.8 GHZ, 8Meg Cache, 8 GB RAM.
  • Ubuntu 12 / Linux Kernel 3.2.0-26-generic

Test software:

  • Autobench 2.1.1
  • httperf 0.9.0

Software under test:

  • Resin Pro 4.0.29
  • nginx 1.2.0

0k test

We want to make sure Resin can handle as many concurrent connections as possible without glitches or blocking. The tiny 0k file is a good test for high concurrency, because it spends less time on network overhead and more time stressing the threading and internal locks. Because we used an 8-core machine, we can be certain that we’re avoiding unnecessary locks or timing problems.

For most sites, the small file stress test simulates heavy ajax use, and small file use. As sites become more interactive, this small file test becomes ever more important.

As a comparison of a threaded Java web server with an event-based C web server, the 0k test is a good test of the threading and event manager dispatch. Because most of the time in the test is establishing a connection or switching between requests at the very highest rate, both the threading and the event management get a tough work-out.

Command Line Arguments

0k.sh

./admin.sh 300000 2000 20000 1000 0k

admin.sh

autobench_admin
--clients xen:4600,lancre:4600
--uri1 /file_$5.html
--host1 ch_resin --port1 8080
--uri2 /file_$5.html
--host2 ch_nginx --port2 80
--num_conn $1
--num_call 10
--low_rate $2
--high_rate $3
--rate_step $4
--timeout 3
--file out_con$1_start$2_end$3_step$4_$5.tsv

Above is used to setup 300,000 connections at a rate of 20,000 to 200,000 requests per second. Each iteration increases the rate by 10,000 from 20,000 to 200,000.

0k html file file_0k.html

 <html> 
 <body>
 <pre></pre>
 </body>
 </html>

0k full Results for 0K test

Resin nginx 0k full2.png

Resin nginx response time.png

Nginx resin 0k IO throughput.png

Nginx resin errors 0k.png


1K test

Command line

1k.sh

./admin.sh 200000 1000 10000 250 1k


admin.sh

autobench_admin
--clients xen.caucho.com:4600,lancre.caucho.com:4600 
--uri1 /file_$5.html
--host1 ch_resin --port1 8080
--uri2 /file_$5.html
--host2 ch_nginx --port2 80
--num_conn $1
--num_call 10
--low_rate $2
--high_rate $3
--rate_step $4
--timeout 3
--file out_con$1_start$2_end$3_step$4_$5.tsv


1k.html

<html>
<body>
<pre>
0 0123456789 0123456789 0123456789 0123456789 0123456789 0123456789 0123456789 0123456789 0123456789 
1 0123456789 0123456789 0123456789 0123456789 0123456789 0123456789 0123456789 0123456789 0123456789 
2 0123456789 0123456789 0123456789 0123456789 0123456789 0123456789 0123456789 0123456789 0123456789 
3 0123456789 0123456789 0123456789 0123456789 0123456789 0123456789 0123456789 0123456789 0123456789 
4 0123456789 0123456789 0123456789 0123456789 0123456789 0123456789 0123456789 0123456789 0123456789 
5 0123456789 0123456789 0123456789 0123456789 0123456789 0123456789 0123456789 0123456789 0123456789 
6 0123456789 0123456789 0123456789 0123456789 0123456789 0123456789 0123456789 0123456789 0123456789 
7 0123456789 0123456789 0123456789 0123456789 0123456789 0123456789 0123456789 0123456789 0123456789 
8 0123456789 0123456789 0123456789 0123456789 0123456789 0123456789 0123456789 0123456789 0123456789 
9 0123456789 0123456789 0123456789 0123456789 0123456789 0123456789 0123456789 0123456789 0123456789 
</pre>
</body> 
</html>

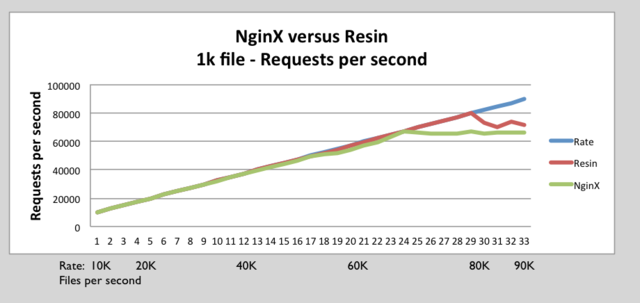
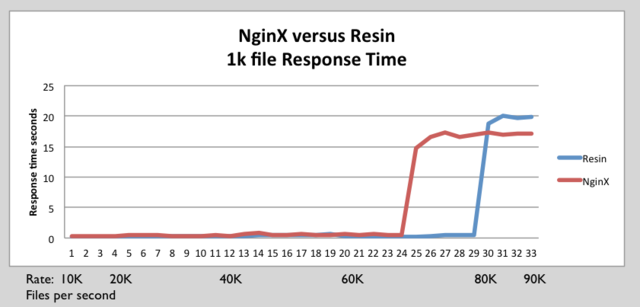
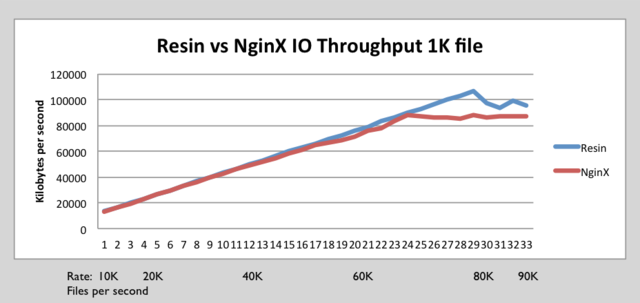
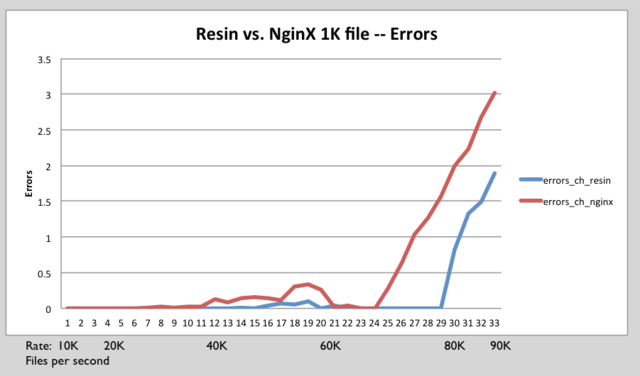
1k full Results for 1K test

Resin nginx 1k requests per second.png

Resin nginx 1k response time.png

Resin nginx IO 1k.png

Resin nginx 1k errors.png

64 K test results

Result

PUT IMAGES HERE

64k.sh

./admin.sh 10 50 1500 50 64k
====admin.sh====
<pre>
autobench_admin
--clients xen.caucho.com:4600,lancre.caucho.com:4600 
--uri1 /file_$5.html
--host1 ch_resin --port1 8080
--uri2 /file_$5.html
--host2 ch_nginx --port2 80
--num_conn $1
--num_call 10
--low_rate $2
--high_rate $3
--rate_step $4
--timeout 3
--file out_con$1_start$2_end$3_step$4_$5.tsv

64 test file

<html>
<body>
<pre>
0
0 0123456789 0123456789 0123456789 0123456789 0123456789 0123456789 0123456789 0123456789 0123456789
1 0123456789 0123456789 0123456789 0123456789 0123456789 0123456789 0123456789 0123456789 0123456789
2 0123456789 0123456789 0123456789 0123456789 0123456789 0123456789 0123456789 0123456789 0123456789
3 0123456789 0123456789 0123456789 0123456789 0123456789 0123456789 0123456789 0123456789 0123456789
4 0123456789 0123456789 0123456789 0123456789 0123456789 0123456789 0123456789 0123456789 0123456789
5 0123456789 0123456789 0123456789 0123456789 0123456789 0123456789 0123456789 0123456789 0123456789
6 0123456789 0123456789 0123456789 0123456789 0123456789 0123456789 0123456789 0123456789 0123456789
7 0123456789 0123456789 0123456789 0123456789 0123456789 0123456789 0123456789 0123456789 0123456789
8 0123456789 0123456789 0123456789 0123456789 0123456789 0123456789 0123456789 0123456789 0123456789
9 0123456789 0123456789 0123456789 0123456789 0123456789 0123456789 0123456789 0123456789 0123456789

[Repeats 63 more times, there are 0-7 blocks repeated 0-7 times]

</pre>
</body>
</html>

kingston sd card vs toshiba sd card

前段時間買了一張kingston class10 32G 的SD card,放在D7000上,發現沒有原來的TOSHIBA CLASS4 8G的速度快,於是就個測試工具測試咗一下,O曬嘴。。。。。。

兩張CARD的前後合照:
TOSHIBA是09年買的,KINGSTON是前天買的;都是MAKE IN JAPAN。

KINGSTON的讀寫測試:

TOSHIAB的讀寫測試:

這說是為什麽KINGSTON這麽便宜的原因了;天下沒有又便又好的東西,別相信什麽 CLASS10標準;然後很多廠家都寫住CLASS10,但實際讀寫速度肯定大打折扣。當然如果你追求是不速度而是容量和價錢,二三線廠家嘅SD CARD是首先。

測試工具:USB Flash Benchmark

Comparing HTML5 Mobile Web Framework

Comparing HTML5 Mobile Web Framework

It’s been an exciting year for the mobile Web. Adoption of HTML5 and CSS3, improved performance in mobile browsers, and an explosion of mobile app frameworks mean it’s more feasible than ever to create rich, interactive Web experiences for mobile devices. Using a wrapper like PhoneGap, you can distribute them via the native app stores for iPhone, iPad, and Android —targeting multiple platforms with a single code-base.

Mobile Web developers have a plethora of frameworks to do the heavy lifting for them: animated transitions, toolbars, buttons, list views, even offline storage. Most of these are new and the landscape is shifting rapidly. I have gone through many of the Mobile web frameworks and compared and analyzed them. And here is something what I found:

jQTouch is easy to use and relatively well-documented. It’s featured in the excellentBuilding iPhone Apps with HTML, CSS, and JavaScript. jQTouch takes a progressive-enhancement approach, building an iPhone-like experience on top of your appropriately-constructed HTML. It’s simple, providing a basic set of widgets and animations and just enough programmatic control to permit more dynamic behavior.

But even in my simple test app there were performance issues. Page transitions can be jumpy or missing, and there are periodic delays in responding to tap events. And while the project is technically active, the original author has moved on and development seems to have slowed.

jQTouch is available under the permissive MIT License, one of my favorite open source licenses.

jQuery Mobile was the new kid on the block. Announced in August 2010, it’s quickly progressed to a very functional Alpha 2 and now on February 28 it comes with a JQM 1.1.0. It takes a similar – but more standards-compliant – approach to jQTouch and feels very much like that framework’s successor, with a broader array of UI controls and styles.

jQuery Mobile’s performance is variable (though better than that of jQTouch), particularly in responding to tap events rendering animations. It also lacks a small number of key programmatic hooks that would permit easy creation of more dynamic apps. For instance, there’s an event that triggers when a page is about to load (i.e. slide into view) but no way to tell the associated handler code what UI element resulted in the page switch, or to pass additional information to that handler. I was able to create workarounds but hope that future versions will take a cue from jQTouch and build out this functionality a little more.

In the 2011 end and the starting of 2012 the JQM catched the eye of lot of web geeks. And it is the most improving framework in the Mobile Web industry.

jQuery Mobile is available under either the MIT or the GPL2 license.

Sencha Touch is the mobile counterpart to the Ext JS framework. Its approach differs significantly from jQTouch and jQuery Mobile: instead of enhancing preexisting HTML, it generates its own DOM based on objects created in JavaScript. As such, working with Sencha feels a little less “webby” and a little more like building apps in other technologies like Java or Flex. (It’s also a bit more like YUI than like jQuery.) I personally prefer the progressive enhancement approach, but it really is a matter of preference.

Sencha is far more extensive than its competitors, with a vast array of UI components, explicit iPad support, storage and data binding facilities using JSON and HTML5 offline storage, and more. (It’s very cool to manipulate app data in one of Sencha’s data structures and watch the corresponding list update in real time.) It’s also the only Web framework I’ve seen with built-in support for objects that stay put (like a toolbar) while others scroll (like a list).

For all that apparent extra weight, Sencha performed noticeably better and more reliably than either jQTouch or jQuery Mobile in my tests, with the exception of initial load time.

When working with a library or framework, it’s usually counterproductive to “fight the framework” and do things your own way. Given how extensive Sencha Touch is, that means your app will probably end up doing just about everything the Sencha way. I’d originally usedWebKit’s built-in SQLite database for offline storage but ultimately eliminated both complexity and bugs by moving that functionality into Sencha’s data stores.

The documentation, while extensive, has odd holes. Between those and the sheer size of the framework, I spent a lot of time fighting bugs that were difficult to trace and to understand. Responses to my questions in the developer forums were more frequent and helpful than with the other frameworks, but still ultimately insufficient. Sencha provides paid support starting at $300/year; I strongly considered purchasing it but oddly, their response to my sales support inquiries was incredibly underwhelming given my interest in sending them money.

Sencha Touch is available under the GPL3; under a somewhat confusing set of exceptions to the GPL that seem similar to the LGPL; or under a free commercial license.

Much like Sencha Touch, Appcelerator’s Titanium Mobile allows you to write apps using a JavaScript API. But unlike Sencha, it compiles most of your code into a native iPhone or Android app. That means it isn’t really a Web framework, but a compatibility layer or compiler. (Note that its cousin Titanium Desktop is Web-based, allowing you to write HTML/JS applications that run inside a native wrapper on the desktop.)

So Titanium allows Web developers to produce high-performance, easily skinnable native apps using JavaScript and a little XML, i.e. without learning Objective-C or Cocoa Touch. My simple test app blew away the true Web frameworks in terms of performance, and wasn’t much harder to put together.

But that advantage is also its greatest disadvantage: you can only target the platforms Titanium supports, and you’re tied to their developer tools. As if to prove this point, my test app quickly got into a state where it wouldn’t launch on the iPhone. Titanium doesn’t include much of a debugger; Titanium projects can’t be run and debugged in XCode; and it ran fine in the simulator, leaving me with no real way to attack the problem.

Rebuilding my app on three of these four frameworks was tedious but educational. I like jQTouch but have trouble believing it will evolve much from here. I’m rooting for jQuery Mobile for its simplicity and its very Web-centric approach to development…but it lacks a few key features and doesn’t perform as well as Sencha Touch.

It’s unfair to compare an Alpha 2 product with a 1.0 one, except in one respect: I need something now. Which brings me to Sencha Touch. I was initially impressed with its performance and breadth, but put off by its development style. As I’ve dug in, the holes in its documentation have been frustrating but the breadth has continued to impress me, and I’ve gotten more used to the coding style. The option for paid support is tempting, and I’d probably buy it if they’d answer my emails. But for now, Pints is a Sencha-based app.

I haven’t answered the big question: can a Web-based app really hold its own alongside native apps? And if so, are the challenges of getting it there worth the benefit of a single codebase?

The answer is YES ! Because the Web-based apps needs the core knowledge of HTML5 and CSS3.
Asterisk

Asterisk是一款实现电话用户交换机(PBX)功能的自由软件、开源软件。Asterisk提供完善PBX功能,可以连接多种不同的电话终端,包括普通电话机,IP电话机,软电话等,支持多种主流的IP电话协议和系统接口。软件名称Asterisk-星号(*),在Unix(包括Linux)和DOS操作系统中是通配符,用来在查找中适配任何字符,寓意该软件广泛的适用性。
Asterisk软件提供很多以前只有昂贵的专业PBX系统才支持的功能,比如:语音信箱,会议电话,交互式语音应答和自动电话转接等。由于该软件开放的性质,用户可以灵活的配置方便的扩展系统的功能,甚至编程开发自己所需功能的模块。Asterisk通常都运行在Linux操作系统下,当然它也可以在其他系统,如BSD,Windows或OS X下编译并安装。
Asterisk服务器不需要任何特殊的硬件即可提供VoIP的服务,只需服务器有网络连接即可。它支持主流VoIP协议,包括会话发起协议(SIP)、H.323,既可作为IP电话服务器也可以作IP电话和PSTN之间的转接。Asterisk系统还设计了一个新协议,IAX,用于在Asterisk服务器之间维护话路通道。如果需要连接普通电话或PSTN中继线,运行Asterisk的服务器则需要安装相应的硬件接口板。许多厂商都生产用于连接普通电话、T1、E1中继线、ISDN等的接口板。
由于是自由软件且具有丰富的系统功能,Asterisk提供给用户一个廉价并功能强大的PBX解决方案。它被越来越多的用于代替传统专用的PBX,或被用于跨国VoIP电话以节省长途费用。一些国家的VoIP电话公司已经开始支持Asterisk,提供IAX2接口或允许用户的Asterisk服务器使用SIP协议连接。
截止2010年10月28日,Asterisk的最新版本是1.8.0版。
由于Asterisk过于专业,所以目前也存在大量的基于Asterisk开发的容易使用的通信系统,比如在欧美比较流行的elastix、trixbox、或以中文为基础的Freeiris等。


初步试用Squid的替代产品──Varnish Cache网站加速器

Varnish是一款高性能的开源HTTP加速器,挪威最大的在线报纸 Verdens Gang (vg.no) 使用3台Varnish代替了原来的12台squid,性能比以前更好。

Varnish的作者Poul-Henning Kamp是FreeBSD的内核开发者之一,他认为现在的计算机比起1975年已经复杂许多。在1975年时,储存媒介只有两种:内存与硬盘。但现在计算机系统的内存除了主存外,还包括了cpu内的L1、L2,甚至有L3快取。硬盘上也有自己的快取装置,因此squid cache自行处理物件替换的架构不可能得知这些情况而做到最佳化,但操作系统可以得知这些情况,所以这部份的工作应该交给操作系统处理,这就是Varnish cache设计架构。

Varnish可以在FreeBSD 6.0和Linux 2.6内核上运行。

1、编译安装varnish HTTP加速器:

引用
wget http://blog.s135.com/soft/linux/varnish/varnish-1.1.1.tar.gz
tar zxvf varnish-1.1.1.tar.gz
cd varnish-1.1.1
./configure –prefix=/usr/local/varnish
make && make install

2、简单启动varnish守护进程,用本机80端口去反向代理加速127.0.0.1:81上的Apache服务器:

引用
/usr/local/varnish/sbin/varnishd -a :8080 -b 127.0.0.1:81 -p thread_pool_max=1500 -p thread_pools=5 -p listen_depth=512 -p client_http11=on -w 1,10000,120

Varnish官方网站:http://www.varnish-cache.org/

另有一份PDF文档,说明Varnish原理的:http://ishare.iask.sina.com.cn/cgi-bin/fileid.cgi?fileid=2163384

我测试了一下,在同等配置环境下,Varnish的性能确实要超过Squid,稳定性也不错,值得继续去深入研究。


原文地址:http://blog.s135.com/post/290/

使用Varnish代替Squid做网站缓存加速器的详细解决方案

今天写的这篇关于Varnish的文章,已经是一篇可以完全替代Squid做网站缓存加速器的详细解决方案了。网上关于Varnish的资料很少,中文资料更是微乎其微,希望本文能够吸引更多的人研究、使用Varnish。
在我看来,使用Varnish代替Squid的理由有三点:
1、Varnish采用了“Visual Page Cache”技术,在内存的利用上,Varnish比Squid具有优势,它避免了Squid频繁在内存、磁盘中交换文件,性能要比Squid高。
2、Varnish的稳定性还不错,我管理的一台图片服务器运行Varnish已经有一个月,没有发生过故障,而进行相同工作的Squid服务器就倒过几次。
3、通过Varnish管理端口,可以使用正则表达式快速、批量地清除部分缓存,这一点是Squid不能具备的。

点击在新窗口中浏览此图片


下面来安装Varnish网站缓存加速器(Linux系统):
1、创建www用户和组,以及Varnish缓存文件存放目录(/var/vcache):

/usr/sbin/groupadd www -g 48
/usr/sbin/useradd -u 48 -g www www
mkdir -p /var/vcache
chmod +w /var/vcache
chown -R www:www /var/vcache

2、创建Varnish日志目录(/var/logs/):

mkdir -p /var/logs
chmod +w /var/logs
chown -R www:www /var/logs

3、编译安装varnish:

wget http://blog.s135.com/soft/linux/varnish/varnish-1.1.2.tar.gz
tar zxvf varnish-1.1.2.tar.gz
cd varnish-1.1.2
./configure –prefix=/usr/local/varnish
make && make install

4、创建Varnish配置文件:

vi /usr/local/varnish/vcl.conf

输入以下内容:

引用
backend myblogserver {
set backend.host = “192.168.0.5”;
set backend.port = “80”;
}

acl purge {
“localhost”;
“127.0.0.1”;
“192.168.1.0”/24;
}

sub vcl_recv {
if (req.request == “PURGE”) {
if (!client.ip ~ purge) {
error 405 “Not allowed.”;
}
lookup;
}

if (req.http.host ~ “^blog.s135.com”) {
set req.backend = myblogserver;
if (req.request != “GET” && req.request != “HEAD”) {
pipe;
}
else {
lookup;
}
}
else {
error 404 “Zhang Yan Cache Server”;
lookup;
}
}

sub vcl_hit {
if (req.request == “PURGE”) {
set obj.ttl = 0s;
error 200 “Purged.”;
}
}

sub vcl_miss {
if (req.request == “PURGE”) {
error 404 “Not in cache.”;
}
}

sub vcl_fetch {
if (req.request == “GET” && req.url ~ “\.(txt|js)$”) {
set obj.ttl = 3600s;
}
else {
set obj.ttl = 30d;
}
}

这里,我对这段配置文件解释一下:
(1)、Varnish通过反向代理请求后端IP为192.168.0.5,端口为80的web服务器;
(2)、Varnish允许localhost、127.0.0.1、192.168.0.***三个来源IP通过PURGE方法清除缓存;
(3)、Varnish对域名为blog.s135.com的请求进行处理,非blog.s135.com域名的请求则返回“Zhang Yan Cache Server”;
(4)、Varnish对HTTP协议中的GET、HEAD请求进行缓存,对POST请求透过,让其直接访问后端Web服务器。之所以这样配置,是因为POST请求一般是发送数据给服务器的,需要服务器接收、处理,所以不缓存;
(5)、Varnish对以.txt和.js结尾的URL缓存时间设置1小时,对其他的URL缓存时间设置为30天。

5、启动Varnish

ulimit -SHn 51200
/usr/local/varnish/sbin/varnishd -n /var/vcache -f /usr/local/varnish/vcl.conf -a 0.0.0.0:80 -s file,/var/vcache/varnish_cache.data,1G -g www -u www -w 30000,51200,10 -T 127.0.0.1:3500 -p client_http11=on

6、启动varnishncsa用来将Varnish访问日志写入日志文件:

/usr/local/varnish/bin/varnishncsa -n /var/vcache -w /var/logs/varnish.log &

7、配置开机自动启动Varnish

vi /etc/rc.local

在末尾增加以下内容:

引用
ulimit -SHn 51200
/usr/local/varnish/sbin/varnishd -n /var/vcache -f /usr/local/varnish/vcl.conf -a 0.0.0.0:80 -s file,/var/vcache/varnish_cache.data,1G -g www -u www -w 30000,51200,10 -T 127.0.0.1:3500 -p client_http11=on
/usr/local/varnish/bin/varnishncsa -n /var/vcache -w /var/logs/youvideo.log &

8、优化Linux内核参数

vi /etc/sysctl.conf

在末尾增加以下内容:

引用
net.ipv4.tcp_fin_timeout = 30
net.ipv4.tcp_keepalive_time = 300
net.ipv4.tcp_syncookies = 1
net.ipv4.tcp_tw_reuse = 1
net.ipv4.tcp_tw_recycle = 1
net.ipv4.ip_local_port_range = 5000    65000


再看看如何管理Varnish:
1、查看Varnish服务器连接数与命中率:

/usr/local/varnish/bin/varnishstat

点击在新窗口中浏览此图片

2、通过Varnish管理端口进行管理:
用help看看可以使用哪些Varnish命令:

/usr/local/varnish/bin/varnishadm -T 127.0.0.1:3500 help


引用
Available commands:
ping [timestamp]
status
start
stop
stats
vcl.load
vcl.inline
vcl.use
vcl.discard
vcl.list
vcl.show
param.show [-l] []
param.set
help [command]
url.purge
dump.pool

3、通过Varnish管理端口,使用正则表达式批量清除缓存:
(1)、例:清除类似http://blog.s135.com/a/zhangyan.html的URL地址):

/usr/local/varnish/bin/varnishadm -T 127.0.0.1:3500 url.purge /a/

(2)、例:清除类似http://blog.s135.com/tech的URL地址:

/usr/local/varnish/bin/varnishadm -T 127.0.0.1:3500 url.purge w*$

(3)、例:清除所有缓存:

/usr/local/varnish/bin/varnishadm -T 127.0.0.1:3500 url.purge *$

4、一个清除Squid缓存的PHP函数(清除Varnish缓存同样可以使用该函数,无需作任何修改,十分方便):

  1. <?php
  2. function purge($ip, $url)
  3. {
  4.     $errstr = ”;
  5.     $errno = ”;
  6.     $fp = fsockopen ($ip, 80, $errno, $errstr, 2);
  7.     if (!$fp)
  8.     {
  9.          return false;
  10.     }
  11.     else
  12.     {
  13.         $out = “PURGE $url HTTP/1.1\r\n”;
  14.         $out .= “Host:blog.s135.com\r\n”;
  15.         $out .= “Connection: close\r\n\r\n”;
  16.         fputs ($fp, $out);
  17.         $out = fgets($fp , 4096);
  18.         fclose ($fp);
  19.         return true;
  20.     }
  21. }
  22. purge(“192.168.0.4”, “/index.php”);
  23. ?>

附1:Varnish官方网站:http://www.varnish-cache.org/

附2:2007年12月10日,我写了一个每天0点运行,按天切割Varnish日志,生成一个压缩文件,同时删除上个月旧日志的脚本(/var/logs/cutlog.sh):
/var/logs/cutlog.sh文件内容如下:

引用
#!/bin/sh
# This file run at 00:00
date=$(date -d “yesterday” +”%Y-%m-%d”)
pkill -9 varnishncsa
mv /var/logs/youvideo.log /var/logs/${date}.log
/usr/local/varnish/bin/varnishncsa -n /var/vcache -w /var/logs/youvideo.log &
mkdir -p /var/logs/youvideo/
gzip -c /var/logs/${date}.log > /var/logs/youvideo/${date}.log.gz
rm -f /var/logs/${date}.log
rm -f /var/logs/youvideo/$(date -d “-1 month” +”%Y-%m*”).log.gz

设置在每天00:00定时执行:

/usr/bin/crontab -e

或者

vi /var/spool/cron/root

输入以下内容:

引用
0 0 * * * /bin/sh /var/logs/cutlog.sh


原文地址:http://blog.s135.com/post/313/

Android多线程断点续传下载文件类设计

对于Android平台,很多网友可能考虑开发一个软件商店,对于Android平台上如何实现断点续传操作呢? 这里给大家一些思路和原理的介绍,同时在Android手机上要考虑的一些事情。

1. 流量控制,获取运营商的接入方式,比如说使用移动网络接入,尽可能的提示用户切换WiFi或提示,限制下载的流量以节省话费。

2. 屏幕锁控制,屏幕锁屏后导致应用会被挂起,当然Android提供了PowerManager.WakeLock来控制。

3. 对于断点续传,这要追溯到Http 1.1的特性了,主要是获取文件大小,如果这个无法读取的话,那么就无法断点续传了只能使用chunked模式了,当然获取远程服务器上文件的大小可以通过Http的响应头查找Content-Length。

4. 获取上次文件的更改时间,对于断点续传来说比较有风险的就是 继续下载的文件和早期下载的在server上有变动,这将会导致续传时下载的文件版本和原始的不同,一般有两种解决方法,早期我们配置服务器时通过Last-Modified这个http header获取文件上次修改时间,不过本次Android开发网推荐使用更为强大的ETag,ETag一般用于解决同一个URL处理不同返回相应,比如Session认证,多国语言,以及部分黑帽的SEO中。具体的实现大家可以参考RFC文档。

5. 考虑服务器的3xx的返回,对于专业的下载文件服务器会考虑到负载平衡问题,这就涉及到重定向问题,处理重定向使用Android的Apache库处理比较好。

6. 至于多线程,这里CWJ提示大家可能存在独立的线程下载一个文件,和多个线程分块下载单个文件之分,其中后者需要考虑上次下载数据是否存在问题,同时如果服务器不支持文件大小获取,则无法通过分段下载数据,因为不知道如何分段,所以在chunked模式中,只能使用一个线程下载一个文件,而不是多个线程下载一个文件。

7. 下载后的数据效验,可以考虑CRC等方式,当然对于一般的传输只要逻辑不出现问题,基本上不会有偏差。

8. 考虑DRM问题,这个问题在国内用的比较少,而国外的受数字保护的音乐和视频,需要额外的获取证书等。

9. 重试次数,对于一个文件可能在本次网络传输中受到问题,尤其是移动网络,所以可以设置一定的重试次数,让任务单独的走下去。

10. 线程开发方式,这里如果你的Java基础比较好,推荐直接使用Java并发库API比较好,如果过去只做过Java开发使用Thread即可,如果Java技术不过关可以Android封装的AsyncTask。

原文地址:http://www.android123.com.cn/androidkaifa/932.html

浏览器与服务器交互原理以及用java模拟浏览器操作

* 1,在HTTP的WEB应用中, 应用客户端和服务器之间的状态是通过Session来维持的, 而Session的本质就是Cookie,
* 简单的讲,当浏览器向服务器发送Http请求的时候, HTTP服务器会产生一个SessionID,这个SessionID就唯一的标识了一个客户端到服务器的请求会话过程.
* 就如同一次会议开始时,主办方给每位到场的嘉宾一个临时的编号胸牌一样, 可以通过这个编号记录每个嘉宾(客户端)的活动(请求状态).
* 为了保持这个状态, 当服务端向客户端回应的时候,会附带Cookie信息,当然,Cookie里面就包含了SessionID
* 客户端在执行一系列操作时向服务端发送请求时,也会带上这个SessionID, 一般来说,Session也是一个URL QueryParameter ,就是说,session可以以Key-Value的形式通过URL传递
* 比如,http://www.51etest.com/dede/login.php?PHPSESSIONID=7dg3dsf19SDf73wqc32fdsf
* 一般而言,浏览器会自动把此Session信息放入Header报文体中进行传递.
* 如果浏览器不支持Cookie,那么,浏览器会自动把SessionID附加到URL中去.
*
* 2,在这个例子中,以登陆这个功能点进行讲解.
* 首先,我们登陆的页面是http://www.51etest.com/dede, 我们第一次访问这个页面后,可以从服务器过来的Http Response报文中的Header中找出服务器与浏览器向关联的数据 — Cookie,
* 而且Session的值也在Cookie中. 于是,我们可以通过分析Set-Cookie这个Header中的参数的值,找到Seesion的Key-Value段.
* 然后,我们再向服务器发送请求,请求URL为:post@@http://www.51etest.com/dede/login.php@@userid=admin&pwd=tidus2005&gotopage=/dede/&dopost=login
* 服务器验证登陆成功了, 并且在此次会话变量中增加了我们登陆成功的标识.
*
* 3,增加一个广告定义
* 增加一个广告定义其实就是一个添加数据的过程,无非是我们把我们要添加的数据通过参数的形式告诉指定url页面,页面获取后添加到数据库去而已.
* 此url地址为:
* post@@http://www.51etest.com/dede/ad_add.php@@dopost=save&tagname=test&typeid=0&adname=test&starttime=2008-05-29
* 因为这个页面会先判断我是否登陆
* 而判断的依据,前面讲了,就是根据我请求时的SessionID找到指定的Session数据区中是否存在我的登陆信息,
* 所以我当然要把访问登陆页面时获取的SessionID原封不动的再发回去
* 相当于对服务器说,这是我刚刚来时,你发我的临时身份证,我现在可以形势我的权利。
*
* 这就是整个Java后台登陆网站,然后添加数据的过程。

 
/** 
 *  
 */ 
package sky.dong.test; 
 
import java.io.BufferedReader; 
import java.io.InputStreamReader; 
 
import org.apache.commons.httpclient.Cookie; 
import org.apache.commons.httpclient.Header; 
import org.apache.commons.httpclient.HttpClient; 
import org.apache.commons.httpclient.NameValuePair; 
import org.apache.commons.httpclient.cookie.CookiePolicy; 
import org.apache.commons.httpclient.methods.PostMethod; 
import org.apache.commons.httpclient.params.HttpMethodParams; 
 
/** 
 * @author 核弹头 
 * Email:[email protected] 版权所有 盗版必究 
 * @since 2009-8-11 
 * @version 1.0 
 */ 
public class HttpLoginTest { 
 
    public static void main(String[] args) { 
        String url = "http://discuzdemo.c88.53dns.com/logging.php?action=login&loginsubmit=yes&floatlogin=yes";//论坛的登陆页面 
        String url2="http://discuzdemo.c88.53dns.com/post.php?infloat=yes&action=newthread&fid=2&extra=&topicsubmit=yes&inajax=1";//论坛的发贴页面 
        HttpClient httpClient = new HttpClient(); 
        //httpClient.getHostConfiguration().setProxy("222.247.62.195", 8080); 
        httpClient.getParams().setCookiePolicy( 
                CookiePolicy.BROWSER_COMPATIBILITY); 
        PostMethod postMethod = new PostMethod(url); 
        PostMethod postMethod2 = new PostMethod(url2); 
        NameValuePair[] data = { 
                new NameValuePair("username", "123"), 
                new NameValuePair("referer", 
                        "http://discuzdemo.c88.53dns.com/index.php"), 
                new NameValuePair("password", "123"), 
                new NameValuePair("loginfield", "username"), 
                new NameValuePair("questionid", "0"), 
                new NameValuePair("formhash", "fc922ca7") }; 
        postMethod.setRequestHeader("Referer", 
                "http://discuzdemo.c88.53dns.com/index.php"); 
        postMethod.setRequestHeader("Host", "discuzdemo.c88.53dns.com"); 
        // postMethod.setRequestHeader("Connection", "keep-alive"); 
        // postMethod.setRequestHeader("Cookie", "jbu_oldtopics=D123D; 
        // jbu_fid2=1249912623; smile=1D1; jbu_onlineusernum=2; 
        // jbu_sid=amveZM"); 
        postMethod 
                .setRequestHeader( 
                        "User-Agent", 
                        "Mozilla/5.0 (Windows; U; Windows NT 5.1; zh-CN; rv:1.9.1.2) Gecko/20090729 Firefox/3.5.2"); 
        postMethod 
                .setRequestHeader("Accept", 
                        "text/html,application/xhtml+xml,application/xml;q=0.9,*/*;q=0.8"); 
        // postMethod.setRequestHeader("Accept-Encoding", "gzip,deflate"); 
        // postMethod.setRequestHeader("Accept-Language", "zh-cn"); 
        // postMethod.setRequestHeader("Accept-Charset", 
        // "GB2312,utf-8;q=0.7,*;q=0.7"); 
        postMethod.setRequestBody(data); 
        try { 
            httpClient.executeMethod(postMethod); 
            StringBuffer response = new StringBuffer(); 
            BufferedReader reader = new BufferedReader(new InputStreamReader( 
                    postMethod.getResponseBodyAsStream(), "gb2312"));//以gb2312编码方式打印从服务器端返回的请求 
            String line; 
            while ((line = reader.readLine()) != null) { 
                response.append(line).append( 
                        System.getProperty("line.separator")); 
            } 
            reader.close(); 
            Header header = postMethod.getResponseHeader("Set-Cookie"); 
            Cookie[] cookies=httpClient.getState().getCookies();//取出登陆成功后,服务器返回的cookies信息,里面保存了服务器端给的“临时证” 
            String tmpcookies=""; 
            for(Cookie c:cookies){ 
                tmpcookies=tmpcookies+c.toString()+";"; 
                System.out.println(c); 
            } 
            System.out.println(tmpcookies); 
//            System.out.println(header.getValue()); 
            System.out.println(response); 
            NameValuePair[] data2 = { 
                    new NameValuePair("subject", "测试自动发贴"), 
                    new NameValuePair("message", 
                            "能否发贴成功呢?测试一下就知道了"), 
                    new NameValuePair("updateswfattach", "0"), 
                    new NameValuePair("wysiwyg", "0"), 
                    new NameValuePair("checkbox", "0"), 
                    new NameValuePair("handlekey", "newthread"), 
                    new NameValuePair("formhash", "885493ec") }; 
            postMethod2.setRequestHeader("cookie",tmpcookies);//将“临时证明”放入下一次的发贴请求操作中 
            postMethod2.getParams().setParameter(HttpMethodParams.HTTP_CONTENT_CHARSET, "gbk");//因为发贴时候有中文,设置一下请求编码 
            postMethod2.setRequestHeader("Referer", 
                    "http://discuzdemo.c88.53dns.com/forumdisplay.php?fid=4"); 
            postMethod2.setRequestHeader("Host", "discuzdemo.c88.53dns.com"); 
            // postMethod.setRequestHeader("Connection", "keep-alive"); 
            // postMethod.setRequestHeader("Cookie", "jbu_oldtopics=D123D; 
            // jbu_fid2=1249912623; smile=1D1; jbu_onlineusernum=2; 
            // jbu_sid=amveZM"); 
            postMethod2 
                    .setRequestHeader( 
                            "User-Agent", 
                            "Mozilla/5.0 (Windows; U; Windows NT 5.1; zh-CN; rv:1.9.1.2) Gecko/20090729 Firefox/3.5.2"); 
            postMethod2 
                    .setRequestHeader("Accept", 
                            "text/html,application/xhtml+xml,application/xml;q=0.9,*/*;q=0.8");//以上操作是模拟浏览器的操作,使用服务器混淆 
             
            postMethod2.setRequestBody(data2); 
            httpClient.executeMethod(postMethod2); 
            StringBuffer response1 = new StringBuffer(); 
            BufferedReader reader1 = new BufferedReader(new InputStreamReader( 
                    postMethod2.getResponseBodyAsStream(), "gb2312")); 
            String line1; 
            while ((line1 = reader1.readLine()) != null) { 
                response1.append(line1).append( 
                        System.getProperty("line.separator")); 
            } 
            reader1.close(); 
            System.out.println(response1); 
        } catch (Exception e) { 
            System.out.println(e.getMessage()); 
            // TODO: handle exception 
        } finally { 
            postMethod.releaseConnection(); 
            postMethod2.releaseConnection(); 
        } 
 
    } 
 
} 
 

以上代码完成一个登陆论坛后在指定的版块自动发贴的功能