性能提升1000+倍。
原理是使用df 代替du,
wget https://www.strongd.net/dl/hadoop-common-2.8.1.jar -C /usr/local/hadoop-2.8.1/share/hadoop/common/
wget https://www.strongd.net/dl/mydu -C /usr/bin/
chmod a+x /usr/bin/mydu
然后重启hadoop就可以了。
性能提升1000+倍。
原理是使用df 代替du,
wget https://www.strongd.net/dl/hadoop-common-2.8.1.jar -C /usr/local/hadoop-2.8.1/share/hadoop/common/
wget https://www.strongd.net/dl/mydu -C /usr/bin/
chmod a+x /usr/bin/mydu
然后重启hadoop就可以了。
云实验室云主机自动使用root账户登录系统,因此本教程中所有的操作都是以root用户来执行的。若要在自己的云主机上进行本教程的实验,为了系统安全,建议新建一个账户登录后再进行后续操作。
任务时间:1min ~ 5min
安装SSH:
sudo yum install openssh-clients openssh-server
安装完成后,可以使用下面命令进行测试:
ssh localhost
输入root账户的密码,如果可以正常登录,则说明SSH安装没有问题。测试正常后使用exit命令退出ssh。
任务时间:5min ~ 10min
使用yum来安装1.7版本OpenJDK:
sudo yum install java-1.7.0-openjdk java-1.7.0-openjdk-devel
安装完成后,输入java和javac命令,如果能输出对应的命令帮助,则表明jdk已正确安装。
执行命令:
编辑 ~/.bashrc,在结尾追加:
export JAVA_HOME=/usr/lib/jvm/java-1.7.0-openjdk
保存文件后执行下面命令使JAVA_HOME环境变量生效:
source ~/.bashrc
为了检测系统中JAVA环境是否已经正确配置并生效,可以分别执行下面命令:
java -version
$JAVA_HOME/bin/java -version
若两条命令输出的结果一致,且都为我们前面安装的openjdk-1.7.0的版本,则表明JDK环境已经正确安装并配置。
任务时间:10min ~ 15min
本教程使用hadoop-2.7版本,使用wget工具在线下载(注:本教程是从清华大学的镜像源下载,如果下载失败或报错,可以自己在网上找到国内其他一个镜像源下载2.7版本的hadoop即可):
wget https://mirrors.tuna.tsinghua.edu.cn/apache/hadoop/common/hadoop-2.7.4/hadoop-2.7.4.tar.gz
将Hadoop安装到/usr/local目录下:
tar -zxf hadoop-2.7.4.tar.gz -C /usr/local
对安装的目录进行重命名,便于后续操作方便:
cd /usr/local
mv ./hadoop-2.7.4/ ./hadoop
检查Hadoop是否已经正确安装:
/usr/local/hadoop/bin/hadoop version
如果成功输出hadoop的版本信息,表明hadoop已经成功安装。
任务时间:15min ~ 30min
Hadoop伪分布式模式使用多个守护线程模拟分布的伪分布运行模式。
编辑 ~/.bashrc,在结尾追加如下内容:
export HADOOP_HOME=/usr/local/hadoop
export HADOOP_INSTALL=$HADOOP_HOME
export HADOOP_MAPRED_HOME=$HADOOP_HOME
export HADOOP_COMMON_HOME=$HADOOP_HOME
export HADOOP_HDFS_HOME=$HADOOP_HOME
export YARN_HOME=$HADOOP_HOME
export HADOOP_COMMON_LIB_NATIVE_DIR=$HADOOP_HOME/lib/native
export PATH=$PATH:$HADOOP_HOME/sbin:$HADOOP_HOME/bin
使Hadoop环境变量配置生效:
source ~/.bashrc
Hadoop的配置文件位于安装目录的/etc/hadoop目录下,在本教程中即位于/url/local/hadoop/etc/hadoop目录下,需要修改的配置文件为如下两个:
/usr/local/hadoop/etc/hadoop/core-site.xml
/usr/local/hadoop/etc/hadoop/hdfs-site.xml
编辑 core-site.xml,修改<configuration></configuration>节点的内容为如下所示:
<configuration>
    <property>
        <name>hadoop.tmp.dir</name>
        <value>file:/usr/local/hadoop/tmp</value>
        <description>location to store temporary files</description>
    </property>
    <property>
        <name>fs.defaultFS</name>
        <value>hdfs://localhost:9000</value>
    </property>
</configuration>
同理,编辑 hdfs-site.xml,修改<configuration></configuration>节点的内容为如下所示:
<configuration>
    <property>
        <name>dfs.replication</name>
        <value>1</value>
    </property>
    <property>
        <name>dfs.namenode.name.dir</name>
        <value>file:/usr/local/hadoop/tmp/dfs/name</value>
    </property>
    <property>
        <name>dfs.datanode.data.dir</name>
        <value>file:/usr/local/hadoop/tmp/dfs/data</value>
    </property>
</configuration>
格式化NameNode:
/usr/local/hadoop/bin/hdfs namenode -format
在输出信息中看到如下信息,则表示格式化成功:
Storage directory /usr/local/hadoop/tmp/dfs/name has been successfully formatted.
Exiting with status 0
启动NameNode和DataNode进程:
/usr/local/hadoop/sbin/start-dfs.sh
执行过程中会提示输入用户密码,输入root用户密码即可。另外,启动时ssh会显示警告提示是否继续连接,输入yes即可。
检查 NameNode 和 DataNode 是否正常启动:
jps
如果NameNode和DataNode已经正常启动,会显示NameNode、DataNode和SecondaryNameNode的进程信息:
[hadoop@VM_80_152_centos ~]$ jps
3689 SecondaryNameNode
3520 DataNode
3800 Jps
3393 NameNode
任务时间:10min ~ 20min
Hadoop自带了丰富的例子,包括 wordcount、grep、sort 等。下面我们将以grep例子为教程,输入一批文件,从中筛选出符合正则表达式dfs[a-z.]+的单词并统计出现的次数。
Hadoop 附带了丰富的例子, 执行下面命令可以查看:
cd /usr/local/hadoop
./bin/hadoop jar ./share/hadoop/mapreduce/hadoop-mapreduce-examples-2.7.4.jar
在 HDFS 中创建用户目录 hadoop:
/usr/local/hadoop/bin/hdfs dfs -mkdir -p /user/hadoop
本教程中,我们将以 Hadoop 所有的 xml 配置文件作为输入数据来完成实验。执行下面命令在 HDFS 中新建一个 input 文件夹并将 hadoop 配置文件上传到该文件夹下:
cd /usr/local/hadoop
./bin/hdfs dfs -mkdir /user/hadoop/input
./bin/hdfs dfs -put ./etc/hadoop/*.xml /user/hadoop/input
使用下面命令可以查看刚刚上传到 HDFS 的文件:
/usr/local/hadoop/bin/hdfs dfs -ls /user/hadoop/input
运行实验:
cd /usr/local/hadoop
./bin/hadoop jar ./share/hadoop/mapreduce/hadoop-mapreduce-examples-2.7.4.jar grep /user/hadoop/input /user/hadoop/output 'dfs[a-z.]+'
上述命令以 HDFS 文件系统中的 input 为输入数据来运行 Hadoop 自带的 grep 程序,提取其中符合正则表达式 dfs[a-z.]+ 的数据并进行次数统计,将结果输出到 HDFS 文件系统的 output 文件夹下。
上述例子完成后的结果保存在 HDFS 中,通过下面命令查看结果:
/usr/local/hadoop/bin/hdfs dfs -cat /user/hadoop/output/*
如果运行成功,可以看到如下结果:
1       dfsadmin
1       dfs.replication
1       dfs.namenode.name.dir
1       dfs.datanode.data.dir
删除 HDFS 中的结果目录:
/usr/local/hadoop/bin/hdfs dfs -rm -r /user/hadoop/output
运行 Hadoop 程序时,为了防止覆盖结果,程序指定的输出目录不能存在,否则会提示错误,因此在下次运行前需要先删除输出目录。
关闭 Hadoop 进程:
/usr/local/hadoop/sbin/stop-dfs.sh
再起启动只需要执行下面命令:
/usr/local/hadoop/sbin/start-dfs.sh
任务时间:时间未知
恭喜您已经完成了搭建 Hadoop 伪分布式环境的学习
使用hbase的目的是为了海量数据的随机读写,但是在实际使用中却发现针对随机读的优化和gc是一个很大的问题,而且hbase的数据是存储在Hdfs,而Hdfs是面向流失数据访问进行设计的,就难免带来效率的下降。下面介绍一下Facebook Message系统在HBase online storage场景下的一个案例(《Apache Hadoop Goes Realtime at Facebook》, SIGMOD 2011),最近他们在存储领域顶级会议FAST2014上发表了一篇论文《Analysis of HDFS Under HBase: A Facebook Messages Case Study》分析了他们在使用HBase中遇到的一些问题和解决方案。该论文首先讲了Facebook的分析方法包括tracing/analysis/simulation,FM系统的架构和文件与数据构成等,接下来开始分析FM系统在性能方面的一些问题,并提出了解决方案。
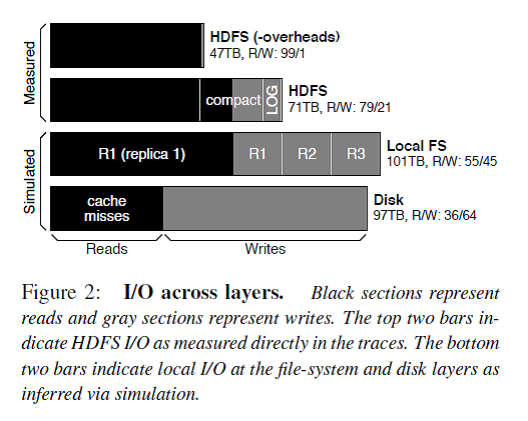
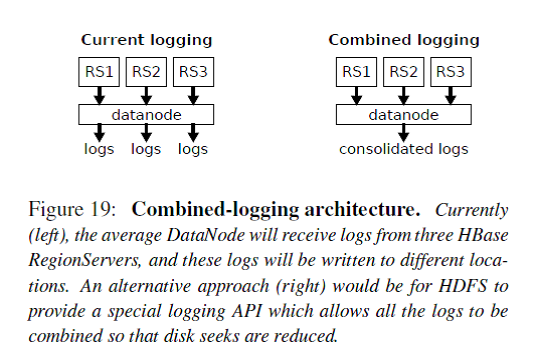
Figure 2描述了每一层的I/O构成,解释了在FM系统对外请求中读占主导,但是由于logging/compaction/replication/caching导致写被严重放大。
总的来说,HBase stack的logging/compaction/replication/caching会放大写I/O,导致业务逻辑上读为主导的HBase系统在地层实际磁盘I/O中写占据了主导。
FM系统的主要文件类型和大小
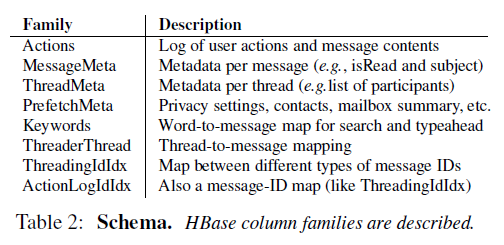
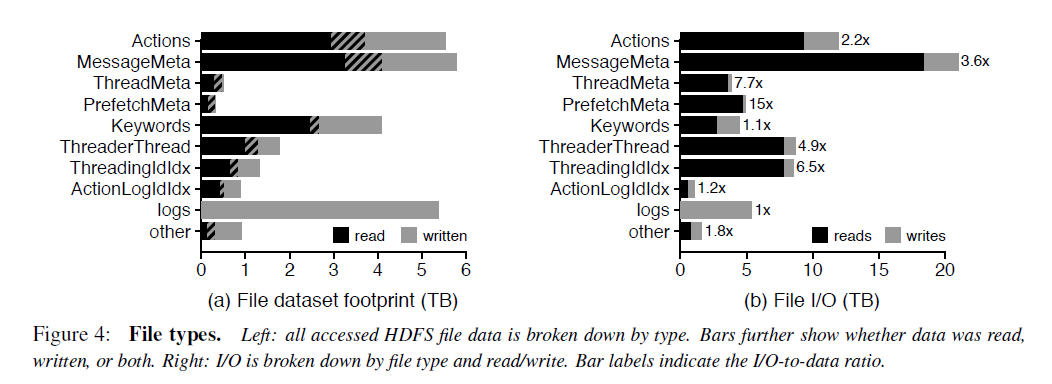
对于每个column family的文件,90%是小于15M的。但是少量的特别大的文件会拉高column family的平均文件大小。例如MessageMeta这个column family的平均文件大小是293M。从这些文件的生命周期来看,大部分FM的数据存储在large,long-lived files,然而大部分文件却是small, short-lived。这对HDFS的NameNode提出了很大的挑战,因为HDFS设计的初衷是为了存储少量、大文件准备的,所有的文件的元数据是存储在NameNode的内存中的,还有有NameNode federation。
FM系统的主要I/O访问类型
下面从temporal locality, spatial locality, sequentiality的角度来看。
73.7%的数据只被读取了一次,但是1.1%的数据被读取了至少64次。也就是说只有少部分的数据被重复读取了。但是从触发I/O的角度,只有19%的读操作读取的是只被读取一次的数据,而大部分I/O是读取那些热数据。
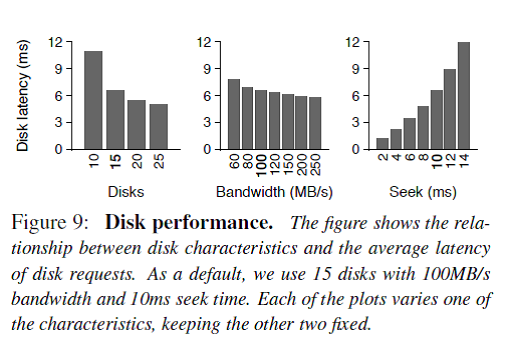
在HDFS这一层,FM读取数据没有表现出sequentiality,也就是说明high-bandwidth, high-latency的机械磁盘不是服务读请求的理想存储介质。而且对数据的读取也没有表现出spatial locality,也就是说I/O预读取也没啥作用。
解决方案1. Flash/SSD作为cache使用
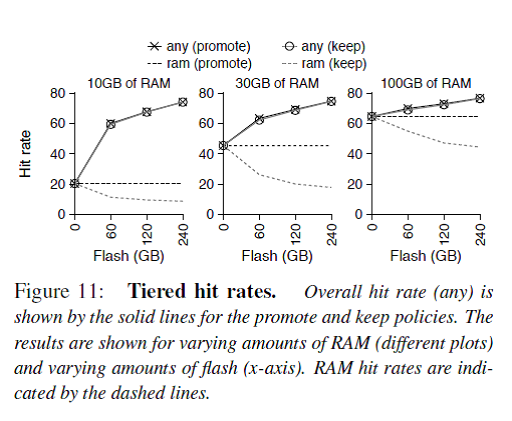
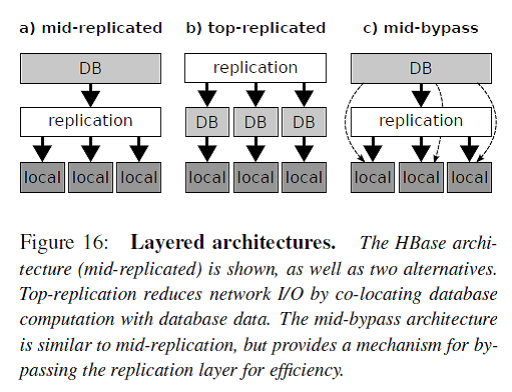
如Figure 16所示,一般分布式数据库系统分为三个层次:db layer/replication layer/local layer。这种分层架构的最大优点是简洁清晰,每层各司其职。例如db layer只需要处理DB相关的逻辑,底层的存储认为是available和reliable的。
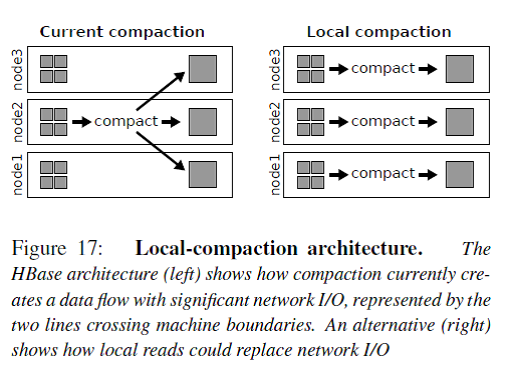
HBase是图中a)的架构,数据的冗余replication由HDFS来负责。但是这个带来一个问题就是例如compaction操作会读取多个三备份的小文件到内存merge-sorting成一个三备份的大文件,这个操作只能在其中的一个RS/DN上完成,那么从其他RS/DN上的数据读写都会带来网络传输I/O。
图中b)的架构就是把replication层放到了DB层的上面,Facebook举的例子是Salus,不过我对这个东西不太熟悉。我认为Cassandra就是这个架构的。这个架构的缺点就是DB层需要处理底层文件系统的问题,还要保证和其他节点的DB层协调一致,太复杂了。
图中c)的架构是在a的基础上的一种改进,Spark使用的就是这个架构。HBase的compaction操作就可以简化成join和sort这样两个RDD变换。
You will need node.js and npm. Joyent has
an excellent blog post on how to get those installed, so we’ll omit those details here.
Once node and npm are ready, we can install the hubot generator:
% npm install -g yo generator-hubot
This will give us the hubot yeoman generator. Now we
can make a new directory, and generate a new instance of hubot in it. For example, if
we wanted to make a bot called myhubot:
% mkdir myhubot
% cd myhubot
% yo hubot
At this point, you’ll be asked a few questions about who is creating the bot,
and which adapter you’ll be using. Adapters are hubot’s way of
integrating with different chat providers.
If you are using git, the generated directory includes a .gitignore, so you can
initialize and add everything:
% git init
% git add .
% git commit -m "Initial commit"
If you’d prefer to automate your hubot build without being interactively
prompted for its configuration, you can add the following options
to the yo hubot command to do so:
| Option | Description |
|---|---|
--owner="Bot Wrangler <[email protected]>" |
Bot owner, e.g. “Bot Wrangler [email protected]“ |
--name="Hubot" |
Bot name, e.g. “Hubot” |
--description="Delightfully aware robutt" |
Bot description, e.g. “Delightfully aware robutt” |
--adapter=campfire |
Bot adapter, e.g. “campfire” |
--defaults |
Declare all defaults are set and no prompting required |
You now have your own functional hubot! There’s a bin/hubot
command for convenience, to handle installing npm dependencies, loading scripts,
and then launching your hubot.
Hubot needs Redis to persist data, so before you can start hubot on your own computer, you should have Redis installed on your localhost. If just want to test Hubot without Redis, then you can remove redis-brain.coffee from hubot-scripts.json.
% bin/hubot
Hubot>
This starts hubot using the shell adapter, which
is mostly useful for development. Make note of Hubot>; this is the name your hubot will
respond to with commands. For example, to list available commands:
% bin/hubot
Hubot> hubot: help
hubot <keyword> tweet - Returns a link to a tweet about <keyword>
hubot <user> is a badass guitarist - assign a role to a user
hubot <user> is not a badass guitarist - remove a role from a user
hubot animate me <query> - The same thing as `image me`, except adds a few parameters to try to return an animated GIF instead.
hubot convert me <expression> to <units> - Convert expression to given units.
hubot die - End hubot process
hubot echo <text> - Reply back with <text>
hubot fake event <event> - Triggers the <event> event for debugging reasons
hubot help - Displays all of the help commands that Hubot knows about.
hubot help <query> - Displays all help commands that match <query>.
hubot image me <query> - The Original. Queries Google Images for <query> and returns a random top result.
hubot map me <query> - Returns a map view of the area returned by `query`.
hubot mustache me <query> - Searches Google Images for the specified query and mustaches it.
hubot mustache me <url> - Adds a mustache to the specified URL.
hubot ping - Reply with pong
hubot show storage - Display the contents that are persisted in the brain
hubot show users - Display all users that hubot knows about
hubot the rules - Make sure hubot still knows the rules.
hubot time - Reply with current time
hubot translate me <phrase> - Searches for a translation for the <phrase> and then prints that bad boy out.
hubot translate me from <source> into <target> <phrase> - Translates <phrase> from <source> into <target>. Both <source> and <target> are optional
hubot who is <user> - see what roles a user has
hubot youtube me <query> - Searches YouTube for the query and returns the video embed link.
hubot pug bomb N - get N pugs
hubot pug me - Receive a pug
hubot ship it - Display a motivation squirrel
You almost definitely will want to change your hubot’s name to add character. bin/hubot takes a --name:
% bin/hubot --name myhubot
myhubot>
Your hubot will now respond as myhubot. This is
case-insensitive, and can be prefixed with @ or suffixed with :. These are equivalent:
MYHUBOT help
myhubot help
@myhubot help
myhubot: help
Hubot’s power comes through scripting. Read more about scripting for the deal on bending hubot to your will using code.
There are many community-contributed scripts available through hubot-scripts. To use scripts from it:
hubot-scripts is listed as a dependency in package.json (it should by default)hubot-scripts.json to include the script you want in the list. Make sure the file is still valid JSON!In addition, there are scripts released as npm packages. If you find one you want to use:
dependencies into your package.jsonnpm install to make sure its installedTo enable third-party scripts that you’ve added you will need to add the package
name as a double quoted string to the external-scripts.json file in this repo.
Please note that external scripts may become the default for hubot scripts in future releases.
Hubot uses the adapter pattern to support multiple chat-backends. Here is a list of available adapters, along with details on how to configure them.
You can deploy hubot to Heroku, which is the officially supported method.
Additionally you are able to deploy hubot to a UNIX-like system or Windows.
Please note the support for deploying to Windows isn’t officially supported.
Using custom scripts, you can quickly customize Hubot to be the most life embettering robot he or she can be. Readdocs/patterns.md for some nifty tricks that may come in handy as you teach your hubot new skills.
项目使用的hadoop已经存放了3000W+的文件,
为了节省成本,当时抢建平台时,使用了组装服务器+普通硬盘
hadoop每次做du操作都非常耗时,于是把hadoop代码改了一个
使用一个bash脚本替代原来du操作。
bash:
#/bin/sh
mydf=$(df $2 | grep -vE ‘^Filesystem|tmpfs|cdrom’ | awk ‘{ print $3 }’)
echo -e “$mydf\t$2”
java:hadoop\src\core\org\apache\hadoop\fs\DU.java:168行的toString()及getExecString()方法
public String toString() {
return
“mydu -sk ” + dirPath +”\n” +
used + “\t” + dirPath;
}protected String[] getExecString() {
return new String[] {“mydu”, “-sk”, dirPath};
}
改造后,原来的du操作其他不耗时。
只是存在统计不准确的问题,不过并不影响hadoop运作。
这篇文档的目的是帮助你快速完成单机上的Hadoop安装与使用以便你对Hadoop分布式文件系统(HDFS)和Map-Reduce框架有所体会,比如在HDFS上运行示例程序或简单作业等。
Linux和Windows所需软件包括:
Windows下的附加软件需求
如果你的集群尚未安装所需软件,你得首先安装它们。
以Ubuntu Linux为例:
$ sudo apt-get install ssh
$ sudo apt-get install rsync
在Windows平台上,如果安装cygwin时未安装全部所需软件,则需启动cyqwin安装管理器安装如下软件包:
为了获取Hadoop的发行版,从Apache的某个镜像服务器上下载最近的 稳定发行版。
解压所下载的Hadoop发行版。编辑 conf/hadoop-env.sh文件,至少需要将JAVA_HOME设置为Java安装根路径。
尝试如下命令:
$ bin/hadoop
将会显示hadoop 脚本的使用文档。
现在你可以用以下三种支持的模式中的一种启动Hadoop集群:
默认情况下,Hadoop被配置成以非分布式模式运行的一个独立Java进程。这对调试非常有帮助。
下面的实例将已解压的 conf 目录拷贝作为输入,查找并显示匹配给定正则表达式的条目。输出写入到指定的output目录。
$ mkdir input
$ cp conf/*.xml input
$ bin/hadoop jar hadoop-*-examples.jar grep input output ‘dfs[a-z.]+’
$ cat output/*
Hadoop可以在单节点上以所谓的伪分布式模式运行,此时每一个Hadoop守护进程都作为一个独立的Java进程运行。
使用如下的 conf/hadoop-site.xml:
| <configuration> |
| <property> |
| <name>fs.default.name</name> |
| <value>localhost:9000</value> |
| </property> |
| <property> |
| <name>mapred.job.tracker</name> |
| <value>localhost:9001</value> |
| </property> |
| <property> |
| <name>dfs.replication</name> |
| <value>1</value> |
| </property> |
| </configuration> |
现在确认能否不输入口令就用ssh登录localhost:
$ ssh localhost
如果不输入口令就无法用ssh登陆localhost,执行下面的命令:
$ ssh-keygen -t dsa -P ” -f ~/.ssh/id_dsa
$ cat ~/.ssh/id_dsa.pub >> ~/.ssh/authorized_keys
格式化一个新的分布式文件系统:
$ bin/hadoop namenode -format
启动Hadoop守护进程:
$ bin/start-all.sh
Hadoop守护进程的日志写入到 ${HADOOP_LOG_DIR} 目录 (默认是 ${HADOOP_HOME}/logs).
浏览NameNode和JobTracker的网络接口,它们的地址默认为:
将输入文件拷贝到分布式文件系统:
$ bin/hadoop fs -put conf input
运行发行版提供的示例程序:
$ bin/hadoop jar hadoop-*-examples.jar grep input output ‘dfs[a-z.]+’
查看输出文件:
将输出文件从分布式文件系统拷贝到本地文件系统查看:
$ bin/hadoop fs -get output output
$ cat output/*
或者
在分布式文件系统上查看输出文件:
$ bin/hadoop fs -cat output/*
完成全部操作后,停止守护进程:
$ bin/stop-all.sh
关于搭建完全分布式模式的,有实际意义的集群的资料可以在这里找到。