在CentOS 5.4上安装CouchDB

CouchDB一种半结构化面向文档的分布式,高容错的数据库系统,具体的可以参见其网站上的文档,以及这里的一篇技术简介的翻译。CouchDB在Ubuntu下安装非常方便,只需要使用sudo apt-get install couchdb即可,我以为在CentOS中也会比较容易,没想到却遇到了比较多的问题。主要包括:

  1. CentOS的安装源里不包含CouchDB
  2. CouchDB需要Erlang的运行时支持,CentOS的安装源里也没有Erlang

OK,我们一步一步来搞定在CentOS下安装CouchDB。首先需要安装Erlang,却Erlang的官方网站下载源码,然后在本地编译安装:具体的脚本为:

   1: wget http://www.erlang.org/download/otp_src_R13B02-1.tar.gz
   2: tar–xzvf otp_src_R13B02-1.tar.gz
   3: cd otp_src_R13B02-1
   4: ./configure
   5: make && make install

中途有可能会遇到一些依赖的问题,比如缺少icu、ncurses、wxWindows等,前面几个大略都可以从yum时行安装,wxWindows可以不问,如果你之后不准备使用Erlang进行UI编程的话,这些也足够用了。

Erlang安装完成之后,测试一下在bash里erl和erlc能否使用,若能,则这一步就完成了。

接着是安装CouchDB,由于CouchDB里用到了JavaScript,所以其依赖于SpiderMonkey,需要先安装libmozjs这个库,步骤为:

   1: wget ftp://ftp.mozilla.org/pub/mozilla.org/js/js-1.8.0-rc1.tar.gz
   2: tar–xzvf js-1.8.0-rc1.tar.gz
   3: cd js/src
   4: make BUILD_OPT=1–f Makefile.ref

编译应该不会出什么问题,如果你的机器没有配置编译环境,你可以参考这篇文章进行配置。

可以当我执行make –f Makefile.ref install的时候傻了,没有这个target,好吧,我们自己写脚本安装这个库。代码如下:

   1: #!/bin/bash
   2: mkdir -p /usr/include/mozjs/ -v
   3: cp *.{h,tbl}
   4: /usr/include/mozjs/ -v
   5: cd Linux_All_OPT.OBJ
   6: cp *.h /usr/include/mozjs/ -v
   7: mkdir -p /usr/local/{bin,lib}/ -v
   8: cp js /usr/local/bin/ -v
   9: cp libjs.so /usr/local/lib/ -v

把上面的代码保存成install.sh,并放在src文件夹下,执行一遍即可。

终于可以编译CouchDB了,脚本如下:

   1:
   2: wget http://labs.xiaonei.com/apache-mirror/couchdb/0.10.0/apache-couchdb-0.10.0.tar.gz
   3: tar–xzvf apache-couchdb-0.10.0.tar.gz
   4: cd apache-couchdb-0.10.0
   5: ./configure
   6: make && make install

这次编译应该不会出什么问题,如果出了,也应该是比较好解决的,我们假设你看这篇文章的时候,有这个能力来解决那些小问题。

然后这个时候就安装成功了。接着是配置CouchDB,官方建议不要用root帐户来运行,所以,我们新建一个账户跟组来运行。脚本如下:

   1: groupadd couchdb
   2: useradd couchdb–g couchdb–d /usr/local/var/lib/couchdb
   3: su– couchdb–c “/user/local/bin/couchdb -b”

最后一行是用来启动couchdb的后台进程,如果要停止,把参数从-b改成-d即可。

新版本的配置文件好像是/user/local/etc/couchdb/local.ini,各取所需,自己修改吧。


linux 根据文件内容查找文件

今天编程,居然说”TCP_NODELAY” 未定义
加了man setsockopt 得到的头文件也没用

find 很强大,但貌似不支持根据文件的内容来查找,
以前百度就是没找到,这次多放一些关键字 linux 根据文件的特定内容来查找文件

grep “TCP_NODELAY” -r /usr

这样就递归查找/usr下的所有内容里带有TCP_NODELAY的文件了

很快找到了/usr/include/linux/tcp.h #define TCP_NODELAY 1

此外,知道文件名搜文件位置 find / -name “filename”


配置mongodb分片群集(sharding cluster)


Sharding cluster介绍

这是一种可以水平扩展的模式,在数据量很大时特给力,实际大规模应用一般会采用这种架构去构建monodb系统。

要构建一个 MongoDB Sharding Cluster,需要三种角色:

Shard Server: mongod 实例,用于存储实际的数据块,实际生产环境中一个shard server角色可由几台机器组个一个relica set承担,防止主机单点故障

Config Server: mongod 实例,存储了整个 Cluster Metadata,其中包括 chunk 信息。

Route Server: mongos 实例,前端路由,客户端由此接入,且让整个集群看上去像单一数据库,前端应用可以透明使用。

Sharding架构图:
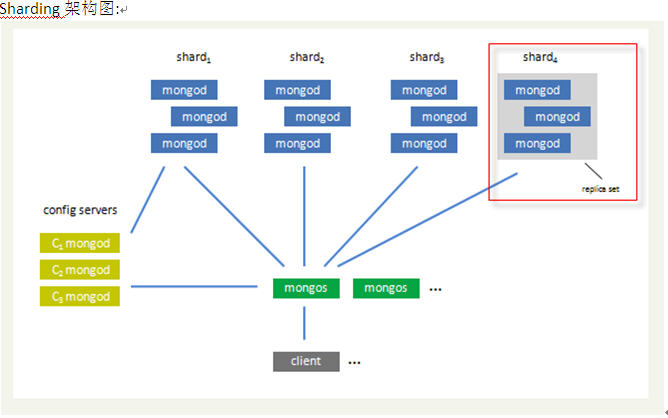
本例实际环境架构

本例架构示例图:

  1. 分别在3台机器运行一个mongod实例(称为mongod shard11,mongod shard12,mongod shard13)组织replica set1,作为cluster的shard1
  2. 分别在3台机器运行一个mongod实例(称为mongod shard21,mongod shard22,mongod shard23)组织replica set2,作为cluster的shard2
  3. 每台机器运行一个mongod实例,作为3个config server
  4. 每台机器运行一个mongs进程,用于客户端连接


主机 IP 端口信息
Server1 10.1.1.1 mongod shard11:27017
mongod shard12:27018
mongod config1:20000
mongs1:30000
Server2 10.1.1.2 mongod shard12:27017
mongod shard22:27018
mongod config2:20000
mongs2:30000
Server3 10.1.1.3 mongod shard13:27017
mongod shard23:27018
mongod config3:20000
mongs3:30000


软件准备

软件准备
1. 创建用户
groupadd -g 20001 mongodb
useradd -u 20001 -g mongodb mongodb
passwd mongodb

2. 安装monodb软件
su – mongodb
tar zxvf mongodb-linux-x86_64-1.7.2.tar
安装好后,目录结构如下:
$ tree mongodb-linux-x86_64-1.7.2
mongodb-linux-x86_64-1.7.2
|– GNU-AGPL-3.0
|– README
|– THIRD-PARTY-NOTICES
`– bin
|– bsondump
|– mongo
|– mongod
|– mongodump
|– mongoexport
|– mongofiles
|– mongoimport
|– mongorestore
|– mongos
|– mongosniff
`– mongostat
1 directory, 14 files

3. 创建数据目录
根据本例sharding架构图所示,在各台sever上创建shard数据文件目录
Server1:
su – monodb
cd /home/monodb
mkdir -p data/shard11
mkdir -p data/shard21
Server2:
su – monodb
cd /home/monodb
mkdir -p data/shard11
mkdir -p data/shard22
Server3:
su – monodb
cd /home/monodb
mkdir -p data/shard13
mkdir -p data/shard23

配置relica sets

1. 配置shard1所用到的replica sets:
Server1:
cd /home/mongodb/mongodb-linux-x86_64-1.7.2/bin
./mongod –shardsvr –replSet shard1 –port 27017 –dbpath /home/mongodb/data/shard11 –oplogSize 100 –logpath /home/mongodb/data/shard11.log –logappend –fork

Server2:
cd /home/mongodb/mongodb-linux-x86_64-1.7.2/bin
./mongod –shardsvr –replSet shard1 –port 27017 –dbpath /home/mongodb/data/shard12 –oplogSize 100 –logpath /home/mongodb/data/shard12.log –logappend –fork

Server3:
cd /home/mongodb/mongodb-linux-x86_64-1.7.2/bin
./mongod –shardsvr –replSet shard1 –port 27017 –dbpath /home/mongodb/data/shard13 –oplogSize 100 –logpath /home/mongodb/data/shard13.log –logappend –fork

初始化replica set
用mongo连接其中一个mongod,执行:
> config = {_id: ’shard1′, members: [
{_id: 0, host: ‘10.1.1.1:27017’},
{_id: 1, host: ‘10.1.1.2:27017’},
{_id: 2, host: ‘10.1.1.3:27017’}]
}

> rs.initiate(config);

同样方法,配置shard2用到的replica sets:
server1:
cd /home/mongodb/mongodb-linux-x86_64-1.7.2/bin
./mongod –shardsvr –replSet shard2 –port 27018 –dbpath /home/mongodb/data/shard21 –oplogSize 100 –logpath /home/mongodb/data/shard21.log –logappend –fork

server2:
cd /home/mongodb/mongodb-linux-x86_64-1.7.2/bin
./mongod –shardsvr –replSet shard2 –port 27018 –dbpath /home/mongodb/data/shard22 –oplogSize 100 –logpath /home/mongodb/data/shard22.log –logappend –fork

server3:
cd /home/mongodb/mongodb-linux-x86_64-1.7.2/bin
./mongod –shardsvr –replSet shard2 –port 27018 –dbpath /home/mongodb/data/shard23 –oplogSize 100 –logpath /home/mongodb/data/shard23.log –logappend –fork

初始化replica set
用mongo连接其中一个mongod,执行:
> config = {_id: ’shard2′, members: [
{_id: 0, host: ‘10.1.1.1:27018’},
{_id: 1, host: ‘10.1.1.2:27018’},
{_id: 2, host: ‘10.1.1.3:27018’}]
}

> rs.initiate(config);

到此就配置好了二个replica sets,也就是准备好了二个shards

配置三台config server

Server1:
mkdir -p /home/mongodb/data/config
./mongod –configsvr –dbpath /home/mongodb/data/config –port 20000 –logpath /home/mongodb/data/config.log –logappend –fork   #config server也需要dbpath

Server2:
mkdir -p /home/mongodb/data/config
./mongod –configsvr –dbpath /home/mongodb/data/config –port 20000 –logpath /home/mongodb/data/config.log –logappend –fork

Server3:
mkdir -p /home/mongodb/data/config
./mongod –configsvr –dbpath /home/mongodb/data/config –port 20000 –logpath /home/mongodb/data/config.log –logappend –fork

配置mongs

在server1,server2,server3上分别执行:
./mongos –configdb 10.1.1.1:20000,10.1.1.2:20000,10.1.1.3:20000 –port 30000 –chunkSize 5 –logpath /home/mongodb/data/mongos.log –logappend –fork
#mongs不需要dbpath

Configuring the Shard Cluster

连接到其中一个mongos进程,并切换到admin数据库做以下配置
1. 连接到mongs,并切换到admin
./mongo 10.1.1.1:30000/admin
>db
Admin
2. 加入shards
如里shard是单台服务器,用>db.runCommand( { addshard : “<serverhostname>[:<port>]” } )这样的命令加入,如果shard是replica sets,用replicaSetName/<serverhostname>[:port][,serverhostname2[:port],…]这样的格式表示,例如本例执行:
>db.runCommand( { addshard : “shard1/10.1.1.1:27017,10.1.1.2:27017,10.1.1.3:27017″,name:”s1″,maxsize:20480} );
>db.runCommand( { addshard : “shard2/10.1.1.1:27018,10.1.1.2:27018,10.1.1.3:27018″,name:”s2″,maxsize:20480} );
注意:在添加第二个shard时,出现error:test database 已经存在的错误,这里用mongo命令连接到第二个replica set,用db.dropDatabase()命令把test数据库给删除然后就可加入

3. 可选参数
Name:用于指定每个shard的名字,不指定的话系统将自动分配
maxSize:指定各个shard可使用的最大磁盘空间,单位megabytes

4. Listing shards
>db.runCommand( { listshards : 1 } )
如果列出了以上二个你加的shards,表示shards已经配置成功

5. 激活数据库分片
命令:
> db.runCommand( { enablesharding : “<dbname>” } );
通过执行以上命令,可以让数据库跨shard,如果不执行这步,数据库只会存放在一个shard,一旦激活数据库分片,数据库中不同的collection将被存放在不同的shard上,但一个collection仍旧存放在同一个shard上,要使单个collection也分片,还需单独对collection作些操作

Collecton分片

要使单个collection也分片存储,需要给collection指定一个分片key,通过以下命令操作:
> db.runCommand( { shardcollection : “<namespace>”,key : <shardkeypatternobject> });
注:
a. 分片的collection系统会自动创建一个索引(也可用户提前创建好)
b. 分片的collection只能有一个在分片key上的唯一索引,其它唯一索引不被允许
One note: a sharded collection can have only one unique index, which must exist on the shard key. No other unique indexes can exist on the collection.

分片collection例子

>db.runCommand( { shardcollection : “test.c1″,key : {id: 1} } )
>for (var i = 1; i <= 200003; i++) db.c1.save({id:i,value1:”1234567890″,value2:”1234567890″,value3:”1234567890″,value4:”1234567890″});
> db.c1.stats()
{
“sharded” : true,
“ns” : “test.c1″,
“count” : 200003,
“size” : 25600384,
“avgObjSize” : 128,
“storageSize” : 44509696,
“nindexes” : 2,
“nchunks” : 15,
“shards” : {
“s1″ : {
“ns” : “test.c1″,
“count” : 141941,
“size” : 18168448,
“avgObjSize” : 128,
“storageSize” : 33327616,
“numExtents” : 8,
“nindexes” : 2,
“lastExtentSize” : 12079360,
“paddingFactor” : 1,
“flags” : 1,
“totalIndexSize” : 11157504,
“indexSizes” : {
“_id_” : 5898240,
“id_1″ : 5259264
},
“ok” : 1
},
“s2″ : {
“ns” : “test.c1″,
“count” : 58062,
“size” : 7431936,
“avgObjSize” : 128,
“storageSize” : 11182080,
“numExtents” : 6,
“nindexes” : 2,
“lastExtentSize” : 8388608,
“paddingFactor” : 1,
“flags” : 1,
“totalIndexSize” : 4579328,
“indexSizes” : {
“_id_” : 2416640,
“id_1″ : 2162688
},
“ok” : 1
}
},
“ok” : 1
}


调查服务器响应时间的利器 tcprstat

我们在做服务器程序的时候,经常要知道一个请求的响应时间,借以优化或者定位问题。 通常的做法是在代码里面加入日志计算时间,这个方法有问题,时间不准确。因为数据从网卡到应用程序,从应用到网卡的时间没有被计算在内。 而且这个时间随着系统的负载有很大的变化。
那同学说,我wireshark, tcpdump抓包人肉统计不行吗。 可以的,只不过我会很同情你,此举需要耐心且不具可持续性。 所以我们希望有个工具能够最少费力的做这个事情。

这时候来自percona的tcprstat来救助了! 这个工具原本开发用来调查mysqld的性能问题,所以不要奇怪它的默认端口是3306, 但是我们可以用这个工具来调查典型的request->response类型的服务器。

什么是tcprstat:

tcprstat is a free, open-source TCP analysis tool that watches network traffic and computes the delay between requests and responses. From this it derives response-time statistics and prints them out. The output is similar to other Unix -stat tools such as vmstat, iostat, and mpstat. The tool can optionally watch traffic to only a specified port, which makes it practical for timing requests and responses to a single daemon process such as mysqld, httpd, memcached, or any of a variety of other server processes.

文档很详细: 请参考: http://www.percona.com/docs/wiki/tcprstat:start

不愿意编译的同学直接从这里下载64位系统的编译好的二进制:http://github.com/downloads/Lowercases/tcprstat/tcprstat-static.v0.3.1.x86_64

源码编译也挺容易的: 由于它自带libpcap包, 这个包有可能在configure的时候没认识好netlink, 只要把config.h里面的netlink那个define注释掉就好。

编译好了, 典型使用很简单:

# tcprstat -p 3306 -t 1 -n 5
timestamp count max min avg med stddev 95_max 95_avg 95_std 99_max 99_avg 99_std
1283261499 1870 559009 39 883 153 13306 1267 201 150 6792 323 685
1283261500 1865 25704 29 578 142 2755 889 175 107 23630 333 1331
1283261501 1887 26908 33 583 148 2761 714 176 94 23391 339 1340
1283261502 2015 304965 35 624 151 7204 564 171 79 8615 237 507
1283261503 1650 289087 35 462 146 7133 834 184 120 3565 244 358

但是这个tcprstat在bonding的网卡下有点问题:

# /sbin/ifconfig
bond0 Link encap:Ethernet HWaddr A4:BA:DB:28:B5:AB
inet addr:10.232.31.19 Bcast:10.232.31.255 Mask:255.255.255.0
inet6 addr: fe80::a6ba:dbff:fe28:b5ab/64 Scope:Link
UP BROADCAST RUNNING MASTER MULTICAST MTU:1500 Metric:1
RX packets:19451951688 errors:0 dropped:4512 overruns:0 frame:0
TX packets:26522074966 errors:0 dropped:0 overruns:0 carrier:0
collisions:0 txqueuelen:0
RX bytes:6634368171533 (6.0 TiB) TX bytes:32576206882863 (29.6 TiB)

# tcprstat -p 3306 -t 1 -n 5
pcap: SIOCGIFFLAGS: bonding_masters: No such device

解决方案是:

# sudo tcprstat -p 3306 -t 1 -n 0 -l `/sbin/ifconfig | grep ‘addr:[^ ]\+’ -o | cut -f 2 -d : | xargs echo | sed -e ’s/ /,/g’`

在典型满负载的mysql服务器上抓包的开销是:

26163 root 18 0 104m 5304 4696 S 18.3 0.0 49:47.58 tcprstat

用IP方式,而不是网络接口方式搞定。

祝大家玩的开心。


linux下使用nload查看网卡实时流量

linux下使用nload查看网卡实时流量


nload是一个网络流量统计工具,当前版本为0.7.2。
下载地址:http://sourceforge.net/project/showfiles.php?group_id=35865


使用yum 安装也可以。


yum install nload


使用源码方式安装到/usr/local/nload,将/usr/local/nload/bin目录加入/etc/profile。


重新登陆ssh后,直接输入nload即可查看网卡的当前流量情况。
nload eth0 — 查看名叫eth0网卡的流量


可查看当前、平均、最小、最大、总共等的流量情况,单位为bit,详细的使用说明请参见:
http://www.debuntu.org/2006/07/14/74-nload-a-network-traffic-analyser


Resin 3.2.1 破解文件 crack keygen

resin3.2.1 的破解文件,仅供学习所用,不得用于商业用途.

把附件里的文件覆盖${resin_home}\lib里的pro.jar 即可
没用用户的可以用test/test 下载
如果你的版本不是是resin3.2.1,如果覆盖不能用时,可以试一下,把附件里的pro.jar里的 \com\caucho\license 目录覆盖你的pro里相应目录

Tomcat Today, GlassFish Tomorrow?

While there are indeed several advantages to using GlassFish vs. Tomcat, it’s probably useful to know that Sun is the original creator of Tomcat and that any application running today on Tomcat should run just fine (no modification whatsoever) on GlassFish.

Grizzly


Historically, if you wanted to get good HTTP performance from Tomcat you really needed to have a the Apache web server to sit in front of Tomcat which involved more setting up and extra administrative work. Since GlassFish v1 (May 2006), Grizzly is the HTTP frontend of the application server. It’s a 100% Java nio framework that provides the same performance as Apache only it’s written in Java and integrated straight into the application server. While using Apache or Sun Web Server in front of GlassFish is quite possible, it’s certainly no longer needed for performance reasons. Grizzly is also used for other protocols such as IIOP and now SIP (project Sailfin). Finally, Grizzly is the key technology for implementing Comet (aka Reverse Ajax, aka Ajax Push) which enables so very interesting push scenarios (from server to clients).


Full Java EE 5 support


Support for Java EE 5 (and soon Java EE 6) has always been a key priority for the GlassFish project. It delivered its first Java EE 5- certified implementation more than two years ago. This allowed developers to enjoy the much simplified EJB 3.0 specification, JAX-WS, and more goodness early on but it also provided dependency injection in the web tier (in servlet or JSF managed beans). Tomcat is not a full blown application server so while it may be enough for some developments, many companies find themselves maintaining a stack of frameworks and libraries on top of Tomcat when a GlassFish provides a JPA persistence engine (Toplink), a full web services stack (Metro), an application model (EJB3), and more, all out of the box. Java EE 6 profiles should help improve that situation for the industry as a whole.


Admin Tools


Administration and monitoring tools is what GlassFish users coming from Tomcat get as an immediate benefit. From web tools to command- line tools, GlassFish has an extensive set of features ranging from application (un)deployment, to JNDI resource creation, to all sorts of configuration details. All is JMX-based, exposed using MBeans (called AMX) and usable from JMX tools such as JConsole or the new VisualVM (specific plugin for GlassFish there). GlassFish also provides a fully- integrated monitoring feature called Call-Flow which reveals very accurately where time is being spent in the application before a response is sent. GlassFish also comes with a self-monitoring framework capable of implementing administrative rules such as the addition of a new node to a cluster if the average response time goes beyond a certain threshold.


Documentation


Technical information for GlassFish comes in various forms complementing one another quite well. The official documentation is extensive and complete (20+ books, from Developer’s Guide to Deployment Planning Guide). There’s also the Java EE tutorial, Enterprise Tech Tips, GlassFish user FAQs, blogs from engineers, forums and mailing lists.


Clustering


Full clustering is built right into GlassFish with no need to move to some other codebase or for-pay version of the product. In fact, you can even upgrade from a “developer” profile to a “cluster” profile. Clustering in GlassFish means the grouping technology (heartbeats, centralized admin), the load-balancing, but also the stateful data in- memory replication. Project Shoal is the GlassFish sub-project that does the heavy-lifting for most of these features. It uses JXTA under the covers which has the nice side-effect or requiring little to no configuration. GlassFish clustering make no assumption about the load- balancing technology used – it provides Web Server plugins but also works with hardware load-balancers. Such load-balancers do not need to know where the replicas are. Finally, Sun also offers a 99.999% solution with an in-memory distributed database (HADB). It has greater performance degradation, but probably unmatched availability.


Performance


Sun has literally worked for years on the performance of GlassFish – Grizzly, EJB container, Servlet container, Web Services, OpenMQ implementation, etc… The best result of this has been the SPECjAppServer world record published late last year and putting GlassFish in first place ahead of Weblogic and WebSphere (Tomcat isn’t a full app server and thus isn’t listed there, while JBoss has never published results). This is the first time one could claim that you no longer need to choose between open source and performance, you can have both. Performance is a strong priority for Sun.


Support from Sun


GlassFish is free and open source (dual CDDL + GPLv2 license), but Sun also has a business strategy to monetize GlassFish thru services. One such service is the subscription that covers access to patches and interim releases, access to support and escalation of bugs as well as indemnification. Sun also recently announced the GlassFish and MySQL unlimited offering (see http://www.sun.com/aboutsun/pr/2008-06/sunflash.20080627.1.xml) .


Tooling


While the NetBeans/GlassFish integration is very good, there is clearly no “NetBeans prerequisite” to use GlassFish. In fact Sun is the main developer of an open source plugin for Eclipse WTP to use GlassFish v2 and even v3. Both NetBeans and Eclipse users can get the plugin right from the IDE (for Eclipse, it’s a WTP plugin for Eclipse 3.3 or 3.4). There is also support for GlassFish in IntelliJ and Oracle has announced support in JDeveloper.


Tomcat, GlassFish v3


GlassFish has made a lot of efforts to appeal to developers. Its a single, small download of about 60MB, has auto-deploy capabilities, starts pretty fast for an application server with GlassFish v2 (probably the best full-blown application server startup time). To be fair to Tomcat or Jetty, they are still perceived by many as lighter- weight and faster to start. GlassFish v3 is all about being modular (based on OSGi), extensible and very developer friendly. The recently released TP2 (Tech Preview 2) starts in less than a second, starts/ stops containers and resources as needed and provides support for scripting technologies such as Rails, Groovy, PHP and more. There is also an Embedded mode for GlassFish which enables developers to use GlassFish via an API for testing or embeddability purposes. GlassFish v3 is scheduled to be aligned with Java EE 6 and released mid-2009. In the mean time there will be regular refreshes.


Linux/Ubuntu tar命令详解使用格式和方法

格式: tar 选项 文件目录列表
功能: 对文件目录进行打包备份
选项:
-c 建立新的归档文件
-r 向归档文件末尾追加文件
-x 从归档文件中解出文件
-O 将文件解开到标准输出
-v 处理过程中输出相关信息
-f 对普通文件操作
-z 调用gzip来压缩归档文件,与-x联用时调用gzip完成解压缩
-Z 调用compress来压缩归档文件,与-x联用时调用compress完成解压缩


例如:


1.将当前目录下所有.txt文件打包并压缩归档到文件this.tar.gz,我们可以使用


tar czvf this.tar.gz ./*.txt


2.将当前目录下的this.tar.gz中的文件解压到当前目录我们可以使用


tar xzvf this.tar.gz ./


利用samba备份文件。

利用samba备份文件。


首先安装samba
# yum install samba


增加用户backupuser
#adduser backupuser -g users
然后修改backupuser的密码xxxxxx
#passwd backupuser


[backupfile]
    comment = file backup dir.it will auto backup per hour.
    valid users= backupuser
    path=/data/backupfile
    browseable=no
    writable=yes


增加smbuser
#smbpasswd -a backupuser
输入密码,直接按回车就可以了。


#mount -t cifs -o username=strong,password=strongkiller -v //mysqlhost/1363file /backupdir


如果出现错,如权限等,请确认backupuser有读写/data/backupfile的权限,如果还不行就把seLinux关闭。


#vi backup_file_per_hour.sh


#!/bin/sh
time_year_month=”$(date +”%Y%m”)”
time_day=”$(date +”%d”)”
need_backup_folder=”/data2/album/$time_year_month/$time_day”
backup_year_folder=”/backupdir/album/$time_year_month”
if [ ! -d $backup_year_folder ]
        then
       mkdir $backup_year_folder
fi


backup_current_folder=”/backupdir/album/$time_year_month/$time_day”
if [ ! -d $backup_current_folder ]
        then
                mkdir $backup_current_folder
fi


cp -rfu $need_backup_folder/*.* $backup_current_folder/


#crontab -e


59 * * * * sh /home1/software/backup_file_per_hour.sh


lighttpd 1.4.20发布

9月30日lighttpd 1.4.20版本发布了。lighttpd不用多介绍了,现在非常流行的轻量级Web服务器,提供良好的Ruby on Rails,PHP和Python的FastCGI/SCGI运行方式的支持。 

lighttpd1.4.20版本是1.4.x系列的最新的维护版本,修复了从1.4.19以来大量的小bug,也是目前lighttpd最稳定最好的版本,推荐升级。这个版本比较关注的bug修复是一些HTTP不规范的400请求造成的内存泄漏问题以及SSL处理的问题造成的DOS攻击。以下是详细更新记录: 

引用
    *  Fix mod_compress to compile with old gcc version (#1592) 
    * Fix mod_extforward to compile with old gcc version (#1591) 
    * Update documentation for #1587 
    * Fix #285 again: read error after SSL_shutdown (thx [email protected]) and clear the error queue before some other calls (CVE-2008-1531) 
    * Fix mod_magnet: enable “request.method” and “request.protocol” in lighty.env (#1308) 
    * Fix segfault for appending matched parts if there was no regex matching (just give empty strings) (#1601) 
    * Use data_response_init in mod_fastcgi x-sendfile handling for response.headers, fix a small “memleak” (#1628) 
    * Don’t send empty Server headers (#1620) 
    * Fix conditional interpretation of core options 
    * Enable escaping of % and $ in redirect/rewrite; only two cases changed their behaviour: “%” => “”, ”$$” => ”$” 
    * Fix accesslog port (should be port from the connection, not the “server.port”) (#1618) 
    * Fix mod_fastcgi prefix matching: match the prefix always against url, not the absolute filepath (regardless of check-local) 
    * Overwrite Content-Type header in mod_dirlisting instead of inserting (#1614), patch by Henrik Holst 
    * Handle EINTR in mod_cgi during write() (#1640) 
    * Allow all http status codes by default; disable body only for 204,205 and 304; generate error pages for 4xx and 5xx (#1639) 
    * Fix mod_magnet to set con->mode = p->id if it generates content, so returning 4xx/5xx doesn’t append an error page 
    * Remove lighttpd.spec* from source, fixing all problems with it 😉 
    * Do not rely on PATH_MAX (POSIX does not require it) (#580) 
    * Disable logging to access.log if filename is an empty string 
    * Implement a clean way to open /dev/null and use it to close stdin/out/err in the needed places (#624) 
    * merge spawn-fcgi changes from trunk (from @2191) 
    * let spawn-fcgi propagate exit code from spawned fcgi application 
    * close connection after redirect in trigger_b4_dl (thx icy) 
    * close connection in mod_magnet if returned status code 
    * fix bug with IPv6 in mod_evasive (#1579) 
    * fix scgi HTTP/1.* status parsing (#1638), found by [email protected] 
    * [tests] fixed system, use foreground daemons and waitpid 
    * [tests] removed pidfile from test system 
    * [tests] fixed tests needing php running (if not running on port 1026, search php in env[PHP] or /usr/bin/php-cgi) 
    * fixed typo in mod_accesslog (#1699) 
    * replaced buffer_{append,copy}_string with the _len variant where possible (#1732) (thx crypt) 
    * case insensitive match for secdownload md5 token (#1710) 
    * Handle only HEAD, GET and POST in mod_dirlisting (same as in staticfile) (#1687) 
    * fixed mod_secdownload problem with unsigned time_t (#1688) 
    * handle EAGAIN and EINTR for freebsd sendfile (#1675) 
    * Use filedescriptor 0 for mod_scgi spawn socket, redirect STDERR to /dev/null (#1716) 
    * fixed round-robin balancing in mod_proxy (#1715) 
    * fixed EINTR handling for waitpid in mod_fastcgi 
    * mod_{fast,s}cgi: overwrite environment variables (#1722) 
    * inserted many con->mode checks; they should prevent two modules to handle the same request if they shouldn’t (#631) 
    * fixed url encoding to encode more characters (#266) 
    * allow digits in [s]cgi env vars (#1712) 
    * fixed dropping last character of evhost pattern (#161) 
    * print helpful error message on conditionals in global block (#1550) 
    * decode url before matching in mod_rewrite (#1720) 
    * fixed conditional patching of ldap filter (#1564) 
    * Match headers case insensitive in response (removing of X-{Sendfile,LIGHTTPD-*}, catching Date/Server) 
    * fixed bug with case-insensitive filenames in mod_userdir (#1589), spotted by “anders1” 
    * fixed format string bugs in mod_accesslog for SYSLOG 
    * replaced fprintf with log_error_write in fastcgi debug 
    * fixed mem leak in ssi expression parser (#1753), thx Take5k 
    * hide some ssl errors per default, enable them with debug.log-ssl-noise (#397) 
    * do not send content-encoding for 304 (#1754), thx yzlai 
    * fix segfault for stat_cache(fam) calls with relative path (without ’/’, can be triggered by x-sendfile) (#1750) 
    * fix splitting of auth-ldap filter 
    * workaround ldap connection leak if a ldap connection failed (restarting ldap) 
    * fix auth.backend.ldap.bind-dn/pw problems (only read from global context for temporary ldap reconnects, thx ruskie) 
    * fix memleak in request header parsing (#1774, thx qhy) 
    * fix mod_rewrite memleak/endless loop detection (#1775, thx phy – again!) 
    * use decoded url for matching in mod_redirect (#1720)