How to Use MQTT With the Raspberry Pi and ESP8266

How to Use MQTT With the Raspberry Pi and ESP8266

In this Instructable, I will explain what the MQTT protocol is and how it is used to communicate between devices.Then, as a practical demonstration, I shall show you how to setup a simple two client system, where an ESP8266 module will send a message to a Python program when a button is pushed. Specifically, I am using an Adafruit HUZZAH module for this project, a Raspberry Pi and a desktop computer. The Raspberry Pi will be acting as the MQTT broker, and the Python client will be run from a separate desktop computer (optional, as this could be run on the Raspberry Pi).

To follow along with this Instructable, you will need to have some basic knowledge of electronics, and how to use the Arduino software. You should also be familiar with using a command line interface (for the Raspberry Pi). Hopefully, once you’ve gained the knowledge of what MQTT is, and how to use it in a basic scenario, you will be able to create your own IoT projects!

Required Parts

  • 1 x Raspberry Pi, connected to a local network (running Jessie)
  • 1 x ESP8266 Module (Adafruit HUZZAH)
  • 1 x Breadboard
  • 3 x Jumper Wires (Male-to-Male)
  • 1 x Pushbutton
  • 1 x 10k Ohm Resistor (Brown-Black-Orange colour code)

I’ve created this Instructable, as MQTT has always interested me as a protocol and there are many different ways it could be used. However, I couldn’t seem to get my head around how to code devices to use it. This was because I didn’t know/understand what was actually going on to take my “Hello, World!” from device A and send it to device B. Hence, I decided to write this Instructable to (hopefully) teach you how it works, and to also reinforce my own understanding of it!


Step 1: What Is MQTT?

What Is MQTT?

MQTT, or MQ Telemetry Transport, is a messaging protocol which allows multiple devices to talk to each other. Currently, it is a popular protocol for the Internet of Things, although it has been used for other purposes – for example, Facebook Messenger. Interestingly MQTT was invented in 1999 – meaning it’s as old as me!

MQTT is based around the idea that devices can publish or subscribe to topics. So, for example. If Device #1 has recorded the temperature from one of its sensors, it can publish a message which contains the temperature value it recorded, to a topic (e.g. “Temperature”). This message is sent to an MQTT Broker, which you can think of as a switch/router on a local area network. Once the MQTT Broker has received the message, it will send it to any devices (in this case, Device #2) which are subscribed to the same topic.

In this project, we will be publishing to a topic using an ESP8266, and creating a Python script that will subscribe to this same topic, via a Raspberry Pi which will act as the MQTT Broker. The great thing about MQTT is that it is lightweight, so it perfect for running on small microcontrollers such as an ESP8266, but it is also widely available – so we can run it on a Python script as well.

Hopefully, at the end of this project, you will have an understanding of what MQTT is and how to use it for your own projects in the future.

Step 2: Installing the MQTT Broker on the Raspberry Pi

Installing the MQTT Broker on the Raspberry Pi

To setup our MQTT system, we need a broker, as explained in the previous step. For the Raspberry Pi, we will be using the “Mosquitto” MQTT broker. Before we install this, it is always best to update our Raspberry Pi.

sudo apt-get update
sudo apt-get upgrade

Once you’ve done this, install mosquitto and then the mosquitto-clients packages.

sudo apt-get install mosquitto -y
sudo apt-get install mosquitto-clients -y

When you’ve finished installing these two packages, we are going to need to configure the broker. The mosquitto broker’s configuration file is located at /etc/mosquitto/mosquitto.conf, so open this with your favourite text editor. If you don’t have a favourite text editor or don’t know how to use any of the command line editors, I’ll be using nano so you can follow along:

sudo nano /etc/mosquitto/mosquitto.conf

At the bottom of this file, you should see the line:

include_dir /etc/mosquitto/conf.d

Delete this line. Add the following lines to the bottom of the file.

allow_anonymous false
password_file /etc/mosquitto/pwfile
listener 1883

By typing those lines, we’ve told mosquitto that we don’t want anyone connecting to our broker who doesn’t supply a valid username and password (we’ll get on to set these in a second) and that we want mosquitto to listen for messages on port number 1883.

If you don’t want the broker to require a username and password, don’t include the first two lines that we added (i.e. allow_anonymous… and password_file…). If you have done this, then skip to rebooting the Raspberry Pi.

Now close (and save) that file. If you are following along with the nano example, press CTRL+X, and type Y when prompted.

Because we’ve just told mosquitto that users trying to use the MQTT broker need to be authenticated, we now need to tell mosquitto what the username and password are! So, type the following command – replacing username with the username that you would like – then enter the password you would like when prompted (Note: if, when editing the configuration file, you specified a different password_file path, replace the path below with the one you used).

sudo mosquitto_passwd -c /etc/mosquitto/pwfile username

As we’ve just changed the mosquitto configuration file, we should reboot the Raspberry Pi.

sudo reboot

Once the Raspberry Pi has finished rebooting, you should have a fully functioning MQTT broker! Next, we are going to try to interact with it, using a number of different devices/methods!

Step 3: Testing the Broker

Testing the Broker

Once you’ve installed mosquitto on the Raspberry Pi, you can give it a quick test – just to make sure everything is working correctly. For this purpose, there are two commands that we can use on the command line. mosquitto_pub and mosquitto_sub. In this step, I will guide you through using each of these to test our broker.

In order to test the broker, you will need to open two command line windows. If you are using Putty or another SSH client, this is as simple as opening another SSH window and logging in as usual. If you are accessing your Pi from a UNIX terminal, this is exactly the same. If you are using the Raspberry Pi directly, you will need to open two terminal windows in the GUI mode (the command startxcan be used to start the GUI).

Now that you have opened two windows, we can get started on the testing. In one of the two terminals, type the following command, replacing username and password with the ones you setup in the previous step.

mosquitto_sub -d -u username -P password -t test

If you decided not to set a username and password in the previous step, then from now on, ignore the -u and -P flags in the commands. So, as an example, the mosquitto_sub command would now be:

mosquitto_sub -d -t test

The mosquitto_sub command will subscribe to a topic, and display any messages that are sent to the specified topic in the terminal window. Here, -d means debug mode, so all messages and activity will be output on the screen. -u and -P should be self-explanatory. Finally, -t is the name of the topic we want to subscribe to – in this case, “test”.

Next, in the other terminal window, we are going to try and publish a message to the “test” topic. Type the following, remembering again to change username and password:

mosquitto_pub -d -u username -P password -t test -m "Hello, World!"

When you press enter, you should see your message “Hello, World!” appear in the first terminal window we used (to subscribe). If this is the case, you’re all set to start working on the ESP8266!

Step 4: Setting Up the ESP8266 (Adafruit HUZZAH)

Setting Up the ESP8266 (Adafruit HUZZAH)

This step if specific to the Adafruit HUZZAH (as that is what I am using to complete this project). If you are using a different Arduino / ESP8266 device, you may wish to skip this step. However, I would advise you skim read it, just in case there is any information here that may be relevant to you.

For this project, I am going to be programming the HUZZAH with the Arduino software. So, if you haven’t already, make sure to install the Arduino software (newer than 1.6.4). You can download it here.

Once you have installed the Arduino software, open it and navigate to File->Preferences. Here you should see (near the bottom of the window) a text box with the label: “Additional Boards Manager URLs”. In this text box, copy and paste the following link:

http://arduino.esp8266.com/stable/package_esp8266com_index.json

Click OK to save your changes. Now open the Board Manager (Tools->Board->Board Manager) and search for ESP8266. Install the esp8266 by ESP8266 Community package. Restart the Arduino software.

Now, before we can program the board, we need to select a few different options. In the Tools menu option, select Adafruit HUZZAH ESP8266 for Board, 80 MHz for the CPU Frequency (you can use 160 MHz if you wish to overclock it, but for now I’m going to use 80 MHz), 4M (3M SPIFFS) for the Flash Size, and 115200 for the Upload Speed. Also, make sure to select the COM port that you are using (this will depend on your setup).

Before you can upload any code, you need to make sure that the HUZZAH is in bootloader mode. To enable this, hold down the button on the board marked GPIO0, and whilst this is held, hold down the Reset button as well. Then, release the Reset button, and then GPIO0. If you have done this correctly, the red LED that came on when you pressed GPIO0 should now be dimly lit.

To upload code to the microcontroller, first make sure the HUZZAH is in bootloader mode, then simply click the upload button in the Arduino IDE.

If you are having any trouble setting up the HUZZAH, further information can be found at Adafruit’s own tutorial.

Step 5: Programming the ESP8266

Programming the ESP8266

Now we will begin to program the ESP8266, but before we can start, you will need to install the following libraries in the Arduino Library manager (Sketch->Include Libraries->Manage Libraries)

  • Bounce2
  • PubSubClient

Once you’ve installed those libraries, you will be able to run the code I’ve included in this Instructable (MQTT_Publish.zip). I’ve made sure to comment it so that you can understand what each section is doing, and this should hopefully enable you to adapt it to your needs.

Remember to change the constants at the top of the code so that your ESP8266 can connect to your WiFi network and your MQTT Broker (the Raspberry Pi).

If you decided not to set a username and password for the MQTT Broker, then download the MQTT_PublishNoPassword.zip file instead.

Attachments

Step 6: Installing Python Client (paho-mqtt)

Installing Python Client (paho-mqtt)

Thankfully, this step is very simple! To install the mosquitto python client, you just need to type the following into the command line (Linux/Mac) or even command prompt (Windows).

pip install paho-mqtt

Note: Windows command prompt may have an issue running the pip command if you didn’t specify that you wanted pip installed and python added to your PATH variable when you installed Python. There are a number of ways of fixing this, but I think just reinstalling Python is the easiest way. If in doubt – give it a google!

Step 7: Python Client – Subscribing

Python Client - Subscribing

In this step, we are going to setup the Python script (either on the Raspberry Pi itself or on another computer connected to the network) to handle all of the messages that are sent (published) by the ESP8266 to the MQTT topic.

I have included the python code below (PythonMQTT_Subscribe.py), which has been commented to help you understand what is going on, but I will explain some of the main features here as well.

If you didn’t set a username and password for the MQTT connection earlier, download the PythonMQTT_SubscribeNoPassword.py file instead.

Attachments

Step 8: Communicating Between ESP8266 Devices

Communicating Between ESP8266 Devices

If you want to set up an IoT network, for example, you may wish to communicate between ESP8266 devices. Thankfully, this isn’t much more complex than the code we’ve written before, however, there are a couple of notable changes.

For one ESP to send data to another, the first ESP will need to publish to the topic, and the second ESP will need to subscribe to that topic. This setup will allow for a one-way conversation – ESP(1) to ESP(2). If we want ESP(2) to talk back to ESP(1), we can create a new topic, to which ESP(2) will publish, and ESP(1) will subscribe. Thankfully, we can have multiple subscribers on the same topic, so if you want to send data to a number of systems, you will only need one topic (to which they all subscribe, except the device which is sending the data, as that will be publishing).

If you need help figuring out what each device needs to do, think about the system as a room of people. If ESP(1) is publishing, you can imagine this device as a “speaker”, and any devices that are subscribing to the topic are “listeners” in this example.

I have included some example code below, which demonstrates how an ESP8266 can subscribe to a topic, and listen for certain messages – 1 and 0. If 1 is received, the on-board LED (for the HUZZAH – GPIO 0) is switched on. If 0 is received, this LED is switched off.

If you want to process more complex data, this should be done in the ReceivedMessage function (see code).

For your own projects, if you need to both send and receive data, you can incorporate the publish function from the previous example into the code included in this step. This should be handled in the main Arduino loop() function.

Remember to change the variables at the top of the code to suit your network!

IoT based Smart Irrigation System using Soil Moisture Sensor and ESP8266 NodeMCU

IoT based Smart Irrigation System using Soil Moisture Sensor and ESP8266 NodeMCUIoT based Smart Irrigation System using Soil Moisture Sensor and ESP8266 NodeMCU

Most of the farmers use large portions of farming land and it becomes very difficult to reach and track each corner of large lands. Sometime there is a possibility of uneven water sprinkles. This result in the bad quality crops which further leads to financial losses. In this scenario the Smart Irrigation System using Latest IoT technology is helpful and leads to ease of farming.

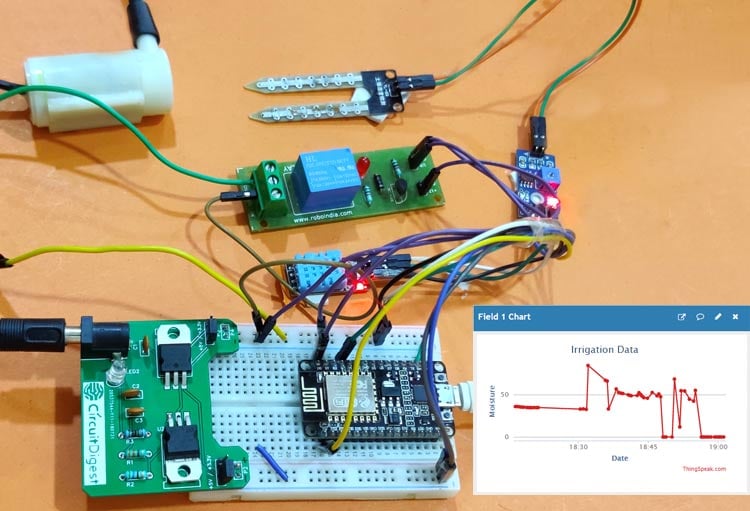
The Smart irrigation System has wide scope to automate the complete irrigation system. Here we are building a IoT based Irrigation System using ESP8266 NodeMCU Module and DHT11 Sensor. It will not only automatically irrigate the water based on the moisture level in the soil but also send the Data to ThingSpeak Server to keep track of the land condition. The System will consist a water pump which will be used to sprinkle water on the land depending upon the land environmental condition such as Moisture, Temperature and Humidity.

We previously build similar Automatic Plant Irrigation System which sends alerts on mobile but not on IoT cloud. Apart from this, Rain alarm and soil moisture detector circuit can also be helpful in building Smart Irrigation system.

Before starting, it is important to note that the different crops require different Soil Moisture, Temperature and Humidity Condition. So in this tutorial we are using such a crop which will require a soil moisture of about 50-55%. So when the soil loses its moisture to less than 50% then Motor pump will turn on automatically to sprinkle the water and it will continue to sprinkle the water until the moisture goes upto 55% and after that the pump will be turned off. The sensor data will be sent to ThingSpeak Server in defined interval of time so that it can be monitored from anywhere in the world.

Components Required

  • NodeMCU ESP8266
  • Soil Moisture Sensor Module
  • Water Pump Module
  • Relay Module
  • DHT11
  • Connecting Wires

You can buy all the components required for this project.

Circuit Diagram

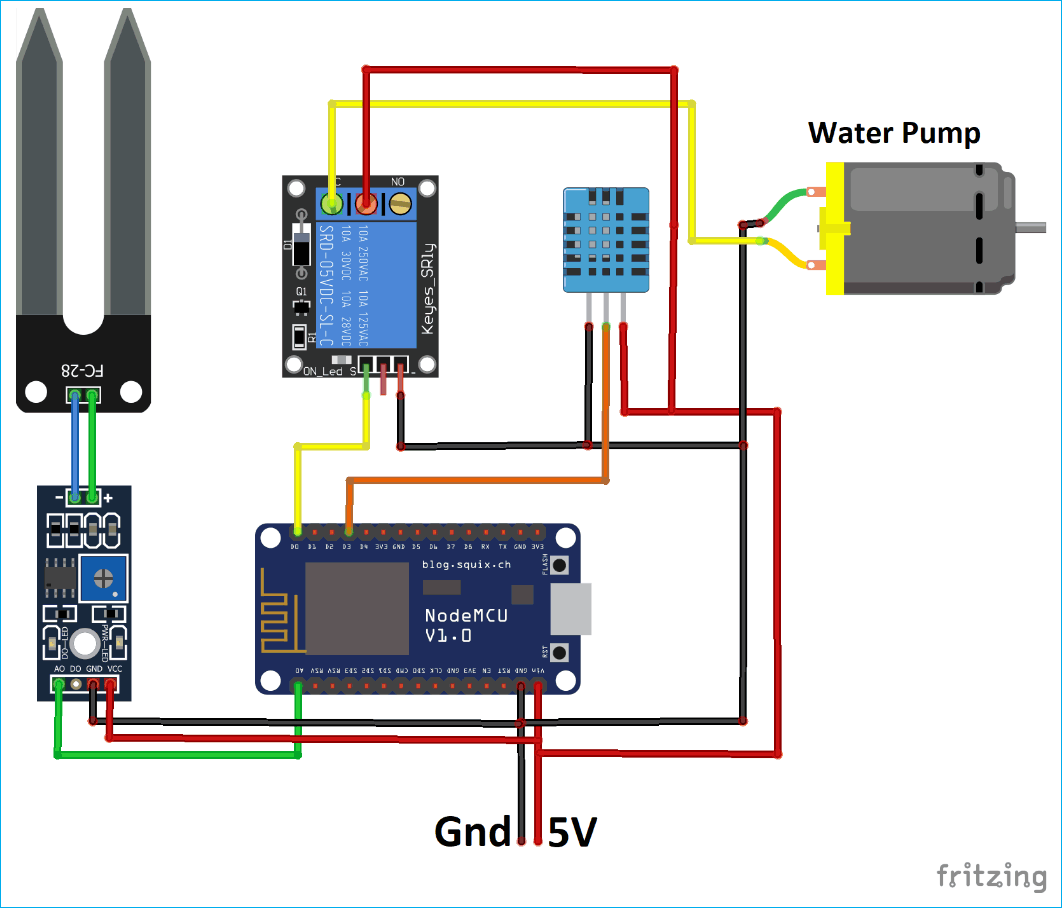
Circuit diagram for this IoT Smart Irrigation System is given below:

Circuit Diagram for IoT based Smart Irrigation System using Soil Moisture Sensor and ESP8266 NodeMCU

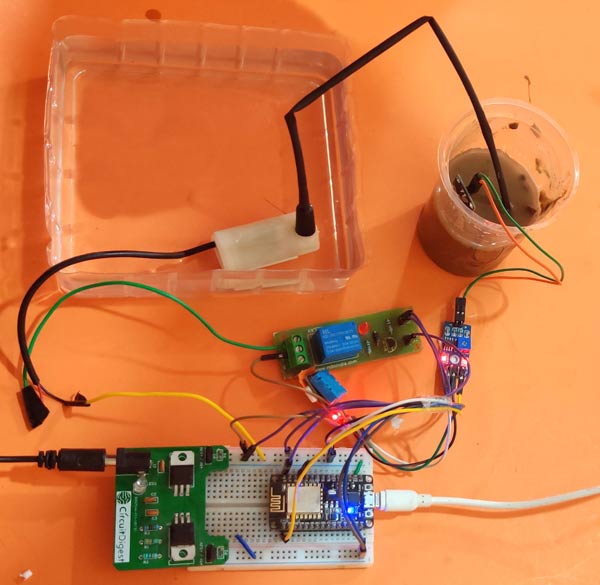
Circuit Hardware for IoT based Smart Irrigation System using Soil Moisture Sensor and ESP8266 NodeMCU

Programming ESP8266 NodeMCU for Automatic Irrigation System

For programming the ESP8266 NodeMCU module, only the DHT11 sensor library is used as external library. The moisture sensor gives analog output which can be read through the ESP8266 NodeMCU analog pin A0. Since the NodeMCU cannot give output voltage greater than 3.3V from its GPIO so we are using a relay module to drive the 5V motor pump. Also the Moisture sensor and DHT11 sensor is powered from external 5V power supply.

Complete code with a working video is given at the end of this tutorial, here we are explaining the program to understand the working flow of the project.

Start with including necessary library.

#include <DHT.h>
#include <ESP8266WiFi.h>

Since we are using the ThingSpeak Server, the API Key is necessary in order to communicate with server. To know how we can get API Key from ThingSpeak you can visit previous article on Live Temperature and Humidity Monitoring on ThingSpeak.

String apiKey = "X5AQ445IKMBYW31H
const char* server = "api.thingspeak.com"; 

The next Step is to write the Wi-Fi credentials such as SSID and Password.

const char *ssid =  "CircuitDigest";     
const char *pass =  "xxxxxxxxxxx"; 

Define the DHT Sensor Pin where the DHT is connected and Choose the DHT type.

#define DHTPIN D3          
DHT dht(DHTPIN, DHT11);

The moisture sensor output is connected to Pin A0 of ESP8266 NodeMCU. And the motor pin is connected to D0 of NodeMCU.

const int moisturePin = A0;
const int motorPin = D0;

We will be using millis() function to send the data after every defined interval of time here it is 10 seconds. The delay() is avoided since it stops the program for a defined delay where microcontroller cannot do other tasks. Learn more about the difference between delay() and millis() here.

unsigned long interval = 10000;
unsigned long previousMillis = 0;

Set motor pin as output, and turn off the motor initially. Start the DHT11 sensor reading.

pinMode(motorPin, OUTPUT);
digitalWrite(motorPin, LOW); // keep motor off initally
dht.begin();

Try to connect Wi-Fi with given SSID and Password and wait for the Wi-Fi to be connected and if connected then go to next steps.

WiFi.begin(ssid, pass);
  while (WiFi.status() != WL_CONNECTED)
  {
    delay(500);
    Serial.print(".");
  }
  Serial.println("");
  Serial.println("WiFi connected");
}

Define the current time of starting the program and save it in a variable to compare it with the elapsed time.

unsigned long currentMillis = millis();

Read temperature and humidity data and save them into variables.

float h = dht.readHumidity();
float t = dht.readTemperature();

If DHT is connected and the ESP8266 NodeMCU is able to read the readings then proceed to next step or return from here to check again.

if (isnan(h) || isnan(t))
  {
    Serial.println("Failed to read from DHT sensor!");
    return;
  }

Read the moisture reading from sensor and print the reading.

moisturePercentage = ( 100.00 - ( (analogRead(moisturePin) / 1023.00) * 100.00 ) );
  Serial.print("Soil Moisture is  = ");
  Serial.print(moisturePercentage);
  Serial.println("%");

If the moisture reading is in between the required soil moisture range then keep the pump off or if it goes beyond the required moisture then turn the pump ON.

if (moisturePercentage < 50) {
    digitalWrite(motorPin, HIGH);
  }
   if (moisturePercentage > 50 && moisturePercentage < 55) {
    digitalWrite(motorPin, HIGH);
  }
 if (moisturePercentage > 56) {
    digitalWrite(motorPin, LOW);
  }

Now after every 10 seconds call the sendThingspeak() function to send the moisture, temperature and humidity data to ThingSpeak server.

  if ((unsigned long)(currentMillis - previousMillis) >= interval) {
    sendThingspeak();
    previousMillis = millis();
    client.stop();
  }

In the sendThingspeak() function we check if the system is connected to server and if yes then we prepare a string where moisture, temperature, humidity reading is written and this string will be sent to ThingSpeak server along with API key and server address.

if (client.connect(server, 80))
    {
      String postStr = apiKey;
      postStr += "&field1=";
      postStr += String(moisturePercentage);
      postStr += "&field2=";
      postStr += String(t);
      postStr += "&field3=";
      postStr += String(h);      
      postStr += "\r\n\r\n";

Finally the data is sent to ThingSpeak server using client.print() function which contains API key, server address and the string which is prepared in previous step.

client.print("POST /update HTTP/1.1\n");
      client.print("Host: api.thingspeak.com\n");
      client.print("Connection: close\n");
      client.print("X-THINGSPEAKAPIKEY: " + apiKey + "\n");
      client.print("Content-Type: application/x-www-form-urlencoded\n");
      client.print("Content-Length: ");
      client.print(postStr.length());
      client.print("\n\n");
      client.print(postStr);

Finally this is how the data looks on ThingSpeak Dashboard

Getting Data on ThingSpeak for IoT based Smart Irrigation System

This last step finishes the complete tutorial on IoT based Smart Irrigation System. Note that it is important to switch off the motor when the soil moisture has reached the required level after water sprinkle. You can make a more smart system which can contain different control for different crops.

If you face any issues while doing this project then comment below or reach to our forums for more relevant questions and their answers.

Find the complete program and demonstration Video for this project below.

Code

#include <DHT.h>
#include <ESP8266WiFi.h>
String apiKey = “X5AQ3EGIKMBYW31H”;     //  Enter your Write API key here
const char* server = “api.thingspeak.com”;
const char *ssid =  “CircuitLoop”;     // Enter your WiFi Name
const char *pass =  “circuitdigest101”; // Enter your WiFi Password
#define DHTPIN D3          // GPIO Pin where the dht11 is connected
DHT dht(DHTPIN, DHT11);
WiFiClient client;

const int moisturePin = A0;             // moisteure sensor pin
const int motorPin = D0;
unsigned long interval = 10000;
unsigned long previousMillis = 0;
unsigned long interval1 = 1000;
unsigned long previousMillis1 = 0;
float moisturePercentage;              //moisture reading
float h;                  // humidity reading
float t;                  //temperature reading

void setup()
{
Serial.begin(115200);
delay(10);
pinMode(motorPin, OUTPUT);
digitalWrite(motorPin, LOW); // keep motor off initally
dht.begin();
Serial.println(“Connecting to “);
Serial.println(ssid);
WiFi.begin(ssid, pass);
while (WiFi.status() != WL_CONNECTED)
{
delay(500);
Serial.print(“.”);              // print … till not connected
}
Serial.println(“”);
Serial.println(“WiFi connected”);
}

void loop()
{
unsigned long currentMillis = millis(); // grab current time

h = dht.readHumidity();     // read humiduty
t = dht.readTemperature();     // read temperature

if (isnan(h) || isnan(t))
{
Serial.println(“Failed to read from DHT sensor!”);
return;
}

moisturePercentage = ( 100.00 – ( (analogRead(moisturePin) / 1023.00) * 100.00 ) );

if ((unsigned long)(currentMillis – previousMillis1) >= interval1) {
Serial.print(“Soil Moisture is  = “);
Serial.print(moisturePercentage);
Serial.println(“%”);
previousMillis1 = millis();
}

if (moisturePercentage < 50) {
digitalWrite(motorPin, HIGH);         // tun on motor
}
if (moisturePercentage > 50 && moisturePercentage < 55) {
digitalWrite(motorPin, HIGH);        //turn on motor pump
}
if (moisturePercentage > 56) {
digitalWrite(motorPin, LOW);          // turn off mottor
}

if ((unsigned long)(currentMillis – previousMillis) >= interval) {

sendThingspeak();           //send data to thing speak
previousMillis = millis();
client.stop();
}

}

void sendThingspeak() {
if (client.connect(server, 80))
{
String postStr = apiKey;              // add api key in the postStr string
postStr += “&field1=”;
postStr += String(moisturePercentage);    // add mositure readin
postStr += “&field2=”;
postStr += String(t);                 // add tempr readin
postStr += “&field3=”;
postStr += String(h);                  // add humidity readin
postStr += “\r\n\r\n”;

client.print(“POST /update HTTP/1.1\n”);
client.print(“Host: api.thingspeak.com\n”);
client.print(“Connection: close\n”);
client.print(“X-THINGSPEAKAPIKEY: ” + apiKey + “\n”);
client.print(“Content-Type: application/x-www-form-urlencoded\n”);
client.print(“Content-Length: “);
client.print(postStr.length());           //send lenght of the string
client.print(“\n\n”);
client.print(postStr);                      // send complete string
Serial.print(“Moisture Percentage: “);
Serial.print(moisturePercentage);
Serial.print(“%. Temperature: “);
Serial.print(t);
Serial.print(” C, Humidity: “);
Serial.print(h);
Serial.println(“%. Sent to Thingspeak.”);
}
}

ADS1115 analog-to-digital converter and ESP8266

The ADS1115 device is a precision, low-power, 16-bit, I2C-compatible, analog-to-digital converters (ADCs) offered in an ultra-small, leadless, X2QFN-10 package, and a VSSOP-10 package. The ADS1115 device incorporates a low-drift voltage reference and an oscillator. The ADS1115 also incorporate a programmable gain amplifier and a digital comparator. These features, along with a wide operating supply range, make the ADS1115 well suited for power- and space-constrained, sensor measurement applications.

The ADS1115 perform conversions at data rates up to 860 samples per second (SPS). The PGA offers input ranges from ±256 mV to ±6.144 V, allowing precise large- and small-signal measurements. The ADS1115 features an input multiplexer  that allows two differential or four single-ended input measurements. Use the digital comparator in the ADS1115 for under- and overvoltage detection.

The ADS1115 operates in either continuous-conversion mode or single-shot mode. The devices are automatically powered down after one conversion in single-shot mode; therefore, power consumption is significantly reduced during idle periods.

Features

Wide Supply Range: 2.0 V to 5.5 V
Low Current Consumption: 150 µA
(Continuous-Conversion Mode)
Programmable Data Rate: 8 SPS to 860 SPS
Single-Cycle Settling
Internal Low-Drift Voltage Reference
Internal Oscillator
I2C Interface: Four Pin-Selectable Addresses
Four Single-Ended or Two Differential Inputs (ADS1115)
Programmable Comparator (ADS1114 and ADS1115)
Operating Temperature Range: –40°C to +125°C

Parts List

This module will cost less than $2

Amount Part Type
1 ADS1115
1 Wemos D1 mini V2


Schematics/Layout


In the layout below we just show basic connection between Wemos Mini and ADS1115 – you can add a pot, connect an LDR to one of the A0 – A3 inputs of the ADS1115

esp8266 and ads1115
esp8266 and ads1115


Code

Again we use a library and again its an adafruit one – https://github.com/adafruit/Adafruit_ADS1X15

#include <Wire.h>
#include <Adafruit_ADS1015.h>
 
Adafruit_ADS1115 ads(0x48);
 
void setup(void)
{
Serial.begin(9600);
Serial.println("Hello!");
 
Serial.println("Getting single-ended readings from AIN0..3");
Serial.println("ADC Range: +/- 6.144V (1 bit = 3mV/ADS1015, 0.1875mV/ADS1115)");
 
ads.begin();
}
 
void loop(void)
{
int16_t adc0, adc1, adc2, adc3;
 
adc0 = ads.readADC_SingleEnded(0);
adc1 = ads.readADC_SingleEnded(1);
adc2 = ads.readADC_SingleEnded(2);
adc3 = ads.readADC_SingleEnded(3);
Serial.print("AIN0: ");
Serial.println(adc0);
Serial.print("AIN1: ");
Serial.println(adc1);
Serial.print("AIN2: ");
Serial.println(adc2);
Serial.print("AIN3: ");
Serial.println(adc3);
Serial.println(" ");
 
delay(1000);
}


Links

http://www.ti.com/lit/ds/symlink/ads1115.pdf

I2C ADS1115 16 Bit ADC 4 channel Module with Programmable Gain Amplifier 2.0V to 5.5V RPi

How to Setup VyprVPN on the Raspberry Pi

In this tutorial, I will be going through all the steps to setting up Raspberry Pi VyprVPN.

Raspberry Pi VyprVPN

This tutorial is handy if you’re looking to connect your Pi to the VyprVPN service.

There are many reasons why you may want to set up a VPN on the Raspberry Pi. The most common is that you want an extra layer of security and anonymity to your network activities. These benefits are handy for a range of different Raspberry Pi projects.

Most of our projects have been tested for the latest version of Raspbian. I recommend upgrading to the most recent for the best experience when following this tutorial.

If VyprVPN doesn’t take your fancy, then we do have other tutorials that cover services such as ExpressVPN or NordVPN.

You can find the tutorial right below if you have any issues then be sure to let us know over at our forum.

 Equipment

All the equipment that you need to set up this Raspberry Pi VyprVPN tutorial is listed right below.

Recommended

 Raspberry Pi

 Micro SD Card

 Ethernet Cable or WiFi dongle (Pi 3 has WiFi inbuilt)

 Power Adapter

 VyprVPN Subscription

Optional

 Raspberry Pi Case

 USB Keyboard

 USB Mouse

 Installing VyprVPN to the Raspberry Pi

VyprVPN isn’t much different to installing most VPN services on the Raspberry Pi as most make use of the OpenVPN software.

1. If you haven’t already, then you will need to sign up to VyprVPN.

2. Load the terminal on the Raspberry Pi or make use of SSH to remotely it access.

3. Update the Raspbian to the latest packages.

sudo apt-get update
sudo apt-get upgrade

4. Now, let’s install the OpenVPN package, you can do this by entering the following command.

sudo apt-get install openvpn

5. Change directory to the OpenVPN directory by entering the following.

cd /etc/openvpn/

6. We will now need to download the VyprVPN ovpn files.

sudo wget -O vyprvpn.zip \
https://support.goldenfrog.com/hc/article_attachments/360008728172/GF_OpenVPN_10142016.zip

7. Next, we will now need to extract the files that we need.

sudo unzip vyprvpn.zip

8. Now let’s move all the files to the base directory and delete VyprVPN directory.

sudo mv /etc/openvpn/OpenVPN256/* /etc/openvpn/
sudo rm -r /etc/openvpn/OpenVPN256

9. To connect to VyprVPN simply use the following command.

sudo openvpn file_name

Replace file_name with the location of where you wish to connect. For example, If I wanted Canada for example, then I will use Canada.ovpn. You can view all the locations by using the following command.

ls -l /etc/openvpn

Below is an example of connecting to Canada.

sudo openvpn /etc/openvpn/Canada.ovpn

10. It will now ask for your credentials, and you will need to enter them to be able to connect to VyprVPN. Test your connection by going ipleak.net. You should have a different IP to your usual one.

11. If you need to disconnect, then you can easily use either ctrl+c or the following command.

sudo killall openvpn

 Auto Start VyprVPN

Most of us love to reduce the amount of manual input required for when it comes to technology. The following steps will show you how to set up VyprVPN to connect automatically on bootup.

1. Firstly, we will need to save both our username and password in a file.

sudo nano /etc/openvpn/auth.txt

2. In this file, add your chosen username and password for the service. Make sure the username and password are both on separate lines.

username
password

3. Save and exit by pressing ctrl+x, then y and lastly enter.

4. Now we will need to copy the ovpn file, simplify its name at the same time.

sudo cp "/etc/openvpn/Australia - Sydney.ovpn" /etc/openvpn/aussyd.conf

5. Now let’s edit this new file.

sudo nano /etc/openvpn/aussyd.conf

6. We will only need to do a straightforward edit in this file.

Find

auth-user-pass

Replace with

auth-user-pass auth.txt

7. Finally, we need to setup OpenVPN to auto start using our ovpn file.

sudo nano /etc/default/openvpn

Find

#AUTOSTART="all"

Replace with

AUTOSTART="aussyd"

Replace aussyd with the filename you set.

8. Save and exit.

9. Reboot the Raspberry Pi to test out our new configuration.

sudo reboot

10. Now test the VPN by going to ipleak.net or a similar website. The IP should be VyprVPNs and not your own. Doing this step will confirm that we have successfully set up VyprVPN on the Raspberry Pi.

 Preventing DNS Leaks

To ensure that your DNS isn’t leaking your location you will need to do a tweak on your Pi. To fix this, we will simply force our DNS to run through Cloudflare’s public DNS rather than our internet service providers (ISP) DNS. This process is pretty easy and won’t take long to do.

1. Firstly, load into the dhcpcd configuration file and update the following line.

Open

sudo nano /etc/dhcpcd.conf

Find

#static domain_name_servers=192.168.0.1

Replace with

static domain_name_servers=1.1.1.1

2. Save & exit the file.

3. Now reboot your Pi by entering the following command.

sudo reboot

4. Go to ipleak.net and check that your DNS is no longer leaking. If you’re still leaking. then you might want to look at this page on WebRTC requests for more information.

 Troubleshooting

If you run into trouble while setting up Raspberry Pi VyprVPN then the troubleshooting tips might help you out.

  • You’re able to start and stop your VPN by using the following command. Replacing stop with start will start the VPN backup. This command will only work if you have it set up for autostart.
sudo systemctl stop openvpn
  • It’s important to be aware that we are storing credentials in plain text. This lack of security makes it essential that you keep your Pi secure against unauthorized access. Just changing the default password will heavily improve your security.

As I mentioned above, there is plenty of other projects that work great with a VPN. Something as simple as a Torrentbox will benefit. Just make sure your VPN provider allows torrenting as some will ban you for using up too much bandwidth.

Hopefully, by the end of this Raspberry Pi VyprVPN tutorial, you have everything set up and working as it should be. If you require further help, then I highly recommend that you leave a comment.

One Program Written in Python, Go, and Rust

Python, Go, Rust mascots

Update (2019-07-04): Some kind folks have suggested changes on the implementations to make them more idiomatic, so the code here may differ from what’s currently in the repos.


This is a subjective, primarily developer-ergonomics-based comparison of the three languages from the perspective of a Python developer, but you can skip the prose and go to the code samplesthe performance comparison if you want some hard numbers, the takeaway for the tl;dr, or the PythonGo, and Rust diffimg implementations.

A few years ago, I was tasked with rewriting an image processing service. To tell whether my new service was creating the same output as the old given an image and one or more transforms (resize, make a circular crop, change formats, etc.), I had to inspect the images myself. Clearly I needed to automate this, but I could find no existing Python library that simply told me how different two images were on a per-pixel basis. Hence diffimg, which can give you a difference ratio/percentage, or generate a diff image (check out the readme to see an example).

The initial implementation was in Python (the language I’m most comfortable in), with the heavy lifting done by Pillow. It’s usable as a library or a command line tool. The actual meatof the program is very small, only a few dozen lines, thanks to Pillow. Not a lot of effort went into building this tool (xkcd was right, there’s a Python module for nearly everything), but it’s at least been useful for a few dozen people other than myself.

A few months ago, I joined a company that had several services written in Go, and I needed to get up to speed quickly on the language. Writing diffimg-go seemed like an fun and possibly even useful way to do this. Here are a few points of interest that came out of the experience, along with some that came up while using it at work:

Comparing Python and Go

(Again, the code: diffimg (python) and diffimg-go)

  • Standard Library: Go comes with a decent image standard library module, as well as a command line flag parsing library. I didn’t need to look for any external dependencies; the diffimg-go implementation has none, where the Python implementation uses the fairly heavy third party module (ironically) named Pillow. Go’s standard library in general is more structured and well thought out, while Python’s is organically evolved, created by many authors over years, with many differing conventions. The Go standard library’s consistency makes it easier to predict how any given module will function, and the source code is extremely well documented.
    • One downside of using the standard image library is that it does not automatically detect if the image has an alpha channel; pixel values have four channels (RGBA) for all image types. The diffimg-go implementation therefore requires the user to indicate whether or not they want to use the alpha channel. This small inconvenience wasn’t worth finding a third party library to fix.
    • One big upside is that there’s enough in the standard library that you don’t need a web framework like Django. It’s possible to build a real, usable web service in Go without any dependencies. Python’s claim is that it’s batteries-included, but Go does it better, in my opinion.
  • Static Type System: I’ve used statically typed languages in the past, but my programming for the past few years has mostly been in Python. The experience was somewhat annoying at first, it felt as though it was simply slowing me down and forcing me to be excessively explicit whereas Python would just let me do what I wanted, even if I got it wrong occasionally. Somewhat like giving instructions to someone who always stops you to ask you to clarify what you mean, versus someone who always nods along and seems to understand you, though you’re not always sure they’re absorbing everything. It will decrease the amount of type-related bugs for free, but I’ve found that I still need to spend nearly the same amount of time writing tests.
    • One of the common complaints of Go is that it does not have user-implementable generic types. While this is not a must-have feature for building a large, extensible application, it certainly slows development speed. Alternative patterns have been suggested, but none of them are as effective as having real generic types.
    • One upside of the static type system is that it reading through an unfamiliar codebase is easier and faster. Good use of types imbues a lot of extra information that is lost with a dynamic type system.
  • Interfaces and Structs: Go uses interfaces and structs where Python would use classes. This was probably the most interesting difference to me, as it forced me to differentiate the concept of a type that defines behavior versus a type that holds information. Python and other “traditionally object-oriented” languages would encourage you to mash these together, but there are pros and cons to both paradigms:
    • Go heavily encourages composition over inheritance. While it has inheritance via embedding, without classes, it’s not as easy to forward both data and methods. I generally agree that composition is the better default pattern to reach for, but I’m not an absolutist and some situations are a better fit for inheritance, so I’d prefer not to have the language make this decision for me.
    • Divorcing implementations for interfaces means you need to write similar code several times if you have many types that are similar to each other. Because of the lack of generic types, there are situations in Go where I wouldn’t be able to reuse code, though I would in Python.
    • However, because Go is statically typed, the compiler/linter will tell you when you’re writing code that would have caused a runtime error in Python when you try to access a method or attribute that may not exist. Python linters can get a bit of this functionality, but because of the language’s dynamicity, the linter can’t know exactly what methods/attributes will exist until runtime. Statically defined interfaces and structs are the only way to know what’s available at compile time and during development, making Go that compiles more trustworthy than Python that runs.
  • No Optional Arguments: Go only has variadic functions which are similar to Python’s keyword arguments, but less useful, since the arguments need to be of the same type. I found keyword arguments to be something I really missed, mainly for how much easier refactoring is if you can just throw a kwarg of any type onto whatever function needs it without having to rewrite every one of its calls. I use this feature quite often in at work, it’s saved me a lot of time over the years. Not having the feature made my implementation for how to handle whether or not the diff image should be created based on the command line flags somewhat clumsy.
  • Verbosity: Go is a bit more verbose (though not Java verbose). Part of that is because type system does not have generics, but mainly the fact that the language itself is very small and not heavily loaded with features (you only get one looping construct!). I missed having Python’s list comprehensions and other functional programming features. If you’re comfortable with Python, you can go through the Tour of Go in a day or two, and you’ll have been exposed to the entirety of the language.
  • Error Handling: Python has exceptions, whereas Go propagates errors by returning tuples: value, error from functions wherever something may go wrong. Python lets you catch errors at any point in the call stack as opposed to requiring you to manually pass them back up over and over again. This again results in brevity and code that isn’t littered with Go’s infamous if err != nil pattern, though you do need to be aware of what possible exceptions can be thrown by a function and all(!) of its internal calls (using except Exception: is a usually-bad-practice workaround for this). Good docstrings and tests can help here, which you should be writing in either language. Go’s system is definitely safer. You’re still allowed to shoot yourself in the foot by ignoring the err value, but the system makes it obvious that this is a bad idea.
  • Third Party Modules: Prior to Go modules, Go’s package manager would just throw all downloaded packages into $GOPATH/src instead of the project’s directory (like most other languages). The path for these modules inside $GOPATH would also be built from the URL where the package is hosted, so your import would look something like import "github.com/someuser/somepackage". Embedding github.cominside the source code of almost all Go codebases seems like a strange choice. In any case, Go now allows the conventional way of doing things, but Go modules are still new so this quirk will remain common in wild Go code for some time.
  • Asynchronicity: Goroutines are a very convenient way to fire off asynchronous tasks. Before async/await, Python’s asynchronous solutions were somewhat hairy. Unfortunately I haven’t written much real-world async code in Python or Go, and the simplicity of diffimg didn’t seem to lend itself to the added overhead of asynchronicity, so I don’t have too much to say here, though I do like Go’s channels as a way to handle multiple async tasks. My understanding is that for performance, Go still has the upper hand here as goroutines can make use of full multiprocessor parallelism, where Python’s basic async/await is still stuck on one processor, so mainly useful for I/O bound tasks.
  • Debugging: Python wins. pdb (and more sophisticated options like ipdb are available) is extremely flexible, once you’ve entered the REPL, you’re able to write whatever code you want. Delve is a good debugger, but it’s not the same as dropping straight into an interpreter, the full power of the language at your fingertips.

Go Summary

My initial impression of Go is that because its ability to abstract is (purposely) limited, it’s not as fun a language as Python is. Python has more features and thus more ways of doing something, and it can be a lot of fun to find the fastest, most readable, or “cleverest” solution. Go actively tries to stop you from being “clever.” I would go as far as saying that Go’s strength is that it’s not clever.

Its minimalism and lack of freedom are constraining as a single developer just trying to materialize an idea. However, this weakness becomes its strength when the project scales to dozens or hundreds of developers – because everyone’s working with the same small toolset of language features, it’s more likely to be uniform and thus understandable by others. It’s still very possible to write bad Go, but it’s more difficult to create monstrosities that more “powerful” languages will let you produce.

After using it for a while, it makes sense to me why a company like Google would want a language like this. New engineers are being introduced to enormous codebases constantly, and in a messier/more powerful language and under the pressure of deadlines, complexity could be introduced faster than it can be removed. The best way to prevent that is with a language that has less capacity for it.

With that said, I’m happy to work on a Go codebase in the context of a large application with a diverse and ever-growing team. In fact, I think I’d prefer it. I just have no desire to use it for my own personal projects.

Enter Rust

A few weeks ago, I decided to give an honest go at learning Rust. I had attempted to do so before but found the type system and borrow checker confusing and without enough context for why all these constraints were being forced on me, cumbersome for the tasks I was trying to do. However, since then, I’ve learned a bit more about what happens with memory during the execution of a program. I also started with the book instead of just attempting to dive in headfirst. This was massively helpful, and probably the best introduction to any programming language I’ve ever experienced.

After I had gone through the first dozen or so chapters of the book, I felt confident enough to try another implementation of diffimg (at this point, I had about as much experience with Rust as I’d had with Go when I wrote diffimg-go). It took me a bit longer to write than the Go implementation, which itself took longer than Python. I think this would be true even taking into account my greater comfort with Python – there’s just more to write in both languages.

Some of the things that I took notice of when writing diffimg-rs:

  • Type System: I was comfortable with the more basic static type system of Go by now, but Rust’s is significantly more powerful (and complicated). Generic types, enumerated types, traits, reference types, lifetimes are all additional concepts that I had to learn on top of Go’s much simpler interfaces and structs. Additionally, Rust uses its type system to implement features that other languages don’t use the type system for (example: the Result type, which I’ll talk about soon). Luckily, the compiler/linter is extremely helpful in telling you what you’re doing wrong, and often even tells you exactly how to fix it. Despite this, I’ve spent significantly more time than I did learning Go’s type system and I’m still not comfortable with all the features yet.
    • There was one place where because of the type system, the implementation of the imaging library I was using would have led to an uncomfortable amount of code repetition. I only ended up matching the two most important enum types, but matching the others would lead another half dozen or so lines of nearly identical code. At this scale it’s not an issue, but it rubs me the wrong way. Maybe it’s a good candidate for using macros, which I still need to experiment with.
      let mut diff = match image1.color() {
          image::ColorType::RGB(_) => image::DynamicImage::new_rgb8(w, h),
          image::ColorType::RGBA(_) => image::DynamicImage::new_rgba8(w, h),
          // keep going for all 7 types?
          _ => return Err(
              format!("color mode {:?} not yet supported", image1.color())
          ),
      };
      
  • Manual Memory Management: Python and Go pick up your trash for you. C lets you litter everywhere, but throws a fit when it steps on your banana peel. Rust slaps you and demands that you clean up after yourself. This stung at first, since I’m spoiled and usually have my languages pick up after me, moreso even than moving from a dynamic to a statically typed language. Again, the compiler tries to help you as much as is possible, but there’s still a good amount of studying you’ll need to do to understand what’s really going on.
    • One nice part about having such direct access to the memory (and the functional programming features of Rust) is that it simplified the difference ratio calculationbecause I could simply map over the raw byte arrays instead of having to index each pixel by coordinate.
  • Functional Features: Rust strongly encourages a functional approach: it has a FP-friendly type system like Haskell, immutable types, closures, iterators, pattern matching, and more, but also allows imperative code. It’s similar to writing OCaml (interestingly, the original Rust compiler was written in OCaml). Because of this, code is more concise than you’d expect for a language that competes with C.
  • Error Handling: Instead of the exception model that Python uses or the tuple returns that Go uses for error handling, Rust makes use of its enumerated types: Resultreturns either Ok(value) or Err(error). This is closer to Go’s way if you squint, but is a bit more explicit and leverages the type system. There’s also syntactic sugar for checking a statement for an Err and returning early: the ? operator (Go could use something like this, IMO).
  • Asynchronicity: Async/await hasn’t quite landed for Rust yet, but the final syntax has recently been agreed upon. Rust also has some basic threading features in the standard library that seem a bit easier to use than Python’s, but I haven’t spent much time with it. Go still seems to have the best offerings here.
  • Toolingrustup and cargo are extremely polished implementations of a language version manager and package/module manager, respectively. Everything “just works.” I especially love the autogenerated docs. The Python options for these are somewhat organic and finicky, and as I mentioned before, Go has a strange way of managing modules, though aside from that, its tooling is in a much better state than Python’s.
  • Editor Plugins: My .vimrc is embarrassingly large, with at least three dozen plugins. I have some plugins for linting, autocompleting, and formatting both Python and Go, but the Rust plugins were easier to set up, more helpful, and more consistent compared to the other two languages. The rust.vim and vim-lsp plugins (along with the Rust Language Server) were all I needed to get an extremely powerful configuration. I haven’t tested out other editors with Rust but with the excellent editor-agnostic tooling that Rust comes with, I’d expect them to be just as helpful. The setup provides the best go-to-definition I’ve ever used. It works perfectly on local, standard library, and third-party code out of the box.
  • Debugging: I haven’t tried out a debugger with Rust yet (since the type system andprintln! take you pretty far), but you can use rust-gdb and rust-lldb, wrappers around the gdb and lldb debuggers that are installed with the initial rustup. The experience should be predictable if you’ve used those debuggers before with C. As mentioned previously, the compiler error messages are extremely helpful.

Rust Summary

I definitely wouldn’t recommend attempting to write Rust without at least going through the first few chapters of the book, even if you’re already familiar with C and memory management. With Go and Python, as long as you have some experience with another modern imperative programming language, they’re not difficult to just start writing, referring to the docs when necessary. Rust is a large language. Python also has a lot of features, but they’re mostly opt-in. You can get a lot done just by understanding a few primitive data structures and some builtin functions. With Rust, you really need to understand the complexity inherent to the type system and borrow checker, or you’re going to be getting tangled up a lot.

As far as how I feel when I write Rust, it’s a lot of fun, like Python. Its breadth of features makes it very expressive. While the compiler stops you a lot, it’s also very helpful, and its suggestions on how to solve your borrowing/typing problems usually work. The tooling as I’ve mentioned is the best I’ve encountered for any language and doesn’t bring me a lot of headaches like some other languages I’ve used. I really like using the language and will continue to look for opportunities to do so, where the performance of Python isn’t good enough.

Code Samples

I’ve extracted the chunks of each diffimg which calculate the difference ratio. To summarize how it works for Python, this takes the diff image generated by Pillow, sums the values of all channels of all pixels, and returns the ratio produced by dividing the maximum possible value (a pure white image of the same size) by this sum.

Python:


diff_img = ImageChops.difference(im1, im2)
stat = ImageStat.Stat(diff_img)
sum_channel_values = sum(stat.mean)
max_all_channels = len(stat.mean) * 255
diff_ratio = sum_channel_values / max_all_channels

For Go and Rust, the method is a little different: Instead of creating a diff image, we just loop over both input images and keep a running sum of the differences of each pixel. In Go, we’re indexing into each image by coordinate…

Go:


func GetRatio(im1, im2 image.Image, ignoreAlpha bool) float64 {
  var sum uint64
  width, height := getWidthAndHeight(im1)
  for y := 0; y < height; y++ {
    for x := 0; x < width; x++ {
      sum += uint64(sumPixelDiff(im1, im2, x, y, ignoreAlpha))
    }
  }
  var numChannels = 4
  if ignoreAlpha {
    numChannels = 3
  }
  totalPixVals := (height * width) * (maxChannelVal * numChannels)
  return float64(sum) / float64(totalPixVals)
}

… but in Rust, we’re treating the images as what they really are in memory, a series of bytes that we can just zip together and consume.

Rust:


pub fn calculate_diff(
    image1: DynamicImage,
    image2: DynamicImage
  ) -> f64 {
  let max_val = u64::pow(2, 8) - 1;
  let mut diffsum: u64 = 0;
  for (&p1, &p2) in image1
      .raw_pixels()
      .iter()
      .zip(image2.raw_pixels().iter()) {
    diffsum += u64::from(abs_diff(p1, p2));
  }
  let total_possible = max_val * image1.raw_pixels().len() as u64;
  let ratio = diffsum as f64 / total_possible as f64;

  ratio
}

Some things to take note of in these examples:

  • Python has the least code by far. Obviously, it’s leaning heavily on features of the image library it’s using, but this is indicative of the general experience of using Python. In many cases, a lot of the work has been done for you because the ecosystem is so developed that there are mature pre-existing solutions for everything.
  • There’s type conversion in the Go and Rust examples. In each block there are three numerical types being used: uint8/u8 for the pixel channel values (the type is inferred in both Go and Rust, so you don’t see any explicit mention of either type),uint64/u64 for the sum, and float64/f64 for the final ratio. For Go and Rust, there was time spent getting the types to line up, whereas Python converts everything implicitly.
  • The Go implementation’s style is very imperative, but also explicit and understandable (minus the ignoreAlpha part I mentioned earlier), even to those unaccustomed to the language. The Python example is fairly clear as well, once you understand what ImageStat is doing. Rust is definitely murkier to those unfamiliar with the language:
    • .raw_pixels() gets the image as a vector of unsigned 8-bit integers.
    • .iter() creates an iterator for that vector. Vectors by default are not iterable.
    • .zip() you may be familiar with, it takes two iterators and produces one, with each element being a tuple: (element from first vector, element from second vector).
    • We need a mut in our diffsum declaration because by default, variables are immutable.
    • If you’re familiar with C you can probably figure out why we have the &s in for (&p1, &p2): The iterator produces references to the pixel values, but abs_diff() takes the values themselves. Go supports pointers (which are not quite the same as references), but they’re not as commonly used as references are in Rust.
    • The last statement in a function is used as the return value if there isn’t a line-ending ;. A few other functional languages do this as well.

    This snippet gives you some insight into how much language-specific knowledge you’ll need to pick up to be effective in Rust.

Performance

Now for something resembling a scientific comparison. I first generated three random images of different sizes: 1×1, 2000×2000, and 10,000×10,000. Then I measured each (language, image size) combination’s performance 10 times for each diffimg ratio calculation and averaged them, using the values given by the real values from the timecommand. diffimg-rs was built using --releasediffimg-go with just go build, and the Python diffimg invoked with python3 -m diffimg. The results, on a 2015 Macbook Pro:

Image size: 1×1 2000×2000 10,000×10,000
Rust 0.001s 0.490s 5.871s
Go 0.002s (2x) 0.756s (1.54x) 14.060s (2.39x)
Python 0.095s (95x) 1.419s (2.90x) 28.751s (4.89x)

I’m losing a lot of precision because time only goes down to 10ms resolution (one more digit is shown here because of the averaging). The task only requires a very specific type of calculation as well, so a different or more complex one could have very different numbers. Despite these caveats, we can still learn something from the data.

With the 1×1 image, virtually all the time is spent in setup, not ratio calculation. Rust wins, despite using two third-party libraries (clap and image) and Go only using the standard library. I’m not surprised Python’s startup is as slow as it is, since importing a large library (Pillow) is one of its steps, and even just time python -c '' takes 0.030s.

At 2000×2000, the gap narrows for both Go and Python compared to Rust, presumably because less of the overall time is spent in setup compared to calculation. However, at 10,000×10,000, Rust is more performant in comparison, which I would guess is due to its compiler’s optimizations producing the smallest block of machine code that is looped through 100,000,000 times, dwarfing the setup time. Never needing to pause for garbage collection could also be a factor.

The Python implementation definitely has room for improvement, because as efficient as Pillow is, we’re still creating a diff image in memory (traversing both input images) and then adding up each of its pixel’s channel values. A more direct approach like the Go and Rust implementations would probably be marginally faster. However, a pure Python implementation would be wildly slower, since Pillow does its main work in C. Because the other two are pure language implementations, this isn’t really a fair comparison, though in some ways it is, because Python has an absurd amount of libraries available to you that are performant thanks to C extensions (and Python and C have a very tight relationship in general).

I should also mention the binary sizes: Rust’s is 2.1mb with the --release build, and Go’s is comparable at 2.5mb. Python doesn’t create binaries, but .pyc files are sort ofcomparable, and diffimg’s .pyc files are about 3kb in total. Its source code is also only about 3kb, but including the Pillow dependency, it weighs in at 24mb(!). Again, not a fair comparison because I’m using a third party imaging library, but it should be mentioned.

The Takeaway

Obviously, these are three very different languages fulfilling different niches. I’ve heard Go and Rust often mentioned together, but I think Go and Python are the two more similar/competing languages. They’re both good for writing server-side application logic (what I spend most of my time doing at work). Comparing just native code performance, Go blows Python away, but many of Python’s libraries that require speed are wrappers around fast C implementations – in practice, it’s more complicated than a naive comparison. Writing a C extension for Python doesn’t really count as Python anymore (and then you’ll need to know C), but the option is open to you.

For your backend server needs, Python has proven itself to be “fast enough” for most applications, though if you need more performance, Go has it. Rust even more so, but you pay for it with development time. Go is not far off from Python in this regard, though it certainly is slower to develop, primarily due to its small feature set. Rust is very fully featured, but managing memory will always take more time than having the language do it, and this outweighs having to deal with Go’s minimality.

It should also be mentioned that there are many, many Python developers in the world, some with literally decades of experience. It will likely never be hard to find more people with language experience to add to your backend team if you choose Python. However, Go developers are not particularly rare, and can easily be created because the language is so easy to learn. Rust developers are both rarer and harder to make since the language takes longer to internalize.

With respect to the type systems: static type systems make it easier to write more correct code, but it’s not a panacea. You still need to write comprehensive tests no matter the language you use. It requires a bit more discipline, but I’ve found that the code I write in Python is not necessarily more error prone than Go as long as I’m able to write a good suite of tests. That said, I much prefer Rust’s type system to Go’s: it supports generics, pattern matching, handles errors, and just does more for you in general.

In the end, this comparison is a bit silly, because though the use cases of these languages overlap, they occupy very different niches. Python is high on the development-speed, low on the performance scale, while Rust is the opposite, and Go is in the middle. I enjoy writing Python and Rust more than Go (this may be unsurprising), though I’ll continue to use Go at work happily (along with Python) since it really is a great language for building stable and maintainable applications with many contributors from many backgrounds. Its inflexibility and minimalism which makes it less enjoyable to use (for me) becomes its strength here. If I had to choose the language for the backend of a new web application, it would be Go.

I’m pretty satisfied with the range of programming tasks that are covered by these three languages – there’s virtually no project that one of them wouldn’t be a great choice for.

Top 10 Python Libraries You Must Know in 2019

In this article, we will discuss some of the top libraries in Python that can be used by developers to prase, clean, and represent data and implement machine learning in their existing applications.

We will be considering the following 10 libraries:

  • TensorFlow
  • Scikit-Learn
  • Numpy
  • Keras
  • PyTorch
  • LightGBM
  • Eli5
  • SciPy
  • Theano
  • Pandas

Image title

Introduction

Python is one of the most popular and widely used programming languages and has replaced many programming languages in the industry.

There are many reasons why Python is popular among developers. However, one of the most significant is its large collection of libraries that users can work with.

The simplicity of Python has attracted many developers to create new libraries for machine learning. Because of the huge collection of libraries, Python is becoming hugely popular among machine learning experts.

So, the first library is TensorFlow.

TensorFlow

Top 10 Python Libraries - Edureka

What Is TensorFlow?

If you are currently working on a machine learning project in Python, then you may have heard about this popular open-source library known as TensorFlow.

This library was developed by Google in collaboration with the Brain Team. TensorFlow is used in almost every Google application for machine learning.

TensorFlow works like a computational library for writing new algorithms that involve a large number of tensor operations. Since neural networks can be easily expressed as computational graphs, they can be implemented using TensorFlow as a series of operations on Tensors. Plus, tensors are N-dimensional matrices that represent your data.

Features of TensorFlow

TensorFlow is optimized for speed, and it makes use of techniques like XLA for quick linear algebra operations.

1. Responsive Construct

With TensorFlow, we can easily visualize each and every part of the graph, which is not an option while using Numpy or SciKit.

2. Flexible

One of the very important Tensorflow Features is that it is flexible in its operability, meaning it has modularity, and for the parts of it that you want to make stand alone, it offers you that option.

3. Easily Trainable

It is easily trainable on CPU as well as GPU for distributed computing.

4. Parallel Neural Network Training

TensorFlow offers pipelining, in the sense that you can train multiple neural networks and multiple GPUs, which makes the models very efficient on large-scale systems.

5. Large Community

Needless to say, if it has been developed by Google, there is already a large team of software engineers who work on stability improvements continuously.

6. Open Source

The best thing about this machine learning library is that it is open source, so anyone can use it as long as they have internet connectivity.

Where Is TensorFlow Used?

You are using TensorFlow daily but indirectly with applications like Google Voice Search or Google Photos. These applications are developed using this library.

All the libraries created in TensorFlow are written in C and C++. However, it has a complicated frontend for Python. Your Python code will get compiled and then executed on TensorFlow distributed execution engine built using C and C++.

The number of applications of TensorFlow is literally unlimited, and that is the beauty of TensorFlow.

Scikit-Learn

Top 10 Python Libraries - Edureka

What Is Scikit-learn?

It is a Python library is associated with NumPy and SciPy. It is considered one of the best libraries for working with complex data.

There are a lot of changes being made in this library. One modification is the cross-validation feature, providing the ability to use more than one metric. Lots of training methods like logistics regression and nearest neighbors have received some little improvements.

Features Of Scikit-Learn

1. Cross-validation: There are various methods to check the accuracy of supervised models on unseen data.

2.Unsupervised learning algorithms: Again, there is a large spread of algorithms in the offering — starting from clustering, factor analysis, and principal component analysis to unsupervised neural networks.

3. Feature extraction: Useful for extracting features from images and text (e.g. Bag of words

Where Is Scikit-Learn Used?

It contains a numerous number of algorithms for implementing standard machine learning and data mining tasks like reducing dimensionality, classification, regression, clustering, and model selection.

Numpy

Top 10 Python Libraries - Edureka

What Is Numpy?

Numpy is considered one of the most popular machine learning libraries in Python.

TensorFlow and other libraries use Numpy internally for performing multiple operations on Tensors. Array interface is the best and the most important feature of Numpy.

Features Of Numpy

  1. Interactive: Numpy is very interactive and easy to use
  2. Mathematics: Makes complex mathematical implementations very simple
  3. Intuitive: Makes coding real easy and grasping the concepts is easy
  4. Lots of Interaction: Widely used, hence a lot of open source contribution

Where Is Numpy Used?

This interface can be utilized for expressing images, sound waves, and other binary raw streams as an array of real numbers in N-dimensional.

For implementing this library for machine learning, having knowledge of Numpy is important for full-stack developers.

Keras

Top 10 Python Libraries - Edureka

What Is Keras?

Keras is considered one of the coolest machine learning libraries in Python. It provides an easier mechanism to express neural networks. Keras also provides some of the best utilities for compiling models, processing data-sets, visualization of graphs, and much more.

In the backend, Keras uses either Theano or TensorFlow internally. Some of the most popular neural networks like CNTK can also be used. Keras is comparatively slow when we compare it with other machine learning libraries because it creates a computational graph by using back-end infrastructure and then makes use of it to perform operations. All the models in Keras are portable.

Features Of Keras

  • It runs smoothly on both CPU and GPU.
  • Keras supports almost all the models of a neural network — fully connected, convolutional, pooling, recurrent, embedding, etc. Furthermore, these models can be combined to build more complex models.
  • Keras, being modular in nature, is incredibly expressive, flexible, and apt for innovative research.
  • Keras is a completely Python-based framework, which makes it easy to debug and explore.

Where Is Keras Used?

You are already constantly interacting with features built with Keras — it is in use at Netflix, Uber, Yelp, Instacart, Zocdoc, Square, and many others. It is especially popular among startups that place deep learning at the core of their products.

Keras contains numerous implementations of commonly used neural network building blocks such as layers, objectives, activation functions, optimizers and a host of tools to make working with image and text data easier.

Plus, it provides many pre-processed data-sets and pre-trained models like MNIST, VGG, Inception, SqueezeNet, ResNet, etc.

Keras is also a favorite among deep learning researchers, coming in at #2. Keras has also been adopted by researchers at large scientific organizations, in particular, CERN and NASA.

PyTorch

Top 10 Python Libraries - Edureka

What Is PyTorch?

PyTorch is the largest machine learning library that allows developers to perform tensor computations with the acceleration of GPU, creates dynamic computational graphs, and calculate gradients automatically. Other than this, PyTorch offers rich APIs for solving application issues related to neural networks.

This machine learning library is based on Torch, which is an open-source machine library implemented in C with a wrapper in Lua.

This machine library, in Python, was introduced in 2017, and since its inception, the library is gaining popularity and attracting an increasing number of machine learning developers.

Features Of PyTorch

Hybrid Front-End

A new hybrid frontend provides ease-of-use and flexibility in eager mode, while seamlessly transitioning to graph mode for speed, optimization, and functionality in C++ runtime environments.

Distributed Training

Optimize performance in both research and production by taking advantage of native support for asynchronous execution of collective operations and peer-to-peer communication that is accessible from Python and C++.

Python First

PyTorch is not a Python binding into a monolithic C++ framework. It’s built to be deeply integrated into Python so it can be used with popular libraries and packages such as Cython and Numba.

Libraries and Tools

An active community of researchers and developers have built a rich ecosystem of tools and libraries for extending PyTorch and supporting development in areas from computer vision to reinforcement learning.

Where Is PyTorch Used?

PyTorch is primarily used for applications such as natural language processing.

It is primarily developed by Facebook’s artificial-intelligence research group and Uber’s “Pyro” software for probabilistic programming is built on it.

PyTorch is outperforming TensorFlow in multiple ways and it is gaining a lot of attention in recent days.

LightGBM

Top 10 Python Libraries - Edureka

What Is LightGBM?

Gradient Boosting is one of the best and most popular machine learning(ML) library, which helps developers in building new algorithms by using redefined elementary models and namely decision trees. Therefore, there are special libraries that are designed for fast and efficient implementation of this method.

These libraries are LightGBM, XGBoost, and CatBoost. All these libraries are competitors that help in solving a common problem and can be utilized in almost a similar manner.

Features of LightGBM

Very fast computation ensures high production efficiency.

Intuitive, hence makes it user-friendly.

Faster training than many other deep learning libraries.

Will not produce errors when you consider NaN values and other canonical values.

Where Is LightGBM Used?

This library provides highly scalable, optimized, and fast implementations of gradient boosting, which makes it popular among machine learning developers. Because most of the machine learning full-stack developers won machine learning competitions by using these algorithms.

Eli5

Top 10 Python Libraries - Edureka

What Is Eli5?

Most often, the results of machine learning model predictions are not accurate, and Eli5 machine learning library built-in Python helps in overcoming this challenge. It is a combination of visualization and debugs all the machine learning models and tracks all working steps of an algorithm.

Features of Eli5

Moreover, Eli5 supports other libraries XGBoost, lightning, scikit-learn, and sklearn-crfsuite libraries. All the above-mentioned libraries can be used to perform different tasks using each one of them.

Where Is Eli5 Used?

  • Mathematical applications that require a lot of computation in a short time.
  • Eli5 plays a vital role where there are dependencies with other Python packages.
  • Legacy applications and implementing newer methodologies in various fields.

SciPy

Top 10 Python Libraries - Edureka

What Is SciPy?

SciPy is a machine learning library for application developers and engineers. However, you still need to know the difference between SciPy library and SciPy stack. SciPy library contains modules for optimization, linear algebra, integration, and statistics.

Features Of SciPy

The main feature of the SciPy library is that it is developed using NumPy, and its array makes the most use of NumPy.

In addition, SciPy provides all the efficient numerical routines like optimization, numerical integration, and many others using its specific submodules.

All the functions in all submodules of SciPy are well documented.

Where Is SciPy Used?

SciPy is a library that uses NumPy for the purpose of solving mathematical functions. SciPy uses NumPy arrays as the basic data structure and comes with modules for various commonly used tasks in scientific programming.

Tasks including linear algebra, integration (calculus), ordinary differential equation solving and signal processing are handled easily by SciPy.

Theano

Top 10 Python Libraries - Edureka

What Is Theano?

Theano is a computational framework machine learning library in Python for computing multidimensional arrays. Theano works similar to TensorFlow, but it not as efficient as TensorFlow. Because of its inability to fit into production environments.

Moreover, Theano can also be used on a distributed or parallel environments just similar to TensorFlow.

Features Of Theano

  • Tight integration with NumPy – Ability to use completely NumPy arrays in Theano-compiled functions.
  • Transparent use of a GPU – Perform data-intensive computations much faster than on a CPU.
  • Efficient symbolic differentiation – Theano does your derivatives for functions with one or many inputs.
  • Speed and stability optimizations – Get the right answer for log(1+x) even when x is very tiny. This is just one of the examples to show the stability of Theano.
  • Dynamic C code generation – Evaluate expressions faster than ever before, thereby increasing efficiency by a lot.
  • Extensive unit-testing and self-verification – Detect and diagnose multiple types of errors and ambiguities in the model.

Where Is Theano Used?

The actual syntax of Theano expressions is symbolic, which can be off-putting to beginners used to normal software development. Specifically, an expression is defined in the abstract sense, compiled, and later actually used to make calculations.

It was specifically designed to handle the types of computation required for large neural network algorithms used in Deep Learning. It was one of the first libraries of its kind (development started in 2007) and is considered an industry standard for Deep Learning research and development.

Theano is being used in multiple neural network projects today, and the popularity of Theano is only growing with time.

Pandas

Top 10 Python Libraries - Edureka

What Is Pandas?

Pandas is a machine learning library in Python that provides data structures of high-level and a wide variety of tools for analysis. One of the great features of this library is the ability to translate complex operations with data using one or two commands. Pandas has so many inbuilt methods for grouping, combining data, filtering, as well as time-series functionality.

All these are followed by outstanding speed indicators.

Features Of Pandas

Pandas makes sure that the entire process of manipulating data will be easier. Support for operations such as Re-indexing, Iteration, Sorting, Aggregations, Concatenations, and Visualizations are among the feature highlights of Pandas.

Where Is Pandas Used?

Currently, there are fewer releases of the Pandas library, which includes hundreds of new features, bug fixes, enhancements, and changes in API. The improvements in Pandas are its ability to group and sort data, select the best-suited output for the applied method, and provide support for performing custom types operations.

Data Analysis, among everything else, takes the highlight when it comes to using Pandas. But when used with other libraries and tools, Pandas ensures high functionality and a good amount of flexibility.

That’s it, folks! I hope this article helped you kickstart your learning the libraries available in Python.

18.4 systemd-journald.service 簡介

過去只有rsyslogd 的年代中,由於rsyslogd 必須要開機完成並且執行了rsyslogd 這個daemon 之後,登錄文件才會開始記錄。所以,核心還得要自己產生一個klogd 的服務, 才能將系統在開機過程、啟動服務的過程中的信息記錄下來,然後等rsyslogd 啟動後才傳送給它來處理~

現在有了systemd 之後,由於這玩意兒是核心喚醒的,然後又是第一支執行的軟件,它可以主動調用systemd-journald 來協助記載登錄文件~ 因此在開機過程中的所有信息,包括啟動服務與服務若啟動失敗的情況等等,都可以直接被記錄到systemd-journald 裡頭去!

不過systemd-journald 由於是使用於內存的登錄文件記錄方式,因此重新開機過後,開機前的登錄文件信息當然就不會被記載了。為此,我們還是建議啟動rsyslogd 來協助分類記錄!也就是說, systemd-journald 用來管理與查詢這次開機後的登錄信息,而rsyslogd 可以用來記錄以前及現在的所以數據到磁盤文件中,方便未來進行查詢喔!


Tips雖然systemd-journald所記錄的數據其實是在內存中,但是系統還是利用文件的型態將它記錄到/run/log/下面!不過我們從前面幾章也知道, /run在CentOS 7其實是內存內的數據,所以重新開機過後,這個/run/log下面的數據當然就被刷新,舊的當然就不再存在了!

18.4.1 使用journalctl 觀察登錄信息

那麼systemd-journald.service 的數據要如何叫出來查閱呢?很簡單!就通過journalctl 即可!讓我們來瞧瞧這個指令可以做些什麼事?

[root@study ~]# journalctl [-nrpf] [--since TIME] [--until TIME] _optional
选项与参数:
默认会秀出全部的 log 内容,从旧的输出到最新的讯息
-n  :秀出最近的几行的意思~找最新的信息相当有用
-r  :反向输出,从最新的输出到最旧的数据
-p  :秀出后面所接的讯息重要性排序!请参考前一小节的 rsyslogd 信息
-f  :类似 tail -f 的功能,持续显示 journal 日志的内容(实时监测时相当有帮助!)
--since --until:设置开始与结束的时间,让在该期间的数据输出而已
_SYSTEMD_UNIT=unit.service :只输出 unit.service 的信息而已
_COMM=bash :只输出与 bash 有关的信息
_PID=pid   :只输出 PID 号码的信息
_UID=uid   :只输出 UID 为 uid 的信息
SYSLOG_FACILITY=[0-23] :使用 syslog.h 规范的服务相对序号来调用出正确的数据!

范例一:秀出目前系统中所有的 journal 日志数据
[root@study ~]# journalctl
-- Logs begin at Mon 2015-08-17 18:37:52 CST, end at Wed 2015-08-19 00:01:01 CST. --
Aug 17 18:37:52 study.centos.vbird systemd-journal[105]: Runtime journal is using 8.0M (max 
 142.4M, leaving 213.6M of free 1.3G, current limit 142.4M).
Aug 17 18:37:52 study.centos.vbird systemd-journal[105]: Runtime journal is using 8.0M (max
 142.4M, leaving 213.6M of free 1.3G, current limit 142.4M).
Aug 17 18:37:52 study.centos.vbird kernel: Initializing cgroup subsys cpuset
Aug 17 18:37:52 study.centos.vbird kernel: Initializing cgroup subsys cpu
.....(中间省略).....
Aug 19 00:01:01 study.centos.vbird run-parts(/etc/cron.hourly)[19268]: finished 0anacron
Aug 19 00:01:01 study.centos.vbird run-parts(/etc/cron.hourly)[19270]: starting 0yum-hourly.cron
Aug 19 00:01:01 study.centos.vbird run-parts(/etc/cron.hourly)[19274]: finished 0yum-hourly.cron
# 从这次开机以来的所有数据都会显示出来!通过 less 一页页翻动给管理员查阅!数据量相当大!

范例二:(1)仅显示出 2015/08/18 整天以及(2)仅今天及(3)仅昨天的日志数据内容
[root@study ~]# journalctl --since "2015-08-18 00:00:00" --until "2015-08-19 00:00:00"
[root@study ~]# journalctl --since today
[root@study ~]# journalctl --since yesterday --until today

范例三:只找出 crond.service 的数据,同时只列出最新的 10 笔即可
[root@study ~]# journalctl _SYSTEMD_UNIT=crond.service -n 10

范例四:找出 su, login 执行的登录文件,同时只列出最新的 10 笔即可
[root@study ~]# journalctl _COMM=su _COMM=login -n 10

范例五:找出讯息严重等级为错误 (error) 的讯息!
[root@study ~]# journalctl -p err

范例六:找出跟登录服务 (auth, authpriv) 有关的登录文件讯息
[root@study ~]# journalctl SYSLOG_FACILITY=4 SYSLOG_FACILITY=10
# 更多关于 syslog_facility 的数据,请参考 18.2.1 小节的内容啰!

基本上,有journalctl 就真的可以搞定你的訊息數據囉!全部的數據都在這裡面耶~再來假設一下,你想要了解到登錄文件的實時變化, 那又該如何處置呢?現在,請開兩個終端機,讓我們來處理處理!

# 第一号终端机,请使用下面的方式持续侦测系统!
[root@study ~]# journalctl -f
# 这时系统会好像卡住~其实不是卡住啦!是类似 tail -f 在持续的显示登录文件信息的!

# 第二号终端机,使用下面的方式随便发一封 email 给系统上的帐号!
[root@study ~]# echo "testing" &#124; mail -s 'tset' dmtsai
# 这时,你会发现到第一号终端机竟然一直输出一些讯息吧!没错!这就对了!

如果你有一些必須要偵測的行為,可以使用這種方式來實時了解到系統出現的訊息~而取消journalctl -f 的方法,就是[crtl]+c 啊!

18.4.2 logger 指令的應用

上面談到的是叫出登錄文件給我們查閱,那換個角度想,“如果你想要讓你的數據儲存到登錄文件當中”呢?那該如何是好?這時就得要使用logger 這個好用的傢伙了!這個傢伙可以傳輸很多信息,不過,我們只使用最簡單的本機信息傳遞~ 更多的用法就請您自行man logger 囉!

[root@study ~]# logger [-p 服务名称.等级] "讯息"
选项与参数:
服务名称.等级 :这个项目请参考 rsyslogd 的本章后续小节的介绍;

范例一:指定一下,让 dmtsai 使用 logger 来传送数据到登录文件内
[root@study ~]# logger -p user.info "I will check logger command"
[root@study ~]# journalctl SYSLOG_FACILITY=1 -n 3
-- Logs begin at Mon 2015-08-17 18:37:52 CST, end at Wed 2015-08-19 18:03:17 CST. --
Aug 19 18:01:01 study.centos.vbird run-parts(/etc/cron.hourly)[29710]: starting 0yum-hourly.cron
Aug 19 18:01:01 study.centos.vbird run-parts(/etc/cron.hourly)[29714]: finished 0yum-hourly.cron
Aug 19 18:03:17 study.centos.vbird dmtsai[29753]: I will check logger command

現在,讓我們來瞧一瞧,如果我們之前寫的backup.service 服務中,如果使用手動的方式來備份,亦即是使用”/backups/backup.sh log” 來執行備份時, 那麼就通過logger來記錄備份的開始與結束的時間!該如何是好呢?這樣作看看!

[root@study ~]# vim /backups/backup.sh
#!/bin/bash

if [ "${1}" == "log" ]; then
        logger -p syslog.info "backup.sh is starting"
fi
source="/etc /home /root /var/lib /var/spool/{cron,at,mail}"
target="/backups/backup-system-$(date +%Y-%m-%d).tar.gz"
[ ! -d /backups ] && mkdir /backups
tar -zcvf ${target} ${source} &&gt; /backups/backup.log
if [ "${1}" == "log" ]; then
        logger -p syslog.info "backup.sh is finished"
fi

[root@study ~]# /backups/backup.sh log
[root@study ~]# journalctl SYSLOG_FACILITY=5 -n 3
Aug 19 18:09:37 study.centos.vbird dmtsai[29850]: backup.sh is starting
Aug 19 18:09:54 study.centos.vbird dmtsai[29855]: backup.sh is finished

通過這個玩意兒,我們也能夠將數據自行處置到登錄文件當中囉!

18.4.3 保存journal 的方式

再強調一次,這個systemd-journald.servicd 的訊息是不會放到下一次開機後的,所以,重新開機後,那之前的記錄通通會遺失。雖然我們大概都有啟動rsyslogd 這個服務來進行後續的登錄文件放置,不過如果你比較喜歡journalctl 的存取方式,那麼可以將這些數據儲存下來喔!

基本上,systemd-journald.service 的配置文件主要參考/etc/systemd/journald.conf 的內容,詳細的參數你可以參考man 5 journald.conf 的數據。因為默認的情況下面,配置文件的內容應該已經符合我們的需求,所以這邊鳥哥就不再修改配置文件了。只是如果想要保存你的journalctl 所讀取的登錄文件, 那麼就得要創建一個/var/log/journal 的目錄,並且處理一下該目錄的權限,那麼未來重新啟動systemd-journald.service 之後, 日誌登錄文件就會主動的複制一份到/var/log/journal 目錄下囉!

# 1\. 先处理所需要的目录与相关权限设置
[root@study ~]# mkdir /var/log/journal
[root@study ~]# chown root:systemd-journal /var/log/journal
[root@study ~]# chmod 2775 /var/log/journal

# 2\. 重新启动 systemd-journald 并且观察备份的日志数据!
[root@study ~]# systemctl restart systemd-journald.service
[root@study ~]# ll /var/log/journal/
drwxr-sr-x. 2 root systemd-journal 27 Aug 20 02:37 309eb890d09f440681f596543d95ec7a

你得要注意的是,因為現在整個日誌登錄文件的容量會持續長大,因此你最好還是觀察一下你係統能用的總容量喔!避免不小心文件系統的容量被灌爆!此外,未來在/run/log 下面就沒有相關的日誌可以觀察了!因為移動到/var/log/journal 下面來囉!

其實鳥哥是這樣想的,既然我們還有rsyslog.service 以及logrotate 的存在,因此這個systemd-journald.service 產生的登錄文件, 個人建議最好還是放置到/run/log 的內存當中,以加快存取的速度!而既然rsyslog.service 可以存放我們的登錄文件, 似乎也沒有必要再保存一份journal 登錄文件到系統當中就是了。單純的建議!如何處理,依照您的需求即可喔!

Go 語言很好很強大,但我有幾個問題想吐槽

Go 是一門非常不錯的編程語言。然而,我在公司的Slack 編程頻道中對Go 的抱怨卻越來越多(猜到我是做啥了的吧?),因此我認為有必要把這些吐槽寫下來並放在這裡,這樣當人們問我抱怨什麼時,我給他們一個鏈接就行了。

image

先聲明一下,在過去的一年裡,我大量地使用Go語言開發命令行應用程序、scclc和API。其中既有供客戶端調用的大規模API,也有即將在https://searchcode.com/使用的語法高亮顯示器

我這些批評全部是針對Go 語言的。但是,我對使用過的每種語言都有不滿。我非常贊同下面的話:

“世界上只有兩種語言:人們抱怨的語言和沒人使用的語言。” —— Bjarne Stroustrup

1 不支持函數式編程

我並不是一個函數式編程狂熱者。說到Lisp 語言,我首先想到的是語言障礙。

這可能是Go 語言最大的痛點了。與大部分人不同,我不希望Go 支持泛型,因為它會為多數Go 項目帶來不必要的複雜性。我希望Go 語言支持適用於內置切片和Map 的函數式方法。切片和Map 具有通用性,並且可以容納任何類型,從這個意義上講,它們已經非常神奇。在Go 語言中只有利用接口才能實現類似效果,但這樣一來將喪失安全性和速度。

例如,請考慮下面的問題。

給定兩個字符串切片,找出二者都包含的字符串,並將其放入新的切片以備後用。

複製代碼

existsBoth := []string{}
for _, first := range firstSlice {
for _, second := range secondSlice {
if first == second {
existsBoth = append(existsBoth, proxy)
break
}
}
}

上面是一個用Go 語言實現的簡單方案。當然還有其它方法,比如借助Map 來減少運行時間。這裡我們假設內存足夠用或者切片都不太大,同時假設優化運行時間帶來的複雜性遠超收益,因此不值得優化。作為對比,使用Java 流和函數式編程把相同的邏輯重寫如下:

複製代碼

var existsBoth = firstList.stream()
.filter(x -> secondList.contains(x))
.collect(Collectors.toList());

上面的代碼隱藏了算法的複雜性,但是,你更容易理解它實際做的事情。

與Go 代碼相比,Java 代碼的意圖一目了然。真正靈活之處在於,添加更多的過濾條件易如反掌。如果使用Go 語言添加下面例子中的過濾條件,我們需要在嵌套的for 循環中再添加兩個if 條件。

複製代碼

var existsBoth = firstList.stream()
.filter(x -> secondList.contains(x))
.filter(x -> x.startsWith(needle))
.filter(x -> x.length() >= 5)
.collect(Collectors.toList());

有些借助go generate 命令的項目可以幫你實現上面的一些功能。但是,如果缺少良好的IDE 支持,抽取循環中的語句作為單獨的方法是一件低效又麻煩的事情。

2 通道/ 並行切片處理

Go 通道通常都很好用。但它並不能提供無限的並發能力。它確實存在一些會導致永久阻塞的問題,但這些問題用競爭檢測器能很容易地解決。對於數量不確定或不知何時結束的流式數據,以及非CPU 密集型的數據處理方法,Go 通道都是很好的選擇。

Go 通道不太適合併行處理大小已知的切片。

多線程編程、理論和實踐

image

幾乎在其它任何語言中,當列表或切片很大時,為了充分利用所有CPU 內核,通常都會使用並行流、並行Linq、Rayon、多處理或其它語法來遍歷列表。遍歷後的返回值是一個包含已處理元素的列表。如果元素足夠多,或者處理元素的函數足夠複雜,多核系統會更高效。

但是在Go 語言中,實現高效處理所需要做的事情卻並不顯而易見。

一種可能的解決方案是為切片中的每個元素都創建一個Go 例程。由於Go 例程的開銷很低,因此從某種程度上來說這是一個有效的策略。

複製代碼

toProcess := []int{1,2,3,4,5,6,7,8,9}
var wg sync.WaitGroup
for i, _ := range toProcess {
wg.Add(1)
go func(j int) {
toProcess[j] = someSlowCalculation(toProcess[j])
wg.Done()
}(i)
}
wg.Wait()
fmt.Println(toProcess)

上面的代碼會保持切片中元素的順序,但我們假設不必保持元素順序。

這段代碼的第一個問題是增加了一個WaitGroup,並且必須要記得調用它的Add 和Done 方法。這增加了開發人員的工作量。如果弄錯了,這個程序不會產生正確的輸出,結果是要么輸出不確定,要么程序永不結束。此外,如果列表很長,你會為每個列表創建一個Go 例程。正如我之前所說,這不是問題,因為Go 能輕鬆搞定。問題在於,每個Go 例程都會爭搶CPU 時間片。因此,這不是執行該任務的最有效方式。

你可能希望為每個CPU內核創建一個Go例程,並讓這些例程選取列表並處理。創建Go例程的開銷很小,但是在一個非常緊湊的循環中創建它們會使開銷陡增。當我開發scc時就遇到了這種情況,因此我採用了每個CPU內核對應一個Go例程的策略。在Go語言中,要這樣做的話,你首先要創建一個通道,然後遍歷切片中的元素,使函數從該通道讀取數據,之後從另一個通道讀取。我們來看一下。

複製代碼

toProcess := []int{1,2,3,4,5,6,7,8,9}
var input = make(chan int, len(toProcess))
for i, _ := range toProcess {
input <- i
}
close(input)
var wg sync.WaitGroup
for i := 0; i < runtime.NumCPU(); i++ {
wg.Add(1)
go func(input chan int, output []int) {
for j := range input {
toProcess[j] = someSlowCalculation(toProcess[j])
}
wg.Done()
}(input, toProcess)
}
wg.Wait()
fmt.Println(toProcess)

上面的代碼創建了一個通道,然後遍歷切片,將索引值放入通道。接下來我們為每個CPU 內核創建一個Go 例程,操作系統會報告並處理相應的輸入,然後等待,直到所有操作完成。這裡有很多代碼需要理解。

然而,這種實現有待商榷。如果切片非常大,通道的緩衝區長度和切片大小相同,你可能不希望創建一個有這麼大緩衝區的通道。因此,你應該創建另一個Go 例程來遍歷切片,並將切片中的值放入通道,完成後關閉通道。但這樣一來代碼會變得冗長,因此我把它去掉了。我希望可以大概地闡明基本思路。

使用Java 語言大致這樣實現:

複製代碼

var firstList = List.of(1,2,3,4,5,6,7,8,9);
firstList = firstList.parallelStream()
.map(this::someSlowCalculation)
.collect(Collectors.toList());

通道和流並不等價。使用隊列去仿寫Go 代碼的邏輯更好一些,因為它們更具有可比性,但我們的目的不是進行1 對1 的比較。我們的目標是充分利用所有的CPU 內核處理切片或列表。

如果someSlowCalucation 方法調用了網絡或其它非CPU 密集型任務,這當然不是問題。在這種情況下,通道和Go 例程都會表現得很好。

這個問題與問題#1 有關。如果Go 語言支持適用於切片/Map 對象的函數式方法,那麼就能實現這個功能。但是,如果Go 語言支持泛型,有人就可以把上面的功能封裝成像Rust 的Rayon 一樣的庫,讓每個人都從中受益,這就很令人討厭了(我不希望Go 支持泛型)。

順便說一下,我認為這個缺陷妨礙了Go 語言在數據科學領域的成功,這也是為什麼Python 仍然是數據科學領域的王者。Go 語言在數值操作方面缺乏表現力和能力,原因就是以上討論的這些。

3 垃圾回收器

Go 的垃圾回收器做得非常不錯。我開發的應用程序通常都會因為新版本的改進而變得更快。但是,它以低延遲為最高優先級。對於API 和UI 應用來說,這個選擇完全可以接受。對於包含網絡調用的應用,因為網絡調用往往會是瓶頸,所以它也沒問題。

我發現的問題是Go對UI應用來講一點也不好(我不知道它有任何良好的支持)。如果你想要盡可能高的吞吐量,那這個選擇會讓你很受傷。這是我開發scc時遇到的一個主要問題。scc是一個CPU密集型的命令行工具。為了解決這個問題,我不得不在代碼裡添加邏輯關閉GC,直到達到某個閾值。但是我又不能簡單的禁用它,因為有些任務會很快耗盡內存。

缺乏對GC 的控制時常令人沮喪。你得學會適應它,但是,有時候如果能做到這樣該有多好:“嘿,這些代碼確實需要盡可能快地運行,所以如果你能在高吞吐模式運行一會,那就太好了。”

image

我認為這種情況在Go 1.12 版本中有所改善,因為GC 得到了進一步的改進。但僅僅是關閉和打開GC 還不夠,我期望更多的控制。如果有時間我會再進行研究。

4 錯誤處理

我並不是唯一一個抱怨這個問題的人,但我不吐不快。

複製代碼

value, err := someFunc()
if err != nil {
// Do something here
}
err = someOtherFunc(value)
if err != nil {
// Do something here
}

上面的代碼很乏味。Go 甚至不會像有些人建議的那樣強制你處理錯誤。你可以使用“_”顯式忽略它(這是否算作對它進行了處理呢?),你還可以完全忽略它。比如上面的代碼可以重寫為:

複製代碼

value, _ := someFunc()
someOtherFunc(value)

很顯然,我顯式忽略了someFunc 方法的返回。someOtherFunc(value)方法也可能返回錯誤值,但我完全忽略了它。這裡的錯誤都沒有得到處理。

說實話,我不知道如何解決這個問題。我喜歡Rust中的“?”運算符,它可以幫助避免這種情況。V-Lang https://vlang.io/看起來也可能有一些有趣的解決方案。

另一個辦法是使用可選類型(Optional types)並去掉nil,但這不會發生在Go 語言裡,即使是Go 2.0 版本,因為它會破壞向後兼容性。

結語

Go 仍然是一種非常不錯的語言。如果你讓我寫一個API,或者完成某個需要大量磁盤/ 網絡調用的任務,它依然是我的首選。現在我會用Go 而非Python 去完成很多一次性任務,數據合併任務是例外,因為函數式編程的缺失使執行效率難以達到要求。

與Java 不同,Go 語言盡量遵循“最小驚喜“原則。比如可以這樣比較字兩個符串是否相等:stringA == stringB。但如果你這樣比較兩個切片,那麼會產生編譯錯誤。這些都是很好的特性。

的確,二進製文件還可以變的更小(一些編譯標誌和upx可以解決這個問題),我希望它在某些方面變得更快,GOPATH雖然不是很好,但也沒有人們想得那麼糟糕,默認的單元測試框架缺少很多功能,模擬(mocking)有點讓人痛苦…

它仍然是我使用過的效率較高的語言之一。我會繼續使用它,雖然我希望https://vlang.io/能最終發布,並解決我的很多抱怨。V語言或Go 2.0,Nim或Rust。現在有很多很酷的新語言可以使用,我們開發人員真的要被寵壞了。

查看英文原文:

https://boyter.org/posts/my-personal-complaints-about-golang/

IDEA 2019.02.07注册码

N757JE0KCT-eyJsaWNlbnNlSWQiOiJONzU3SkUwS0NUIiwibGljZW5zZWVOYW1lIjoid3UgYW5qdW4iLCJhc3NpZ25lZU5hbWUiOiIiLCJhc3NpZ25lZUVtYWlsIjoiIiwibGljZW5zZVJlc3RyaWN0aW9uIjoiRm9yIGVkdWNhdGlvbmFsIHVzZSBvbmx5IiwiY2hlY2tDb25jdXJyZW50VXNlIjpmYWxzZSwicHJvZHVjdHMiOlt7ImNvZGUiOiJJSSIsInBhaWRVcFRvIjoiMjAyMC0wMS0wNyJ9LHsiY29kZSI6IkFDIiwicGFpZFVwVG8iOiIyMDIwLTAxLTA3In0seyJjb2RlIjoiRFBOIiwicGFpZFVwVG8iOiIyMDIwLTAxLTA3In0seyJjb2RlIjoiUFMiLCJwYWlkVXBUbyI6IjIwMjAtMDEtMDcifSx7ImNvZGUiOiJHTyIsInBhaWRVcFRvIjoiMjAyMC0wMS0wNyJ9LHsiY29kZSI6IkRNIiwicGFpZFVwVG8iOiIyMDIwLTAxLTA3In0seyJjb2RlIjoiQ0wiLCJwYWlkVXBUbyI6IjIwMjAtMDEtMDcifSx7ImNvZGUiOiJSUzAiLCJwYWlkVXBUbyI6IjIwMjAtMDEtMDcifSx7ImNvZGUiOiJSQyIsInBhaWRVcFRvIjoiMjAyMC0wMS0wNyJ9LHsiY29kZSI6IlJEIiwicGFpZFVwVG8iOiIyMDIwLTAxLTA3In0seyJjb2RlIjoiUEMiLCJwYWlkVXBUbyI6IjIwMjAtMDEtMDcifSx7ImNvZGUiOiJSTSIsInBhaWRVcFRvIjoiMjAyMC0wMS0wNyJ9LHsiY29kZSI6IldTIiwicGFpZFVwVG8iOiIyMDIwLTAxLTA3In0seyJjb2RlIjoiREIiLCJwYWlkVXBUbyI6IjIwMjAtMDEtMDcifSx7ImNvZGUiOiJEQyIsInBhaWRVcFRvIjoiMjAyMC0wMS0wNyJ9LHsiY29kZSI6IlJTVSIsInBhaWRVcFRvIjoiMjAyMC0wMS0wNyJ9XSwiaGFzaCI6IjExNTE5OTc4LzAiLCJncmFjZVBlcmlvZERheXMiOjAsImF1dG9Qcm9sb25nYXRlZCI6ZmFsc2UsImlzQXV0b1Byb2xvbmdhdGVkIjpmYWxzZX0=-AE3x5sRpDellY4SmQVy2Pfc2IT7y1JjZFmDA5JtOv4K5gwVdJOLw5YGiOskZTuGu6JhOi50nnd0WaaNZIuVVVx3T5MlXrAuO3kb2qPtLtQ6/n3lp4fIv+6384D4ciEyRWijG7NA9exQx39Tjk7/xqaGk7ooKgq5yquIfIA+r4jlbW8j9gas1qy3uTGUuZQiPB4lv3P5OIpZzIoWXnFwWhy7s//mjOWRZdf/Du3RP518tMk74wizbTeDn84qxbM+giNAn+ovKQRMYHtLyxntBiP5ByzfAA9Baa5TUGW5wDiZrxFuvBAWTbLrRI0Kd7Nb/tB9n1V9uluB2WWIm7iMxDg==-MIIElTCCAn2gAwIBAgIBCTANBgkqhkiG9w0BAQsFADAYMRYwFAYDVQQDDA1KZXRQcm9maWxlIENBMB4XDTE4MTEwMTEyMjk0NloXDTIwMTEwMjEyMjk0NlowaDELMAkGA1UEBhMCQ1oxDjAMBgNVBAgMBU51c2xlMQ8wDQYDVQQHDAZQcmFndWUxGTAXBgNVBAoMEEpldEJyYWlucyBzLnIuby4xHTAbBgNVBAMMFHByb2QzeS1mcm9tLTIwMTgxMTAxMIIBIjANBgkqhkiG9w0BAQEFAAOCAQ8AMIIBCgKCAQEAxcQkq+zdxlR2mmRYBPzGbUNdMN6OaXiXzxIWtMEkrJMO/5oUfQJbLLuMSMK0QHFmaI37WShyxZcfRCidwXjot4zmNBKnlyHodDij/78TmVqFl8nOeD5+07B8VEaIu7c3E1N+e1doC6wht4I4+IEmtsPAdoaj5WCQVQbrI8KeT8M9VcBIWX7fD0fhexfg3ZRt0xqwMcXGNp3DdJHiO0rCdU+Itv7EmtnSVq9jBG1usMSFvMowR25mju2JcPFp1+I4ZI+FqgR8gyG8oiNDyNEoAbsR3lOpI7grUYSvkB/xVy/VoklPCK2h0f0GJxFjnye8NT1PAywoyl7RmiAVRE/EKwIDAQABo4GZMIGWMAkGA1UdEwQCMAAwHQYDVR0OBBYEFGEpG9oZGcfLMGNBkY7SgHiMGgTcMEgGA1UdIwRBMD+AFKOetkhnQhI2Qb1t4Lm0oFKLl/GzoRykGjAYMRYwFAYDVQQDDA1KZXRQcm9maWxlIENBggkA0myxg7KDeeEwEwYDVR0lBAwwCgYIKwYBBQUHAwEwCwYDVR0PBAQDAgWgMA0GCSqGSIb3DQEBCwUAA4ICAQAF8uc+YJOHHwOFcPzmbjcxNDuGoOUIP+2h1R75Lecswb7ru2LWWSUMtXVKQzChLNPn/72W0k+oI056tgiwuG7M49LXp4zQVlQnFmWU1wwGvVhq5R63Rpjx1zjGUhcXgayu7+9zMUW596Lbomsg8qVve6euqsrFicYkIIuUu4zYPndJwfe0YkS5nY72SHnNdbPhEnN8wcB2Kz+OIG0lih3yz5EqFhld03bGp222ZQCIghCTVL6QBNadGsiN/lWLl4JdR3lJkZzlpFdiHijoVRdWeSWqM4y0t23c92HXKrgppoSV18XMxrWVdoSM3nuMHwxGhFyde05OdDtLpCv+jlWf5REAHHA201pAU6bJSZINyHDUTB+Beo28rRXSwSh3OUIvYwKNVeoBY+KwOJ7WnuTCUq1meE6GkKc4D/cXmgpOyW/1SmBz3XjVIi/zprZ0zf3qH5mkphtg6ksjKgKjmx1cXfZAAX6wcDBNaCL+Ortep1Dh8xDUbqbBVNBL4jbiL3i3xsfNiyJgaZ5sX7i8tmStEpLbPwvHcByuf59qJhV/bZOl8KqJBETCDJcY6O2aqhTUy+9x93ThKs1GKrRPePrWPluud7ttlgtRveit/pcBrnQcXOl1rHq7ByB8CFAxNotRUYL9IF5n3wJOgkPojMy6jetQA5Ogc8Sm7RG6vg1yow==

本博客Nginx 配置之安全篇

之前有細心的朋友問我,為什麼你的博客副標題是「專注WEB 端開發」,是不是少了「前端」的「前」。我想說的是,儘管我從畢業到現在七年左右的時間一直都在專業前端團隊從事前端相關工作,但這並不意味著我的知識體係就必須局限於前端這個範疇內。現在比較流行「全棧工程師」的概念,我覺得全棧意味著一個項目中,各個崗位所需要的技能你都具備,但並不一定意味著你什麼都需要做。你需要做什麼,更多是由能力、人員配比以及成本等各個因素所決定。儘管我現在的工作職責是在WEB 前端領域,但是我的關注點在整個WEB 端。

我接觸過的有些前端朋友,從一開始就把自己局限在一個很小的範圍之中,這在大公司到也無所謂,大公司分工明確,基礎設施齊全,你只要做好自己擅長的那部分就可以了。但是當他們進入創業公司之後,會發現一下子來了好多之前完全沒有接觸過的東西,十分被動。

去年我用Lua + OpenResty替換了線上千萬級的PHP + Nginx服務,至今穩定運行,算是前端之外的一點嘗試。我一直認為學習任何知識很重要的一點是實踐,所以我一直都在折騰我的VPS,進行各種WEB安全、優化相關的嘗試。我打算從安全和性能兩方面介紹一下本博客所用Nginx的相關配置,今天先寫安全相關的。

隱藏不必要的信息

大家可以看一下我的博客請求響應頭,有這麼一行server: nginx,說明我用的是Nginx服務器,但並沒有具體的版本號。由於某些Nginx漏洞只存在於特定的版本,隱藏版本號可以提高安全性。這只需要在配置裡加上這個就可以了:

server_tokens   off;

如果想要更徹底隱藏所用Web Server,可以修改Nginx源碼,把Server Name改掉再編譯,具體步驟可以自己搜索。需要提醒的是:如果你的網站支持SPDY,只改動網上那些文章寫到的地方還不夠,跟SPDY有關的代碼也要改。更簡單的做法是改用Tengine這個Nginx的增強版,並指定server_tag為off或者任何想要的值就可以了。另外,既然想要徹底隱藏Nginx,404、500等各種出錯頁也需要自定義。

同樣,一些WEB語言或框架默認輸出的x-powered-by也會洩露網站信息,他們一般都提供了修改或移除的方法,可以自行查看手冊。如果部署上用到了Nginx的反向代理,也可以通過proxy_hide_header指令隱藏它:

proxy_hide_header        X-Powered-By;

禁用非必要的方法

由於我的博客只處理了GET、POST 兩種請求方法,而HTTP/1 協議還規定了TRACE 這樣的方法用於網絡診斷,這也可能會暴露一些信息。所以我針對GET、POST 以及HEAD 之外的請求,直接返回了444 狀態碼(444 是Nginx 定義的響應狀態碼,會立即斷開連接,沒有響應正文)。具體配置是這樣的:

NGINXif ($request_method !~ ^(GET|HEAD|POST)$ ) {
    return    444;
}

合理配置響應頭

我的博客是由自己用ThinkJS 寫的Node 程序提供服務,Nginx 通過proxy_pass 把請求反向代理給Node 綁定的IP 和端口。在最終輸出時,我給響應增加了以下頭部:

NGINXadd_header  Strict-Transport-Security  "max-age=31536000";
add_header  X-Frame-Options  deny;
add_header  X-Content-Type-Options  nosniff;
add_header  Content-Security-Policy  "default-src 'self'; script-src 'self' 'unsafe-inline' 'unsafe-eval' https://a.disquscdn.com; img-src 'self' data: https://www.google-analytics.com; style-src 'self' 'unsafe-inline'; frame-src https://disqus.com";

Strict-Transport-Security(簡稱為HSTS)可以告訴瀏覽器,在指定的max-age內,始終通過HTTPS訪問我的博客。即使用戶自己輸入HTTP的地址,或者點擊了HTTP鏈接,瀏覽器也會在本地替換為HTTPS再發送請求。另外由於我的證書不支持多域名,我沒有加上includeSubDomains。關於HSTS更多信息,可以查看我之前的介紹

X-Frame-Options用來指定此網頁是否允許被iframe嵌套,deny就是不允許任何嵌套發生。關於這個響應頭的更多介紹可以看這裡

X-Content-Type-Options用來指定瀏覽器對未指定或錯誤指定Content-Type資源真正類型的猜測行為,nosniff表示不允許任何猜測。這部分內容更多介紹見這裡

Content-Security-Policy(簡稱為CSP)用來指定頁面可以加載哪些資源,主要目的是減少XSS的發生。我允許了來自本站、disquscdn的外鏈JS,還允許內聯JS,以及在JS中使用eval;允許來自本站和google統計的圖片,以及內聯圖片(Data URI形式);允許本站外鏈CSS以及內聯CSS;允許iframe加載來自disqus的頁面。對於其他未指定的資源,都會走默認規則self,也就是只允許加載本站的。關於CSP的詳細介紹請看這裡

之前的博客中,我還介紹過X-XSS-Protection這個響應頭,也可以用來防範XSS。不過由於有了CSP,所以我沒配置它。

需要注意的是,以上這些響應頭現代瀏覽器才支持,所以並不是說加上他們,網站就可以不管XSS,萬事大吉了。但是鑑於低廉的成本,還是都配上。

HTTPS 安全配置

啟用HTTPS 並正確配置了證書,意味著數據傳輸過程中無法被第三者解密或修改。有了HTTPS,也得合理配置好Web Server,才能發揮最大價值。我的博客關於HTTPS 這一塊有以下配置:

NGINXssl_certificate      /home/jerry/ssl/server.crt;
ssl_certificate_key  /home/jerry/ssl/server.key;
ssl_dhparam          /home/jerry/ssl/dhparams.pem;

ssl_ciphers          ECDHE-ECDSA-CHACHA20-POLY1305:ECDHE-RSA-CHACHA20-POLY1305:ECDHE-ECDSA-AES128-GCM-SHA256:ECDHE-RSA-AES128-GCM-SHA256:ECDHE-ECDSA-AES256-GCM-SHA384:ECDHE-RSA-AES256-GCM-SHA384:ECDHE-ECDSA-AES128-SHA:ECDHE-RSA-AES128-SHA:ECDHE-ECDSA-AES256-SHA384:ECDHE-RSA-AES256-SHA384:ECDHE-ECDSA-AES256-SHA:ECDHE-RSA-AES256-SHA:ECDHE-ECDSA-AES128-SHA256:ECDHE-RSA-AES128-SHA256:AES128-GCM-SHA256:AES256-GCM-SHA384:DES-CBC3-SHA;

ssl_prefer_server_ciphers  on;

ssl_protocols        TLSv1 TLSv1.1 TLSv1.2;

最終效果是我的博客在ssllabs的測試中達到了A+,如下圖:

ssllabs test

如何配置ssl_ciphers可以參考這個網站。需要注意的是,這個網站默認提供的加密方式安全性較高,一些低版本客戶端並不支持,例如IE9-、Android2.2-和Java6-。如果需要支持這些老舊的客戶端,需要點一下網站上的「Yes, give me a ciphersuite that works with legacy / old software」鏈接。

另外,我在ssl_ciphers最開始加上了CHACHA20,這是因為我的Nginx支持了CHACHA20_POLY1305加密算法,這是由Google開發的新一代加密方式,它有兩方面優勢:更好的安全性和更好的性能(尤其是在移動和可穿戴設備上)。下面有一張移動平台上它與AES-GCM的加密速度對比圖(via):

chacha20 poly1305

啟用CHACHA20_POLY1305最簡單的方法是在編譯Nginx時,使用LibreSSL代替OpenSSL。下面是用Chrome訪問我的博客時,點擊地址欄小鎖顯示的信息,可以看到加密方式使用的就是CHACHA20_POLY1305:

imququ.com

關於CHACHA20_POLY1305安全性和性能的詳細介紹可以查看本文

補充:使用CHACHA20_POLY1305的最佳實踐是「僅針對不支持AES-NI的終端使用CHACHA20算法,否則使用AES-GCM」。關於這個話題的詳細解釋和配置方法,請參考我的這篇文章:使用BoringSSL優化HTTPS加密算法選擇

關於ssl_dhparam的配置,可以參考這篇文章:Guide to Deploying Diffie-Hellman for TLS

SSLv3已被證實不安全,所以在ssl_protocols指令中,我並沒有包含它。

ssl_prefer_server_ciphers配置為on,可以確保在TLSv1握手時,使用服務端的配置項,以增強安全性。

好了,本文先就這樣,後面再寫跟性能有關的配置。