This project will show you how to use joystick with serial monitor.
Operation and uses
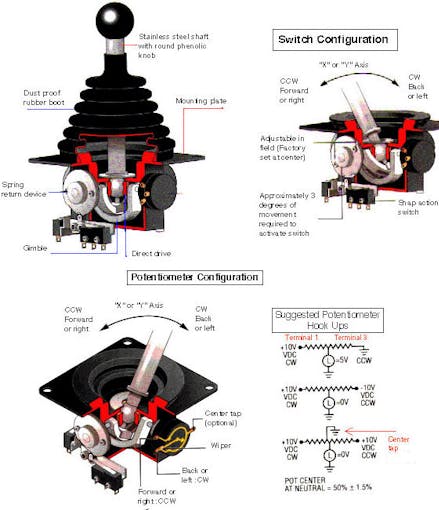
The joystick is similar to two potentiometers connected together, one for the vertical movement (Y-axis) and other for the horizontal movement (X-axis).
( Same operation as an analogic joystick used with arduino card )
The potentiometers are variable resistances and, in a way, they act as sensors that provide us with varying voltage depending on their rotation.
Generally, joysticks are used in the military, leisure and aviation sectors.
The CNC Shield V4 came with some factory errors being a cloned version for china, the step puls and step direction pin numbers have been alternated, this article also show how to correct it. Just modify one file.
modify cpu_map.h file at line 39
#define X_STEP_BIT 5 // Uno Digital Pin 2
#define Y_STEP_BIT 6 // Uno Digital Pin 3
#define Z_STEP_BIT 7 // Uno Digital Pin 4
and line 47
#define X_DIRECTION_BIT 2 // Uno Digital Pin 5
#define Y_DIRECTION_BIT 3 // Uno Digital Pin 6
#define Z_DIRECTION_BIT 4 // Uno Digital Pin 7
In this tutorial, we are going to create responsive Login & Signup UI screens using the Bootstrap 4 CSS framework in the Vue.js application.
We will create a Login screen, Sign up screen, and Forgot Password screen from scratch.
Bootstrap is a free and open-source CSS based UI framework, and It is used for rapid front-end development. It offers plenty of UI components that are 100% responsive and can work on any device size smoothly. It contains CSS- and JavaScript-based design templates for typography, forms, buttons, navigation, and other interface components.
Vue.js is a robust progressive open-source JavaScript framework, and It is used use by web developers for creating excellent user interfaces and single-page applications. It makes app development quite simple and straightforward. The primary factor of Vue is that it is lightweight, flexible, modular, and highly performant.
Let’s start creating Login and Registration user-interface templates for Vue.js.
Vue.js Login & Signup UI Example
You need to have following tools and frameworks ready to get started with this tutorial:
Vue CLI
Vue
Bootstrap 4
Code Editor
Generate Vue App with Vue CLI
The Vue CLI offers the standard tooling option for swift development in Vue, run the command to install Vue CLI.
npminstall -g @vue/cli
# or yarn global add @vue/cli
Make sure which vue-cli version has been installed in your development system:
vue --version
Generate a new Vue.js project by running the command from Vue CLI.
vue create vue-animated-ui
Answer Vue CLI questions with following choices.
# ? Please pick a preset: Manually select features# ? Check the features needed for your project: Babel, Router, CSS Pre-processors, Linter# ? Use history mode for router? (Requires proper server setup for index fallback in production) Yes# ? Pick a CSS pre-processor (PostCSS, Autoprefixer and CSS Modules are supported by default): Sass/SCSS (with dart-sass)# ? Pick a linter / formatter config: Basic# ? Pick additional lint features: Lint on save# ? Where do you prefer placing config for Babel, ESLint, etc.? In package.json# ? Save this as a preset for future projects? (y/N) No
Head over to project folder.
cd vue-animated-ui
Start to see the latest created Vue app on the browser window.
npm run serve
Adding Bootstrap 4 in Vue.js
To use the Bootstrap UI components, we need to install the Bootstrap module in our Vue app.
npminstall bootstrap
# oryarnadd bootstrap
Import Bootstrap path in the main.js file. It makes Bootstrap module available throughout our app.
Add the common style of our primary authentication components in assets/css/main.css file.
*{box-sizing: border-box;}body{background: #2554FF !important;min-height: 100vh;display: flex;font-weight: 400;}body,
html,
.App,
.vue-tempalte,
.vertical-center{width: 100%;height: 100%;}.navbar-light{background-color: #ffffff;box-shadow: 0px 14px 80px rgba(34, 35, 58, 0.2);}.vertical-center{display: flex;text-align: left;justify-content: center;flex-direction: column;}.inner-block{width: 450px;margin: auto;background: #ffffff;box-shadow: 0px 14px 80px rgba(34, 35, 58, 0.2);padding: 40px 55px 45px 55px;border-radius: 15px;transition: all .3s;}.vertical-center .form-control:focus{border-color: #2554FF;box-shadow: none;}.vertical-center h3{text-align: center;margin: 0;line-height: 1;padding-bottom: 20px;}label{font-weight: 500;}.forgot-password,
.forgot-password a{text-align: right;font-size: 13px;padding-top: 10px;color: #7a7a7a;margin: 0;}.forgot-password a{color: #2554FF;}.social-icons{text-align: center;font-family:"Open Sans";font-weight: 300;font-size: 1.5em;color: #222222;}.social-icons ul{list-style: none;margin: 0;padding: 0;}.social-icons ul li{display: inline-block;zoom: 1;width: 65px;vertical-align: middle;border: 1px solid #e3e8f9;font-size: 15px;height: 40px;line-height: 40px;margin-right: 5px;background: #f4f6ff;}.social-icons ul li a{display: block;font-size: 1.4em;margin: 0 5px;text-decoration: none;}.social-icons ul li a i{-webkit-transition: all 0.2s ease-in;-moz-transition: all 0.2s ease-in;-o-transition: all 0.2s ease-in;-ms-transition: all 0.2s ease-in;transition: all 0.2s ease-in;}.social-icons ul li a:focus i,
.social-icons ul li a:active i{transition: none;color: #222222;}
Create User Login UI in Vue
Designing and developing a login screen a bit time consuming task and requires some additional skills for a software developer. As we know, the login component allows you to access an application. It contains some strong web development fundamentals such as creating HTML forms, routing to navigate to some other screen, and two-way data-binding to extract the data from the login form.
We’re going to learn how to build a beautiful login form in the Vue.js application.
Create a Login.vue file in components folder and add the following code inside the components/Login.vue file.
Well, sign up in simple terms means to create a new account or register in an application. It could be signing up for any web portal or even for a newsletter. When you visit any new website, you need to create an account using the name, email, and password.
In this step, we are going to create an eye-catching registration UI screen in Vue using the Bootstrap 4 Form component.
Create components/Signup.vue and paste the given below code inside the file.
Next, we enable the router in the vue app, these routes will allow us to navigate from one page to another page. So, first install the vue router package in the app.
npminstall vue-router
Add the following code inside the router/index.js file.
We just created beautiful UI screes for Vue authentication process, we explored how to create some beautiful Login, Signup and Forgot password templates with Bootstrap 4.
如果你需要运行Go lint工具并同时使其输出正常化,那么Go Meta Linter可以为你办到。Go Meta Linter旨在与文本编辑器或IDE集成,如如Sublime Linter插件,Atom go-plus包,Emacs Flycheck检查器,Vim / Neovim,以及Go for Visual Studio Code一起使用。它还支持各种各样的linter和配置文件,如JSON。