性能提升1000+倍。
原理是使用df 代替du,
wget https://www.strongd.net/dl/hadoop-common-2.8.1.jar -C /usr/local/hadoop-2.8.1/share/hadoop/common/
wget https://www.strongd.net/dl/mydu -C /usr/bin/
chmod a+x /usr/bin/mydu
然后重启hadoop就可以了。
性能提升1000+倍。
原理是使用df 代替du,
wget https://www.strongd.net/dl/hadoop-common-2.8.1.jar -C /usr/local/hadoop-2.8.1/share/hadoop/common/
wget https://www.strongd.net/dl/mydu -C /usr/bin/
chmod a+x /usr/bin/mydu
然后重启hadoop就可以了。
云实验室云主机自动使用root账户登录系统,因此本教程中所有的操作都是以root用户来执行的。若要在自己的云主机上进行本教程的实验,为了系统安全,建议新建一个账户登录后再进行后续操作。
任务时间:1min ~ 5min
安装SSH:
sudo yum install openssh-clients openssh-server
安装完成后,可以使用下面命令进行测试:
ssh localhost
输入root账户的密码,如果可以正常登录,则说明SSH安装没有问题。测试正常后使用exit命令退出ssh。
任务时间:5min ~ 10min
使用yum来安装1.7版本OpenJDK:
sudo yum install java-1.7.0-openjdk java-1.7.0-openjdk-devel
安装完成后,输入java和javac命令,如果能输出对应的命令帮助,则表明jdk已正确安装。
执行命令:
编辑 ~/.bashrc,在结尾追加:
export JAVA_HOME=/usr/lib/jvm/java-1.7.0-openjdk
保存文件后执行下面命令使JAVA_HOME环境变量生效:
source ~/.bashrc
为了检测系统中JAVA环境是否已经正确配置并生效,可以分别执行下面命令:
java -version
$JAVA_HOME/bin/java -version
若两条命令输出的结果一致,且都为我们前面安装的openjdk-1.7.0的版本,则表明JDK环境已经正确安装并配置。
任务时间:10min ~ 15min
本教程使用hadoop-2.7版本,使用wget工具在线下载(注:本教程是从清华大学的镜像源下载,如果下载失败或报错,可以自己在网上找到国内其他一个镜像源下载2.7版本的hadoop即可):
wget https://mirrors.tuna.tsinghua.edu.cn/apache/hadoop/common/hadoop-2.7.4/hadoop-2.7.4.tar.gz
将Hadoop安装到/usr/local目录下:
tar -zxf hadoop-2.7.4.tar.gz -C /usr/local
对安装的目录进行重命名,便于后续操作方便:
cd /usr/local
mv ./hadoop-2.7.4/ ./hadoop
检查Hadoop是否已经正确安装:
/usr/local/hadoop/bin/hadoop version
如果成功输出hadoop的版本信息,表明hadoop已经成功安装。
任务时间:15min ~ 30min
Hadoop伪分布式模式使用多个守护线程模拟分布的伪分布运行模式。
编辑 ~/.bashrc,在结尾追加如下内容:
export HADOOP_HOME=/usr/local/hadoop
export HADOOP_INSTALL=$HADOOP_HOME
export HADOOP_MAPRED_HOME=$HADOOP_HOME
export HADOOP_COMMON_HOME=$HADOOP_HOME
export HADOOP_HDFS_HOME=$HADOOP_HOME
export YARN_HOME=$HADOOP_HOME
export HADOOP_COMMON_LIB_NATIVE_DIR=$HADOOP_HOME/lib/native
export PATH=$PATH:$HADOOP_HOME/sbin:$HADOOP_HOME/bin
使Hadoop环境变量配置生效:
source ~/.bashrc
Hadoop的配置文件位于安装目录的/etc/hadoop目录下,在本教程中即位于/url/local/hadoop/etc/hadoop目录下,需要修改的配置文件为如下两个:
/usr/local/hadoop/etc/hadoop/core-site.xml
/usr/local/hadoop/etc/hadoop/hdfs-site.xml
编辑 core-site.xml,修改<configuration></configuration>节点的内容为如下所示:
<configuration>
    <property>
        <name>hadoop.tmp.dir</name>
        <value>file:/usr/local/hadoop/tmp</value>
        <description>location to store temporary files</description>
    </property>
    <property>
        <name>fs.defaultFS</name>
        <value>hdfs://localhost:9000</value>
    </property>
</configuration>
同理,编辑 hdfs-site.xml,修改<configuration></configuration>节点的内容为如下所示:
<configuration>
    <property>
        <name>dfs.replication</name>
        <value>1</value>
    </property>
    <property>
        <name>dfs.namenode.name.dir</name>
        <value>file:/usr/local/hadoop/tmp/dfs/name</value>
    </property>
    <property>
        <name>dfs.datanode.data.dir</name>
        <value>file:/usr/local/hadoop/tmp/dfs/data</value>
    </property>
</configuration>
格式化NameNode:
/usr/local/hadoop/bin/hdfs namenode -format
在输出信息中看到如下信息,则表示格式化成功:
Storage directory /usr/local/hadoop/tmp/dfs/name has been successfully formatted.
Exiting with status 0
启动NameNode和DataNode进程:
/usr/local/hadoop/sbin/start-dfs.sh
执行过程中会提示输入用户密码,输入root用户密码即可。另外,启动时ssh会显示警告提示是否继续连接,输入yes即可。
检查 NameNode 和 DataNode 是否正常启动:
jps
如果NameNode和DataNode已经正常启动,会显示NameNode、DataNode和SecondaryNameNode的进程信息:
[hadoop@VM_80_152_centos ~]$ jps
3689 SecondaryNameNode
3520 DataNode
3800 Jps
3393 NameNode
任务时间:10min ~ 20min
Hadoop自带了丰富的例子,包括 wordcount、grep、sort 等。下面我们将以grep例子为教程,输入一批文件,从中筛选出符合正则表达式dfs[a-z.]+的单词并统计出现的次数。
Hadoop 附带了丰富的例子, 执行下面命令可以查看:
cd /usr/local/hadoop
./bin/hadoop jar ./share/hadoop/mapreduce/hadoop-mapreduce-examples-2.7.4.jar
在 HDFS 中创建用户目录 hadoop:
/usr/local/hadoop/bin/hdfs dfs -mkdir -p /user/hadoop
本教程中,我们将以 Hadoop 所有的 xml 配置文件作为输入数据来完成实验。执行下面命令在 HDFS 中新建一个 input 文件夹并将 hadoop 配置文件上传到该文件夹下:
cd /usr/local/hadoop
./bin/hdfs dfs -mkdir /user/hadoop/input
./bin/hdfs dfs -put ./etc/hadoop/*.xml /user/hadoop/input
使用下面命令可以查看刚刚上传到 HDFS 的文件:
/usr/local/hadoop/bin/hdfs dfs -ls /user/hadoop/input
运行实验:
cd /usr/local/hadoop
./bin/hadoop jar ./share/hadoop/mapreduce/hadoop-mapreduce-examples-2.7.4.jar grep /user/hadoop/input /user/hadoop/output 'dfs[a-z.]+'
上述命令以 HDFS 文件系统中的 input 为输入数据来运行 Hadoop 自带的 grep 程序,提取其中符合正则表达式 dfs[a-z.]+ 的数据并进行次数统计,将结果输出到 HDFS 文件系统的 output 文件夹下。
上述例子完成后的结果保存在 HDFS 中,通过下面命令查看结果:
/usr/local/hadoop/bin/hdfs dfs -cat /user/hadoop/output/*
如果运行成功,可以看到如下结果:
1       dfsadmin
1       dfs.replication
1       dfs.namenode.name.dir
1       dfs.datanode.data.dir
删除 HDFS 中的结果目录:
/usr/local/hadoop/bin/hdfs dfs -rm -r /user/hadoop/output
运行 Hadoop 程序时,为了防止覆盖结果,程序指定的输出目录不能存在,否则会提示错误,因此在下次运行前需要先删除输出目录。
关闭 Hadoop 进程:
/usr/local/hadoop/sbin/stop-dfs.sh
再起启动只需要执行下面命令:
/usr/local/hadoop/sbin/start-dfs.sh
任务时间:时间未知
恭喜您已经完成了搭建 Hadoop 伪分布式环境的学习
使用hbase的目的是为了海量数据的随机读写,但是在实际使用中却发现针对随机读的优化和gc是一个很大的问题,而且hbase的数据是存储在Hdfs,而Hdfs是面向流失数据访问进行设计的,就难免带来效率的下降。下面介绍一下Facebook Message系统在HBase online storage场景下的一个案例(《Apache Hadoop Goes Realtime at Facebook》, SIGMOD 2011),最近他们在存储领域顶级会议FAST2014上发表了一篇论文《Analysis of HDFS Under HBase: A Facebook Messages Case Study》分析了他们在使用HBase中遇到的一些问题和解决方案。该论文首先讲了Facebook的分析方法包括tracing/analysis/simulation,FM系统的架构和文件与数据构成等,接下来开始分析FM系统在性能方面的一些问题,并提出了解决方案。
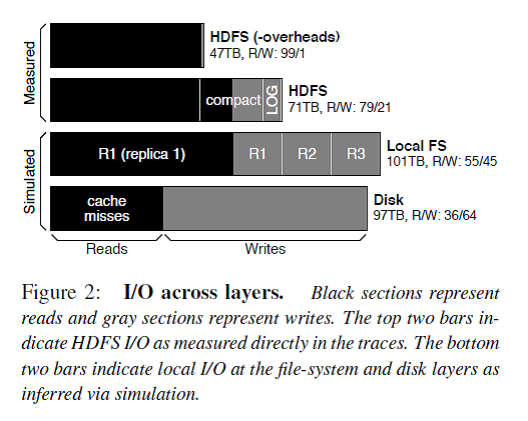
Figure 2描述了每一层的I/O构成,解释了在FM系统对外请求中读占主导,但是由于logging/compaction/replication/caching导致写被严重放大。
总的来说,HBase stack的logging/compaction/replication/caching会放大写I/O,导致业务逻辑上读为主导的HBase系统在地层实际磁盘I/O中写占据了主导。
FM系统的主要文件类型和大小
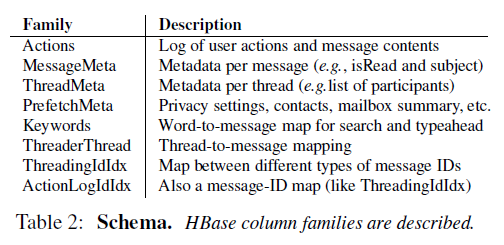
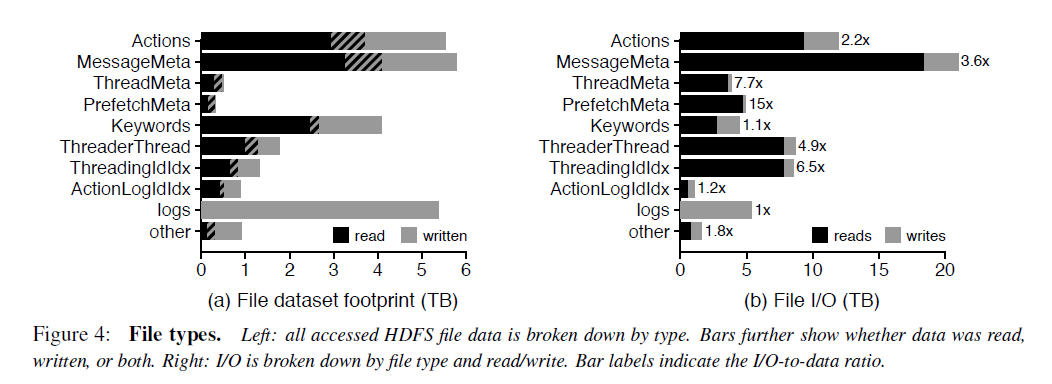
对于每个column family的文件,90%是小于15M的。但是少量的特别大的文件会拉高column family的平均文件大小。例如MessageMeta这个column family的平均文件大小是293M。从这些文件的生命周期来看,大部分FM的数据存储在large,long-lived files,然而大部分文件却是small, short-lived。这对HDFS的NameNode提出了很大的挑战,因为HDFS设计的初衷是为了存储少量、大文件准备的,所有的文件的元数据是存储在NameNode的内存中的,还有有NameNode federation。
FM系统的主要I/O访问类型
下面从temporal locality, spatial locality, sequentiality的角度来看。
73.7%的数据只被读取了一次,但是1.1%的数据被读取了至少64次。也就是说只有少部分的数据被重复读取了。但是从触发I/O的角度,只有19%的读操作读取的是只被读取一次的数据,而大部分I/O是读取那些热数据。
在HDFS这一层,FM读取数据没有表现出sequentiality,也就是说明high-bandwidth, high-latency的机械磁盘不是服务读请求的理想存储介质。而且对数据的读取也没有表现出spatial locality,也就是说I/O预读取也没啥作用。
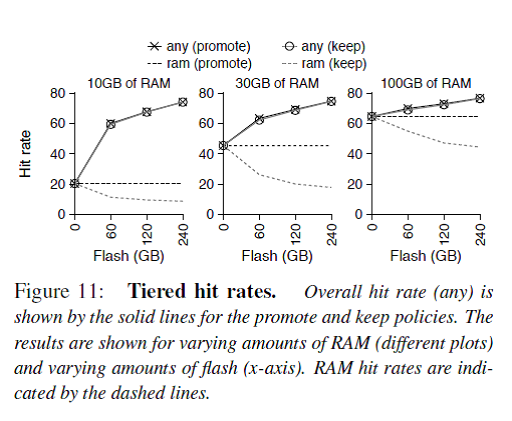
解决方案1. Flash/SSD作为cache使用
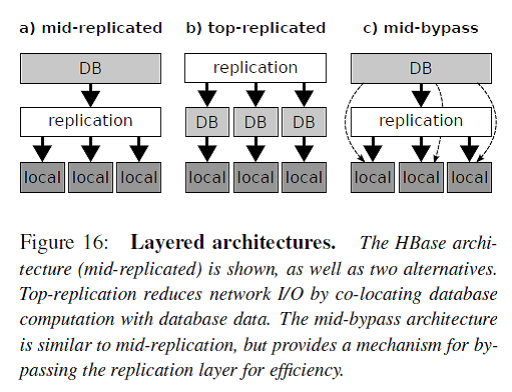
如Figure 16所示,一般分布式数据库系统分为三个层次:db layer/replication layer/local layer。这种分层架构的最大优点是简洁清晰,每层各司其职。例如db layer只需要处理DB相关的逻辑,底层的存储认为是available和reliable的。
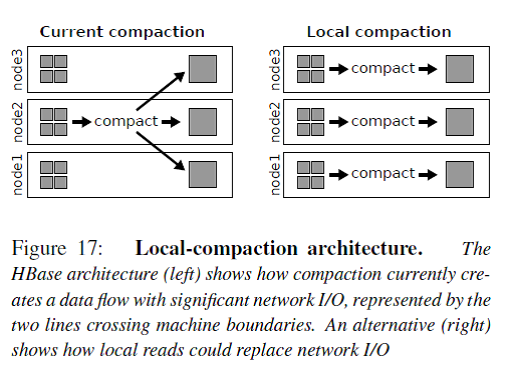
HBase是图中a)的架构,数据的冗余replication由HDFS来负责。但是这个带来一个问题就是例如compaction操作会读取多个三备份的小文件到内存merge-sorting成一个三备份的大文件,这个操作只能在其中的一个RS/DN上完成,那么从其他RS/DN上的数据读写都会带来网络传输I/O。
图中b)的架构就是把replication层放到了DB层的上面,Facebook举的例子是Salus,不过我对这个东西不太熟悉。我认为Cassandra就是这个架构的。这个架构的缺点就是DB层需要处理底层文件系统的问题,还要保证和其他节点的DB层协调一致,太复杂了。
图中c)的架构是在a的基础上的一种改进,Spark使用的就是这个架构。HBase的compaction操作就可以简化成join和sort这样两个RDD变换。
Recognize and manipulate faces from Python or from the command line with the world’s simplest face recognition library.
Built using dlib‘s state-of-the-art face recognition built with deep learning. The model has an accuracy of 99.38% on theLabeled Faces in the Wild benchmark.
This also provides a simple face_recognition command line tool that lets you do face recognition on a folder of images from the command line!
Find all the faces that appear in a picture:

Project site : https://github.com/ageitgey/face_recognition
I strive to respect everybody’s personal preferences, so I usually steer clear of debates about which is the best programming language, text editor or operating system.
However, recently I was asked a couple of times why I like and use a lot of Go, so here is a coherent article to fill in the blanks of my ad-hoc in-person ramblings :-).
I have used C and Perl for a number of decently sized projects. I have written programs in Python, Ruby, C++, CHICKEN Scheme, Emacs Lisp, Rust and Java (for Android only). I understand a bit of Lua, PHP, Erlang and Haskell. In a previous life, I developed a number of programs using Delphi.
I had a brief look at Go in 2009, when it was first released. I seriously started using the language when Go 1.0 was released in 2012, featuring the Go 1 compatibility guarantee. I still have code running in production which I authored in 2012, largely untouched.
Go code, by convention, is formatted using the gofmt tool. Programmatically formatting code is not a new idea, but contrary to its predecessors, gofmt supports precisely one canonical style.
Having all code formatted the same way makes reading code easier; the code feels familiar. This helps not only when reading the standard library or Go compiler, but also when working with many code bases — think Open Source, or big companies.
Further, auto-formatting is a huge time-saver during code reviews, as it eliminates an entire dimension in which code could be reviewed before: now, you can just let your continuous integration system verify that gofmt produces no diffs.
Interestingly enough, having my editor apply gofmt when saving a file has changed the way I write code. I used to attempt to match what the formatter would enforce, then have it correct my mistakes. Nowadays, I express my thought as quickly as possible and trust gofmt to make it pretty (example of what I would type, click Format).
I use the standard library (docs, source) quite a bit, see below.
All standard library code which I have read so far was of extremely high quality.
One example is the image/jpeg package: I didn’t know how JPEG worked at the time, but it was easy to pick up by switching between the Wikipedia JPEG article and theimage/jpeg code. If the package had a few more comments, I would qualify it as a teaching implementation.
I have come to agree with many opinions the Go community holds, such as:
The Go specification lists only 25 keywords, which I can easily keep in my head.
The same is true for builtin functions and types.
In my experience, the small number of abstraction layers and concepts makes the language easy to pick up and quickly feel comfortable in.
While we’re talking about it: I was surprised about how readable the Go specification is. It really seems to target programmers (rather than standards committees?).
I love quick feedback: I appreciate websites which load quickly, I prefer fluent User Interfaces which don’t lag, and I will choose a quick tool over a more powerful tool any day. The findings of large web properties confirm that this behavior is shared by many.
The authors of the Go compiler respect my desire for low latency: compilation speed matters to them, and new optimizations are carefully weighed against whether they will slow down compilation.
A friend of mine had not used Go before. After installing the RobustIRC bridge using go get, they concluded that Go must be an interpreted language and I had to correct them: no, the Go compiler just is that fast.
Most Go tools are no exception, e.g. gofmt or goimports are blazingly fast.
For batch applications (as opposed to interactive applications), utilizing the available resources to their fullest is usually more important than low latency.
It is delightfully easy to profile and change a Go program to utilize all available IOPS, network bandwidth or compute. As an example, I wrote about filling a 1 Gbps link, and optimized debiman to utilize all available resources, reducing its runtime by hours.
The Go standard library provides means to effectively use common communications protocols and data storage formats/mechanisms, such as TCP/IP, HTTP, JPEG, SQL, …
Go’s standard library is the best one I have ever seen. I perceive it as well-organized, clean, small, yet comprehensive: I often find it possible to write reasonably sized programs with just the standard library, plus one or two external packages.
Domain-specific data types and algorithms are (in general) not included and live outside the standard library, e.g. golang.org/x/net/html. The golang.org/x namespace also serves as a staging area for new code before it enters the standard library: the Go 1 compatibility guarantee precludes any breaking changes, even if they are clearly worthwhile. A prominent example is golang.org/x/crypto/ssh, which had to break existing code to establish a more secure default.
To download, compile, install and update Go packages, I use the go get tool.
All Go code bases I have worked with use the built-in testing facilities. This results not only in easy and fast testing, but also in coverage reports being readily available.
Whenever a program uses more resources than expected, I fire up pprof. See this golang.org blog post about pprof for an introduction, or my blog post about optimizing Debian Code Search. After importing the net/http/pprof package, you can profile your server while it’s running, without recompilation or restarting.
Cross-compilation is as easy as setting the GOARCH environment variable, e.g. GOARCH=arm64 for targeting the Raspberry Pi 3. Notably, tools just work cross-platform, too! For example, I can profile gokrazy from my amd64 computer: go tool pprof ~/go/bin/linux_arm64/dhcp http://gokrazy:3112/debug/pprof/heap.
godoc displays documentation as plain text or serves it via HTTP. godoc.org is a public instance, but I run a local one to use while offline or for not yet published packages.
Note that these are standard tools coming with the language. Coming from C, each of the above would be a significant feat to accomplish. In Go, we take them for granted.
Hopefully I was able to convey why I’m happy working with Go.
If you’re interested in getting started with Go, check out the beginner’s resources we point people to when they join the Gophers slack channel. See https://golang.org/help/.
Of course, no programming tool is entirely free of problems. Given that this article explains why Go is my favorite programming language, it focuses on the positives. I will mention a few issues in passing, though:
go/ast.操作系统为了适应更多的硬件环境,许多初始的设置值,宽容度都很高。
如果不经调整,这些值可能无法适应HPC,或者硬件稍好些的环境。
无法发挥更好的硬件性能,甚至可能影响某些应用软件的使用,特别是数据库。
512GB 内存为例
1.
参数
fs.aio-max-nr
支持系统
CentOS 6, 7
参数解释
aio-nr & aio-max-nr:
.
aio-nr is the running total of the number of events specified on the
io_setup system call for all currently active aio contexts.
.
If aio-nr reaches aio-max-nr then io_setup will fail with EAGAIN.
.
Note that raising aio-max-nr does not result in the pre-allocation or re-sizing
of any kernel data structures.
.
aio-nr & aio-max-nr:
.
aio-nr shows the current system-wide number of asynchronous io requests.
.
aio-max-nr allows you to change the maximum value aio-nr can grow to.
推荐设置
fs.aio-max-nr = 1xxxxxx
.
PostgreSQL, Greenplum 均未使用io_setup创建aio contexts. 无需设置。
如果Oracle数据库,要使用aio的话,需要设置它。
设置它也没什么坏处,如果将来需要适应异步IO,可以不需要重新修改这个设置。
2.
参数
fs.file-max
支持系统
CentOS 6, 7
参数解释
file-max & file-nr:
.
The value in file-max denotes the maximum number of file handles that the Linux kernel will allocate.
.
When you get lots of error messages about running out of file handles,
you might want to increase this limit.
.
Historically, the kernel was able to allocate file handles dynamically,
but not to free them again.
.
The three values in file-nr denote :
the number of allocated file handles ,
the number of allocated but unused file handles ,
the maximum number of file handles.
.
Linux 2.6 always reports 0 as the number of free
file handles -- this is not an error, it just means that the
number of allocated file handles exactly matches the number of
used file handles.
.
Attempts to allocate more file descriptors than file-max are reported with printk,
look for "VFS: file-max limit <number> reached".
推荐设置
fs.file-max = 7xxxxxxx
.
PostgreSQL 有一套自己管理的VFS,真正打开的FD与内核管理的文件打开关闭有一套映射的机制,所以真实情况不需要使用那么多的file handlers。
max_files_per_process 参数。
假设1GB内存支撑100个连接,每个连接打开1000个文件,那么一个PG实例需要打开10万个文件,一台机器按512G内存来算可以跑500个PG实例,则需要5000万个file handler。
以上设置绰绰有余。
3.
参数
kernel.core_pattern
支持系统
CentOS 6, 7
参数解释
core_pattern:
.
core_pattern is used to specify a core dumpfile pattern name.
. max length 128 characters; default value is "core"
. core_pattern is used as a pattern template for the output filename;
  certain string patterns (beginning with '%') are substituted with
  their actual values.
. backward compatibility with core_uses_pid:
        If core_pattern does not include "%p" (default does not)
        and core_uses_pid is set, then .PID will be appended to
        the filename.
. corename format specifiers:
        %<NUL>  '%' is dropped
        %%      output one '%'
        %p      pid
        %P      global pid (init PID namespace)
        %i      tid
        %I      global tid (init PID namespace)
        %u      uid
        %g      gid
        %d      dump mode, matches PR_SET_DUMPABLE and
                /proc/sys/fs/suid_dumpable
        %s      signal number
        %t      UNIX time of dump
        %h      hostname
        %e      executable filename (may be shortened)
        %E      executable path
        %<OTHER> both are dropped
. If the first character of the pattern is a '|', the kernel will treat
  the rest of the pattern as a command to run.  The core dump will be
  written to the standard input of that program instead of to a file.
推荐设置
kernel.core_pattern = /xxx/core_%e_%u_%t_%s.%p
.
这个目录要777的权限,如果它是个软链,则真实目录需要777的权限
mkdir /xxx
chmod 777 /xxx
留足够的空间
4.
参数
kernel.sem
支持系统
CentOS 6, 7
参数解释
kernel.sem = 4096 2147483647 2147483646 512000
.
4096 每组多少信号量 (>=17, PostgreSQL 每16个进程一组, 每组需要17个信号量) ,
2147483647 总共多少信号量 (2^31-1 , 且大于4096*512000 ) ,
2147483646 每个semop()调用支持多少操作 (2^31-1),
512000 多少组信号量 (假设每GB支持100个连接, 512GB支持51200个连接, 加上其他进程, > 51200*2/16 绰绰有余)
.
# sysctl -w kernel.sem="4096 2147483647 2147483646 512000"
.
# ipcs -s -l
  ------ Semaphore Limits --------
max number of arrays = 512000
max semaphores per array = 4096
max semaphores system wide = 2147483647
max ops per semop call = 2147483646
semaphore max value = 32767
推荐设置
kernel.sem = 4096 2147483647 2147483646 512000
.
4096可能能够适合更多的场景, 所以大点无妨,关键是512000 arrays也够了。
5.
参数
kernel.shmall = 107374182
kernel.shmmax = 274877906944
kernel.shmmni = 819200
支持系统
CentOS 6, 7
参数解释
假设主机内存 512GB
.
shmmax 单个共享内存段最大 256GB (主机内存的一半,单位字节)
shmall 所有共享内存段加起来最大 (主机内存的80%,单位PAGE)
shmmni 一共允许创建819200个共享内存段 (每个数据库启动需要2个共享内存段。  将来允许动态创建共享内存段,可能需求量更大)
.
# getconf PAGE_SIZE
4096
推荐设置
kernel.shmall = 107374182
kernel.shmmax = 274877906944
kernel.shmmni = 819200
.
9.2以及以前的版本,数据库启动时,对共享内存段的内存需求非常大,需要考虑以下几点
Connections:	(1800 + 270 * max_locks_per_transaction) * max_connections
Autovacuum workers:	(1800 + 270 * max_locks_per_transaction) * autovacuum_max_workers
Prepared transactions:	(770 + 270 * max_locks_per_transaction) * max_prepared_transactions
Shared disk buffers:	(block_size + 208) * shared_buffers
WAL buffers:	(wal_block_size + 8) * wal_buffers
Fixed space requirements:	770 kB
.
以上建议参数根据9.2以前的版本设置,后期的版本同样适用。
6.
参数
net.core.netdev_max_backlog
支持系统
CentOS 6, 7
参数解释
netdev_max_backlog
  ------------------
Maximum number  of  packets,  queued  on  the  INPUT  side,
when the interface receives packets faster than kernel can process them.
推荐设置
net.core.netdev_max_backlog=1xxxx
.
INPUT链表越长,处理耗费越大,如果用了iptables管理的话,需要加大这个值。
7.
参数
net.core.rmem_default
net.core.rmem_max
net.core.wmem_default
net.core.wmem_max
支持系统
CentOS 6, 7
参数解释
rmem_default
  ------------
The default setting of the socket receive buffer in bytes.
.
rmem_max
  --------
The maximum receive socket buffer size in bytes.
.
wmem_default
  ------------
The default setting (in bytes) of the socket send buffer.
.
wmem_max
  --------
The maximum send socket buffer size in bytes.
推荐设置
net.core.rmem_default = 262144
net.core.rmem_max = 4194304
net.core.wmem_default = 262144
net.core.wmem_max = 4194304
8.
参数
net.core.somaxconn
支持系统
CentOS 6, 7
参数解释
somaxconn - INTEGER
        Limit of socket listen() backlog, known in userspace as SOMAXCONN.
        Defaults to 128.
	See also tcp_max_syn_backlog for additional tuning for TCP sockets.
推荐设置
net.core.somaxconn=4xxx
9.
参数
net.ipv4.tcp_max_syn_backlog
支持系统
CentOS 6, 7
参数解释
tcp_max_syn_backlog - INTEGER
        Maximal number of remembered connection requests, which have not
        received an acknowledgment from connecting client.
        The minimal value is 128 for low memory machines, and it will
        increase in proportion to the memory of machine.
        If server suffers from overload, try increasing this number.
推荐设置
net.ipv4.tcp_max_syn_backlog=4xxx
pgpool-II 使用了这个值,用于将超过num_init_child以外的连接queue。
所以这个值决定了有多少连接可以在队列里面等待。
10.
参数
net.ipv4.tcp_keepalive_intvl=20
net.ipv4.tcp_keepalive_probes=3
net.ipv4.tcp_keepalive_time=60
支持系统
CentOS 6, 7
参数解释
tcp_keepalive_time - INTEGER
        How often TCP sends out keepalive messages when keepalive is enabled.
        Default: 2hours.
.
tcp_keepalive_probes - INTEGER
        How many keepalive probes TCP sends out, until it decides that the
        connection is broken. Default value: 9.
.
tcp_keepalive_intvl - INTEGER
        How frequently the probes are send out. Multiplied by
        tcp_keepalive_probes it is time to kill not responding connection,
        after probes started. Default value: 75sec i.e. connection
        will be aborted after ~11 minutes of retries.
推荐设置
net.ipv4.tcp_keepalive_intvl=20
net.ipv4.tcp_keepalive_probes=3
net.ipv4.tcp_keepalive_time=60
.
连接空闲60秒后, 每隔20秒发心跳包, 尝试3次心跳包没有响应,关闭连接。 从开始空闲,到关闭连接总共历时120秒。
11.
参数
net.ipv4.tcp_mem=8388608 12582912 16777216
支持系统
CentOS 6, 7
参数解释
tcp_mem - vector of 3 INTEGERs: min, pressure, max
单位 page
        min: below this number of pages TCP is not bothered about its
        memory appetite.
.
        pressure: when amount of memory allocated by TCP exceeds this number
        of pages, TCP moderates its memory consumption and enters memory
        pressure mode, which is exited when memory consumption falls
        under "min".
.
        max: number of pages allowed for queueing by all TCP sockets.
.
        Defaults are calculated at boot time from amount of available
        memory.
64GB 内存,自动计算的值是这样的
net.ipv4.tcp_mem = 1539615      2052821 3079230
.
512GB 内存,自动计算得到的值是这样的
net.ipv4.tcp_mem = 49621632     66162176        99243264
.
这个参数让操作系统启动时自动计算,问题也不大
推荐设置
net.ipv4.tcp_mem=8388608 12582912 16777216
.
这个参数让操作系统启动时自动计算,问题也不大
12.
参数
net.ipv4.tcp_fin_timeout
支持系统
CentOS 6, 7
参数解释
tcp_fin_timeout - INTEGER
        The length of time an orphaned (no longer referenced by any
        application) connection will remain in the FIN_WAIT_2 state
        before it is aborted at the local end.  While a perfectly
        valid "receive only" state for an un-orphaned connection, an
        orphaned connection in FIN_WAIT_2 state could otherwise wait
        forever for the remote to close its end of the connection.
        Cf. tcp_max_orphans
        Default: 60 seconds
推荐设置
net.ipv4.tcp_fin_timeout=5
.
加快僵尸连接回收速度
13.
参数
net.ipv4.tcp_synack_retries
支持系统
CentOS 6, 7
参数解释
tcp_synack_retries - INTEGER
        Number of times SYNACKs for a passive TCP connection attempt will
        be retransmitted. Should not be higher than 255. Default value
        is 5, which corresponds to 31seconds till the last retransmission
        with the current initial RTO of 1second. With this the final timeout
        for a passive TCP connection will happen after 63seconds.
推荐设置
net.ipv4.tcp_synack_retries=2
.
缩短tcp syncack超时时间
14.
参数
net.ipv4.tcp_syncookies
支持系统
CentOS 6, 7
参数解释
tcp_syncookies - BOOLEAN
        Only valid when the kernel was compiled with CONFIG_SYN_COOKIES
        Send out syncookies when the syn backlog queue of a socket
        overflows. This is to prevent against the common 'SYN flood attack'
        Default: 1
.
        Note, that syncookies is fallback facility.
        It MUST NOT be used to help highly loaded servers to stand
        against legal connection rate. If you see SYN flood warnings
        in your logs, but investigation shows that they occur
        because of overload with legal connections, you should tune
        another parameters until this warning disappear.
        See: tcp_max_syn_backlog, tcp_synack_retries, tcp_abort_on_overflow.
.
        syncookies seriously violate TCP protocol, do not allow
        to use TCP extensions, can result in serious degradation
        of some services (f.e. SMTP relaying), visible not by you,
        but your clients and relays, contacting you. While you see
        SYN flood warnings in logs not being really flooded, your server
        is seriously misconfigured.
.
        If you want to test which effects syncookies have to your
        network connections you can set this knob to 2 to enable
        unconditionally generation of syncookies.
推荐设置
net.ipv4.tcp_syncookies=1
.
防止syn flood攻击
15.
参数
net.ipv4.tcp_timestamps
支持系统
CentOS 6, 7
参数解释
tcp_timestamps - BOOLEAN
        Enable timestamps as defined in RFC1323.
推荐设置
net.ipv4.tcp_timestamps=1
.
tcp_timestamps 是 tcp 协议中的一个扩展项,通过时间戳的方式来检测过来的包以防止 PAWS(Protect Against Wrapped  Sequence numbers),可以提高 tcp 的性能。
16.
参数
net.ipv4.tcp_tw_recycle
net.ipv4.tcp_tw_reuse
net.ipv4.tcp_max_tw_buckets
支持系统
CentOS 6, 7
参数解释
tcp_tw_recycle - BOOLEAN
        Enable fast recycling TIME-WAIT sockets. Default value is 0.
        It should not be changed without advice/request of technical
        experts.
.
tcp_tw_reuse - BOOLEAN
        Allow to reuse TIME-WAIT sockets for new connections when it is
        safe from protocol viewpoint. Default value is 0.
        It should not be changed without advice/request of technical
        experts.
.
tcp_max_tw_buckets - INTEGER
        Maximal number of timewait sockets held by system simultaneously.
        If this number is exceeded time-wait socket is immediately destroyed
        and warning is printed.
	This limit exists only to prevent simple DoS attacks,
	you _must_ not lower the limit artificially,
        but rather increase it (probably, after increasing installed memory),
        if network conditions require more than default value.
推荐设置
net.ipv4.tcp_tw_recycle=0
net.ipv4.tcp_tw_reuse=1
net.ipv4.tcp_max_tw_buckets = 2xxxxx
.
net.ipv4.tcp_tw_recycle和net.ipv4.tcp_timestamps不建议同时开启
17.
参数
net.ipv4.tcp_rmem
net.ipv4.tcp_wmem
支持系统
CentOS 6, 7
参数解释
tcp_wmem - vector of 3 INTEGERs: min, default, max
        min: Amount of memory reserved for send buffers for TCP sockets.
        Each TCP socket has rights to use it due to fact of its birth.
        Default: 1 page
.
        default: initial size of send buffer used by TCP sockets.  This
        value overrides net.core.wmem_default used by other protocols.
        It is usually lower than net.core.wmem_default.
        Default: 16K
.
        max: Maximal amount of memory allowed for automatically tuned
        send buffers for TCP sockets. This value does not override
        net.core.wmem_max.  Calling setsockopt() with SO_SNDBUF disables
        automatic tuning of that socket's send buffer size, in which case
        this value is ignored.
        Default: between 64K and 4MB, depending on RAM size.
.
tcp_rmem - vector of 3 INTEGERs: min, default, max
        min: Minimal size of receive buffer used by TCP sockets.
        It is guaranteed to each TCP socket, even under moderate memory
        pressure.
        Default: 1 page
.
        default: initial size of receive buffer used by TCP sockets.
        This value overrides net.core.rmem_default used by other protocols.
        Default: 87380 bytes. This value results in window of 65535 with
        default setting of tcp_adv_win_scale and tcp_app_win:0 and a bit
        less for default tcp_app_win. See below about these variables.
.
        max: maximal size of receive buffer allowed for automatically
        selected receiver buffers for TCP socket. This value does not override
        net.core.rmem_max.  Calling setsockopt() with SO_RCVBUF disables
        automatic tuning of that socket's receive buffer size, in which
        case this value is ignored.
        Default: between 87380B and 6MB, depending on RAM size.
推荐设置
net.ipv4.tcp_rmem=8192 87380 16777216
net.ipv4.tcp_wmem=8192 65536 16777216
.
许多数据库的推荐设置,提高网络性能
18.
参数
net.nf_conntrack_max
net.netfilter.nf_conntrack_max
支持系统
CentOS 6
参数解释
nf_conntrack_max - INTEGER
        Size of connection tracking table.
	Default value is nf_conntrack_buckets value * 4.
推荐设置
net.nf_conntrack_max=1xxxxxx
net.netfilter.nf_conntrack_max=1xxxxxx
19.
参数
vm.dirty_background_bytes
vm.dirty_expire_centisecs
vm.dirty_ratio
vm.dirty_writeback_centisecs
支持系统
CentOS 6, 7
参数解释
==============================================================
.
dirty_background_bytes
.
Contains the amount of dirty memory at which the background kernel
flusher threads will start writeback.
.
Note: dirty_background_bytes is the counterpart of dirty_background_ratio. Only
one of them may be specified at a time. When one sysctl is written it is
immediately taken into account to evaluate the dirty memory limits and the
other appears as 0 when read.
.
==============================================================
.
dirty_background_ratio
.
Contains, as a percentage of total system memory, the number of pages at which
the background kernel flusher threads will start writing out dirty data.
.
==============================================================
.
dirty_bytes
.
Contains the amount of dirty memory at which a process generating disk writes
will itself start writeback.
.
Note: dirty_bytes is the counterpart of dirty_ratio. Only one of them may be
specified at a time. When one sysctl is written it is immediately taken into
account to evaluate the dirty memory limits and the other appears as 0 when
read.
.
Note: the minimum value allowed for dirty_bytes is two pages (in bytes); any
value lower than this limit will be ignored and the old configuration will be
retained.
.
==============================================================
.
dirty_expire_centisecs
.
This tunable is used to define when dirty data is old enough to be eligible
for writeout by the kernel flusher threads.  It is expressed in 100'ths
of a second.  Data which has been dirty in-memory for longer than this
interval will be written out next time a flusher thread wakes up.
.
==============================================================
.
dirty_ratio
.
Contains, as a percentage of total system memory, the number of pages at which
a process which is generating disk writes will itself start writing out dirty
data.
.
==============================================================
.
dirty_writeback_centisecs
.
The kernel flusher threads will periodically wake up and write `old' data
out to disk.  This tunable expresses the interval between those wakeups, in
100'ths of a second.
.
Setting this to zero disables periodic writeback altogether.
.
==============================================================
推荐设置
vm.dirty_background_bytes = 4096000000
vm.dirty_expire_centisecs = 6000
vm.dirty_ratio = 80
vm.dirty_writeback_centisecs = 50
.
减少数据库进程刷脏页的频率,dirty_background_bytes根据实际IOPS能力以及内存大小设置
20.
参数
vm.extra_free_kbytes
支持系统
CentOS 6
参数解释
extra_free_kbytes
.
This parameter tells the VM to keep extra free memory
between the threshold where background reclaim (kswapd) kicks in,
and the threshold where direct reclaim (by allocating processes) kicks in.
.
This is useful for workloads that require low latency memory allocations
and have a bounded burstiness in memory allocations,
for example a realtime application that receives and transmits network traffic
(causing in-kernel memory allocations) with a maximum total message burst
size of 200MB may need 200MB of extra free memory to avoid direct reclaim
related latencies.
.
目标是尽量让后台进程回收内存,比用户进程提早多少kbytes回收,因此用户进程可以快速分配内存。
推荐设置
vm.extra_free_kbytes=4xxxxxx
21.
参数
vm.min_free_kbytes
支持系统
CentOS 6, 7
参数解释
min_free_kbytes:
.
This is used to force the Linux VM to keep a minimum number
of kilobytes free.  The VM uses this number to compute a
watermark[WMARK_MIN] value for each lowmem zone in the system.
Each lowmem zone gets a number of reserved free pages based
proportionally on its size.
.
Some minimal amount of memory is needed to satisfy PF_MEMALLOC
allocations; if you set this to lower than 1024KB, your system will
become subtly broken, and prone to deadlock under high loads.
.
Setting this too high will OOM your machine instantly.
推荐设置
vm.min_free_kbytes = 2xxxxxx
.
防止在高负载时系统无响应,减少内存分配死锁概率。
22.
参数
vm.mmap_min_addr
支持系统
CentOS 6, 7
参数解释
mmap_min_addr
.
This file indicates the amount of address space  which a user process will
be restricted from mmapping.  Since kernel null dereference bugs could
accidentally operate based on the information in the first couple of pages
of memory userspace processes should not be allowed to write to them.  By
default this value is set to 0 and no protections will be enforced by the
security module.  Setting this value to something like 64k will allow the
vast majority of applications to work correctly and provide defense in depth
against future potential kernel bugs.
推荐设置
vm.mmap_min_addr=6xxxx
.
防止内核隐藏的BUG导致的问题
23.
参数
vm.overcommit_memory
vm.overcommit_ratio
支持系统
CentOS 6, 7
参数解释
==============================================================
.
overcommit_kbytes:
.
When overcommit_memory is set to 2, the committed address space is not
permitted to exceed swap plus this amount of physical RAM. See below.
.
Note: overcommit_kbytes is the counterpart of overcommit_ratio. Only one
of them may be specified at a time. Setting one disables the other (which
then appears as 0 when read).
.
==============================================================
.
overcommit_memory:
.
This value contains a flag that enables memory overcommitment.
.
When this flag is 0,
the kernel attempts to estimate the amount
of free memory left when userspace requests more memory.
.
When this flag is 1,
the kernel pretends there is always enough memory until it actually runs out.
.
When this flag is 2,
the kernel uses a "never overcommit"
policy that attempts to prevent any overcommit of memory.
Note that user_reserve_kbytes affects this policy.
.
This feature can be very useful because there are a lot of
programs that malloc() huge amounts of memory "just-in-case"
and don't use much of it.
.
The default value is 0.
.
See Documentation/vm/overcommit-accounting and
security/commoncap.c::cap_vm_enough_memory() for more information.
.
==============================================================
.
overcommit_ratio:
.
When overcommit_memory is set to 2,
the committed address space is not permitted to exceed
      swap + this percentage of physical RAM.
See above.
.
==============================================================
推荐设置
vm.overcommit_memory = 0
vm.overcommit_ratio = 90
.
vm.overcommit_memory = 0 时 vm.overcommit_ratio可以不设置
24.
参数
vm.swappiness
支持系统
CentOS 6, 7
参数解释
swappiness
.
This control is used to define how aggressive the kernel will swap
memory pages.
Higher values will increase agressiveness, lower values
decrease the amount of swap.
.
The default value is 60.
推荐设置
vm.swappiness = 0
25.
参数
vm.zone_reclaim_mode
支持系统
CentOS 6, 7
参数解释
zone_reclaim_mode:
.
Zone_reclaim_mode allows someone to set more or less aggressive approaches to
reclaim memory when a zone runs out of memory. If it is set to zero then no
zone reclaim occurs. Allocations will be satisfied from other zones / nodes
in the system.
.
This is value ORed together of
.
1       = Zone reclaim on
2       = Zone reclaim writes dirty pages out
4       = Zone reclaim swaps pages
.
zone_reclaim_mode is disabled by default.  For file servers or workloads
that benefit from having their data cached, zone_reclaim_mode should be
left disabled as the caching effect is likely to be more important than
data locality.
.
zone_reclaim may be enabled if it's known that the workload is partitioned
such that each partition fits within a NUMA node and that accessing remote
memory would cause a measurable performance reduction.  The page allocator
will then reclaim easily reusable pages (those page cache pages that are
currently not used) before allocating off node pages.
.
Allowing zone reclaim to write out pages stops processes that are
writing large amounts of data from dirtying pages on other nodes. Zone
reclaim will write out dirty pages if a zone fills up and so effectively
throttle the process. This may decrease the performance of a single process
since it cannot use all of system memory to buffer the outgoing writes
anymore but it preserve the memory on other nodes so that the performance
of other processes running on other nodes will not be affected.
.
Allowing regular swap effectively restricts allocations to the local
node unless explicitly overridden by memory policies or cpuset
configurations.
推荐设置
vm.zone_reclaim_mode=0
.
不使用NUMA
26.
参数
net.ipv4.ip_local_port_range
支持系统
CentOS 6, 7
参数解释
ip_local_port_range - 2 INTEGERS
        Defines the local port range that is used by TCP and UDP to
        choose the local port. The first number is the first, the
        second the last local port number. The default values are
        32768 and 61000 respectively.
.
ip_local_reserved_ports - list of comma separated ranges
        Specify the ports which are reserved for known third-party
        applications. These ports will not be used by automatic port
        assignments (e.g. when calling connect() or bind() with port
        number 0). Explicit port allocation behavior is unchanged.
.
        The format used for both input and output is a comma separated
        list of ranges (e.g. "1,2-4,10-10" for ports 1, 2, 3, 4 and
        10). Writing to the file will clear all previously reserved
        ports and update the current list with the one given in the
        input.
.
        Note that ip_local_port_range and ip_local_reserved_ports
        settings are independent and both are considered by the kernel
        when determining which ports are available for automatic port
        assignments.
.
        You can reserve ports which are not in the current
        ip_local_port_range, e.g.:
.
        $ cat /proc/sys/net/ipv4/ip_local_port_range
        32000   61000
        $ cat /proc/sys/net/ipv4/ip_local_reserved_ports
        8080,9148
.
        although this is redundant. However such a setting is useful
        if later the port range is changed to a value that will
        include the reserved ports.
.
        Default: Empty
推荐设置
net.ipv4.ip_local_port_range=40000 65535
.
限制本地动态端口分配范围,防止占用监听端口。
27.
参数
vm.nr_hugepages
支持系统
CentOS 6, 7
参数解释
==============================================================
nr_hugepages
Change the minimum size of the hugepage pool.
See Documentation/vm/hugetlbpage.txt
==============================================================
nr_overcommit_hugepages
Change the maximum size of the hugepage pool. The maximum is
nr_hugepages + nr_overcommit_hugepages.
See Documentation/vm/hugetlbpage.txt
.
The output of "cat /proc/meminfo" will include lines like:
......
HugePages_Total: vvv
HugePages_Free:  www
HugePages_Rsvd:  xxx
HugePages_Surp:  yyy
Hugepagesize:    zzz kB
.
where:
HugePages_Total is the size of the pool of huge pages.
HugePages_Free  is the number of huge pages in the pool that are not yet
                allocated.
HugePages_Rsvd  is short for "reserved," and is the number of huge pages for
                which a commitment to allocate from the pool has been made,
                but no allocation has yet been made.  Reserved huge pages
                guarantee that an application will be able to allocate a
                huge page from the pool of huge pages at fault time.
HugePages_Surp  is short for "surplus," and is the number of huge pages in
                the pool above the value in /proc/sys/vm/nr_hugepages. The
                maximum number of surplus huge pages is controlled by
                /proc/sys/vm/nr_overcommit_hugepages.
.
/proc/filesystems should also show a filesystem of type "hugetlbfs" configured
in the kernel.
.
/proc/sys/vm/nr_hugepages indicates the current number of "persistent" huge
pages in the kernel's huge page pool.  "Persistent" huge pages will be
returned to the huge page pool when freed by a task.  A user with root
privileges can dynamically allocate more or free some persistent huge pages
by increasing or decreasing the value of 'nr_hugepages'.
推荐设置
如果要使用PostgreSQL的huge page,建议设置它。
大于数据库需要的共享内存即可。
28.
参数
fs.nr_open
支持系统
CentOS 6, 7
参数解释
nr_open:

This denotes the maximum number of file-handles a process can
allocate. Default value is 1024*1024 (1048576) which should be
enough for most machines. Actual limit depends on RLIMIT_NOFILE
resource limit.

它还影响security/limits.conf 的文件句柄限制,单个进程的打开句柄不能大于fs.nr_open,所以要加大文件句柄限制,首先要加大nr_open
推荐设置
对于有很多对象(表、视图、索引、序列、物化视图等)的PostgreSQL数据库,建议设置为2000万,
例如fs.nr_open=20480000
1. 通过/etc/security/limits.conf设置,或者ulimit设置
2. 通过/proc/$pid/limits查看当前进程的设置
#        - core - limits the core file size (KB)
#        - memlock - max locked-in-memory address space (KB)
#        - nofile - max number of open files  建议设置为1000万 , 但是必须设置sysctl, fs.nr_open大于它,否则会导致系统无法登陆。
#        - nproc - max number of processes
以上四个是非常关心的配置
....
#        - data - max data size (KB)
#        - fsize - maximum filesize (KB)
#        - rss - max resident set size (KB)
#        - stack - max stack size (KB)
#        - cpu - max CPU time (MIN)
#        - as - address space limit (KB)
#        - maxlogins - max number of logins for this user
#        - maxsyslogins - max number of logins on the system
#        - priority - the priority to run user process with
#        - locks - max number of file locks the user can hold
#        - sigpending - max number of pending signals
#        - msgqueue - max memory used by POSIX message queues (bytes)
#        - nice - max nice priority allowed to raise to values: [-20, 19]
#        - rtprio - max realtime priority
1. 目前操作系统支持的IO调度策略包括cfq, deadline, noop 等。
/kernel-doc-xxx/Documentation/block
-r--r--r-- 1 root root   674 Apr  8 16:33 00-INDEX
-r--r--r-- 1 root root 55006 Apr  8 16:33 biodoc.txt
-r--r--r-- 1 root root   618 Apr  8 16:33 capability.txt
-r--r--r-- 1 root root 12791 Apr  8 16:33 cfq-iosched.txt
-r--r--r-- 1 root root 13815 Apr  8 16:33 data-integrity.txt
-r--r--r-- 1 root root  2841 Apr  8 16:33 deadline-iosched.txt
-r--r--r-- 1 root root  4713 Apr  8 16:33 ioprio.txt
-r--r--r-- 1 root root  2535 Apr  8 16:33 null_blk.txt
-r--r--r-- 1 root root  4896 Apr  8 16:33 queue-sysfs.txt
-r--r--r-- 1 root root  2075 Apr  8 16:33 request.txt
-r--r--r-- 1 root root  3272 Apr  8 16:33 stat.txt
-r--r--r-- 1 root root  1414 Apr  8 16:33 switching-sched.txt
-r--r--r-- 1 root root  3916 Apr  8 16:33 writeback_cache_control.txt
如果你要详细了解这些调度策略的规则,可以查看WIKI或者看内核文档。
从这里可以看到它的调度策略
cat /sys/block/vdb/queue/scheduler
noop [deadline] cfq
修改
echo deadline > /sys/block/hda/queue/scheduler
或者修改启动参数
grub.conf
elevator=deadline
从很多测试结果来看,数据库使用deadline调度,性能会更稳定一些。
1. 关闭透明大页
2. 禁用NUMA
3. SSD的对齐
数据库的安装一直以来都挺复杂的,特别是Oracle,现在身边都还有安装Oracle数据库赚外快的事情。
PostgreSQL其实安装很简单,但是那仅仅是可用,并不是好用。很多用户使用默认的方法安装好数据库之后,然后测试一通性能,发现性能不行就不用了。
原因不用说,多方面没有优化的结果。
PostgreSQL数据库为了适应更多的场景能使用,默认的参数都设得非常保守,通常需要优化,比如检查点,SHARED BUFFER等。
本文将介绍一下PostgreSQL on Linux的最佳部署方法,其实在我的很多文章中都有相关的内容,但是没有总结成一篇文档。
目的是确认服务器与OS通过certification
Intel Xeon v3和v4的cpu,能支持的RHEL的最低版本是不一样的,
详情请见:https://access.redhat.com/support/policy/intel
Intel Xeon v3和v4的cpu,能支持的Oracle Linux 的最低版本是不一样的,
详情请见:http://linux.oracle.com/pls/apex/f?p=117:1
第一:RedHat生态系统–来自RedHat的认证列表https://access.redhat.com/ecosystem
第二:Oracle Linux 对服务器和存储的硬件认证列表 http://linux.oracle.com/pls/apex/f?p=117:1
# yum -y install coreutils glib2 lrzsz mpstat dstat sysstat e4fsprogs xfsprogs ntp readline-devel zlib-devel openssl-devel pam-devel libxml2-devel libxslt-devel python-devel tcl-devel gcc make smartmontools flex bison perl-devel perl-ExtUtils* openldap-devel jadetex openjade bzip2
1. sysctl
注意某些参数,根据内存大小配置(已说明)
含义详见
# vi /etc/sysctl.conf

# add by digoal.zhou
fs.aio-max-nr = 1048576
fs.file-max = 76724600
kernel.core_pattern= /data01/corefiles/core_%e_%u_%t_%s.%p
# /data01/corefiles事先建好,权限777,如果是软链接,对应的目录修改为777
kernel.sem = 4096 2147483647 2147483646 512000
# 信号量, ipcs -l 或 -u 查看,每16个进程一组,每组信号量需要17个信号量。
kernel.shmall = 107374182
# 所有共享内存段相加大小限制(建议内存的80%)
kernel.shmmax = 274877906944
# 最大单个共享内存段大小(建议为内存一半), >9.2的版本已大幅降低共享内存的使用
kernel.shmmni = 819200
# 一共能生成多少共享内存段,每个PG数据库集群至少2个共享内存段
net.core.netdev_max_backlog = 10000
net.core.rmem_default = 262144
# The default setting of the socket receive buffer in bytes.
net.core.rmem_max = 4194304
# The maximum receive socket buffer size in bytes
net.core.wmem_default = 262144
# The default setting (in bytes) of the socket send buffer.
net.core.wmem_max = 4194304
# The maximum send socket buffer size in bytes.
net.core.somaxconn = 4096
net.ipv4.tcp_max_syn_backlog = 4096
net.ipv4.tcp_keepalive_intvl = 20
net.ipv4.tcp_keepalive_probes = 3
net.ipv4.tcp_keepalive_time = 60
net.ipv4.tcp_mem = 8388608 12582912 16777216
net.ipv4.tcp_fin_timeout = 5
net.ipv4.tcp_synack_retries = 2
net.ipv4.tcp_syncookies = 1
# 开启SYN Cookies。当出现SYN等待队列溢出时,启用cookie来处理,可防范少量的SYN攻击
net.ipv4.tcp_timestamps = 1
# 减少time_wait
net.ipv4.tcp_tw_recycle = 0
# 如果=1则开启TCP连接中TIME-WAIT套接字的快速回收,但是NAT环境可能导致连接失败,建议服务端关闭它
net.ipv4.tcp_tw_reuse = 1
# 开启重用。允许将TIME-WAIT套接字重新用于新的TCP连接
net.ipv4.tcp_max_tw_buckets = 262144
net.ipv4.tcp_rmem = 8192 87380 16777216
net.ipv4.tcp_wmem = 8192 65536 16777216
net.nf_conntrack_max = 1200000
net.netfilter.nf_conntrack_max = 1200000
vm.dirty_background_bytes = 409600000
#  系统脏页到达这个值,系统后台刷脏页调度进程 pdflush(或其他) 自动将(dirty_expire_centisecs/100)秒前的脏页刷到磁盘
vm.dirty_expire_centisecs = 3000
#  比这个值老的脏页,将被刷到磁盘。3000表示30秒。
vm.dirty_ratio = 95
#  如果系统进程刷脏页太慢,使得系统脏页超过内存 95 % 时,则用户进程如果有写磁盘的操作(如fsync, fdatasync等调用),则需要主动把系统脏页刷出。
#  有效防止用户进程刷脏页,在单机多实例,并且使用CGROUP限制单实例IOPS的情况下非常有效。
vm.dirty_writeback_centisecs = 100
#  pdflush(或其他)后台刷脏页进程的唤醒间隔, 100表示1秒。
vm.mmap_min_addr = 65536
vm.overcommit_memory = 0
#  在分配内存时,允许少量over malloc, 如果设置为 1, 则认为总是有足够的内存,内存较少的测试环境可以使用 1 .
vm.overcommit_ratio = 90
#  当overcommit_memory = 2 时,用于参与计算允许指派的内存大小。
vm.swappiness = 0
#  关闭交换分区
vm.zone_reclaim_mode = 0
# 禁用 numa, 或者在vmlinux中禁止.
net.ipv4.ip_local_port_range = 40000 65535
# 本地自动分配的TCP, UDP端口号范围
fs.nr_open=20480000
# 单个进程允许打开的文件句柄上限

# 以下参数请注意
# vm.extra_free_kbytes = 4096000
# vm.min_free_kbytes = 2097152
# 如果是小内存机器,以上两个值不建议设置
# vm.nr_hugepages = 66536
#  建议shared buffer设置超过64GB时 使用大页,页大小 /proc/meminfo Hugepagesize
# vm.lowmem_reserve_ratio = 1 1 1
# 对于内存大于64G时,建议设置,否则建议默认值 256 256 32
2. 生效配置
sysctl -p
# vi /etc/security/limits.conf

# nofile超过1048576的话,一定要先将sysctl的fs.nr_open设置为更大的值,并生效后才能继续设置nofile.

* soft    nofile  1024000
* hard    nofile  1024000
* soft    nproc   unlimited
* hard    nproc   unlimited
* soft    core    unlimited
* hard    core    unlimited
* soft    memlock unlimited
* hard    memlock unlimited
最好在关注一下/etc/security/limits.d目录中的文件内容,会覆盖limits.conf的配置。
已有进程的ulimit请查看/proc/pid/limits,例如
Limit                     Soft Limit           Hard Limit           Units
Max cpu time              unlimited            unlimited            seconds
Max file size             unlimited            unlimited            bytes
Max data size             unlimited            unlimited            bytes
Max stack size            10485760             unlimited            bytes
Max core file size        0                    unlimited            bytes
Max resident set          unlimited            unlimited            bytes
Max processes             11286                11286                processes
Max open files            1024                 4096                 files
Max locked memory         65536                65536                bytes
Max address space         unlimited            unlimited            bytes
Max file locks            unlimited            unlimited            locks
Max pending signals       11286                11286                signals
Max msgqueue size         819200               819200               bytes
Max nice priority         0                    0
Max realtime priority     0                    0
Max realtime timeout      unlimited            unlimited            us
如果你要启动其他进程,建议退出SHELL再进一遍,确认ulimit环境配置已生效,再启动。
(建议按业务场景设置,我这里先清掉)
iptables -F
配置范例
# 私有网段
-A INPUT -s 192.168.0.0/16 -j ACCEPT
-A INPUT -s 10.0.0.0/8 -j ACCEPT
-A INPUT -s 172.16.0.0/16 -j ACCEPT
如果没有这方面的需求,建议禁用
# vi /etc/sysconfig/selinux

SELINUX=disabled
SELINUXTYPE=targeted
chkconfig --list|grep on
关闭不必要的,例如
chkconfig iscsi off
注意SSD对齐,延长寿命,避免写放大。
parted -s /dev/sda mklabel gpt
parted -s /dev/sda mkpart primary 1MiB 100%
格式化(如果你选择ext4的话)
mkfs.ext4 /dev/sda1 -m 0 -O extent,uninit_bg -E lazy_itable_init=1 -T largefile -L u01
建议使用的ext4 mount选项
# vi /etc/fstab

LABEL=u01 /u01     ext4        defaults,noatime,nodiratime,nodelalloc,barrier=0,data=writeback    0 0

# mkdir /u01
# mount -a
为什么需要data=writeback?

建议pg_xlog放到独立的IOPS性能贼好的块设备中。
如果不是SSD的话,还是使用CFQ,否则建议使用DEADLINE。
临时设置(比如sda盘)
echo deadline > /sys/block/sda/queue/scheduler
永久设置
编辑grub文件修改块设备调度策略
vi /boot/grub.conf

elevator=deadline
注意,如果既有机械盘,又有SSD,那么可以使用/etc/rc.local,对指定磁盘修改为对应的调度策略。
加上前面的默认IO调度,如下
vi /boot/grub.conf

elevator=deadline numa=off transparent_hugepage=never
建议使用较新的编译器,安装 gcc 6.2.0 略
cd ~
tar -jxvf gcc6.2.0.tar.bz2
tar -jxvf python2.7.12.tar.bz2


# vi /etc/ld.so.conf

/home/digoal/gcc6.2.0/lib
/home/digoal/gcc6.2.0/lib64
/home/digoal/python2.7.12/lib

# ldconfig
环境变量
# vi ~/env_pg.sh

export PS1="$USER@`/bin/hostname -s`-> "
export PGPORT=$1
export PGDATA=/$2/digoal/pg_root$PGPORT
export LANG=en_US.utf8
export PGHOME=/home/digoal/pgsql9.6
export LD_LIBRARY_PATH=/home/digoal/gcc6.2.0/lib:/home/digoal/gcc6.2.0/lib64:/home/digoal/python2.7.12/lib:$PGHOME/lib:/lib64:/usr/lib64:/usr/local/lib64:/lib:/usr/lib:/usr/local/lib:$LD_LIBRARY_PATH
export PATH=/home/digoal/gcc6.2.0/bin:/home/digoal/python2.7.12/bin:/home/digoal/cmake3.6.3/bin:$PGHOME/bin:$PATH:.
export DATE=`date +"%Y%m%d%H%M"`
export MANPATH=$PGHOME/share/man:$MANPATH
export PGHOST=$PGDATA
export PGUSER=postgres
export PGDATABASE=postgres
alias rm='rm -i'
alias ll='ls -lh'
unalias vi
如果你想使用ICC或者clang编译PostgreSQL,请参考
《[转载]用intel编译器icc编译PostgreSQL》
建议使用NAMED_POSIX_SEMAPHORES
src/backend/port/posix_sema.c

create sem :
named :
                mySem = sem_open(semname, O_CREAT | O_EXCL,
                                                 (mode_t) IPCProtection, (unsigned) 1);


unamed :
/*
 * PosixSemaphoreCreate
 *
 * Attempt to create a new unnamed semaphore.
 */
static void
PosixSemaphoreCreate(sem_t * sem)
{
        if (sem_init(sem, 1, 1) < 0)
                elog(FATAL, "sem_init failed: %m");
}


remove sem :

#ifdef USE_NAMED_POSIX_SEMAPHORES
        /* Got to use sem_close for named semaphores */
        if (sem_close(sem) < 0)
                elog(LOG, "sem_close failed: %m");
#else
        /* Got to use sem_destroy for unnamed semaphores */
        if (sem_destroy(sem) < 0)
                elog(LOG, "sem_destroy failed: %m");
#endif
编译项
. ~/env_pg.sh 1921 u01

cd postgresql-9.6.1
export USE_NAMED_POSIX_SEMAPHORES=1
LIBS=-lpthread CC="/home/digoal/gcc6.2.0/bin/gcc" CFLAGS="-O3 -flto" ./configure --prefix=/home/digoal/pgsql9.6
LIBS=-lpthread CC="/home/digoal/gcc6.2.0/bin/gcc" CFLAGS="-O3 -flto" make world -j 64
LIBS=-lpthread CC="/home/digoal/gcc6.2.0/bin/gcc" CFLAGS="-O3 -flto" make install-world
如果你是开发环境,需要调试,建议这样编译。
cd postgresql-9.6.1
export USE_NAMED_POSIX_SEMAPHORES=1
LIBS=-lpthread CC="/home/digoal/gcc6.2.0/bin/gcc" CFLAGS="-O0 -flto -g -ggdb -fno-omit-frame-pointer" ./configure --prefix=/home/digoal/pgsql9.6 --enable-cassert
LIBS=-lpthread CC="/home/digoal/gcc6.2.0/bin/gcc" CFLAGS="-O0 -flto -g -ggdb -fno-omit-frame-pointer" make world -j 64
LIBS=-lpthread CC="/home/digoal/gcc6.2.0/bin/gcc" CFLAGS="-O0 -flto -g -ggdb -fno-omit-frame-pointer" make install-world
pg_xlog建议放在IOPS最好的分区。
. ~/env_pg.sh 1921 u01
initdb -D $PGDATA -E UTF8 --locale=C -U postgres -X /u02/digoal/pg_xlog$PGPORT
以PostgreSQL 9.6, 512G内存主机为例
最佳到文件末尾即可,重复的会以末尾的作为有效值。

$ vi postgresql.conf

listen_addresses = '0.0.0.0'
port = 1921
max_connections = 5000
unix_socket_directories = '.'
tcp_keepalives_idle = 60
tcp_keepalives_interval = 10
tcp_keepalives_count = 10
shared_buffers = 128GB
maintenance_work_mem = 4GB
dynamic_shared_memory_type = posix
vacuum_cost_delay = 0
bgwriter_delay = 10ms
bgwriter_lru_maxpages = 1000
bgwriter_lru_multiplier = 10.0
bgwriter_flush_after = 0  # IO很好的机器,不需要考虑平滑调度
max_worker_processes = 128
max_parallel_workers_per_gather = 0
old_snapshot_threshold = -1
backend_flush_after = 0  # IO很好的机器,不需要考虑平滑调度
wal_level = replica
synchronous_commit = off
full_page_writes = on
wal_buffers = 1GB
wal_writer_delay = 10ms
wal_writer_flush_after = 0  # IO很好的机器,不需要考虑平滑调度
checkpoint_timeout = 30min  # 不建议频繁做检查点,否则XLOG会产生很多的FULL PAGE WRITE。
max_wal_size = 256GB  # 建议是SHARED BUFFER的2倍
min_wal_size = 64GB
checkpoint_completion_target = 0.05  # 硬盘好的情况下,可以让检查点快速结束,恢复时也可以快速达到一致状态。
checkpoint_flush_after = 0  # IO很好的机器,不需要考虑平滑调度
archive_mode = on
archive_command = '/bin/date'      #  后期再修改,如  'test ! -f /disk1/digoal/arch/%f && cp %p /disk1/digoal/arch/%f'
max_wal_senders = 8
random_page_cost = 1.3  # IO很好的机器,不需要考虑离散和顺序扫描的成本差异
parallel_tuple_cost = 0
parallel_setup_cost = 0
min_parallel_relation_size = 0
effective_cache_size = 300GB  # 看着办,剩下的都是OS可用的CACHE。
force_parallel_mode = off
log_destination = 'csvlog'
logging_collector = on
log_truncate_on_rotation = on
log_checkpoints = on
log_connections = on
log_disconnections = on
log_error_verbosity = verbose
log_timezone = 'PRC'
vacuum_defer_cleanup_age = 0
hot_standby_feedback = off
max_standby_archive_delay = 300s
max_standby_streaming_delay = 300s
autovacuum = on
log_autovacuum_min_duration = 0
autovacuum_max_workers = 16  # CPU核多,并且IO好的情况下,可多点,但是注意16*autovacuum mem,会消耗较多内存,所以内存也要有基础。
autovacuum_naptime = 30s
autovacuum_vacuum_scale_factor = 0.1
autovacuum_analyze_scale_factor = 0.2
autovacuum_freeze_max_age = 1600000000
autovacuum_multixact_freeze_max_age = 1600000000
vacuum_freeze_table_age = 1500000000
vacuum_multixact_freeze_table_age = 1500000000
datestyle = 'iso, mdy'
timezone = 'PRC'
lc_messages = 'C'
lc_monetary = 'C'
lc_numeric = 'C'
lc_time = 'C'
default_text_search_config = 'pg_catalog.english'
shared_preload_libraries='pg_stat_statements'

## 如果你的数据库有非常多小文件(比如有几十万以上的表,还有索引等,并且每张表都会被访问到时),建议FD可以设多一些,避免进程需要打开关闭文件。
## 但是不要大于前面章节系统设置的ulimit -n(open files)
max_files_per_process=655360
避免不必要的访问,开放允许的访问,建议务必使用密码访问。
$ vi pg_hba.conf

host replication xx 0.0.0.0/0 md5  # 流复制

host all postgres 0.0.0.0/0 reject # 拒绝超级用户从网络登录
host all all 0.0.0.0/0 md5  # 其他用户登陆
pg_ctl start
好了,你的PostgreSQL数据库基本上部署好了,可以愉快的玩耍了。
为了方便大家以后发现进程假死的时候能够正常的分析并且第一时间保留现场快照。
最近服务器发现tomcat的应用会偶尔出现无法访问的情况。经过一段时间的观察最近又发现有台tomcat的应用出现了无法访问情况。简单描述下该台tomcat当时具体的表现:客户端请求没有响应,查看服务器端tomcat的进程是存活的,查看业务日志的时候发现日志停止没有任何最新的访问日志。连tomcat下面的catalina.log也没有任何访问记录,基本断定该台tomcat已不能提供服务。
根据前面我描述的假死现象,我最先想到的是网络是否出现了问题,是不是有什么丢包严重的情况,于是我开始从请求的数据流程开始分析,由于我们业务的架构采用的是nginx+tomcat的集群配置,一个请求上来的流向可以用下图来简单的描述一下:
更改nginx的配置,让该台nginx请求只转到本机器的出现问题的tomcat应用上面,在access.log里看是否有网络请求,结果可以查看到当前所有的网络请求,也就是说可以排除是网络的问题。
分析业务配置的tomcat访问日志xxxx.log上是否有日志访问记录,经过查询该台tomcat应用日志完全没有任何访问记录,由于我们的部署是本机的nginx转到本机的tomcat应用,所以可以排除不是网络问题。到此基本可以断定网络没有问题,tomcat 本身出现了假死的情况。在tomcat的日志里有报过OutOfMemoryError的异常,所以可以肯定tomcat假死的原因是OOM
在我们学习Java的时候就知道它最为方便的地方就是我们不需要管理内存的分配和释放,一切由JVM自己来进行处理,当Java对象不再被应用时,等到堆内存不够用时JVM会进行GC处理,清除这些对象占用的堆内存空间,但是如果对象一直被应用,那么JVM是无法对其进行GC处理的,那么我们创建新的对象时,JVM就没有办法从堆中获取足够的内存分配给此对象,这时就会导致OOM。我们出现OOM原因,一般都是因为我们不断的往容器里存放对象,然而容器没有相应的大小限制或清除机制,这样就容易导致OOM。
当我们的应用服务器占用了过多内存的时候,我们怎么样才能快速的定位问题呢?要想快速定位问题,首先我们必需获取服务器JVM某时刻的内存快照。Jdk里面提供了很多相应的命令比如:jstack,jstat,jmap,jps等等. 在出现问题后我们应该快速保留现场。
3.2.1 jstack
可以观察到jvm中当前所有线程的运行情况和线程当前状态.
sudo jstack -F 进程ID
输出内容如下:

从上面的图我们可以看到tomcat进程里面没有死锁的情况,而且每个线程都处理等待的状态。这个时候我们可以telnet命令连上tomcat的端口查看tomcat进程是否有任务回应。这时发现tomcat没有任何回应可以证明tomcat应用已没有响应处理假死状态。
3.2.2 jstat
这是jdk命令中比较重要,也是相当实用的一个命令,可以观察到classloader,compiler,gc相关信息
具体参数如下:
-class:统计class loader行为信息
-compile:统计编译行为信息
-gc:统计jdk gc时heap信息
-gccapacity:统计不同的generations(包括新生区,老年区,permanent区)相应的heap容量情况
-gccause:统计gc的情况,(同-gcutil)和引起gc的事件
-gcnew:统计gc时,新生代的情况
-gcnewcapacity:统计gc时,新生代heap容量
-gcold:统计gc时,老年区的情况
-gcoldcapacity:统计gc时,老年区heap容量
-gcpermcapacity:统计gc时,permanent区heap容量
-gcutil:统计gc时,heap情况
-printcompilation:不知道干什么的,一直没用过。
一般比较常用的几个参数是:
sudo jstat -class 2083 1000 10 (每隔1秒监控一次,一共做10次)
查看当时的head情况
sudo jstat -gcutil 20683 2000

注:该图不是出错截取
出现时候截取的数据是gc已经完全没有处理了,因为没有加上full gc的日志所以不确定JVM GC 时间过长,导致应用暂停.
3.2.3获取内存快照
Jdk自带的jmap可以获取内在某一时刻的快照
命令:jmap -dump:format=b,file=heap.bin <pid>
file:保存路径及文件名
pid:进程编号(windows通过任务管理器查看,linux通过ps aux查看)
dump文件可以通过MemoryAnalyzer分析查看,网址:http://www.eclipse.org/mat/,可以查看dump时对象数量,内存占用,线程情况等。

从上面的图可以看得出来对象没有内存溢出。

从上图我们可以明确的看出此项目的HashMap内存使用率比较高,因为我们的系统都是返回Map的数据结构所以占用比较高的内存是正常情况。
3.2.4观察运行中的jvm物理内存的占用情况
观察运行中的jvm物理内存的占用情况。我们也可以用jmap命令
参数如下:
-heap:打印jvm heap的情况
-histo:打印jvm heap的直方图。其输出信息包括类名,对象数量,对象占用大小。
-histo:live :同上,但是只答应存活对象的情况
-permstat:打印permanent generation heap情况
命令使用:
jmap -heap 2083
可以观察到New Generation(Eden Space,From Space,To Space),tenured generation,Perm Generation的内存使用情况
输出内容:

上图为tomcat应用出错前JVM的配置信息,可以明确的看到当时的信息:
MaxHeapSize堆内存大小为:3500M
MaxNewSize新生代内存大小:512M
PermSize永久代内存大小:192M
NewRatio设置年轻代(包括Eden和两个Survivor区)与年老代的比值(除去持久代)。设置为2,则年轻代与年老代所占比值为1:2,年轻代占整个堆栈的1/3
SurvivorRatio设置年轻代中Eden区与Survivor区的大小比值。设置为8,则两个Survivor区与一个Eden区的比值为2:8,一个Survivor区占整个年轻代的1/10
在New Generation中,有一个叫Eden的空间,主要是用来存放新生的对象,还有两个Survivor Spaces(from,to), 它们用来存放每次垃圾回收后存活下来的对象。在Old Generation中,主要存放应用程序中生命周期长的内存对象,还有个Permanent Generation,主要用来放JVM自己的反射对象,比如类对象和方法对象等。
从上面的图可以看出来JVM的新生代设置太小,可以看出应用的新生代区完全占满了,无法再往新生代区增加新的对象此时的这些对象都处于活跃状态,所以不会被GC处理,但是tomcat应用还在继续产生新的对象,这样就会导致OOM的发生,这就是导致tomcat假死的原因.
以下是网上资料说的tomcat假的情况:
1、应用本身程序的问题,造成死锁。
2、load 太高,已经超出服务的极限
3、jvm GC 时间过长,导致应用暂停
因为出错项目里面没有打出GC的处理情况,所以不确定此原因是否也是我项目tomcat假死的原因之一。
4、大量tcp 连接 CLOSE_WAIT
netstat -n | awk ‘/^tcp/ {++S[$NF]} END {for(a in S) print a, S[a]}’
TIME_WAIT 48
CLOSE_WAIT 2228
ESTABLISHED 86
常用的三个状态是:ESTABLISHED 表示正在通信,TIME_WAIT 表示主动关闭,CLOSE_WAIT 表示被动关
resin-pro-4.0.49 crack 破解文件下载
resin-pro-4.0.49 破解文件下载pro.jar
resin pro 4.0.49 Full Cracked download.
下载pro.jar文件,覆盖原来lib目录的pro.jar文件即可。
仅供学习使用,请在下载后24时间内删除。
This is a short post to describe my recommended method for building Go on the Raspberry Pi. This method has been tested on the Raspberry Pi 2 Model B (900Mhz, 1Gb ram) and the older Raspberry Pi 1 Model B+ (700Mhz, 512Mb ram).
This method will build Go 1.5 into you home directory, /usr/local/go.
As always, please don’t set $GOROOT. You never need to set $GOROOT when building from source.
Go 1.5 requires an existing Go 1.4 (or later) compiler to build Go 1.5. If you have built Go from source on your host machine you can generate this tarball directly, but to save time I’ve done it for you.
% mkdir /usr/local/go
% cd /usr/local/go
% curl http://www.strongd.net/dl/go/go-linux-arm-bootstrap-c788a8e.tbz | tar xj
Fetch the Go 1.5 source tarball and unpack it to /usr/local/go
% cd /usr/local/go
% curl https://storage.googleapis.com/golang/go1.5.src.tar.gz | tar xz
Go 1.5 builds cleanly on arm devices, this is verified by the build dashboard, however if you want to see ./all.bash pass on the Raspberry Pi, some additional configuration is recommended.
This is necessary because the runtime tests create many native operating system threads which at 8mb per thread can exhaust the 32bit user mode address space (especially if you are running a recent Raspbian kernel). See issue 11959 for the details.
% ulimit -s 1024     # set the thread stack limit to 1mb
% ulimit -s          # check that it worked
1024
The default scaling factor is good for powerful amd64 machines, but is too aggressive for small 32 bit machines. This is done with the GO_TEST_TIMEOUT_SCALE environment variable.
% cd /usr/local/go/src
% env GO_TEST_TIMEOUT_SCALE=10 GOROOT_BOOTSTRAP=/usr/local/go/go-linux-arm-bootstrap ./all.bash
# Building C bootstrap tool.
cmd/dist

# Building compilers and Go bootstrap tool for host, linux/arm.
lib9
libbio
liblink
...
##### ../test

##### API check
Go version is "go1.5", ignoring -next /home/pi/go/api/next.txt

ALL TESTS PASSED

---
Installed Go for linux/arm in /usr/local/go
Installed commands in /usr/local/go/bin
On the Raspberry Pi 2 Model B, this should take around an hour, for the older Raspberry Pi 1 Model B+, it takes more than five!
As a final step you should add /usr/local/go to your $PATH, and to save disk space you can remove /usr/local/go/go-linux-arm-bootstrap.