- import java.io.File;
- import java.io.FileOutputStream;
- import java.io.OutputStream;
- import java.util.Date;
- import com.lowagie.text.Document;
- import com.lowagie.text.Paragraph;
- import com.lowagie.text.pdf.PdfWriter;
- public class GeneratePDF {
- public static void main(String[] args) {
- try {
- OutputStream file = new FileOutputStream(new File(“C:\\Test.pdf”));
- Document document = new Document();
- PdfWriter.getInstance(document, file);
- document.open();
- document.add(new Paragraph(“Hello Kiran”));
- document.add(new Paragraph(new Date().toString()));
- document.close();
- file.close();
- } catch (Exception e) {
- e.printStackTrace();
- }
- }
- }
创建图片的缩略图 createThumbnail
- private void createThumbnail(String filename, int thumbWidth, int thumbHeight, int quality, String outFilename)
- throws InterruptedException, FileNotFoundException, IOException
- {
- // load image from filename
- Image image = Toolkit.getDefaultToolkit().getImage(filename);
- MediaTracker mediaTracker = new MediaTracker(new Container());
- mediaTracker.addImage(image, 0);
- mediaTracker.waitForID(0);
- // use this to test for errors at this point: System.out.println(mediaTracker.isErrorAny());
- // determine thumbnail size from WIDTH and HEIGHT
- double thumbRatio = (double)thumbWidth / (double)thumbHeight;
- int imageWidth = image.getWidth(null);
- int imageHeight = image.getHeight(null);
- double imageRatio = (double)imageWidth / (double)imageHeight;
- if (thumbRatio < imageRatio) {
- thumbHeight = (int)(thumbWidth / imageRatio);
- } else {
- thumbWidth = (int)(thumbHeight * imageRatio);
- }
- // draw original image to thumbnail image object and
- // scale it to the new size on-the-fly
- BufferedImage thumbImage = new BufferedImage(thumbWidth, thumbHeight, BufferedImage.TYPE_INT_RGB);
- Graphics2D graphics2D = thumbImage.createGraphics();
- graphics2D.setRenderingHint(RenderingHints.KEY_INTERPOLATION, RenderingHints.VALUE_INTERPOLATION_BILINEAR);
- graphics2D.drawImage(image, 0, 0, thumbWidth, thumbHeight, null);
- // save thumbnail image to outFilename
- BufferedOutputStream out = new BufferedOutputStream(new FileOutputStream(outFilename));
- JPEGImageEncoder encoder = JPEGCodec.createJPEGEncoder(out);
- JPEGEncodeParam param = encoder.getDefaultJPEGEncodeParam(thumbImage);
- quality = Math.max(0, Math.min(quality, 100));
- param.setQuality((float)quality / 100.0f, false);
- encoder.setJPEGEncodeParam(param);
- encoder.encode(thumbImage);
- out.close();
- }
ElasticSearch 简单入门
简介
ElasticSearch是一个开源的分布式搜索引擎,具备高可靠性,支持非常多的企业级搜索用例。像Solr4一样,是基于Lucene构建的。支持时间时间索引和全文检索。官网:http://www.elasticsearch.org
它对外提供一系列基于java和http的api,用于索引、检索、修改大多数配置。
写这篇博客的的主要原因是ElasticSearch的网站只有一些简单的介绍,质量不高,缺少完整的教程。我费了好大劲才把它启动起来,做了一些比hello world更复杂一些的工作。我希望通过分享我的一些经验来帮助对ElasticSearch(很强大的哦)感兴趣的人在初次使用它的时候能够节省些时间。学完这篇教程,你就掌握了它的基本操作——启动、运行。我将从我的电脑上分享这个链接。
这么着就开始了。
- 作者假设读者拥有安装后的Java。
- 下载来自http://www.elasticsearch.org/download/的ElasticSearch。再一次,关于在Linux与其他非视窗系统环境里操作它的谈论有许多,但是作者更加关心着视窗7版桌面环境。请对应选择安装包裹。对视窗系统 – 一Zip文件 – 用户可解压缩到C:\elasticsearch-0.90.3\. 牢记,这十分的不同于安装Eclipse IDE。
- 作者不熟悉curl跟cygwin,而且作者打算节省掌握时间(此多数在官网ElasticSearch.org应用的命令面对非视窗平台)(译者:大可以安装一虚拟机、便携版Linux或者MinGW)。读者可以在http://curl.haxx.se/download.html和http://cygwin.com/install.html安装Curl和cygwin。
于是测试下目前作者和读者所做到的。
- 视窗7版桌面环境,运行命令行,进入 cd C:\elasticsearch-0.90.3\bin 目录。
- 这时运行 elasticsearch.bat
- 上面在本机启动了一个ElasticSearch节点。 读者会看到下面的记录提示。
(如果您家情况明显不一样,请读者们不要忧愁,因那作者有些个Elastic Search的插件程序,而且作者家节点命名和其它会不同读者家的)

4. 现在在浏览器里测试一下
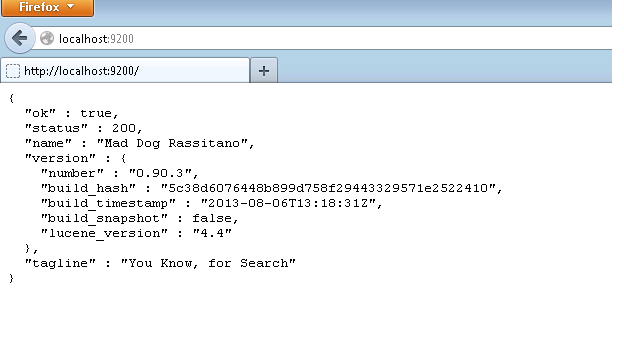

如果你得到的status是200那它意味着所有的事情都ok啦…是不是很简单?
让我们看看JSON的每个字段代表的含义:
Ok:当为true时,意味着请求成功。
Status:发出请求后的HTTP的错误代码。200表示一切正常。
Name:我们Elasticsearch实例的名字。在默认情况下,它将从一个巨长的名字列表中随机选择一个。
Version:这个对象有一个number字段,代表了当前运行的Elasticsearch版本号,和一个Snapshot_build字段,代表了你当前运行的版本是否是从源代码构建而来。
Tagline:包含了Elasticsearch的第一个tagline: “You Know, for Search.”
5. 现在让我们从http://mobz.github.io/elasticsearch-head/ 安装ElasticSearch Head插件
安装方法非常简单
1 |
cd C:\elasticsearch-0.90.3\bin |
2 |
plugin -install mobz/elasticsearch-head |
上面的命令会把 elasticsearch-head插件装到你的环境里
教程样例
我们将要部署一个非常简单的应用–在一个部门里的雇员–这样我们可以把注意力放在功能而不是氧立得复杂性上。总而言之,这篇博文是为了帮助人们开始ElasticSearch入门。
1)现在打开你的cygwin窗口并且键入命令
1 |
curl -XPUT 'http://localhost:9200/dept/employee/32' -d '{ "empname": "emp32"}' |
dept是一个索引并且索引类型是雇员,此时我们正在输入这个索引类型的第31个id。
你应该能在cygwin的窗口看到这样的信息:

让我们看一下这个输出:
1 |
======================================================================== |
2 |
% Total % Received % Xferd Average Speed Time Time Time Current |
3 |
Dload Upload Total Spent Left Speed |
4 |
100 91 100 70 100 21 448 134 --:--:-- --:--:-- --:--:-- 500{"ok":true,"_index":"dept","_type":"employee","_id":"31","_version":1} |
5 |
======================================================================== |
和上面的命令一样–让我们输入更多的记录:
1 |
curl -XPUT 'http://localhost:9200/dept/employee/1' -d '{ "empname": "emp1"}' |
2 |
curl -XPUT 'http://localhost:9200/dept/employee/2' -d '{ "empname": "emp2"}' |
3 |
... |
4 |
... |
5 |
curl -XPUT 'http://localhost:9200/dept/employee/30' -d '{ "empname": "emp30"}' |
注意:你要记得增加索引计数器和大括号里empname的值。
一旦这些工作都完成了–你为ElasticSearch输入了足够多的数据,你就可以开始使用head插件搜索你的数据了。
让我们试试吧!
在浏览器中输入:
http://localhost:9200/_plugin/head/
你会看到这个:
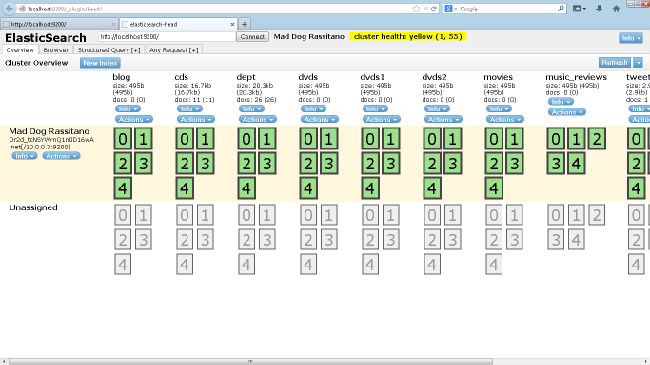
这里是有关簇使用情况和不同索引信息的概况。我们最近创建的索引在其中,显示为”dept”。
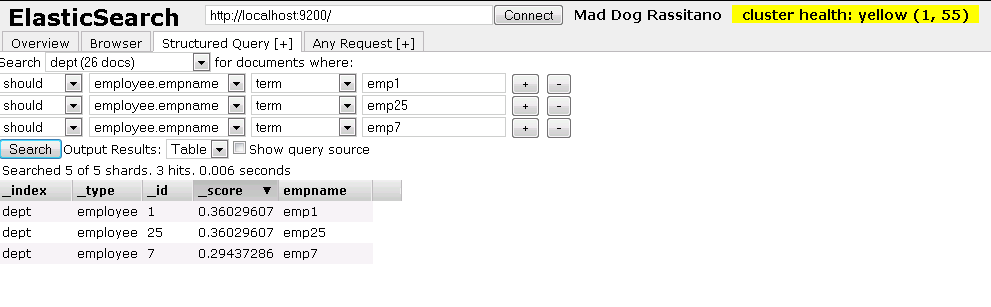
现在点击Structured Query选项卡

在Search下来菜单中选择”dept”并点击”Search”按钮。
这将显示所有记录。
搜索特定条目
让我们来搜索emp1,emp25和emp7。不断点击最右面的”+”来添加更多的搜索项,就像如图显示的那样,之后点击”Search”。确保最左边的选项为”should”,其他的选项也应该和图中的保持一致。
优化了du性能的hadoop 2.8.1
性能提升1000+倍。
原理是使用df 代替du,
wget https://www.strongd.net/dl/hadoop-common-2.8.1.jar -C /usr/local/hadoop-2.8.1/share/hadoop/common/
wget https://www.strongd.net/dl/mydu -C /usr/bin/
chmod a+x /usr/bin/mydu
然后重启hadoop就可以了。
Jenkins 环境搭建
Jenkins 简介
Jenkins 是一个开源软件项目,是基于Java开发的一种持续集成工具,用于监控持续重复的工作,旨在提供一个开放易用的软件平台,使软件的持续集成变成可能。
Java 安装
首先我们需要准备 Java 环境,使用下面命令来安装 Java:
yum -y install java-1.8.0-openjdk-devel
Jenkins 安装
为了使用 Jenkins 仓库,我们要执行以下命令:
sudo wget -O /etc/yum.repos.d/jenkins.repo https://pkg.jenkins.io/redhat-stable/jenkins.repo
sudo rpm --import https://pkg.jenkins.io/redhat-stable/jenkins.io.key
如果您以前从 Jenkins 导入过 key,那么 rpm --import 将失败,因为您已经有一个 key。请忽略,继续下面步骤。
安装
接着我们可以使用 yum 安装 Jenkins:
yum -y install jenkins
启动 Jenkins
任务时间:5min ~ 10min
启动
启动 Jenkins 并设置为开机启动:
systemctl start jenkins.service
chkconfig jenkins on
测试访问
Jenkins 默认运行在 8080端口。
稍等片刻,打开 http://<您的 CVM IP 地址>:8080 测试访问。
进入 Jenkins
任务时间:5min ~ 10min
管理员密码
登入 Jenkins 需要输入管理员密码,按照提示,我们使用以下命令查看初始密码:
cat /var/lib/jenkins/secrets/initialAdminPassword
复制密码,填入,进入 Jenkins。
定制 Jenkins
我们选择默认的 install suggested plugins 来安装插件。
创建用户
请填入相应信息创建用户,然后即可登入 Jenkins 的世界。
实验完成
恭喜,您已完成 搭建 Jenkins 环境搭建 实验。
搭建 Hadoop 伪分布式环境
软硬件环境
- CentOS 7.2 64位
- OpenJDK-1.7
- Hadoop-2.7
关于本教程的说明
云实验室云主机自动使用root账户登录系统,因此本教程中所有的操作都是以root用户来执行的。若要在自己的云主机上进行本教程的实验,为了系统安全,建议新建一个账户登录后再进行后续操作。
安装 SSH 客户端
任务时间:1min ~ 5min
安装SSH
安装SSH:
sudo yum install openssh-clients openssh-server
安装完成后,可以使用下面命令进行测试:
ssh localhost
输入root账户的密码,如果可以正常登录,则说明SSH安装没有问题。测试正常后使用exit命令退出ssh。
安装 JAVA 环境
任务时间:5min ~ 10min
安装 JDK
使用yum来安装1.7版本OpenJDK:
sudo yum install java-1.7.0-openjdk java-1.7.0-openjdk-devel
安装完成后,输入java和javac命令,如果能输出对应的命令帮助,则表明jdk已正确安装。
配置 JAVA 环境变量
执行命令:
编辑 ~/.bashrc,在结尾追加:
export JAVA_HOME=/usr/lib/jvm/java-1.7.0-openjdk
保存文件后执行下面命令使JAVA_HOME环境变量生效:
source ~/.bashrc
为了检测系统中JAVA环境是否已经正确配置并生效,可以分别执行下面命令:
java -version
$JAVA_HOME/bin/java -version
若两条命令输出的结果一致,且都为我们前面安装的openjdk-1.7.0的版本,则表明JDK环境已经正确安装并配置。
安装 Hadoop
任务时间:10min ~ 15min
下载 Hadoop
本教程使用hadoop-2.7版本,使用wget工具在线下载(注:本教程是从清华大学的镜像源下载,如果下载失败或报错,可以自己在网上找到国内其他一个镜像源下载2.7版本的hadoop即可):
wget https://mirrors.tuna.tsinghua.edu.cn/apache/hadoop/common/hadoop-2.7.4/hadoop-2.7.4.tar.gz
安装 Hadoop
将Hadoop安装到/usr/local目录下:
tar -zxf hadoop-2.7.4.tar.gz -C /usr/local
对安装的目录进行重命名,便于后续操作方便:
cd /usr/local
mv ./hadoop-2.7.4/ ./hadoop
检查Hadoop是否已经正确安装:
/usr/local/hadoop/bin/hadoop version
如果成功输出hadoop的版本信息,表明hadoop已经成功安装。
Hadoop 伪分布式环境配置
任务时间:15min ~ 30min
Hadoop伪分布式模式使用多个守护线程模拟分布的伪分布运行模式。
设置 Hadoop 的环境变量
编辑 ~/.bashrc,在结尾追加如下内容:
export HADOOP_HOME=/usr/local/hadoop
export HADOOP_INSTALL=$HADOOP_HOME
export HADOOP_MAPRED_HOME=$HADOOP_HOME
export HADOOP_COMMON_HOME=$HADOOP_HOME
export HADOOP_HDFS_HOME=$HADOOP_HOME
export YARN_HOME=$HADOOP_HOME
export HADOOP_COMMON_LIB_NATIVE_DIR=$HADOOP_HOME/lib/native
export PATH=$PATH:$HADOOP_HOME/sbin:$HADOOP_HOME/bin
使Hadoop环境变量配置生效:
source ~/.bashrc
修改 Hadoop 的配置文件
Hadoop的配置文件位于安装目录的/etc/hadoop目录下,在本教程中即位于/url/local/hadoop/etc/hadoop目录下,需要修改的配置文件为如下两个:
/usr/local/hadoop/etc/hadoop/core-site.xml
/usr/local/hadoop/etc/hadoop/hdfs-site.xml
编辑 core-site.xml,修改<configuration></configuration>节点的内容为如下所示:
示例代码:/usr/local/hadoop/etc/hadoop/core-site.xml
<configuration>
    <property>
        <name>hadoop.tmp.dir</name>
        <value>file:/usr/local/hadoop/tmp</value>
        <description>location to store temporary files</description>
    </property>
    <property>
        <name>fs.defaultFS</name>
        <value>hdfs://localhost:9000</value>
    </property>
</configuration>
同理,编辑 hdfs-site.xml,修改<configuration></configuration>节点的内容为如下所示:
示例代码:/usr/local/hadoop/etc/hadoop/hdfs-site.xml
<configuration>
    <property>
        <name>dfs.replication</name>
        <value>1</value>
    </property>
    <property>
        <name>dfs.namenode.name.dir</name>
        <value>file:/usr/local/hadoop/tmp/dfs/name</value>
    </property>
    <property>
        <name>dfs.datanode.data.dir</name>
        <value>file:/usr/local/hadoop/tmp/dfs/data</value>
    </property>
</configuration>
格式化 NameNode
格式化NameNode:
/usr/local/hadoop/bin/hdfs namenode -format
在输出信息中看到如下信息,则表示格式化成功:
Storage directory /usr/local/hadoop/tmp/dfs/name has been successfully formatted.
Exiting with status 0
启动 NameNode 和 DataNode 守护进程
启动NameNode和DataNode进程:
/usr/local/hadoop/sbin/start-dfs.sh
执行过程中会提示输入用户密码,输入root用户密码即可。另外,启动时ssh会显示警告提示是否继续连接,输入yes即可。
检查 NameNode 和 DataNode 是否正常启动:
jps
如果NameNode和DataNode已经正常启动,会显示NameNode、DataNode和SecondaryNameNode的进程信息:
[hadoop@VM_80_152_centos ~]$ jps
3689 SecondaryNameNode
3520 DataNode
3800 Jps
3393 NameNode
运行 Hadoop 伪分布式实例
任务时间:10min ~ 20min
Hadoop自带了丰富的例子,包括 wordcount、grep、sort 等。下面我们将以grep例子为教程,输入一批文件,从中筛选出符合正则表达式dfs[a-z.]+的单词并统计出现的次数。
查看 Hadoop 自带的例子
Hadoop 附带了丰富的例子, 执行下面命令可以查看:
cd /usr/local/hadoop
./bin/hadoop jar ./share/hadoop/mapreduce/hadoop-mapreduce-examples-2.7.4.jar
在 HDFS 中创建用户目录
在 HDFS 中创建用户目录 hadoop:
/usr/local/hadoop/bin/hdfs dfs -mkdir -p /user/hadoop
准备实验数据
本教程中,我们将以 Hadoop 所有的 xml 配置文件作为输入数据来完成实验。执行下面命令在 HDFS 中新建一个 input 文件夹并将 hadoop 配置文件上传到该文件夹下:
cd /usr/local/hadoop
./bin/hdfs dfs -mkdir /user/hadoop/input
./bin/hdfs dfs -put ./etc/hadoop/*.xml /user/hadoop/input
使用下面命令可以查看刚刚上传到 HDFS 的文件:
/usr/local/hadoop/bin/hdfs dfs -ls /user/hadoop/input
运行实验
运行实验:
cd /usr/local/hadoop
./bin/hadoop jar ./share/hadoop/mapreduce/hadoop-mapreduce-examples-2.7.4.jar grep /user/hadoop/input /user/hadoop/output 'dfs[a-z.]+'
上述命令以 HDFS 文件系统中的 input 为输入数据来运行 Hadoop 自带的 grep 程序,提取其中符合正则表达式 dfs[a-z.]+ 的数据并进行次数统计,将结果输出到 HDFS 文件系统的 output 文件夹下。
查看运行结果
上述例子完成后的结果保存在 HDFS 中,通过下面命令查看结果:
/usr/local/hadoop/bin/hdfs dfs -cat /user/hadoop/output/*
如果运行成功,可以看到如下结果:
1       dfsadmin
1       dfs.replication
1       dfs.namenode.name.dir
1       dfs.datanode.data.dir
删除 HDFS 上的输出结果
删除 HDFS 中的结果目录:
/usr/local/hadoop/bin/hdfs dfs -rm -r /user/hadoop/output
运行 Hadoop 程序时,为了防止覆盖结果,程序指定的输出目录不能存在,否则会提示错误,因此在下次运行前需要先删除输出目录。
关闭 Hadoop 进程
关闭 Hadoop 进程:
/usr/local/hadoop/sbin/stop-dfs.sh
再起启动只需要执行下面命令:
/usr/local/hadoop/sbin/start-dfs.sh
部署完成
任务时间:时间未知
大功告成
恭喜您已经完成了搭建 Hadoop 伪分布式环境的学习
Java Reflection, 1000x Faster
A few weeks ago I got to make some of my code 1000 times faster, without changing the underlying complexity! As the title implies, this involved making Java reflection calls faster.
Let me explain my use case as well, because it’s relatively general, and a good example of why one would use reflection in the first place.
I had an interface (representing a tree node) and a slew of classes (100+) implementing this interface. The trick is that the tree is heterogeneous, each node kind can have different numbers of children, or store them differently.
I needed some code te be able to walk over such a composite tree. The simple approach is to simply add a children() method to the interface and implement it in every kind of node. Very tedious, and boilerplaty as hell.
Instead, I noted that all children were either direct fields, or aggregated in fields holding a collection of nodes. I could write a small piece of code that, with reflection, would work for every node kind!
I’ve put up a much simplified version of the code on Github. I will link the relevant parts as we go.
Initial Code
Here is the version I came up with: WalkerDemoSlowest.java
It’s fairly straightforward: get the methods of the node’s class, filter out those that are not getters, then consider only that return either a node or a collection of node. For those, invoke the method, and recursively invoke walk on the children.
Will anyone be surprised if I tell them it’s very slow?
Caching
There is a simple tweak we can apply that makes it much faster however: we can cache the methods lookup.
Here is the caching version: WalkerDemoSlow.java
It’s really the same except that for each class implementing Node, we create aClassData object that caches all the relevant getters, so we only have to look them up once. This produces a satisfying ~10x speedup.
LambdaMetafactory Magic
Unfortunately, this was still way too slow. So I took to Google, which turned out this helpful StackOverflow question.
The accepted answers proposes the use of LambdaMetafactory, a standard library class that supports lambda invocations in the language.
The details are somewhat hazy to me, but it seems that by using these facilities we can “summon the compiler” on our code and optimize the reflective access into a native invocation. That’s the working hypothesis anyhow.
Here is the code: WalkerDemoFast.java
Now, in my code, this worked wonders, unlocking another 100x speedup. While writing this article however, I wanted to demonstrate the effect with some code snippet, but didn’t manage to. I tried to give the interface three sub-classes, and to give them bogus methods to be filtered out, to no avail. The second and third version of the code would run at about the same speed.
I re-checked the original code — all seemed good. In my original code, the trees are Abstract Syntax Trees (AST) derived by parsing some source files. After fooling around some more, I noticed different results if I limited the input to the first 14 source files.
These files are relatively short (few 10s of lines) and syntactically simple. With only those, the second and third version would run at about the same speed. But add in the 15th file (a few 100s of lines) and the second version would take a whopping 36 seconds while the third version would still complete in 0.2 seconds, a ~700x difference.
My (somewhat shaky) hypothesis is that if the scenario is simple enough, the optimizer notices what you are doing and optmizes away. In more complex cases, it exhausts its optimization budget and falls back on the unoptimized version and its abysmal performance. But the optimizer is devious enough that crafting a toy example that would defeat it seems to be quite the feat.
LambdaMetafactory Possibilities
I’m somewhat intrigued about what is possible with LambdaMetafactory. In my use case, it works wonders because reflection calls are much more expensive than a simple cache lookup. But could it be used to optmize regular code in pathological cases as well? It seems unlikely to help with megamorphic call sites, because the compiled method handle has to be retrieved somehow, and the cost of that lookup would dwarf the gains.
But what about piecing together code at run time, and optimizing it? In particular, one could supply a data structure and an interpreter for that data structure, and “compile” them together using LambdaMetafactory. Would it be smart enough to partially evaluate the code given the data structure, and so turn your interpreter into the equivalent “plain” code?
Incidentally, that is exactly the approach taken by the Truffle framework, which runs on top of the Graal VM, so there is definitely something to the idea. Maybe something precludes it with the current JVM, hence requiring the GraalVM modification?
In any case, there is something to be said in favor of making these capabilities available as a library, which could be used in “regular programs” (i.e. not compilers). Writing a simple interpreter is often the easiest approach to some problems.
Facebook针对hbase的优化方案分析
使用hbase的目的是为了海量数据的随机读写,但是在实际使用中却发现针对随机读的优化和gc是一个很大的问题,而且hbase的数据是存储在Hdfs,而Hdfs是面向流失数据访问进行设计的,就难免带来效率的下降。下面介绍一下Facebook Message系统在HBase online storage场景下的一个案例(《Apache Hadoop Goes Realtime at Facebook》, SIGMOD 2011),最近他们在存储领域顶级会议FAST2014上发表了一篇论文《Analysis of HDFS Under HBase: A Facebook Messages Case Study》分析了他们在使用HBase中遇到的一些问题和解决方案。该论文首先讲了Facebook的分析方法包括tracing/analysis/simulation,FM系统的架构和文件与数据构成等,接下来开始分析FM系统在性能方面的一些问题,并提出了解决方案。
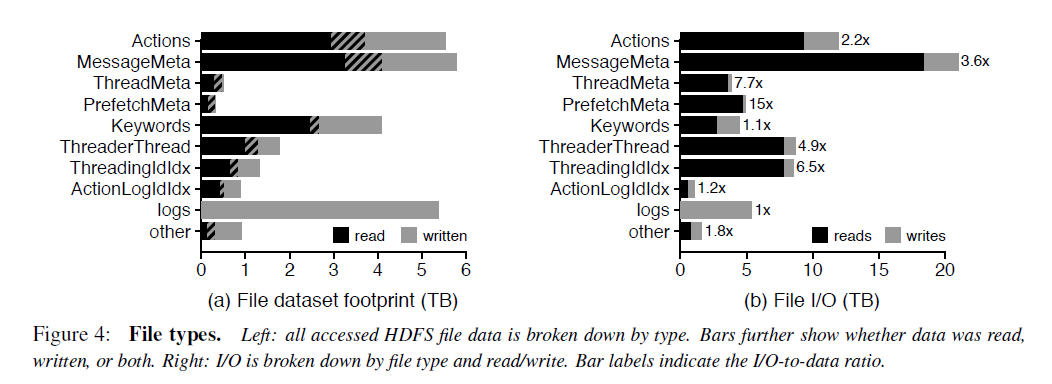
FM系统的主要读写I/O负载
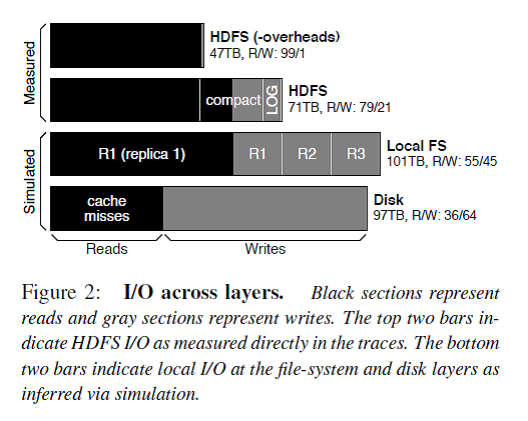
Figure 2描述了每一层的I/O构成,解释了在FM系统对外请求中读占主导,但是由于logging/compaction/replication/caching导致写被严重放大。
- HBase的设计是分层结构的,依次是DB逻辑层、FS逻辑层、底层系统逻辑层。DB逻辑层提供的对外使用的接口主要操作是put()和get()请求,这两个操作的数据都要写到HDFS上,其中读写比99/1(Figure 2中第一条)。
- 由于DB逻辑层内部为了保证数据的持久性会做logging,为了读取的高效率会做compaction,而且这两个操作都是写占主导的,所以把这两个操作(overheads)加上之后读写比为79/21(Figure 2中第二条)。
- 相当于调用put()操作向HBase写入的数据都是写入了两份:一份写入内存Memstore然后flush到HFile/HDFS,另一份通过logging直接写HLog/HDFS。Memstore中积累一定量的数据才会写HFile,这使得压缩比会比较高,而写HLog要求实时append record导致压缩比(HBASE-8155)相对较低,导致写被放大4倍以上。 Compaction操作就是读取小的HFile到内存merge-sorting成大的HFile然后输出,加速HBase读操作。Compaction操作导致写被放大17倍以上,说明每部分数据平均被重复读写了17次,所以对于内容不变的大附件是不适合存储在HBase中的。由于读操作在FM业务中占主要比例,所以加速读操作对业务非常有帮助,所以compaction策略会比较激进。
HBase的数据reliable是靠HDFS层保证的,即HDFS的三备份策略。那么也就是上述对HDFS的写操作都会被转化成三倍的local file I/O和两倍的网络I/O。这样使得在本地磁盘I/O中衡量读写比变成了55/45。 - 然而由于对本地磁盘的读操作请求的数据会被本地OS的cache缓存,那么真正的读操作是由于cache miss引起的读操作的I/O量,这样使得读写比变成了36/64,写被进一步放大。 另外Figure 3从I/O数据传输中真正业务需求的数据大小来看各个层次、各个操作引起的I/O变化。除了上面说的,还发现了整个系统最终存储在磁盘上有大量的cold data(占2/3),所以需要支持hot/cold数据分开存储。
总的来说,HBase stack的logging/compaction/replication/caching会放大写I/O,导致业务逻辑上读为主导的HBase系统在地层实际磁盘I/O中写占据了主导。
FM系统的主要文件类型和大小
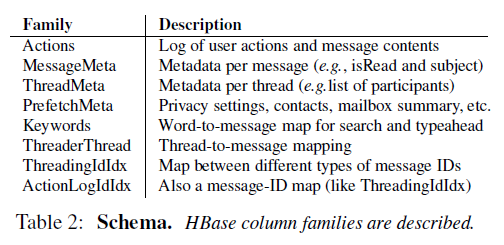
FM系统的几种文件类型如Table 2所示,这个是纯业务的逻辑描述。在HBase的每个RegionServer上的每个column family对应一个或者多个HFile文件。FM系统中有8个column family,由于每个column family存储的数据的类型和大小不一样,使得每个column family的读写比是不一样的。而且很少数据是读写都会请求的,所以cache all writes可能作用不大(Figure 4)。
对于每个column family的文件,90%是小于15M的。但是少量的特别大的文件会拉高column family的平均文件大小。例如MessageMeta这个column family的平均文件大小是293M。从这些文件的生命周期来看,大部分FM的数据存储在large,long-lived files,然而大部分文件却是small, short-lived。这对HDFS的NameNode提出了很大的挑战,因为HDFS设计的初衷是为了存储少量、大文件准备的,所有的文件的元数据是存储在NameNode的内存中的,还有有NameNode federation。
FM系统的主要I/O访问类型
下面从temporal locality, spatial locality, sequentiality的角度来看。
73.7%的数据只被读取了一次,但是1.1%的数据被读取了至少64次。也就是说只有少部分的数据被重复读取了。但是从触发I/O的角度,只有19%的读操作读取的是只被读取一次的数据,而大部分I/O是读取那些热数据。
在HDFS这一层,FM读取数据没有表现出sequentiality,也就是说明high-bandwidth, high-latency的机械磁盘不是服务读请求的理想存储介质。而且对数据的读取也没有表现出spatial locality,也就是说I/O预读取也没啥作用。
解决方案1. Flash/SSD作为cache使用
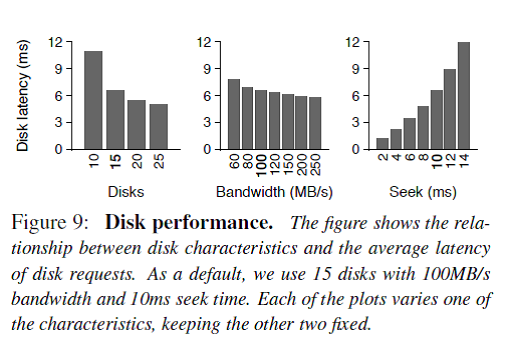
下面就考虑怎么架构能够加速这个系统了。目前Facebook的HBase系统每个Node挂15块100MB/s带宽、10ms寻址时间的磁盘。Figure 9表明:a)增加磁盘块数有点用;b)增加磁盘带宽没啥大用;c)降低寻址时间非常有用。
由于少部分同样的数据会被经常读取,所以一个大的cache能够把80%左右的读取操作拦截而不用触发磁盘I/O,而且只有这少部分的hot data需要被cache。那么拿什么样的存储介质做cache呢?Figure 11说明如果拿足够大的Flash做二级缓存,cache命中率会明显提高,同时cache命中率跟内存大小关系并不大。
注:关于拿Flash/SSD做cache,可以参考HBase BucketBlockCache(HBASE-7404)
由于少部分同样的数据会被经常读取,所以一个大的cache能够把80%左右的读取操作拦截而不用触发磁盘I/O,而且只有这少部分的hot data需要被cache。那么拿什么样的存储介质做cache呢?Figure 11说明如果拿足够大的Flash做二级缓存,cache命中率会明显提高,同时cache命中率跟内存大小关系并不大。
注:关于拿Flash/SSD做cache,可以参考HBase BucketBlockCache(HBASE-7404)
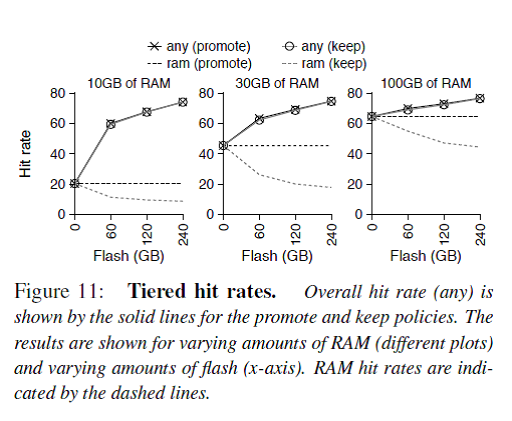
我们知道大家比较关心Flash/SSD寿命的问题,在内存和Flash中shuffling数据能够使得最热的数据被交换到内存中,从而提升读性能,但是会降低Flash的寿命,但是随着技术的发展这个问题带来的影响可能越来越小。
说完加速读的cache,接着讨论了Flash作为写buffer是否会带来性能上的提升。由于HDFS写操作只要数据被DataNode成功接收到内存中就保证了持久性(因为三台DataNode同时存储,所以认为从DataNode的内存flush到磁盘的操作不会三个DataNode都失败),所以拿Flash做写buffer不会提高性能。虽然加写buffer会使后台的compaction操作降低他与前台服务的I/O争用,但是会增加很大复杂度,所以还是不用了。最后他们给出了结论就是拿Flash做写buffer没用。
然后他们还计算了,在这个存储栈中加入Flash做二级缓存不但能提升性能达3倍之多,而且只需要增加5%的成本,比加内存性价比高很多。
2.分层架构的缺点和改进方案
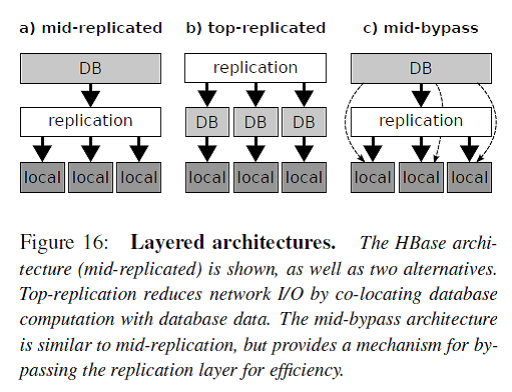
如Figure 16所示,一般分布式数据库系统分为三个层次:db layer/replication layer/local layer。这种分层架构的最大优点是简洁清晰,每层各司其职。例如db layer只需要处理DB相关的逻辑,底层的存储认为是available和reliable的。
HBase是图中a)的架构,数据的冗余replication由HDFS来负责。但是这个带来一个问题就是例如compaction操作会读取多个三备份的小文件到内存merge-sorting成一个三备份的大文件,这个操作只能在其中的一个RS/DN上完成,那么从其他RS/DN上的数据读写都会带来网络传输I/O。
图中b)的架构就是把replication层放到了DB层的上面,Facebook举的例子是Salus,不过我对这个东西不太熟悉。我认为Cassandra就是这个架构的。这个架构的缺点就是DB层需要处理底层文件系统的问题,还要保证和其他节点的DB层协调一致,太复杂了。
图中c)的架构是在a的基础上的一种改进,Spark使用的就是这个架构。HBase的compaction操作就可以简化成join和sort这样两个RDD变换。
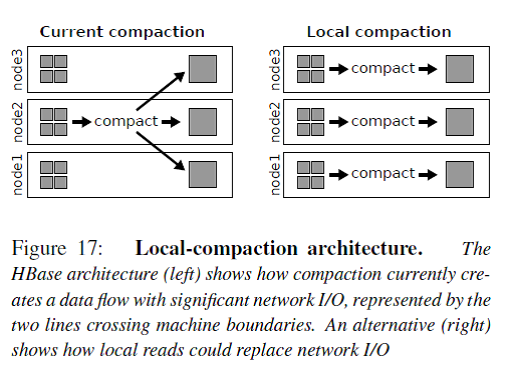
Figure 17展示了local compaction的原理,原来的网络I/O的一半转化成了本地磁盘读I/O,而且可以利用读cache加速。我们都知道在数据密集型计算系统中网络交换机的I/O瓶颈非常大,例如MapReduce Job中Data Shuffle操作就是最耗时的操作,需要强大的网络I/O带宽。加州大学圣迭戈分校(UCSD)和微软亚洲研究院(MSRA)都曾经设计专门的数据中心网络拓扑来优化网络I/O负载,相关研究成果在计算机网络顶级会议SIGCOMM上发表了多篇论文,但是由于其对网络路由器的改动伤筋动骨,最后都没有成功推广开来。
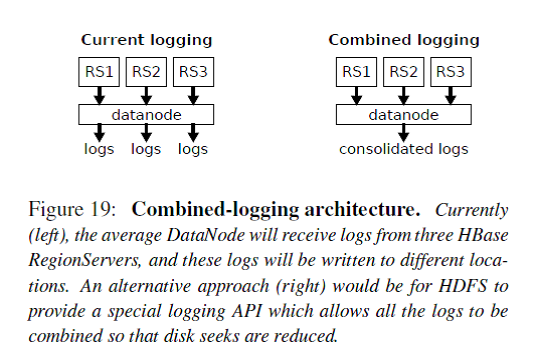
Figure 19展示了combined logging的原理。现在HBase的多个RS会向同一个DataNode发送写log请求,而目前DataNode端会把来自这三个RS的log分别写到不同的文件/块中,会导致该DataNode磁盘seek操作较多(不再是磁盘顺序I/O,而是随机I/O)。Combined logging就是把来自不同RS的log写到同一个文件中,这样就把DataNode的随机I/O转化成了顺序I/O。
Face Recognition
Recognize and manipulate faces from Python or from the command line with the world’s simplest face recognition library.
Built using dlib‘s state-of-the-art face recognition built with deep learning. The model has an accuracy of 99.38% on theLabeled Faces in the Wild benchmark.
This also provides a simple face_recognition command line tool that lets you do face recognition on a folder of images from the command line!
Find faces in pictures
Find all the faces that appear in a picture:

Project site : https://github.com/ageitgey/face_recognition
L2TP/IPSec一键安装脚本
本脚本适用环境:
系统支持:CentOS6+,Debian7+,Ubuntu12+
内存要求:≥128M
更新日期:2017 年 05 月 28 日
关于本脚本:
名词解释如下
L2TP(Layer 2 Tunneling Protocol)
IPSec(Internet Protocol Security)
IKEv2 (Internet Key Exchange v2)
能实现 IPsec 的目前总体上有 openswan,libreswan,strongswan 这3种。
libreswan 是基于 openswan 的 fork,所以现在各个发行版基本已经看不到 openswan 的身影了。
当然也有使用 strongswan 的。
之所以要更新 L2TP 一键安装脚本,是因为随着各个 Linux 发行版不断推陈出新,原有的脚本已经不适应现在的需求。
本脚本通过编译安装最新版 libreswan 来实现 IPSec(CentOS7 下则是全部 yum 安装),yum 或 apt-get 来安装 xl2tpd,再根据各个发行版的使用方法不同,部署防火墙规则。
写在前面:
基于 OpenVZ 虚拟化技术的 VPS 需要开启TUN/TAP才能正常使用,购买 VPS 时请先咨询服务商是否支持开启 TUN/TAP。
OpenVZ 虚拟的 VPS 需要系统内核支持 IPSec 才行。也就是说,母服务器的内核如果不支持的话那就没办法,只能换 VPS。
因此,一般不建议在 OpenVZ 的 VPS 上安装本脚本。脚本如果检测到该 VPS 为 OpenVZ 架构,会出现警告提醒。
如何检测是否支持TUN模块?
执行命令:
cat /dev/net/tun
如果返回信息为:cat: /dev/net/tun: File descriptor in bad state 说明正常
如何检测是否支持ppp模块?
执行命令:
cat /dev/ppp
如果返回信息为:cat: /dev/ppp: No such device or address 说明正常
当然,脚本在安装时也会执行检查,如果不适用于安装,脚本会予以提示。
使用方法:
root 用户登录后,运行以下命令:
wget --no-check-certificate https://raw.githubusercontent.com/teddysun/across/master/l2tp.sh
chmod +x l2tp.sh
./l2tp.sh
执行后,会有如下交互界面

Please input IP-Range:
(Default Range: 192.168.18):
输入本地IP段范围(本地电脑连接到VPS后给分配的一个本地IP地址),直接回车意味着输入默认值192.168.18
Please input PSK:
(Default PSK: teddysun.com):
PSK意为预共享密钥,即指定一个密钥将来在连接时需要用到,直接回车意味着输入默认值teddysun.com
Please input Username:
(Default Username: teddysun):
Username意为用户名,即第一个默认用户。直接回车意味着输入默认值teddysun
Please input teddysun’s password:
(Default Password: Q4SKhu2EXQ):
输入用户的密码,默认会随机生成一个10位包含大小写字母和数字的密码,当然你也可以指定密码。
ServerIP:your_server_main_IP
显示你的 VPS 的主 IP(如果是多 IP 的 VPS 也只显示一个)
Server Local IP:192.168.18.1
显示你的 VPS 的本地 IP(默认即可)
Client Remote IP Range:192.168.18.2-192.168.18.254
显示 IP 段范围
PSK:teddysun.com
显示 PSK
Press any key to start…or Press Ctrl+c to cancel
按下任意按键继续,如果想取消安装,请按Ctrl+c键
安装完成后,脚本会执行 ipsec verify 命令并提示如下:
If there are no [FAILED] above, then you can connect to your
L2TP VPN Server with the default Username/Password is below:

ServerIP:your_server_IP
PSK:your PSK
Username:your usename
Password:your password

If you want to modify user settings, please use command(s):
l2tp -a (Add a user)
l2tp -d (Delete a user)
l2tp -l (List all users)
l2tp -m (Modify a user password)
Welcome to visit https://teddysun.com/448.html
Enjoy it!
如果你要想对用户进行操作,可以使用如下命令:
l2tp -a 新增用户
l2tp -d 删除用户
l2tp -m 修改现有的用户的密码
l2tp -l 列出所有用户名和密码
l2tp -h 列出帮助信息
其他事项:
1、脚本在安装完成后,已自动启动进程,并加入了开机自启动。
2、脚本会改写 iptables 或 firewalld 的规则。
3、脚本安装时,会即时将安装日志写到 /root/l2tp.log 文件里,如果你安装失败,可以通过此文件来寻找错误信息。
使用命令:
ipsec status (查看 IPSec 运行状态)
ipsec verify (查看 IPSec 检查结果)
/etc/init.d/ipsec start|stop|restart|status (CentOS6 下使用)
/etc/init.d/xl2tpd start|stop|restart (CentOS6 下使用)
systemctl start|stop|restart|status ipsec (CentOS7 下使用)
systemctl start|stop|restart xl2tpd (CentOS7 下使用)
service ipsec start|stop|restart|status (Debian/Ubuntu 下使用)
service xl2tpd start|stop|restart (Debian/Ubuntu 下使用)
更新日志
2017 年 05 月 28 日:
升级 libreswan 到版本 3.20。
修正 libreswan 的若干配置问题。
修正 xl2tpd 的端口监听配置问题。
修正在 CentOS 6 对 libevent2 的依赖问题,改为 yum 安装 libevent2-devel。
测试表明,在内网环境的 VPS 里(如AWS, IDCF,GCE,腾讯云,阿里云等)也可以正常使用了。
2017 年 02 月 25 日:
升级 libreswan 到版本 3.19。
2016 年 09 月 12 日:
修正了在 CentOS 6 下 libevent2 依赖的问题;
新增了一个 -m 选项,用以修改现有用户的密码。
2016 年 08 月 13 日:
修正 Debian 8 下的 sd-daemon.h: No such file or directory 问题,是由于缺少依赖包 libsystemd-daemon-dev 导致的。
2016 年 08 月 05 日:
升级 libreswan 到版本 3.18。
2016 年 06 月 10 日:
脚本在安装完成后,新增了几个命令,便于操作用户
l2tp -a 新增用户
l2tp -d 删除用户
l2tp -l 列出所有用户
l2tp -h 列出帮助信息
2016 年 04 月 25 日:
4、在 Vultr 的 Debian 7的系统模板下安装时,软件包 libcurl4-nss-dev 会出现依赖错误。如下所示:
The following packages have unmet dependencies:
libcurl4-nss-dev : Depends: libldap2-dev but it is not going to be installed
Depends: librtmp-dev but it is not going to be installed
而 libldap2-dev 和 librtmp-dev 又依赖了其他几种软件包。总之最后的依赖关系如下:
libldap2-dev : Depends: libldap-2.4-2 (= 2.4.31-2+deb7u1) but 2.4.31+really2.4.40+dfsg-1+deb8u1~bpo70+1 is to be installed
librtmp-dev : Depends: libgnutls-dev but it is not going to be installed
libgnutls-dev : Depends: libp11-kit-dev (>= 0.4) but it is not going to be installed
libp11-kit-dev : Depends: libp11-kit0 (= 0.12-3) but 0.20.7-1~bpo70+1 is to be installed
那么解决办法就是把最底层的依赖包 libp11-kit0 先卸载掉,然后再安装 libcurl4-nss-dev 即可。
apt-get -y remove libp11-kit0
apt-get -y --no-install-recommends install libcurl4-nss-dev wget
然后再运行脚本安装即可。
2016 年 04 月 22 日:
修复了在 Ubuntu 16.04 下因为默认缺少 python 命令而导致 ipsec verify 等命令不能用的问题。
2016 年 04 月 19 日:
修复了在 Debian 7 下因为 libnss3 和 libnspr4 的版本过低而导致编译 libreswan 失败的问题。
2016 年 04 月 18 日:
目前在 Debian 7 上测试的结果,因为 libnss3 和 libnspr4 的版本过低而导致编译 libreswan 失败。临时解决办法是 dpkg 安装 libnss3_3.17.2 和 libnspr4_4.10.7 的 deb 包后重试。
参考链接:
https://libreswan.org/wiki/3.14_on_Debian_Wheezy
https://github.com/libreswan/libreswan
转载请注明:秋水逸冰 » L2TP/IPSec一键安装脚本